
PSIDE PDS 120 B3
PARKSIDE® PDS 120 B3 Scroll Saw Instruction Manual
Model: PDS 120 B3
1. Introduction
Thank you for choosing the PARKSIDE® PDS 120 B3 Scroll Saw. This manual provides essential information for the safe and efficient operation, setup, maintenance, and troubleshooting of your new scroll saw. Please read this manual thoroughly before first use and keep it for future reference.
The PARKSIDE® PDS 120 B3 is designed for precise fine sawing work in various materials such as wood, plastic, acrylic glass, and plaster.
2. Safety Instructions
Always observe basic safety precautions when using electrical tools to reduce the risk of fire, electric shock, and personal injury.
- Read all instructions: Familiarize yourself with the controls and proper use of the tool.
- Wear appropriate personal protective equipment (PPE): Always wear safety glasses, hearing protection, and a dust mask.
- Secure workpiece: Ensure the workpiece is firmly clamped or held to prevent movement during cutting.
- Keep work area clean and well-lit: Cluttered or dark areas invite accidents.
- Avoid accidental starting: Ensure the switch is in the off-position before plugging in.
- Do not overreach: Maintain proper footing and balance at all times.
- Disconnect power: Always unplug the tool before making any adjustments, changing accessories, or performing maintenance.
- Use the correct blade: Ensure the blade is suitable for the material being cut and is properly installed.
- Keep hands clear of the blade: Never place hands near the cutting area while the saw is operating.
- Dust extraction: Connect to an external dust extraction system if possible to minimize dust exposure.
- Supervise children: Do not allow children to operate or play near the tool.
3. Package Contents
Please check that all items are present and undamaged upon unpacking:
- 1x PARKSIDE® PDS 120 B3 Scroll Saw
- 4x Pin-end scroll saw blades (134 mm)
- 1x Hex key for saw blade change
- Mounting material for workbench fastening
- 1x Angle for fine adjustment of the sawing angle
4. Product Features
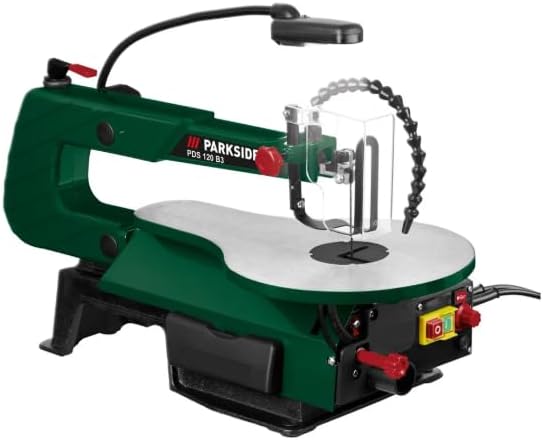
Figure 4.1: Overall view of the PARKSIDE PDS 120 B3 Scroll Saw, highlighting its compact design and integrated LED work light.

Figure 4.2: Front view of the scroll saw, showing the main controls and the transparent protective cover.

Figure 4.3: Side view of the scroll saw, illustrating the adjustable table and the optional foot pedal for speed control.
- Vibration-Damped Motor: Ensures smooth operation and precise cuts.
- Adjustable Stroke Rate: Continuously adjustable stroke rate (500 – 1700 min⁻¹) via rotary knob or optional foot pedal for material-specific cutting.
- Integrated LED Work Light: Separately switchable LED light with a flexible arm for optimal illumination of the workpiece.
- Adjustable Dust Blower: Freely positionable blower for a dust-free cutting line.
- Tilting Aluminum Work Table: Continuously tiltable table with a scale for exact miter cuts (0 – 45°).
- Adjustable Protective Hood: Transparent and adjustable for safety and clear visibility.
- Quick-Release Lever: For easy and quick saw blade changes.
- Dust Extraction Port: Connectable to an external dust extraction system (inner diameter approx. 35 mm).
- Integrated Blade Storage: Convenient storage for saw blades.
- Dust-Proof Safety Switch: On/Off switch designed for durability and safety.
- Blade Compatibility: Suitable for all common pin-end and standard scroll saw blades (134 mm length).
- Workbench Mounting: Designed for secure fastening to a workbench.
5. Setup
5.1 Workbench Mounting
The scroll saw is designed for stable operation when securely mounted to a workbench. Use the provided mounting material to fasten the saw through the designated holes in its base. Ensure the workbench is stable and can support the weight and vibrations of the saw.
5.2 Blade Installation
- Ensure power is disconnected: Unplug the saw from the power outlet.
- Open blade clamps: Use the quick-release lever to loosen the upper and lower blade clamps.
- Insert blade: Insert the lower pin of the blade into the lower blade clamp. Ensure the teeth are pointing downwards and towards the front of the saw.
- Secure upper blade: Pull the upper arm down slightly and insert the upper pin of the blade into the upper blade clamp.
- Tension blade: Engage the quick-release lever to tension the blade. The blade should be taut and produce a clear ping sound when plucked.
- Adjust blade guide: Position the blade guide just above the workpiece thickness, ensuring it does not impede blade movement.
5.3 Dust Extraction Connection
For a cleaner work environment and improved visibility, connect a suitable dust extraction system to the dust port at the rear of the saw. The inner diameter of the port is approximately 35 mm.
6. Operating Instructions
6.1 Power On/Off
Plug the power cord into a suitable 230V AC outlet. Use the dust-proof On/Off safety switch to start and stop the saw.
6.2 Adjusting Stroke Rate
The stroke rate can be continuously adjusted between 500 and 1700 strokes per minute. Use the rotary knob on the saw to set the desired speed. For finer control, the optional foot pedal can be used to vary the speed during operation.
6.3 Adjusting Table Tilt (Miter Cuts)
To perform miter cuts, loosen the locking knob beneath the work table. Tilt the table to the desired angle (0-45°) using the integrated scale for reference. Tighten the locking knob securely before cutting. Use the provided angle accessory for fine adjustment.
6.4 Using the LED Work Light and Dust Blower
The LED work light can be switched on independently to illuminate your cutting area. Adjust its flexible arm for optimal lighting. The dust blower can be positioned to direct air towards the cutting line, keeping it clear of sawdust for better visibility.
6.5 Cutting Operation
- Ensure the blade is correctly installed and tensioned.
- Adjust the blade guide to just above the workpiece.
- Turn on the saw and allow it to reach full speed.
- Gently feed the workpiece into the blade. Do not force the material; let the blade do the work.
- Maintain a firm grip on the workpiece and guide it smoothly along the desired cutting line.
- When finished, turn off the saw and wait for the blade to come to a complete stop before removing the workpiece.
7. Maintenance
Regular maintenance ensures the longevity and safe operation of your scroll saw.
- Always disconnect power: Before any cleaning or maintenance, unplug the saw.
- Cleaning: Regularly clean the saw from sawdust and debris using a brush or compressed air. Pay attention to the blade clamps and the area around the motor.
- Blade Replacement: Replace dull or broken blades immediately. Follow the blade installation steps in Section 5.2.
- Table Cleaning: Keep the work table clean and free of obstructions to ensure smooth workpiece movement.
- Inspection: Periodically inspect the power cord for damage and ensure all fasteners are tight.
8. Troubleshooting
| Problem | Possible Cause | Solution |
|---|---|---|
| Saw does not start | No power supply; On/Off switch not engaged; Damaged power cord. | Check power connection; Ensure switch is fully pressed; Inspect power cord for damage. |
| Blade breaks frequently | Incorrect blade tension; Wrong blade for material; Forcing workpiece; Worn blade. | Adjust blade tension; Use appropriate blade; Reduce feed pressure; Replace blade. |
| Rough or inaccurate cuts | Dull blade; Incorrect blade tension; Workpiece not stable; Incorrect speed setting. | Replace blade; Adjust blade tension; Secure workpiece; Adjust stroke rate. |
| Excessive vibration | Saw not securely mounted; Damaged blade; Loose components. | Ensure saw is firmly mounted; Replace blade; Check and tighten all screws. |
9. Specifications
| Attribute | Value |
|---|---|
| Model Number | PARKSIDE® PDS 120 B3 |
| Power Consumption | 120 W (at 230V) |
| Stroke Rate | 500 – 1700 min⁻¹ |
| Stroke Length | 12 mm |
| Miter Angle | 0 – 45° |
| Cutting Height (90°) | max. 50 mm |
| Cutting Height (45°) | max. 22 mm |
| Cutting Depth | max. 406 mm |
| Dust Port Inner Diameter | approx. 35 mm |
| Saw Blade Length | 134 mm |
| Materials | Steel, Aluminum, Plastic |
| Dimensions (Saw) | approx. 63 x 29.5 x 37 cm |
| Table Size | approx. L 25.5 x W 41.5 cm |
| Power Cable Length | approx. 2 m |
| Weight | approx. 13.2 kg |
10. Warranty and Support
For warranty information and customer support, please refer to the documentation provided at the time of purchase or contact the retailer/manufacturer directly. Keep your proof of purchase for any warranty claims.
This product is supplied by a small or medium-sized business from Germany, Austria, or Switzerland that sells its brand on Amazon.
Ask a question about this manual
Ask about setup, troubleshooting, compatibility, parts, safety, or missing instructions. Manuals+ will review the question and use this page’s manual context to help answer it.