1. Introduction
This manual provides detailed instructions for the setup, operation, and maintenance of your GOYOJO 0310 Smart Wireless Weather Station. This advanced weather station features a 7-in-1 outdoor sensor and an indoor LCD display, offering comprehensive weather monitoring capabilities. Please read this manual thoroughly before using the device to ensure proper function and longevity.
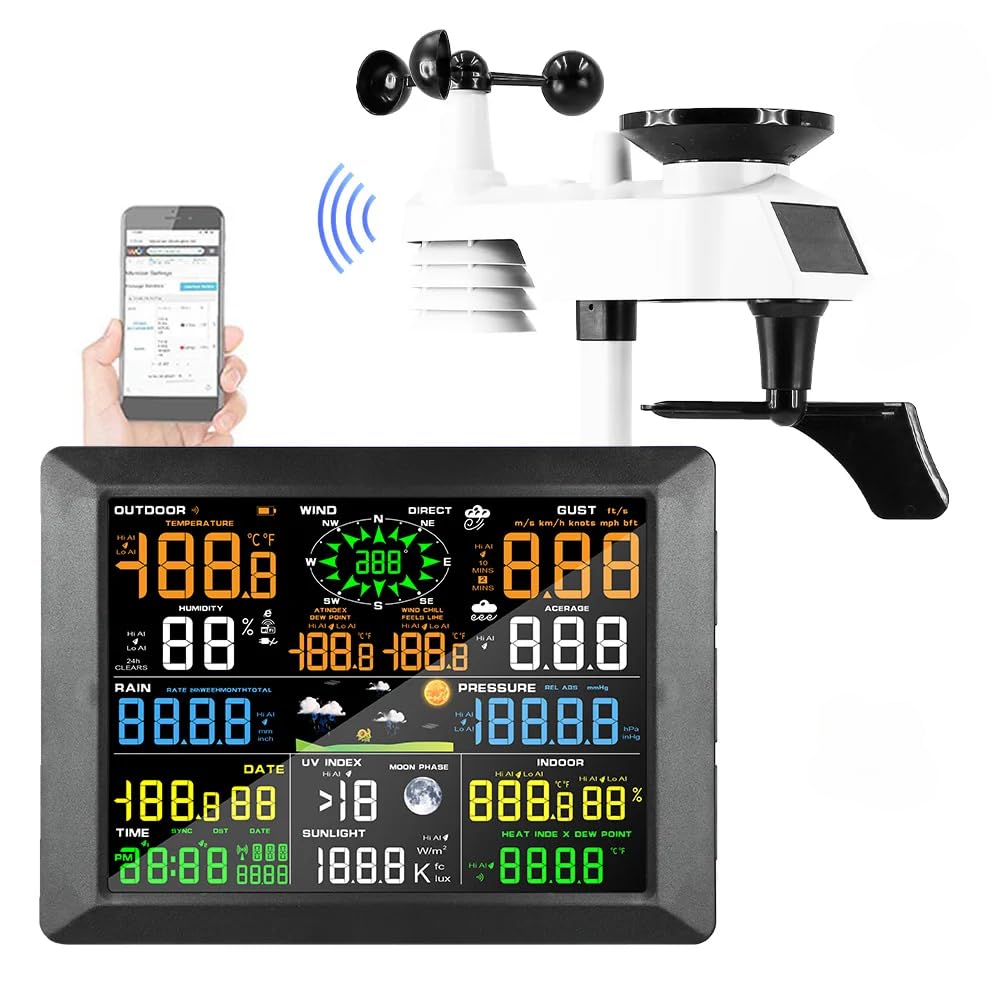
Image 1.1: GOYOJO 0310 Smart Wireless Weather Station components.
2. What's in the Box
Carefully unpack all components and verify that you have received the following items:
- Seven-in-one Outdoor Sensor
- Indoor Receiver (Display Console)
- Indoor WIFI Module
- Power Adapter
- Mounting Hardware (screws, base upper and lower cover, straight rod)
- Instruction Manual (this document)

Image 2.1: All included components and accessories.
3. Setup Guide
3.1 Outdoor Sensor Installation
The 7-in-1 outdoor sensor measures temperature, humidity, wind speed, wind direction, rainfall, and UV index. It is solar-powered with battery backup.
- Battery Installation: Open the battery compartment on the outdoor sensor. Insert 3 AA batteries (not included), observing polarity. Lithium AA batteries are recommended for optimal performance in varying temperatures.
- Mounting Location: Choose an open location for the outdoor sensor, free from obstructions that could interfere with wind, rain, or sunlight. Ensure it is easily accessible for maintenance.
- Mounting Options:
- Pole Mount: Attach the sensor to a pole using the provided mounting hardware (straight rod, base covers, screws).
- Surface Mount: Secure the sensor to a flat surface using the base covers and screws.
- Orientation: Ensure the wind vane and anemometer are free to rotate. The solar panel should face south for maximum sunlight exposure.

Image 3.1: Outdoor sensor mounting options and details.

Image 3.2: Power supply for the indoor display and outdoor sensor.
3.2 Indoor Receiver (Display Console) Setup
- Power Connection: Connect the provided power adapter to the indoor receiver and plug it into a standard electrical outlet. The receiver can also be powered by 3 AAA alkaline batteries (not included) for backup.
- Placement: Place the indoor receiver in a central location within your home, ensuring it is within range of the outdoor sensor for optimal wireless communication.
- Initial Sync: The indoor receiver will automatically attempt to connect with the outdoor sensor. This may take a few minutes. Once connected, weather data will appear on the display.
3.3 Wi-Fi Connection and Data Transfer
The weather station supports Wi-Fi connectivity for seamless data transfer to online weather services like Weathercloud. This allows for remote monitoring and historical data analysis.
- Download App/Access Web Portal: Refer to the specific instructions provided with your device for downloading the companion mobile application or accessing the dedicated web portal (e.g., Weathercloud).
- Register Device: Follow the on-screen instructions in the app or web portal to register your weather station using its unique device ID.
- Connect to Wi-Fi: Use the app or web portal to configure the weather station's Wi-Fi settings, connecting it to your home network.
- Data Synchronization: Once connected, the weather station will automatically upload data to the chosen online service, allowing you to view real-time and historical weather information from anywhere.

Image 3.3: Syncing with online weather servers for remote access.
Video 3.1: Demonstration of the GOYOJO 0310 Weather Station setup and Weathercloud data interface. This video illustrates the physical installation of the outdoor sensor, the connection of the indoor display, and how to access and interpret weather data through the Weathercloud online platform, including changing units and viewing historical trends.
4. Operating Instructions
4.1 Indoor Display Console
The indoor display console provides real-time readings of various weather parameters. It features a large, true-color LCD screen for easy readability.

Image 4.1: Detailed view of the indoor display console.
- Main Display: Shows outdoor temperature, humidity, wind speed, wind direction, rainfall, atmospheric pressure, UV index, and indoor temperature/humidity.
- Time and Date: Automatically synchronized via Wi-Fi.
- Alarm Clock: Features an integrated alarm clock function.
- Weather Forecast: Provides a 24/48-hour weather forecast based on barometric pressure changes.
4.2 Monitoring Weather Data Online
Through the connected online platform (e.g., Weathercloud), you can access a wealth of data and features:
- Real-time Data: View current weather conditions from your station.
- Historical Data: Access daily, weekly, monthly, and yearly records of temperature, humidity, wind, rain, and more.
- Customizable Units: Change units for temperature (°C/°F), wind speed (m/s, km/h, mph, kn), atmospheric pressure (hPa, mbar, inHg), and rainfall (mm, in).
- Graphs and Reports: Visualize weather trends over time with interactive graphs and generate detailed reports.

Image 4.2: Remote monitoring of weather data via Wi-Fi.
5. Maintenance
Regular maintenance ensures the accuracy and longevity of your weather station.
- Outdoor Sensor Cleaning: Periodically clean the rain collector funnel, wind cups, and solar panel to remove dirt, leaves, or debris that could affect readings. Use a soft, damp cloth.
- Battery Check: Check the batteries in the outdoor sensor and indoor receiver annually. Replace them if necessary, especially before winter for outdoor sensors to ensure continuous operation.
- Sensor Calibration: While the sensors are factory-calibrated, if you suspect inaccuracies, refer to the online platform's settings for any available calibration options or contact support.
- Firmware Updates: Check the manufacturer's website or app for any available firmware updates for your device to ensure optimal performance and new features.
6. Troubleshooting
If you encounter issues with your weather station, try the following troubleshooting steps:
| Problem | Possible Cause | Solution |
|---|---|---|
| No data on indoor display | Outdoor sensor not transmitting, low batteries, or interference. | Check outdoor sensor batteries. Ensure sensor and display are within range. Press the RESET button on the outdoor sensor (refer to Image 3.1 for location). |
| Incorrect temperature/humidity readings | Sensor obstruction or placement issues. | Ensure outdoor sensor is not in direct sunlight (unless designed for it) or near heat sources. Verify proper ventilation around the sensor. |
| Wind speed/direction inaccurate | Obstruction of wind cups/vane. | Clear any debris from wind cups and vane. Ensure sensor is mounted in an open area. |
| Rainfall not registering | Rain collector blocked. | Clean the rain collector funnel and tipping bucket mechanism. |
| Wi-Fi connectivity issues | Incorrect Wi-Fi settings, weak signal, or network problems. | Verify Wi-Fi password. Ensure the indoor receiver is within range of your Wi-Fi router. Restart your router and the weather station. |
7. Specifications
| Feature | Detail |
|---|---|
| Brand | GOYOJO |
| Model | 0310 |
| Outdoor Sensor | 7-in-1 (Temperature, Humidity, Wind Speed, Wind Direction, Rainfall, UV Index, Solar Radiation) |
| Power Source (Outdoor Sensor) | Solar Powered with 3x AA battery backup (not included) |
| Power Source (Indoor Receiver) | Power Adapter (included) or 3x AAA batteries (not included) |
| Connectivity Technology | Wi-Fi (2.4 GHz) |
| Temperature Accuracy | ±1 °C |
| Humidity Accuracy | ±5% |
| Wind Speed Accuracy | Reliable data (specific value not provided) |
| Display Type | LCD (True Color) |
| Indoor Receiver Dimensions | 8.46" x 0.87" x 6.22" (215mm x 22mm x 158mm) |
| LCD Display Dimensions | 6.69" x 4.92" (170mm x 125mm) |
| UPC | 658361252622 |
| ASIN | B0CSW35CYF |
8. Warranty and Support
The GOYOJO 0310 Smart Wireless Weather Station is designed for reliable performance. While specific warranty details are not provided in this manual, GOYOJO offers professional technical support.
- Technical Support: A professional technical support team is available to provide timely assistance within 24 hours for any issues encountered during use. Please refer to the product packaging or the manufacturer's official website for contact information.
- Product Registration: Registering your product may provide additional benefits or facilitate warranty claims. Check the manufacturer's website for details.


