
1. Introduction
The TVD Professional Steam Cleaner SW-608 is a versatile and powerful cleaning appliance designed for chemical-free cleaning and sanitization using high-temperature steam. This manual provides essential information for the safe and effective operation, maintenance, and troubleshooting of your steam cleaner. Please read all instructions carefully before first use and retain this manual for future reference.

Image 1.1: The TVD Professional Steam Cleaner SW-608 main unit.
2. Important Safety Instructions
When using electrical appliances, basic safety precautions should always be followed to reduce the risk of fire, electric shock, and personal injury. Read all instructions before using this appliance.
- High Temperature Steam: The steam cleaner produces steam at very high temperatures (up to 320°F / 160°C). Always direct steam away from people, pets, and heat-sensitive materials.
- Electrical Safety: Do not immerse the appliance in water or other liquids. Ensure the power cord is not damaged and always plug into a grounded outlet. Unplug the appliance when not in use and before performing any maintenance.
- Water Tank: Never open the water tank cap while the unit is pressurized or hot. Allow the unit to cool down completely before refilling. Use only clean tap water; distilled water is recommended to prevent mineral buildup.
- Children and Pets: Keep the appliance out of reach of children and pets. Do not allow children to operate the steam cleaner.
- Attachments: Ensure all attachments are securely fastened before use. Do not attempt to change attachments while the unit is operating or hot.
- Storage: Store the appliance in a cool, dry place when not in use.
3. Package Contents
Verify that all items listed below are included in your package. If any parts are missing or damaged, please contact customer support.
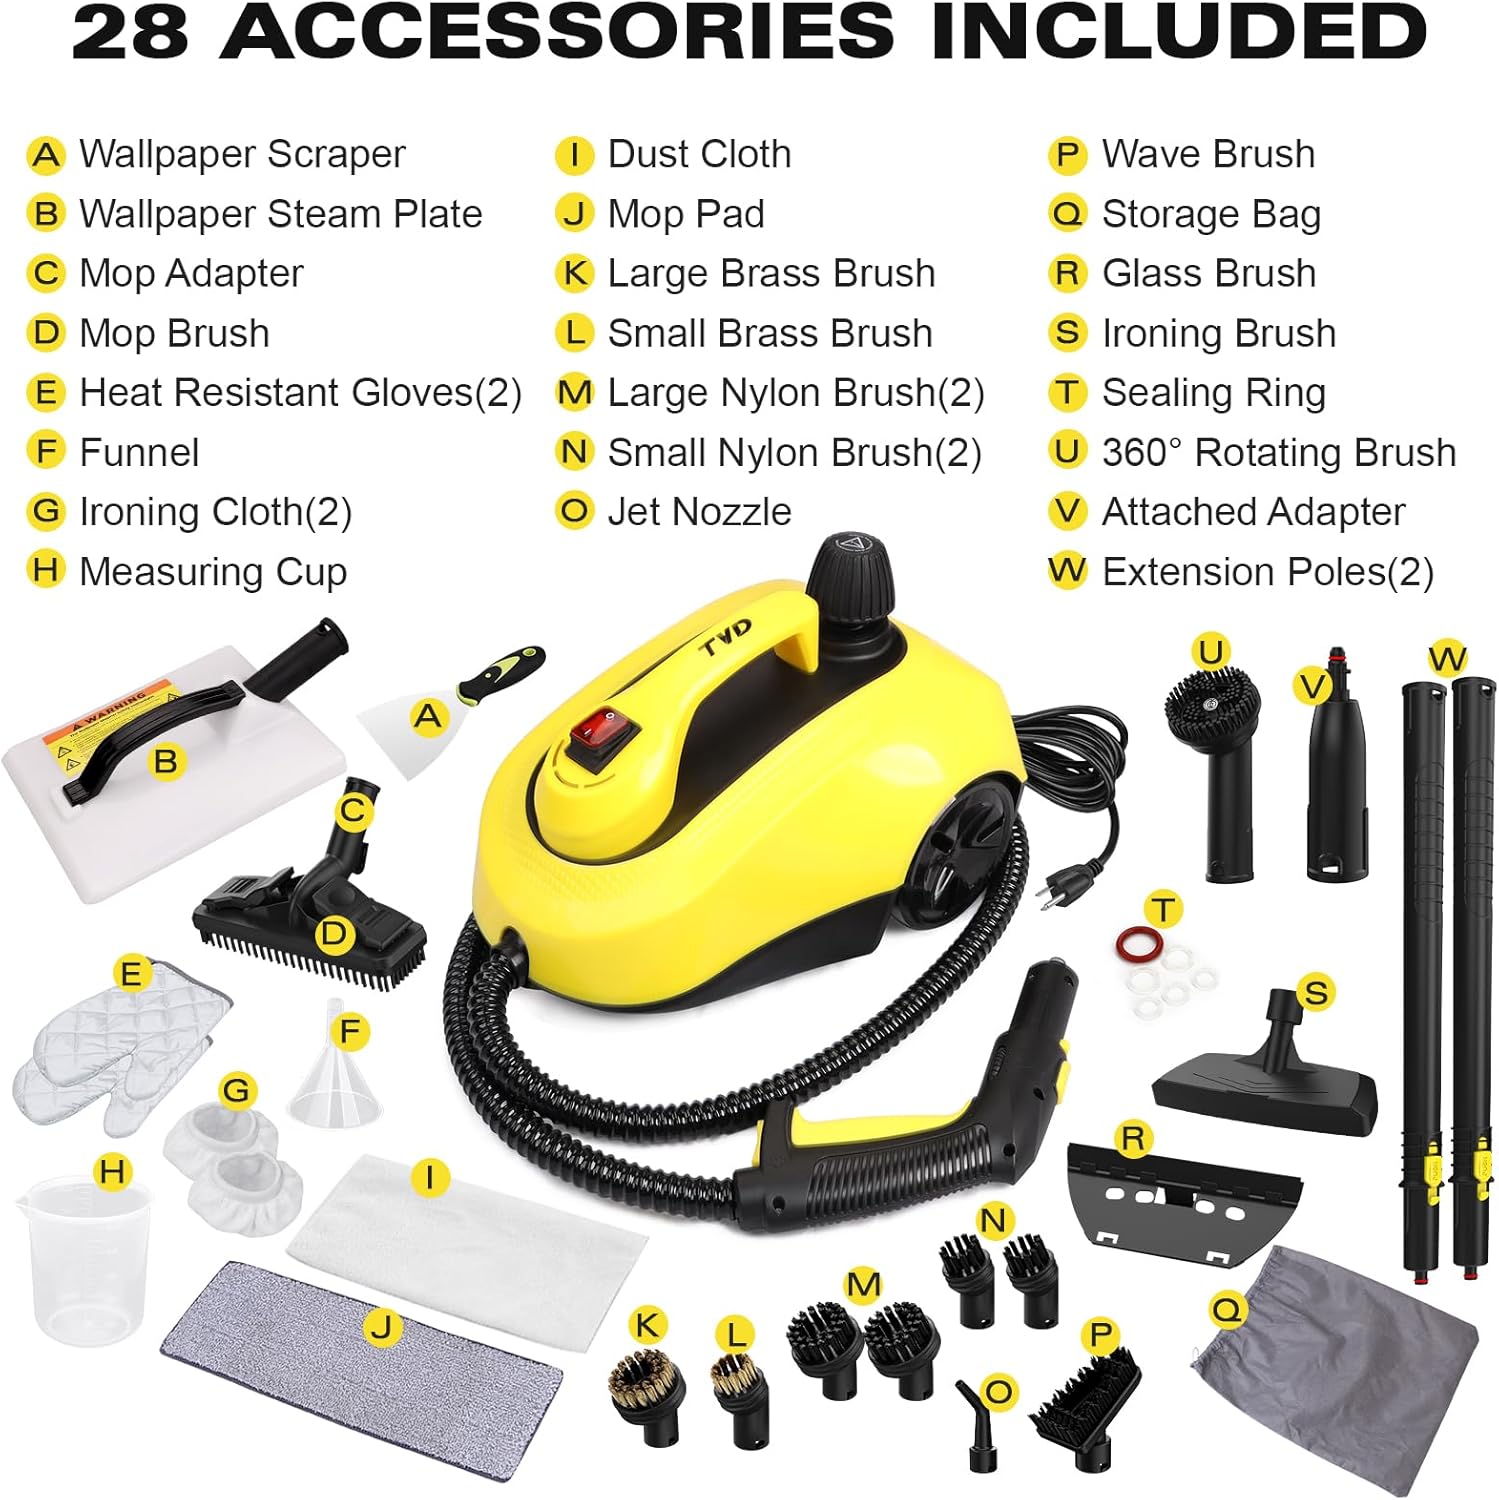
Image 3.1: All 28 accessories included with the steam cleaner.
- Main Steam Cleaner Unit (with Boiler Cover/Safety Valve, Handle, Main Switch, Heating Indicator, Plug, Wheel, Soft Pipe, Steamer Nozzle, Steamer Safety Lock, Steamer Trigger)
- Wallpaper Scraper
- Wallpaper Steam Plate
- Mop Adapter
- Mop Brush
- Heat Resistant Gloves (2)
- Funnel
- Ironing Cloth (2)
- Measuring Cup
- Dust Cloth
- Mop Pad
- Large Brass Brush
- Small Brass Brush
- Large Nylon Brush (2)
- Small Nylon Brush (2)
- Jet Nozzle
- Wave Brush
- Storage Bag
- Glass Brush
- Ironing Brush
- Sealing Ring
- 360° Rotating Brush
- Attached Adapter
- Extension Poles (2)
4. Assembly
Follow these steps to assemble your steam cleaner:
- Connect Hose: Attach the flexible steam hose to the main unit's steam outlet. Ensure it clicks securely into place.
- Attach Extension Poles (Optional): For floor cleaning or reaching high areas, connect the two extension poles to each other, then attach one end to the steam nozzle and the other to the desired cleaning head (e.g., Mop Brush).
- Select and Attach Cleaning Head: Choose the appropriate cleaning head for your task (e.g., 360° Rotating Brush, Jet Nozzle, Mop Brush) and securely attach it to the steam nozzle or extension pole.
5. Setup for Use
Before operating the steam cleaner, proper setup is crucial:
- Unscrew Safety Cap: Ensure the unit is unplugged and cool. Slowly unscrew the safety cap on top of the main unit.
- Fill Water Tank: Use the provided measuring cup and funnel to fill the water tank with clean tap water. The maximum capacity is 1.3L (or 1.5L as indicated in some specifications). Do not overfill. Distilled water is recommended to minimize mineral buildup and extend the life of the appliance.
- Secure Safety Cap: Tightly screw the safety cap back onto the unit. Ensure it is fully closed to prevent steam leakage.
- Plug In and Power On: Plug the power cord into a grounded electrical outlet. Flip the main power switch to the 'ON' position. The heating indicator light will illuminate.
- Warm-up Time: Allow approximately 8 minutes for the water to heat up and produce steam. The heating indicator light will turn off or change color when the unit is ready for use.

Image 5.1: Filling the water tank with the measuring cup and funnel.
6. Operating Instructions
Once the steam cleaner is ready, you can begin cleaning. Always wear the provided heat-resistant gloves when handling hot attachments or directing steam.
General Operation
- Steam Trigger: Press the steam trigger on the handle to release steam.
- Steam Volume Adjustment: Use the steam volume control switch on the handle to adjust the intensity of the steam (Min to Max).
- Safety Lock: The steam trigger features a safety lock. Slide the lock to the 'locked' position when not actively steaming to prevent accidental steam release, especially around children.

Image 6.1: Adjustable steam volume control.

Image 6.2: Steam safety lock mechanism.
Specific Applications
The TVD Professional Steam Cleaner is designed for versatile cleaning tasks. Refer to the image below for a visual guide to various applications.

Image 6.3: Versatile applications of the steam cleaner with different attachments.
- Floor Cleaning: Attach the Mop Brush with extension poles and a mop pad. Move the mop head slowly over hard floors (tile, sealed hardwood) to clean and sanitize.
- Upholstery and Fabric: Use the Ironing Brush with an ironing cloth to refresh and clean upholstery, curtains, and clothing. Test on an inconspicuous area first.
- Wallpaper Removal: Attach the Wallpaper Steam Plate. Hold the plate against the wallpaper for a short period to allow the steam to penetrate and loosen the adhesive, then gently scrape away the wallpaper with the scraper.
- Kitchen Surfaces: Use the 360° Rotating Brush, Brass Brush, or Nylon Brush for sinks, stovetops, and other kitchen surfaces to tackle grease and grime.
- Bathroom Surfaces: The Jet Nozzle and Nylon Brush are effective for cleaning grout, showerheads, toilets, and sinks.
- Window Cleaning: Attach the Glass Brush and Squeegee to clean windows and mirrors for streak-free results.
- Car Wheels: Use the Brass Brush for stubborn dirt on car wheels.

Image 6.4: Effective dirt and grime removal from floors.

Image 6.5: Cleaning a couch with the steam cleaner.

Image 6.6: Removing wallpaper using steam.

Image 6.7: Cleaning a stovetop with the steam cleaner.

Image 6.8: Cleaning windows with the steam cleaner.
Video 6.9: Official product video demonstrating the TVD Heavy Duty Canister Steam Cleaner with 28 Accessories in various cleaning scenarios, including floors, upholstery, wallpaper removal, and kitchen/bathroom surfaces.
7. Maintenance
Regular maintenance ensures optimal performance and longevity of your steam cleaner.
- Draining Water: After each use, unplug the unit and allow it to cool completely. Carefully unscrew the safety cap and drain any remaining water from the tank.
- Cleaning Attachments: Clean all attachments with water and mild soap. Ensure they are dry before storing.
- Descaling (if necessary): If you notice reduced steam output or mineral buildup, descale the unit using a descaling solution specifically designed for steam cleaners, following the product's instructions.
- Storage: Store the steam cleaner and its accessories in a clean, dry place. The storage bag can be used for organizing smaller attachments.
8. Troubleshooting
Refer to this section for common issues and their solutions.
| Problem | Possible Cause | Solution |
|---|---|---|
| No steam or low steam output |
|
|
| Water leaking from attachments |
|
|
| Power indicator light not on |
|
|
| Attachments melting or deforming |
|
|
9. Specifications
Technical details of the TVD Professional Steam Cleaner SW-608:

Image 9.1: Product specifications.
| Feature | Detail |
|---|---|
| Model Number | SW-608 |
| Wattage | 1800W |
| Voltage | 110-120V~ / 60Hz |
| Max Pressure | 5bar / 72.5psi |
| Max Temperature | 320°F (160°C) |
| IP Rating | IPX4 |
| Water Tank Capacity | 1.3 Liters (Max 1.5L) |
| Warm-up Time | 8 Minutes |
| Cord Length | 5 Meters (approx.) |
10. Warranty & Customer Support
For warranty information, technical assistance, or to order replacement parts, please contact TVD customer support. Keep your purchase receipt as proof of purchase.
Customer Support Contact: Refer to the contact information provided with your product packaging or visit the official TVD website.