1. Introduction
Thank you for choosing the XPR3SS HCT378 3-Outlet Garden Automatic Irrigation Water Timer. This device is designed to simplify your garden watering tasks by providing precise and programmable control over your irrigation system. With its independent zone control and user-friendly interface, you can ensure your plants receive optimal hydration with minimal effort.
This manual provides detailed instructions for the setup, operation, maintenance, and troubleshooting of your new water timer. Please read it thoroughly before use to ensure proper functionality and longevity of the product.
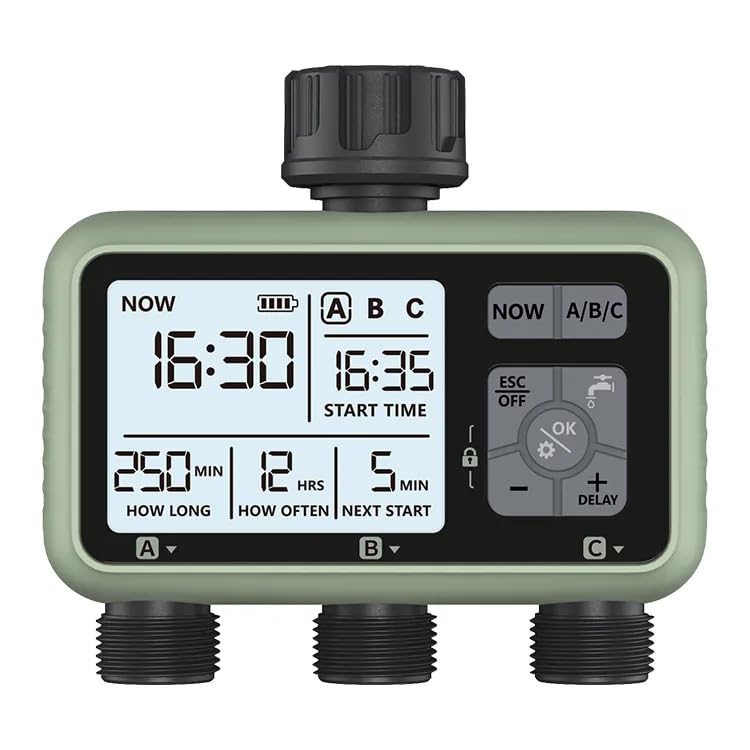
Figure 1: XPR3SS HCT378 Water Timer
This image shows the front view of the XPR3SS HCT378 water timer, highlighting its large LCD screen and control buttons. The three independent outlets are visible at the bottom.
2. Safety Information
- Do not immerse the timer in water. The unit is IPX5 water-resistant, meaning it can withstand water jets, but not submersion.
- Use only 1.5V 'AA' alkaline batteries. Do not mix old and new batteries, or different types of batteries.
- Ensure all connections are tight to prevent leaks.
- Do not expose the timer to extreme temperatures (below 1°C or above 45°C).
- Keep out of reach of children to prevent accidental operation. The child lock feature should be utilized.
- Disconnect the timer from the tap and drain it before freezing temperatures to prevent damage.
3. Product Features
- 3 Independent Outlets: Allows for separate watering schedules for different garden zones (A, B, C).
- Large LCD with Backlight: Provides clear visibility of settings and current status, even in low light.
- Programmable Watering: Set watering duration from 1 second to 99 minutes, and frequency from 1 hour to 15 days.
- Manual Watering: Initiate immediate watering without affecting programmed schedules.
- Rain Delay Function: Postpone watering for a set period (e.g., 24, 48, 72 hours) to conserve water during rainy weather.
- Child Lock Feature: Prevents accidental changes to settings.
- Low Battery Indication: Alerts you when batteries need replacement.
- Durable Construction: Made with ABS+Nylon+Brass materials for longevity.
- IPX5 Waterproof Level: Resistant to water splashes and jets.
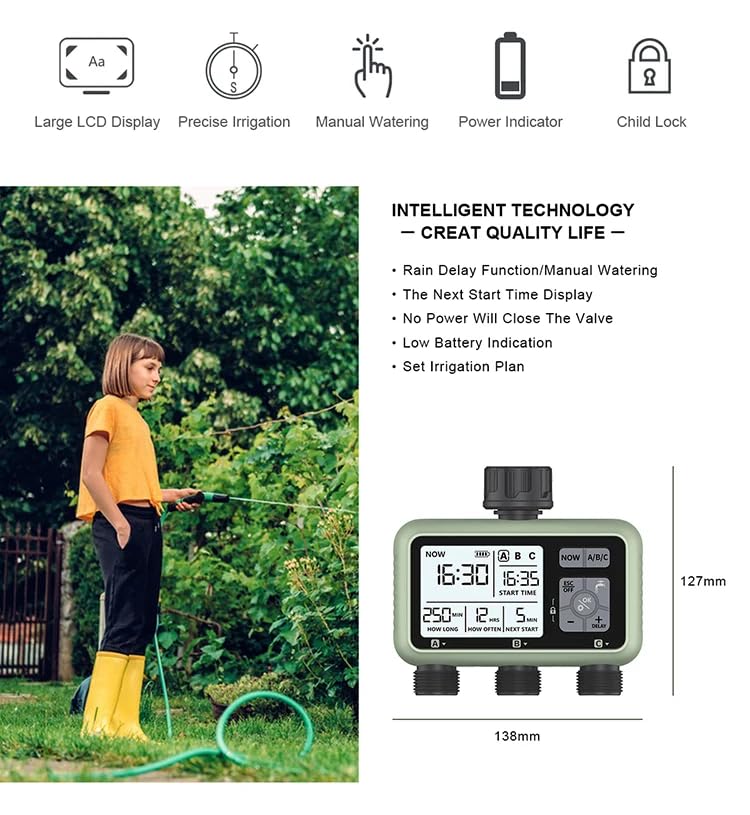
Figure 2: Key Features Overview
This diagram illustrates the main features of the XPR3SS HCT378 water timer, including its large LCD display, precise irrigation capabilities, manual watering option, battery indicator, and child lock function. Product dimensions are also shown.
4. Package Contents
Upon opening the package, please ensure all the following items are present:
- 1 x XPR3SS HCT378 Water Timer
- 1 x User Manual (this document)
- Accessories (e.g., adapters for different tap sizes)
- Warranty Card
- Note: Wifi Gateway is not included with this model (HCT378) as per product description, but listed in generic "Included Components". Batteries are NOT included.
5. Product Overview and Components
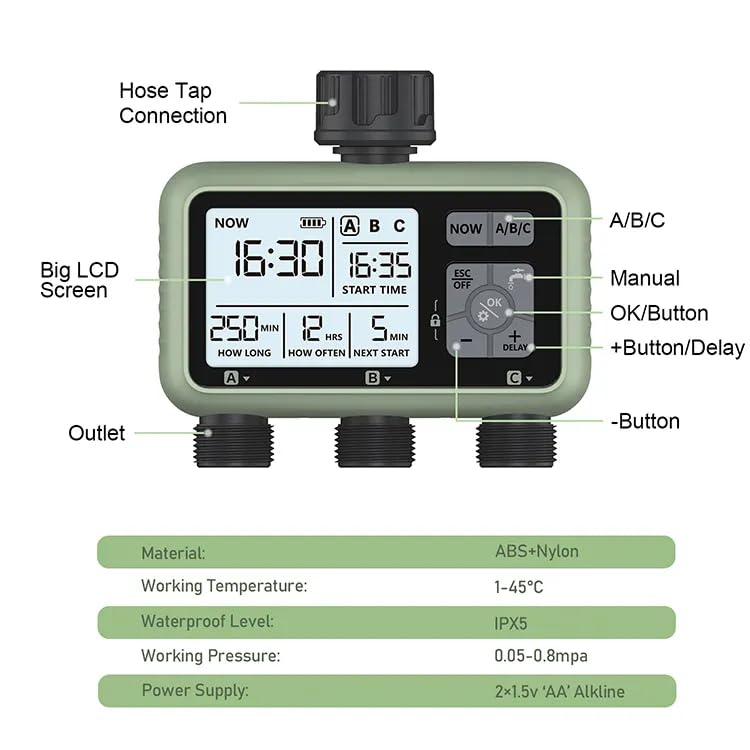
Figure 3: Water Timer Components
This image provides a detailed view of the XPR3SS HCT378 water timer with its key components labeled, including the hose tap connection, big LCD screen, A/B/C zone buttons, Manual button, OK/Button, +Button/Delay, -Button, and the three outlets.
Familiarize yourself with the main components of the water timer:
- Hose Tap Connection: Connects the timer to your outdoor water tap (1/2" or 3/4" BS&NH).
- Big LCD Screen: Displays time, watering schedules, battery status, and other settings.
- A/B/C Buttons: Used to select and program individual watering zones.
- ESC/OFF Button: Exits current menu or turns the timer off.
- OK Button: Confirms selections and enters programming modes.
- +/- Buttons: Adjust values and navigate through options. The '+' button also functions as the Delay button.
- Manual Button: Activates manual watering mode.
- Outlets (A, B, C): Three independent threaded outlets for connecting irrigation hoses or drip lines (3/4" BS&NH).
6. Setup
6.1 Battery Installation
- Locate the battery compartment on the back of the timer.
- Open the battery cover.
- Insert two (2) new 1.5V 'AA' alkaline batteries, ensuring correct polarity (+/-).
- Close the battery cover securely to maintain water resistance.
- The LCD screen will light up, indicating the timer is powered on.
6.2 Connecting the Water Timer
- Ensure your outdoor tap is turned off.
- Screw the timer's inlet connection (top) onto your outdoor tap. Hand-tighten firmly. Use the appropriate adapter if your tap size differs.
- Connect your irrigation hoses, drip lines, or sprinklers to the three independent outlets (A, B, C) at the bottom of the timer. Ensure these connections are also hand-tightened securely to prevent leaks.
- Turn on your outdoor tap fully. The timer is designed to operate under water pressure.

Figure 4: Connection Examples
This diagram illustrates how the XPR3SS HCT378 water timer can be connected to various irrigation systems, including drippers, plastic sprinklers, and sprayers, demonstrating its versatility for different garden watering needs.
6.3 Setting Current Time
Before programming, set the current time on the timer:
- Press the OK button to enter time setting mode. The hour digits will flash.
- Use the + or - buttons to adjust the hour.
- Press OK to confirm the hour and move to minutes.
- Use the + or - buttons to adjust the minutes.
- Press OK to confirm the minutes and exit time setting mode.
7. Operating Instructions
The XPR3SS HCT378 allows for independent programming of three zones (A, B, C).
7.1 Programming Watering Schedules (Zones A, B, C)
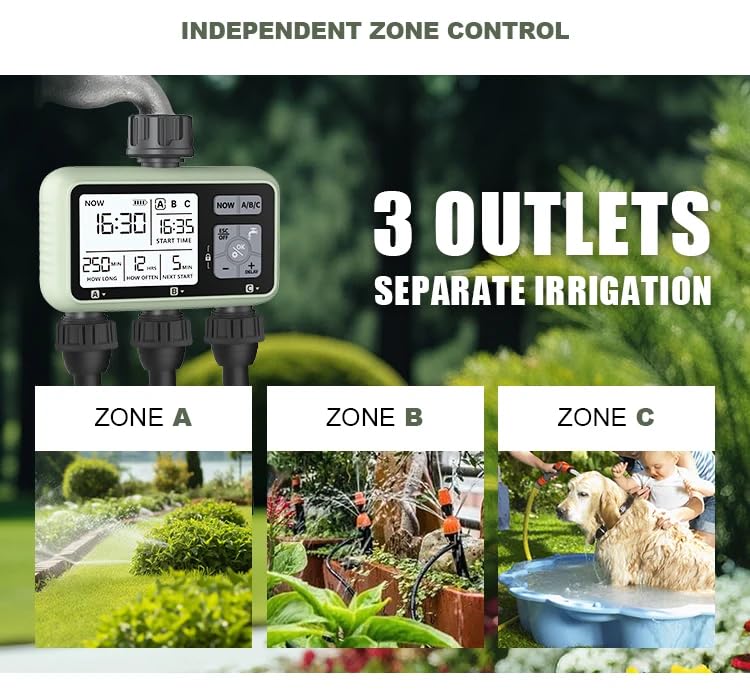
Figure 5: Independent Zone Control
This image highlights the independent control capabilities of the three outlets (Zone A, Zone B, Zone C), allowing for customized watering for different areas like lawns, drip irrigation systems, or even pet bathing areas.
To program a watering schedule for a specific zone:
- Press the A, B, or C button to select the desired zone.
- Press OK to enter programming mode for that zone.
- Set Start Time: The start time digits will flash. Use + or - to adjust, then OK to confirm.
- Set Watering Duration ("How Long"): The duration digits will flash. Use + or - to set the watering time (1 second to 99 minutes). Press OK.
- Set Watering Frequency ("How Often"): The frequency digits will flash. Use + or - to set how often watering occurs (1 hour to 15 days). Press OK.
- The program for the selected zone is now set. Repeat for other zones as needed.
7.2 Manual Watering
To water immediately without affecting your programmed schedules:
- Press the MANUAL button.
- Use + or - to set the desired manual watering duration (e.g., 5 minutes).
- Press OK to start manual watering. The timer will display "ON" and count down.
- To stop manual watering early, press ESC/OFF.
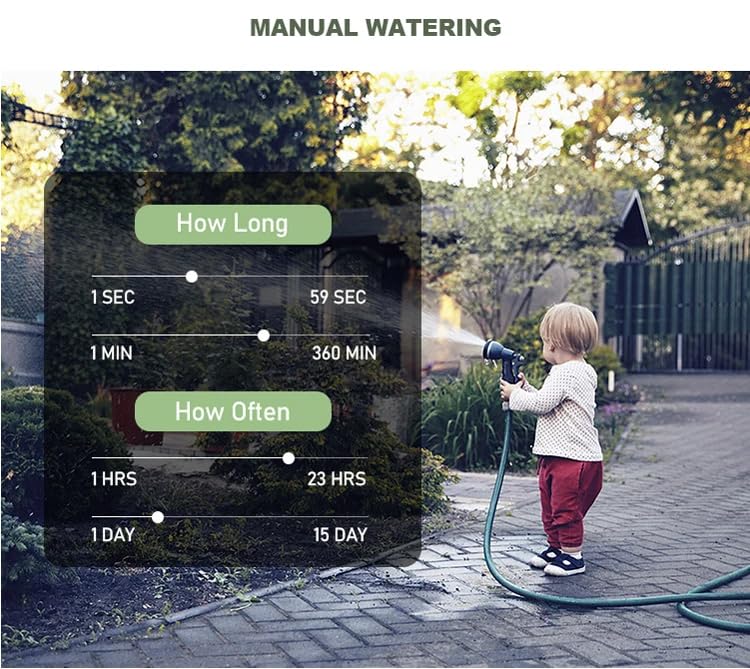
Figure 6: Manual Watering Settings
This image illustrates the range of settings available for manual watering, showing options for "How Long" (1 second to 360 minutes) and "How Often" (1 hour to 15 days), providing flexibility for immediate watering needs.
7.3 Rain Delay Function
To pause watering during rainy periods and conserve water:
- Press the + / DELAY button.
- Use + or - to select the desired delay duration (e.g., 24H, 48H, 72H).
- Press OK to activate the rain delay. The timer will display the remaining delay time.
- Watering will resume automatically after the delay period. To cancel the delay, press ESC/OFF.
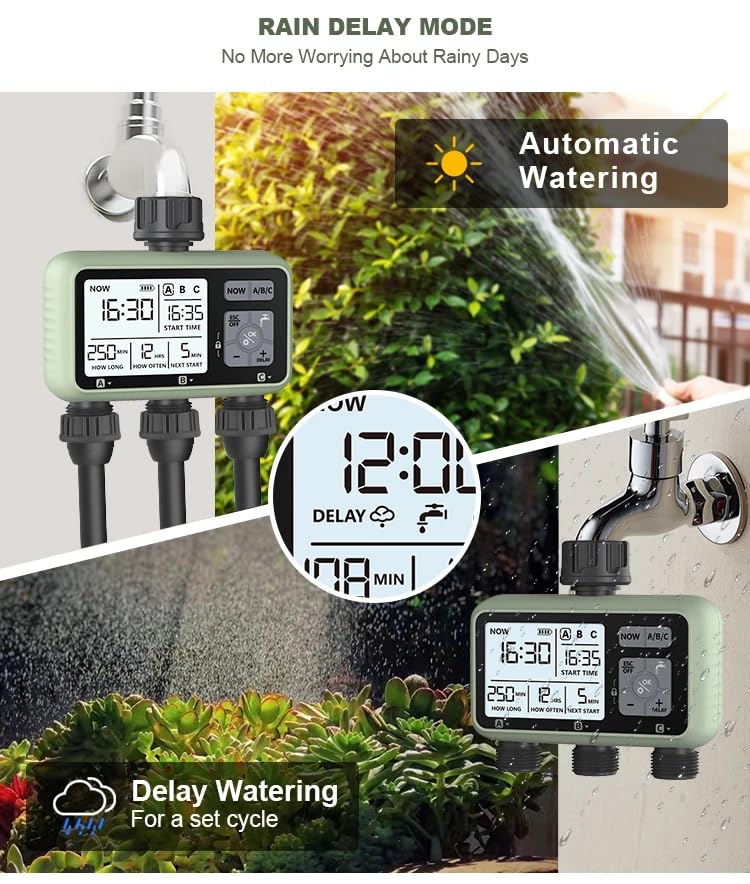
Figure 7: Rain Delay in Action
This image demonstrates the rain delay feature, showing the timer's display indicating a delay, and contrasting it with automatic watering. It highlights how the feature helps prevent over-watering during rainy conditions.
7.4 Child Lock Feature
To prevent accidental changes to settings:
- To activate: Press and hold the OK button for 3 seconds until a lock icon appears on the screen.
- To deactivate: Press and hold the OK button for 3 seconds until the lock icon disappears.
7.5 OFF Mode
To stop all timing plans for an extended period:
- Press and hold the ESC/OFF button for 3 seconds. The screen will display "OFF".
- To resume programmed watering, press and hold the ESC/OFF button again for 3 seconds.
8. Maintenance
8.1 Battery Replacement
When the low battery indicator appears on the LCD screen, replace the batteries promptly to ensure continuous operation. Follow the steps in Section 6.1 Battery Installation.
8.2 Cleaning
Periodically check the inlet filter washer for debris. If clogged, remove and rinse it under running water. Clean the exterior of the timer with a damp cloth. Do not use abrasive cleaners or solvents.
8.3 Winterization
Before the first frost, disconnect the water timer from the tap and hoses. Drain any remaining water from the unit. Store the timer indoors in a dry, frost-free location. Remove batteries if storing for an extended period.
9. Troubleshooting
| Problem | Possible Cause | Solution |
|---|---|---|
| Timer not turning on / LCD blank | Dead or incorrectly installed batteries. | Replace batteries with new 1.5V 'AA' alkaline batteries. Check polarity. |
| No water flow | Tap is off; low water pressure; clogged filter; timer in OFF mode. | Ensure tap is fully open. Check water pressure. Clean inlet filter. Take timer out of OFF mode. |
| Water leakage from connections | Loose connections; missing or damaged washers. | Tighten all connections. Check and replace rubber washers if damaged or missing. |
| Timer not watering at scheduled time | Incorrect program settings; current time not set; rain delay active; child lock active. | Verify program start time, duration, and frequency. Set current time. Cancel rain delay. Deactivate child lock. |
| LCD display is dim or flickering | Low battery. | Replace batteries. |
10. Specifications
| Attribute | Value |
|---|---|
| Model Number | HCT378 |
| Product Dimensions | 13.6D x 12.2W x 5.5H Centimeters |
| Item Weight | 475 Grams |
| Material | ABS+Nylon+Brass |
| Colour | Black, Grey |
| Waterproof Level | IPX5 |
| Working Pressure | 0.05 - 0.8 MPa |
| Working Temperature | 1 to 45 Celcius |
| Power Supply | 2 x 1.5V 'AA' Alkaline Batteries (not included) |
| Water Inlet | 1/2", 3/4" BS&NH |
| Water Outlet | 3/4" BS&NH |
| Manufacturer | Eshine Technology (Ningbo) Co., Ltd |
| Country of Origin | China |
11. Warranty and Support
Your XPR3SS HCT378 Water Timer comes with a manufacturer's warranty. Please refer to the included Warranty Card for specific terms and conditions, including warranty period and coverage details.
For technical support, troubleshooting assistance, or warranty claims, please contact XPR3SS customer service through the contact information provided on your warranty card or the official XPR3SS website.