1. Overview
The TIDRADIO TD-H3 is a multi-band GMRS handheld radio designed for versatile communication. It supports both Bluetooth and USB-C programming, offering a compact and portable design. Key features include 8-band receiving, 199 channels, 50 CTCSS tones, 105 DCS codes, wireless radio replication, frequency matching, DTMF function, Mic Gain, Roger end tone, MSG, Dual Watch, Dual display, and Dual PTT. It also functions as a NOAA Weather Receiver and supports an unlocked version for quick repeater import. The radio features a 1.44-inch color screen for clear visibility.

Figure 1: TIDRADIO TD-H3 GMRS Radio
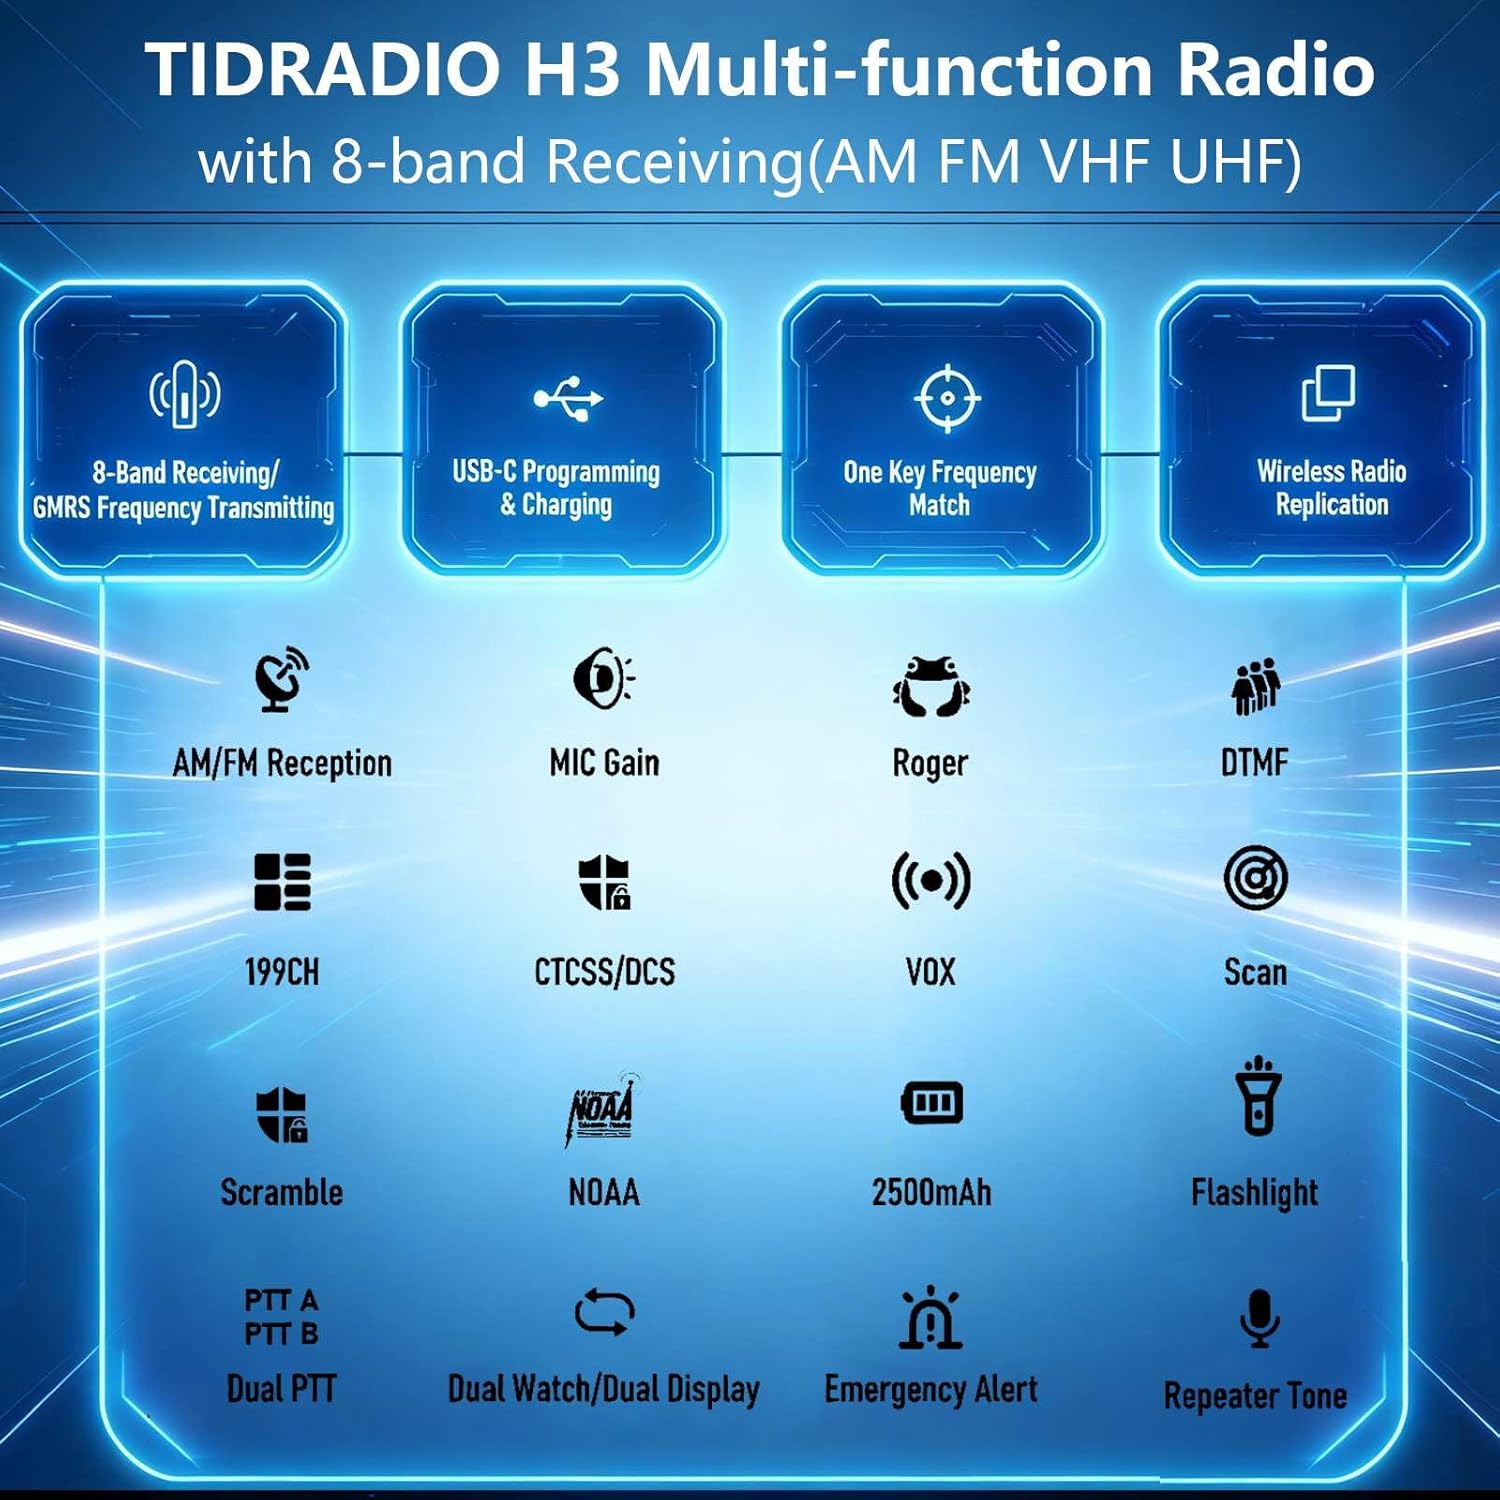
Figure 2: Overview of TD-H3 Features
2. Package Contents
The TIDRADIO TD-H3 GMRS Radio package includes the following items:
- 1 x TD-H3 GMRS Radio
- 2 x 2500mAh Type-C Batteries
- 1 x Long Aviation Antenna
- 1 x GMRS Antenna
- 1 x USB Charger with Cable
- 1 x Desktop Charger
- 1 x G-shape Earpiece
- 2 x Belt Clips
- 1 x User Manual
3. Setup
3.1 Battery Installation and Charging
The TD-H3 comes with two 2500mAh USB-C rechargeable batteries. One battery can be used while the other serves as a backup. Each battery provides approximately 48 hours of standby time or 36 hours of light use after a 3-hour Type-C charge.
- To install the battery, align the battery pack with the back of the radio and slide it into place until it clicks securely.
- To charge, connect the USB-C cable to the radio's USB-C port or place the radio in the desktop charger. Connect the charger to a power source. The charging indicator will show the charging status.

Figure 3: 2500mAh Batteries

Figure 4: USB-C and Desktop Charging Options
3.2 Antenna Attachment
The radio includes both a GMRS antenna and a high-gain 771 Air Band Long Antenna. Choose the appropriate antenna for your intended use.
- Screw the desired antenna clockwise onto the antenna connector at the top of the radio until it is finger-tight. Do not overtighten.

Figure 5: Antenna Options and NOAA Feature
3.3 Initial Power On
To power on the radio, rotate the volume/power knob clockwise. The display will illuminate, and the radio will perform a self-test.
4. Operating Instructions
4.1 Basic Controls
- Volume/Power Knob: Rotate clockwise to power on and increase volume; counter-clockwise to decrease volume and power off.
- PTT Button: Press and hold to transmit, release to receive. The TD-H3 features Dual PTT buttons for convenience.
- Keypad: Used for direct frequency input, menu navigation, and activating various functions.
4.2 Multi-Band Receiving and Transmitting
The TD-H3 GMRS radio supports 8 bands for receiving and transmitting, including AM/FM/UHF & VHF (scanning & receiver), FRS (467.5625-467.7125 MHz), and GMRS (462.5500-467.7250 MHz Rx & Tx).

Figure 6: Multi-Band Capabilities
4.3 NOAA Weather Receiver
The radio includes a NOAA Weather Receiver function, providing access to weather alerts and broadcasts, which can be crucial for emergency preparedness.
4.4 One Key Frequency Match
This feature allows for quick frequency acquisition:
- Enable the Dec.code function (Menu 47).
- Long press button [1] to enter the Match interface.
- The radio will display frequency and CTCSS/DCS when another radio transmits nearby.
4.5 Wireless Radio Replication
To copy data from another TD-H3 radio:
- Long press the Customized button (located under the PTT button) and power on the radio simultaneously to enter the Replication interface.
- Press the Customized Button again to activate the replication process. No PC is needed for this function.
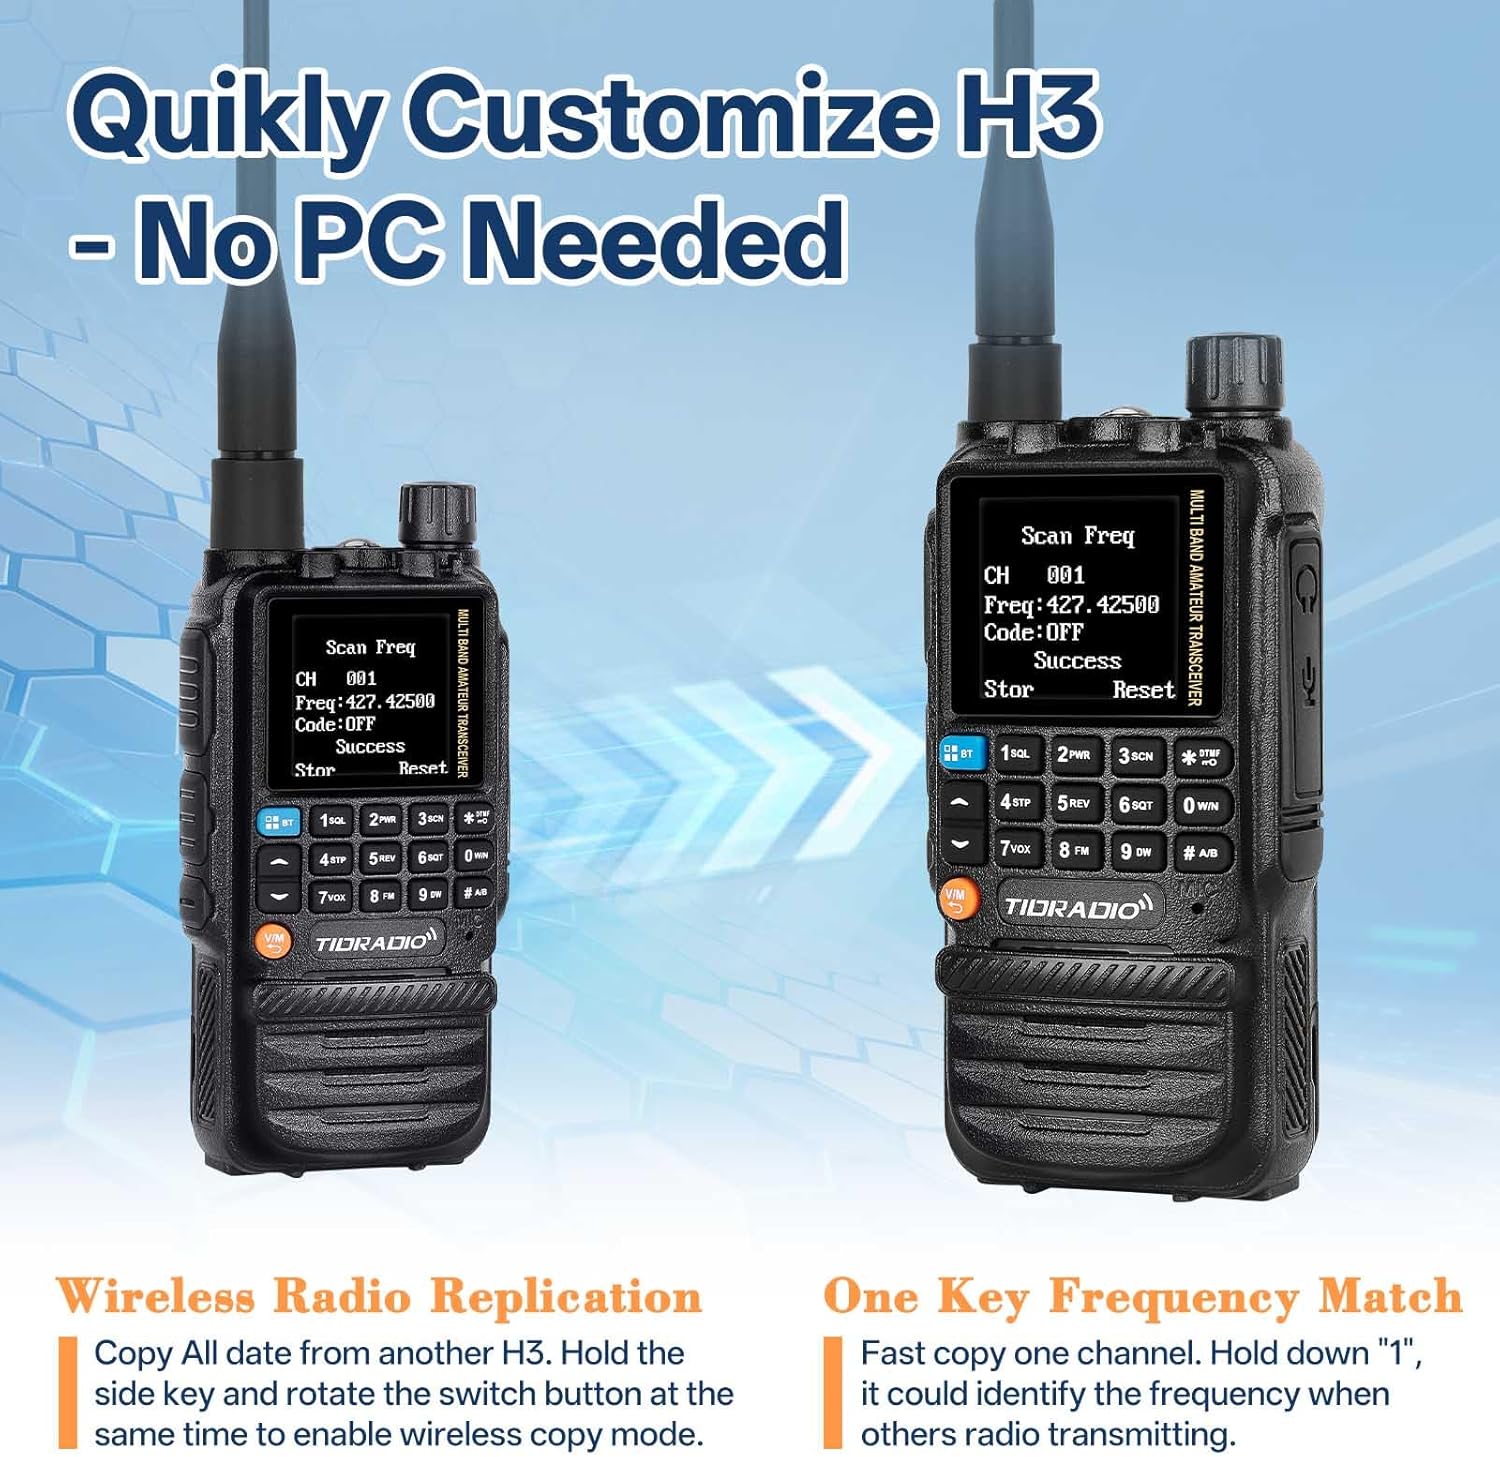
Figure 7: Wireless Replication and Frequency Match
4.6 DTMF Function and Privacy Protection
The TD-H3 supports DTMF functions, including a privacy protection feature:
- Kill Code: Set a 5-digit Kill Code via Odmaster. Any radio on the same frequency can dial this code to lock your H3. The radio will remain inactive until the same digits followed by "#" are sent. Example: 12345 to kill, 12345# to wake.
- Stun Code: Similar to the Kill Code, a Stun Code limits your H3 radio to receive signals only, preventing transmission.
4.7 Flashlight
The radio is equipped with a built-in flashlight for illumination in low-light conditions or emergencies.
5. Programming
The TD-H3 offers multiple programming methods for flexibility.
5.1 USB-C Programming
The radio features a built-in programming chip, allowing standard USB-C cables to be used for programming. Connect the radio to a computer using a USB-C cable and use compatible software (e.g., CHIRP, CPS) to configure channels and settings.
5.2 Wireless Programming (Phone App)
The TD-H3 supports wireless programming via a phone application (Odmaster App). This allows you to customize your radio settings from your smartphone anywhere, anytime.
5.3 CHIRP and CPS Programming
The radio is compatible with CHIRP and CPS programming software, utilizing the 2-Pin Kenwood Port for connection. This provides advanced configuration options for experienced users.
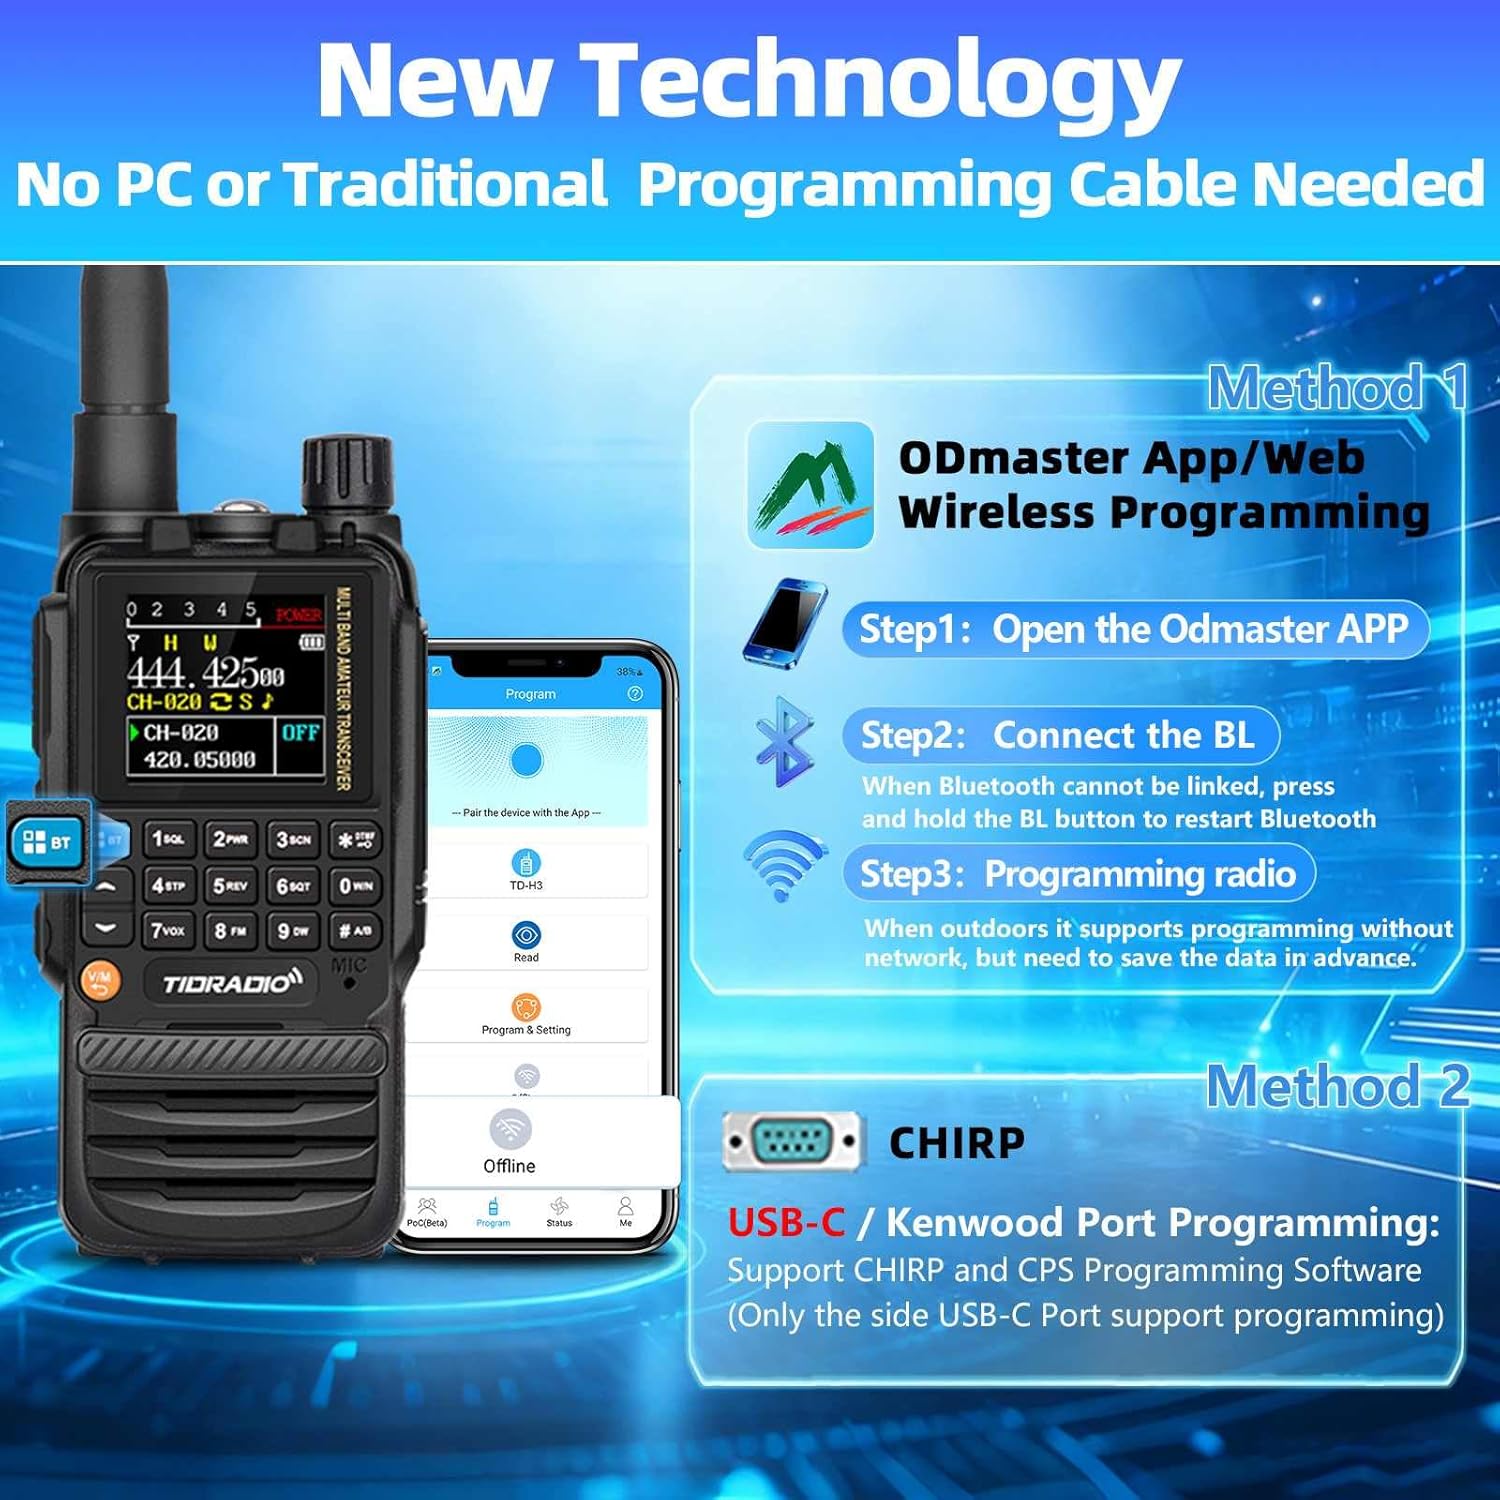
Figure 8: Multiple Programming Methods
6. Maintenance
6.1 Battery Care
- Always use the original TIDRADIO batteries and chargers.
- Avoid exposing batteries to extreme temperatures.
- Do not disassemble, short-circuit, or dispose of batteries in fire.
- Charge batteries fully before first use and when the low battery indicator appears.
6.2 Cleaning
Clean the radio's exterior with a soft, damp cloth. Do not use harsh chemicals or abrasive cleaners. Ensure all ports are closed when cleaning to prevent moisture ingress.
6.3 Storage
Store the radio in a cool, dry place away from direct sunlight and extreme temperatures. Remove the battery if storing for extended periods.
7. Troubleshooting
- Radio does not power on: Ensure the battery is correctly installed and fully charged. Check the power/volume knob position.
- Cannot transmit or receive: Verify the antenna is securely attached. Check frequency and channel settings. Ensure the radio is not in 'Stun' mode.
- Programming issues: Confirm the correct programming software (Odmaster, CHIRP, CPS) and drivers are installed. Ensure the USB-C cable is functioning correctly for wired programming, or Bluetooth is enabled for wireless programming.
- One band scanning, other cannot receive: This is a known operational characteristic. If one band is actively scanning, the other band may not be able to receive simultaneously.
8. Specifications
| Feature | Specification |
|---|---|
| Product Dimensions | 10 x 8.46 x 2.24 inches (10"D x 8.46"W x 2.24"H) |
| Item Weight | 1.32 pounds |
| Batteries | 2 Lithium Ion batteries required (included), 2500mAh each |
| Number of Channels | 199 |
| Frequency Range | AM: 108-136MHz; FM: 50-76MHz, 76-108MHz (RX); UHF: 400-470MHz, 470-600MHz (RX); VHF: 136-174MHz, 174-350MHz, 350-400MHz (RX) |
| Talking Range Maximum | 5 Kilometer |
| Voltage | 7.4 Volts |
| Water Resistance Level | Water Repellent |
| Special Features | Long Range, USB-C Charging, Wireless Programming, NOAA Weather Receiver |
9. Warranty and Support
For any issues with your TIDRADIO TD-H3 GMRS handheld radio, including missing accessories or technical problems, please contact TIDRADIO customer support via Amazon. Firmware upgrades are available upon request or can be downloaded from the official website: walkietalkiesoftware.com.
FCC ID: 2A4FBTD831G
10. Product Video Overview
This video provides a visual overview of the TIDRADIO TD-H3 GMRS radio's key features and functionalities, including multi-band reception, programming options, and various operational modes.


