
1. Introduction
1.1 Product Overview
The PARTPHONER Black Roman Outdoor Post Light and Outdoor Lamp Post is designed to provide reliable and aesthetically pleasing illumination for various outdoor spaces. Featuring a durable aluminum and glass construction, this hardwired fixture includes a built-in GFCI outlet for convenient outdoor power access and a dusk-to-dawn sensor for automatic operation, enhancing both functionality and energy efficiency.
1.2 Safety Information
WARNING: Risk of Electric Shock. Always disconnect power at the circuit breaker before installation or servicing.
- Read all instructions carefully before installation and operation.
- Ensure the power supply is turned off at the main circuit breaker before beginning any electrical work.
- All wiring connections must be in accordance with local and national electrical codes. If you are unsure about wiring, consult a qualified electrician.
- Do not install this fixture near flammable materials or in areas with explosive atmospheres.
- This product is designed for outdoor use and is weather-resistant. However, ensure all connections are properly sealed to prevent water ingress.
- The integrated GFCI outlet provides added protection against electrical faults. Do not bypass or tamper with the GFCI functionality.
2. Package Contents
Verify that all components listed below are present and undamaged before proceeding with installation.
- Outdoor Post Light Fixture (Lamp Head)
- Lamp Post (Pole)
- Base for Post Mount
- Pier Mount Base (if applicable)
- 3 x LED Bulbs
- Mounting Hardware (screws, wire nuts, etc.)
- Instruction Manual

Image: Main components of the PARTPHONER Outdoor Post Light, including the lamp head, post, and base.
3. Specifications
| Brand | PARTPHONER |
| Model | B0CSJ6LBJG |
| Color | Black |
| Material | Aluminum, Glass |
| Indoor/Outdoor Usage | Outdoor |
| Power Source | Hardwired (Corded Electric) |
| Installation Type | Hardwired |
| Light Source Type | LED (Bulbs Included) |
| Number of Light Sources | 1 (per fixture head) |
| Water Resistance Level | Waterproof |
| Mounting Type | Floor Mount (Post Mount/Pier Mount) |
| GFCI Outlet | Integrated (15AWG Input Wire, Max 1875W Load) |
| Sensor | Dusk-to-Dawn Photocell Sensor |

Image: Dimensional diagram of the PARTPHONER Outdoor Post Light, showing overall height and lamp head dimensions.
4. Setup and Installation
4.1 Pre-Installation Checklist
- Ensure the installation location is suitable for a hardwired outdoor light fixture.
- Confirm that the existing wiring meets local electrical codes and is capable of supporting the fixture's power requirements.
- Gather necessary tools: screwdriver, wire strippers, electrical tape, pliers, measuring tape, level.
- Turn off power at the circuit breaker before starting.
4.2 Mounting Options
This post light offers two primary mounting methods: Post Mount and Pier Mount.
- Post Mount: Designed to fit a standard 3-inch lamp post (not included). The fixture head slides onto the top of the post.
- Pier Mount: Includes a base for mounting directly onto a flat surface, such as a pier, pedestal, or concrete pad.
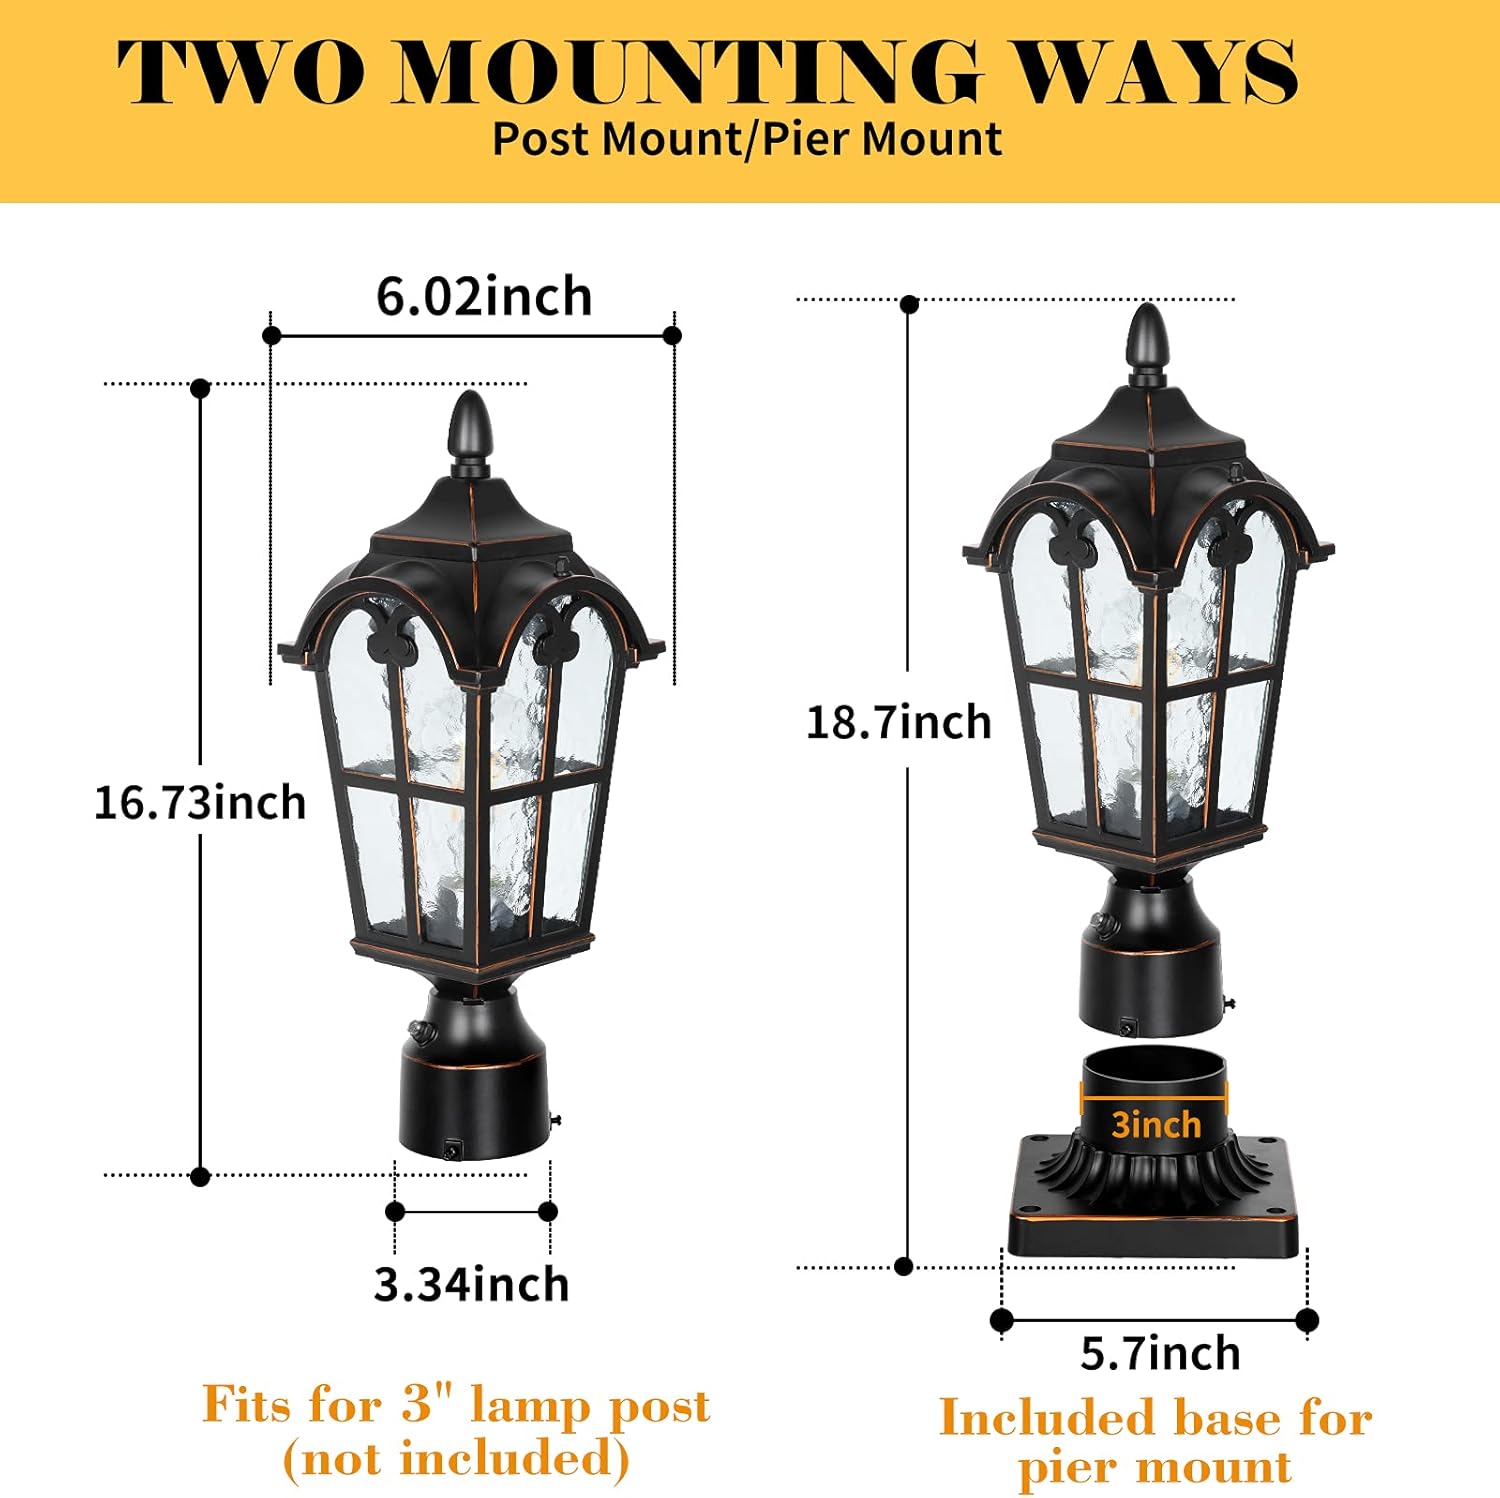
Image: Illustration of the two mounting options: Post Mount (left) and Pier Mount (right), with respective dimensions.
4.3 Wiring Instructions
- Ensure power is OFF at the circuit breaker.
- Route the electrical wires from the power source through the lamp post or pier mount base to the fixture head.
- Connect the fixture's wires to your household wiring using appropriate wire nuts:
- Connect the black wire (live/hot) from the fixture to the black wire from the power supply.
- Connect the white wire (neutral) from the fixture to the white wire from the power supply.
- Connect the green or bare copper wire (ground) from the fixture to the ground wire from the power supply.
- Secure all wire connections with electrical tape and ensure they are tucked neatly into the wiring compartment.
- Attach the lamp head securely to the post or pier mount base according to the chosen mounting method.
- Install the provided LED bulbs into the sockets.
- Restore power at the circuit breaker and test the light and GFCI outlet.
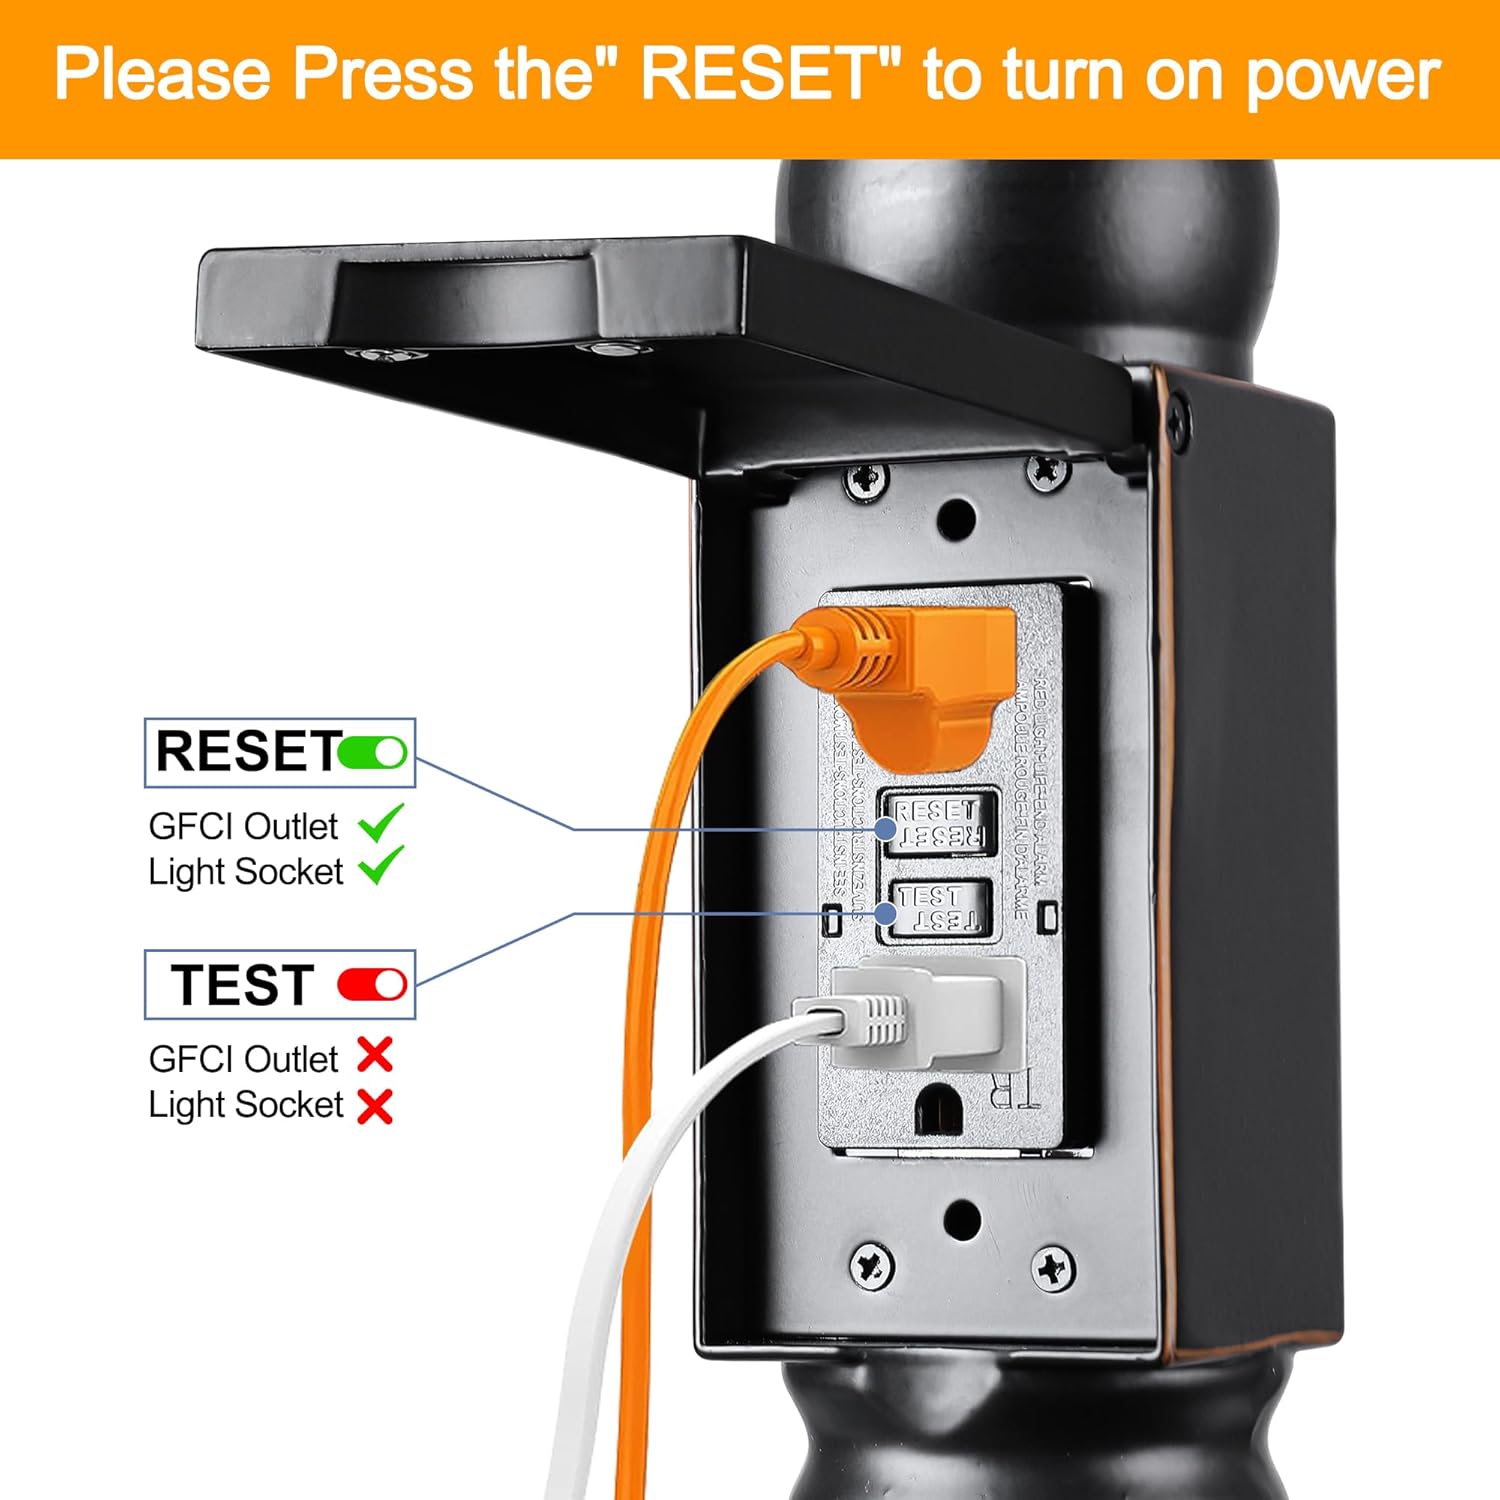
Image: Detailed view of the integrated GFCI outlet, showing the RESET and TEST buttons and indicating proper wiring for power.
5. Operating Instructions
5.1 Dusk-to-Dawn Sensor
The PARTPHONER Outdoor Post Light is equipped with a built-in photocell sensor that automatically controls the light based on ambient light levels.
- The light will automatically turn ON at dusk (when it gets dark).
- The light will automatically turn OFF at dawn (when it gets light).
- Ensure the sensor is not obstructed by objects, debris, or other light sources, as this may interfere with its proper operation.

Image: Visual representation of the dusk-to-dawn sensor functionality, showing the light off during the day and on at night.
5.2 GFCI Outlet Usage
The integrated GFCI (Ground Fault Circuit Interrupter) outlet provides two receptacles for convenient outdoor power access with enhanced safety features.
- To use the GFCI outlet, ensure the light fixture is powered on.
- If the GFCI trips (power is cut off), press the RESET button on the outlet to restore power.
- Periodically test the GFCI by pressing the TEST button. This should trip the GFCI and cut power. Press RESET to restore power. If the GFCI does not trip when tested, it may be faulty and should be replaced by a qualified electrician.
- The GFCI outlet supports a maximum load of 1875W. Do not exceed this rating.
6. Maintenance
6.1 Cleaning
- Before cleaning, ensure the power to the fixture is turned off at the circuit breaker.
- Wipe the fixture with a soft, damp cloth. Do not use abrasive cleaners, solvents, or polishes as they may damage the finish or glass.
- Clean the glass panels regularly to maintain optimal light output.
6.2 Weather Resistance
This outdoor post light is crafted from die-cast aluminum and study clear glass, designed to withstand various weather conditions. It is anti-rust and anti-corrosion.
- Periodically inspect the fixture for any signs of wear, damage, or loose connections.
- Ensure all seals and gaskets remain intact to maintain the waterproof rating.
7. Troubleshooting
Refer to the table below for common issues and their potential solutions.
| Problem | Possible Cause | Solution |
|---|---|---|
| Light does not turn on. | No power to the fixture. Faulty bulb. Dusk-to-dawn sensor obstructed. | Check circuit breaker. Ensure wiring connections are secure. Replace bulb. Clear any obstructions from the sensor. |
| GFCI outlet has no power. | GFCI has tripped. No power to the fixture. | Press the RESET button on the GFCI outlet. Check circuit breaker and fixture wiring. |
| Light stays on during the day. | Dusk-to-dawn sensor is obstructed or receiving insufficient light. | Ensure the sensor is clean and not blocked by objects or shadows. Verify no other light sources are shining directly on the sensor. |
| Light flickers. | Loose wiring connection. Faulty bulb. | Turn off power and check all wiring connections. Replace the bulb. |
8. Warranty and Support
PARTPHONER products are manufactured with quality and durability in mind. For any questions, concerns, or technical assistance regarding your Black Roman Outdoor Post Light, please contact PARTPHONER customer support.
Please have your product model number (B0CSJ6LBJG) and purchase information ready when contacting support to facilitate faster service.
For more information or to contact support, please visit the official PARTPHONER store on Amazon: PARTPHONER Store