Introduction
Thank you for choosing the IRONMAX 13.5 Amp Electric Tiller. This manual provides essential information for the safe assembly, operation, maintenance, and troubleshooting of your new electric tiller. Please read this manual thoroughly before using the product and keep it for future reference.
General Safety Instructions
Always follow basic safety precautions to reduce the risk of fire, electric shock, and personal injury when using this electric tiller.
- Read the Manual: Familiarize yourself with all controls and proper use of the equipment.
- Personal Protective Equipment: Always wear safety glasses or goggles, sturdy footwear, and gloves. Avoid loose clothing that could get caught in moving parts.
- Electrical Safety: Ensure the power source matches the tiller's requirements (120V/60Hz). Use only outdoor-rated extension cords in good condition. Do not operate in wet conditions.
- Work Area: Keep the work area clear of bystanders, children, and pets. Operate only in daylight or good artificial light.
- Blade Safety: Keep hands and feet away from the tines. Disconnect the power cord before performing any adjustments, cleaning, or maintenance.
- Obstacles: Before tilling, clear the area of rocks, roots, wires, and other debris that could damage the blades or be thrown by the machine.
- Overload Protection: The tiller is equipped with over-temperature protection. If the motor stops, allow it to cool down before restarting.
- Secure Grip: Maintain a firm grip on the handles at all times during operation.
- Storage: Store the tiller in a dry, secure place out of reach of children.
Product Components
Understand the different parts of your IRONMAX Electric Tiller for proper assembly and operation.

Image Description: This diagram illustrates the key components of the IRONMAX Electric Tiller. Visible parts include the Ergonomic Handle, Safety Button, ON/OFF Trigger, Lever Clamps for Folding, Cable Clamps, Powerful Motor, Shield, Wheel Position Adjustment, Durable Wheels, and 6 Sharp Blades. A 15-inch long wire is also shown extending from the handle.
- Ergonomic Handle: Designed for comfortable grip and reduced arm strain.
- Safety Button: Must be pressed before the ON/OFF trigger to activate the tiller.
- ON/OFF Trigger: Activates and deactivates the motor. Releasing it stops the machine.
- Lever Clamps for Folding: Used to fold the handle for compact storage.
- Powerful Motor: The 13.5 Amp motor drives the tines.
- Shield: Protects the user from thrown debris and prevents sand splashes.
- Wheel Position Adjustment: Allows adjustment of wheel height for transport or tilling.
- Durable Wheels: For easy maneuverability.
- 6 Sharp Blades (Tines): Steel tines designed for efficient soil cultivation.
Setup and Assembly
The IRONMAX Electric Tiller is designed for straightforward assembly. Follow these steps to prepare your tiller for use.
- Unpack: Carefully remove all components from the packaging. Verify all parts are present according to the packing list.
- Handle Assembly: Attach the upper handle to the lower handle using the provided fasteners. Ensure all connections are secure.
- Secure Cables: Use the cable clamps to secure the power cord along the handle to prevent it from interfering with operation or getting damaged.
- Unfolding the Handle: If the handle is in the folded position for storage, release the lever clamps and extend the handle to the operating position. Secure the clamps firmly.
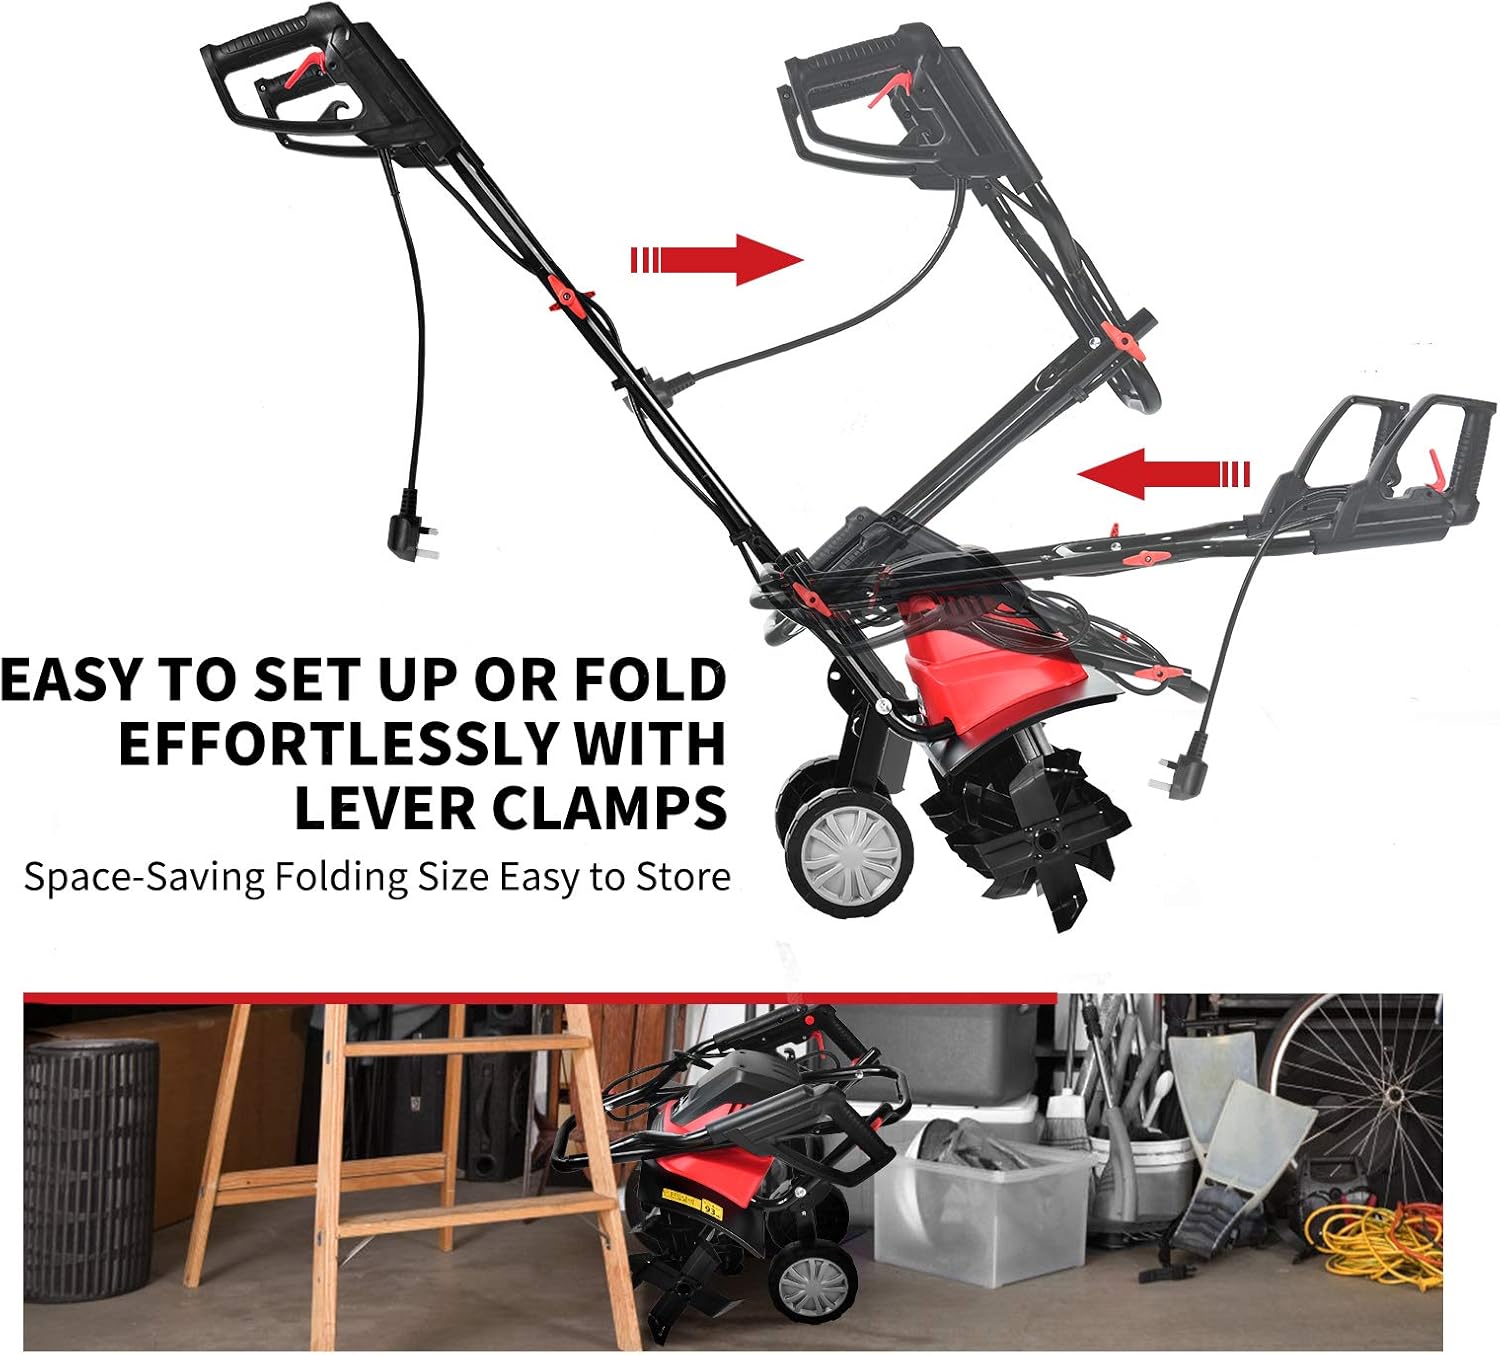
Image Description: This image demonstrates the folding mechanism of the tiller's handle. It shows how the handle can be easily set up or folded using lever clamps, allowing for space-saving storage and transport.
Wheel Position Adjustment
The tiller features adjustable wheels for transport and tilling. To adjust the wheel position:
- Locate the ring-pull mechanism near the wheels.
- Pull out the ring-pull to disengage the wheels.
- Adjust the wheels to the desired height:
- Transport Position: Wheels lowered to allow easy movement of the tiller.
- Tilling Position: Wheels raised to allow the tines to dig into the soil.
- Release the ring-pull to lock the wheels in place. Ensure they are securely locked before operation.

Image Description: This image illustrates the "Easy Use" feature for adjusting the tiller's wheels. It shows a close-up of the ring-pull mechanism, indicating that pulling it out allows the wheels to be lifted or lowered for different operational needs.
Operating Instructions
Follow these steps for safe and effective operation of your electric tiller.
- Prepare the Area: Clear the tilling area of any large rocks, debris, or thick vegetation that could impede the tines.
- Connect Power: Plug the tiller into a suitable 120V/60Hz power outlet using a heavy-duty outdoor extension cord.
- Starting the Tiller:
- Press and hold the Safety Button located on the handle.
- While holding the Safety Button, squeeze the ON/OFF Trigger. The tines will begin to rotate.
- Once the tiller is running, you can release the Safety Button, but continue to hold the ON/OFF Trigger.
- Tilling Technique:
- Begin tilling at one end of the area, moving slowly and steadily.
- Allow the tines to dig into the soil. Do not force the tiller.
- For deeper tilling, make multiple passes over the same area, gradually increasing depth.
- The tiller has a working width of 17.7 inches and a maximum working depth of 8.7 inches.
- Stopping the Tiller: Release the ON/OFF Trigger. The tines will stop rotating.
- After Use: Disconnect the tiller from the power source immediately after use.

Image Description: This image highlights the operational capabilities of the IRONMAX Electric Tiller, specifically its working depth of 8.7 inches and working width of 17.7 inches. It also shows the 6 steel blades, their high strength, and sharp design.
Maintenance and Storage
Regular maintenance ensures the longevity and optimal performance of your tiller.
Cleaning
- Always disconnect power before cleaning.
- Remove soil, debris, and tangled vegetation from the tines and shield after each use. A stiff brush or wooden stick can be used.
- Wipe down the exterior of the tiller with a damp cloth. Do not use water jets or immerse the unit in water.
- Ensure the wide shield is clean to effectively prevent sand and stone splashes.
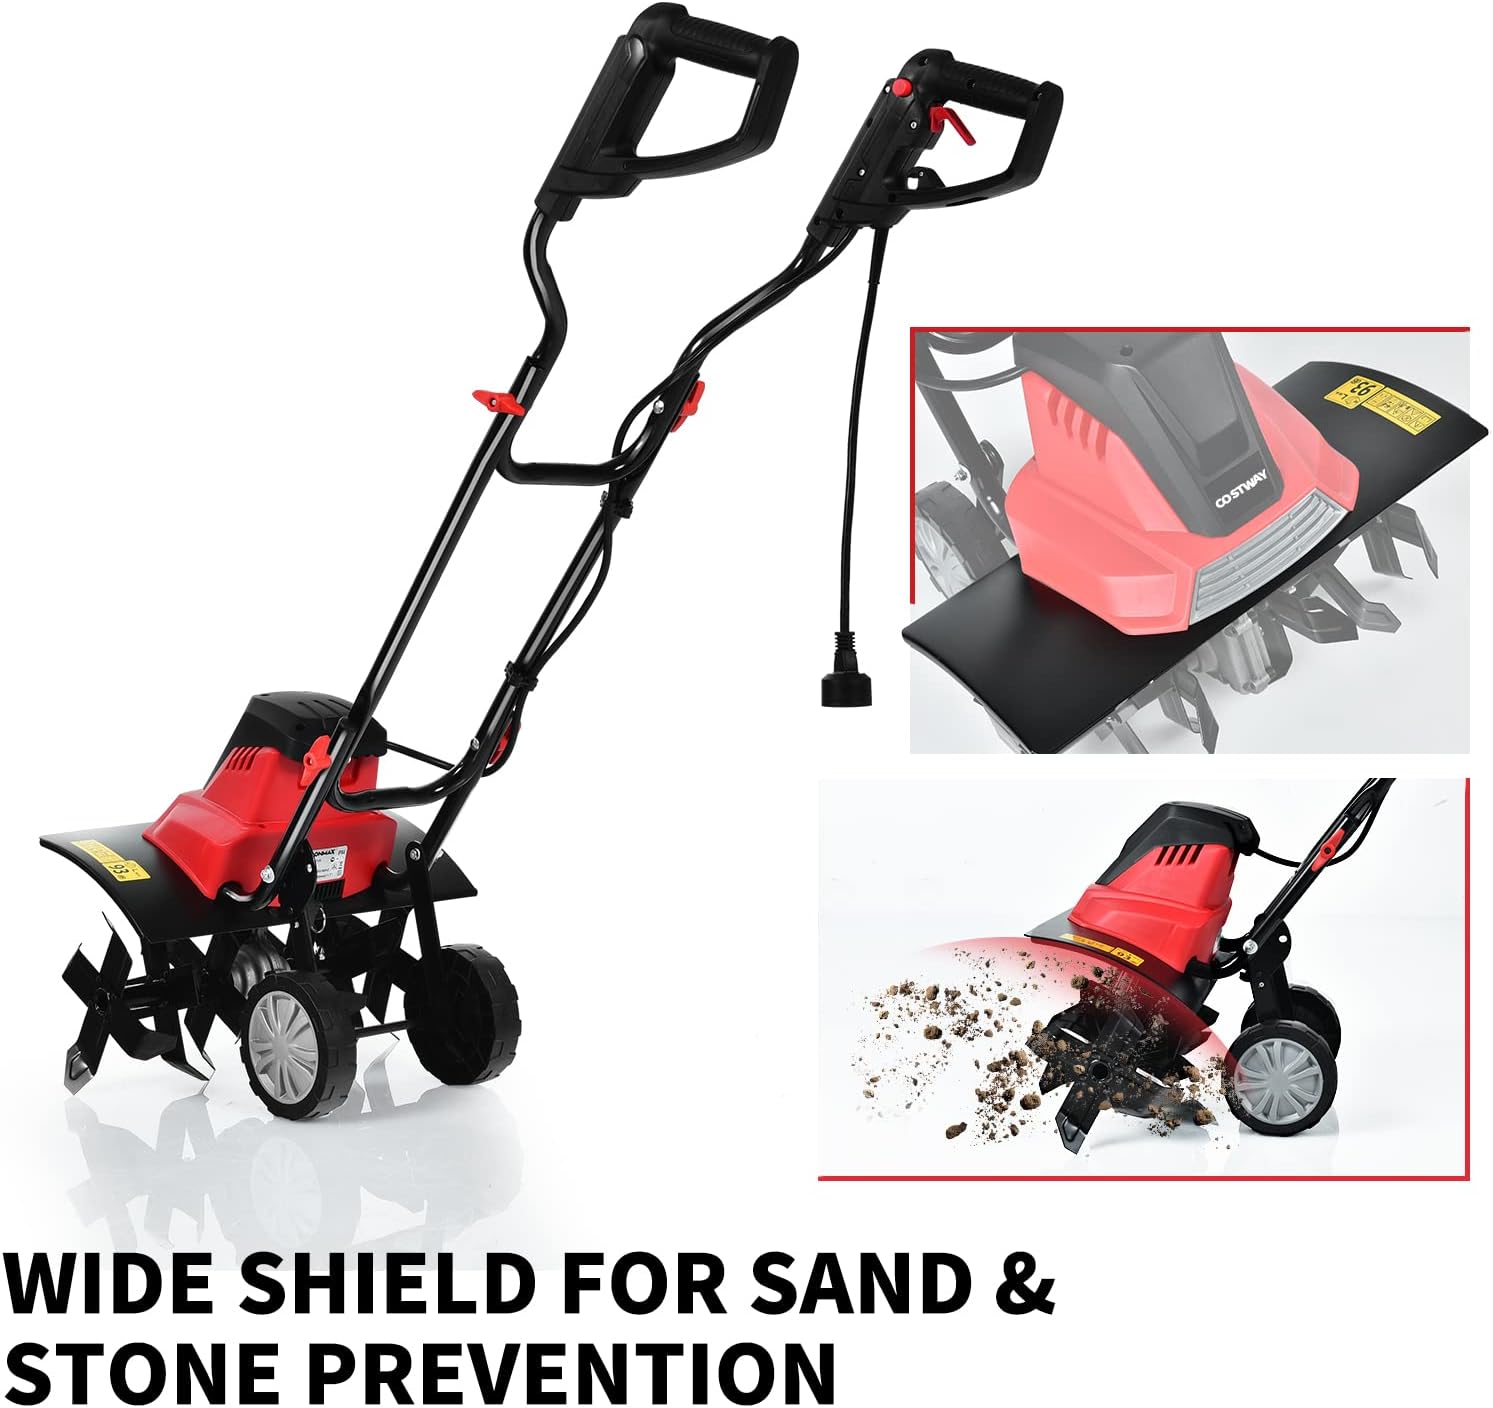
Image Description: This image focuses on the wide shield of the IRONMAX Electric Tiller, emphasizing its role in preventing sand and stone splashes during operation. Keeping this shield clean is part of routine maintenance.
Blade Inspection
- Regularly inspect the tines for wear, damage, or bending.
- Replace damaged tines immediately to maintain tilling efficiency and safety.
Storage
- Disconnect the power cord.
- Clean the tiller thoroughly.
- Fold the handle using the lever clamps for compact storage.
- Store the tiller in a dry, well-ventilated area, protected from direct sunlight and moisture. Keep it out of reach of children.
Troubleshooting
Refer to this section for solutions to common issues you might encounter.
| Problem | Possible Cause | Solution |
|---|---|---|
| Tiller does not start. |
|
|
| Tiller stops during operation. |
|
|
| Tiller not tilling effectively. |
|
|
Technical Specifications
| Feature | Specification |
|---|---|
| Brand | IRONMAX |
| Model Number | IR358TG |
| Power Input | 13.5 Amp |
| Voltage/Frequency | 120V/60HZ |
| No-Load Speed | 400 RPM |
| Number of Tines | 6 |
| Working Width | 17.7 inches (450mm) |
| Max. Working Depth | 8.7 inches (220mm) |
| Net Weight | 24 lbs |
| Overall Dimensions (L x W x H) | 40'' x 18'' x 41'' |
| Material | Alloy Steel |
| Sound Power Level | 91.57 dB(A) |
Warranty Information
Specific warranty details for your IRONMAX Electric Tiller may vary. Please refer to the warranty card included with your product or contact the retailer/manufacturer directly for comprehensive warranty terms and conditions. Keep your proof of purchase for any warranty claims.
Customer Support
If you have any questions, require technical assistance, or need to order replacement parts, please contact IRONMAX customer support or your authorized dealer. For the most up-to-date contact information, please visit the official IRONMAX website or refer to the contact details provided with your purchase.


