
Introduction
Thank you for choosing the MIZISNR AX-60 6-Channel Audio Mixer. This professional digital sound board is designed for versatile audio mixing applications, featuring 48V phantom power, Bluetooth connectivity, and a USB MP3 interface. This manual provides detailed instructions for setup, operation, maintenance, and troubleshooting to ensure optimal performance and longevity of your device.
Important Safety Information
- Read all instructions carefully before operating the device.
- Keep this manual for future reference.
- Do not expose this equipment to rain or moisture to prevent fire or electric shock.
- Ensure the power supply voltage matches the requirements specified on the unit.
- Do not open the casing. Refer all servicing to qualified personnel.
- Disconnect the power cord during lightning storms or when unused for long periods.
- Avoid placing the unit near heat sources or in direct sunlight.
- Ensure proper ventilation around the unit.
Product Overview
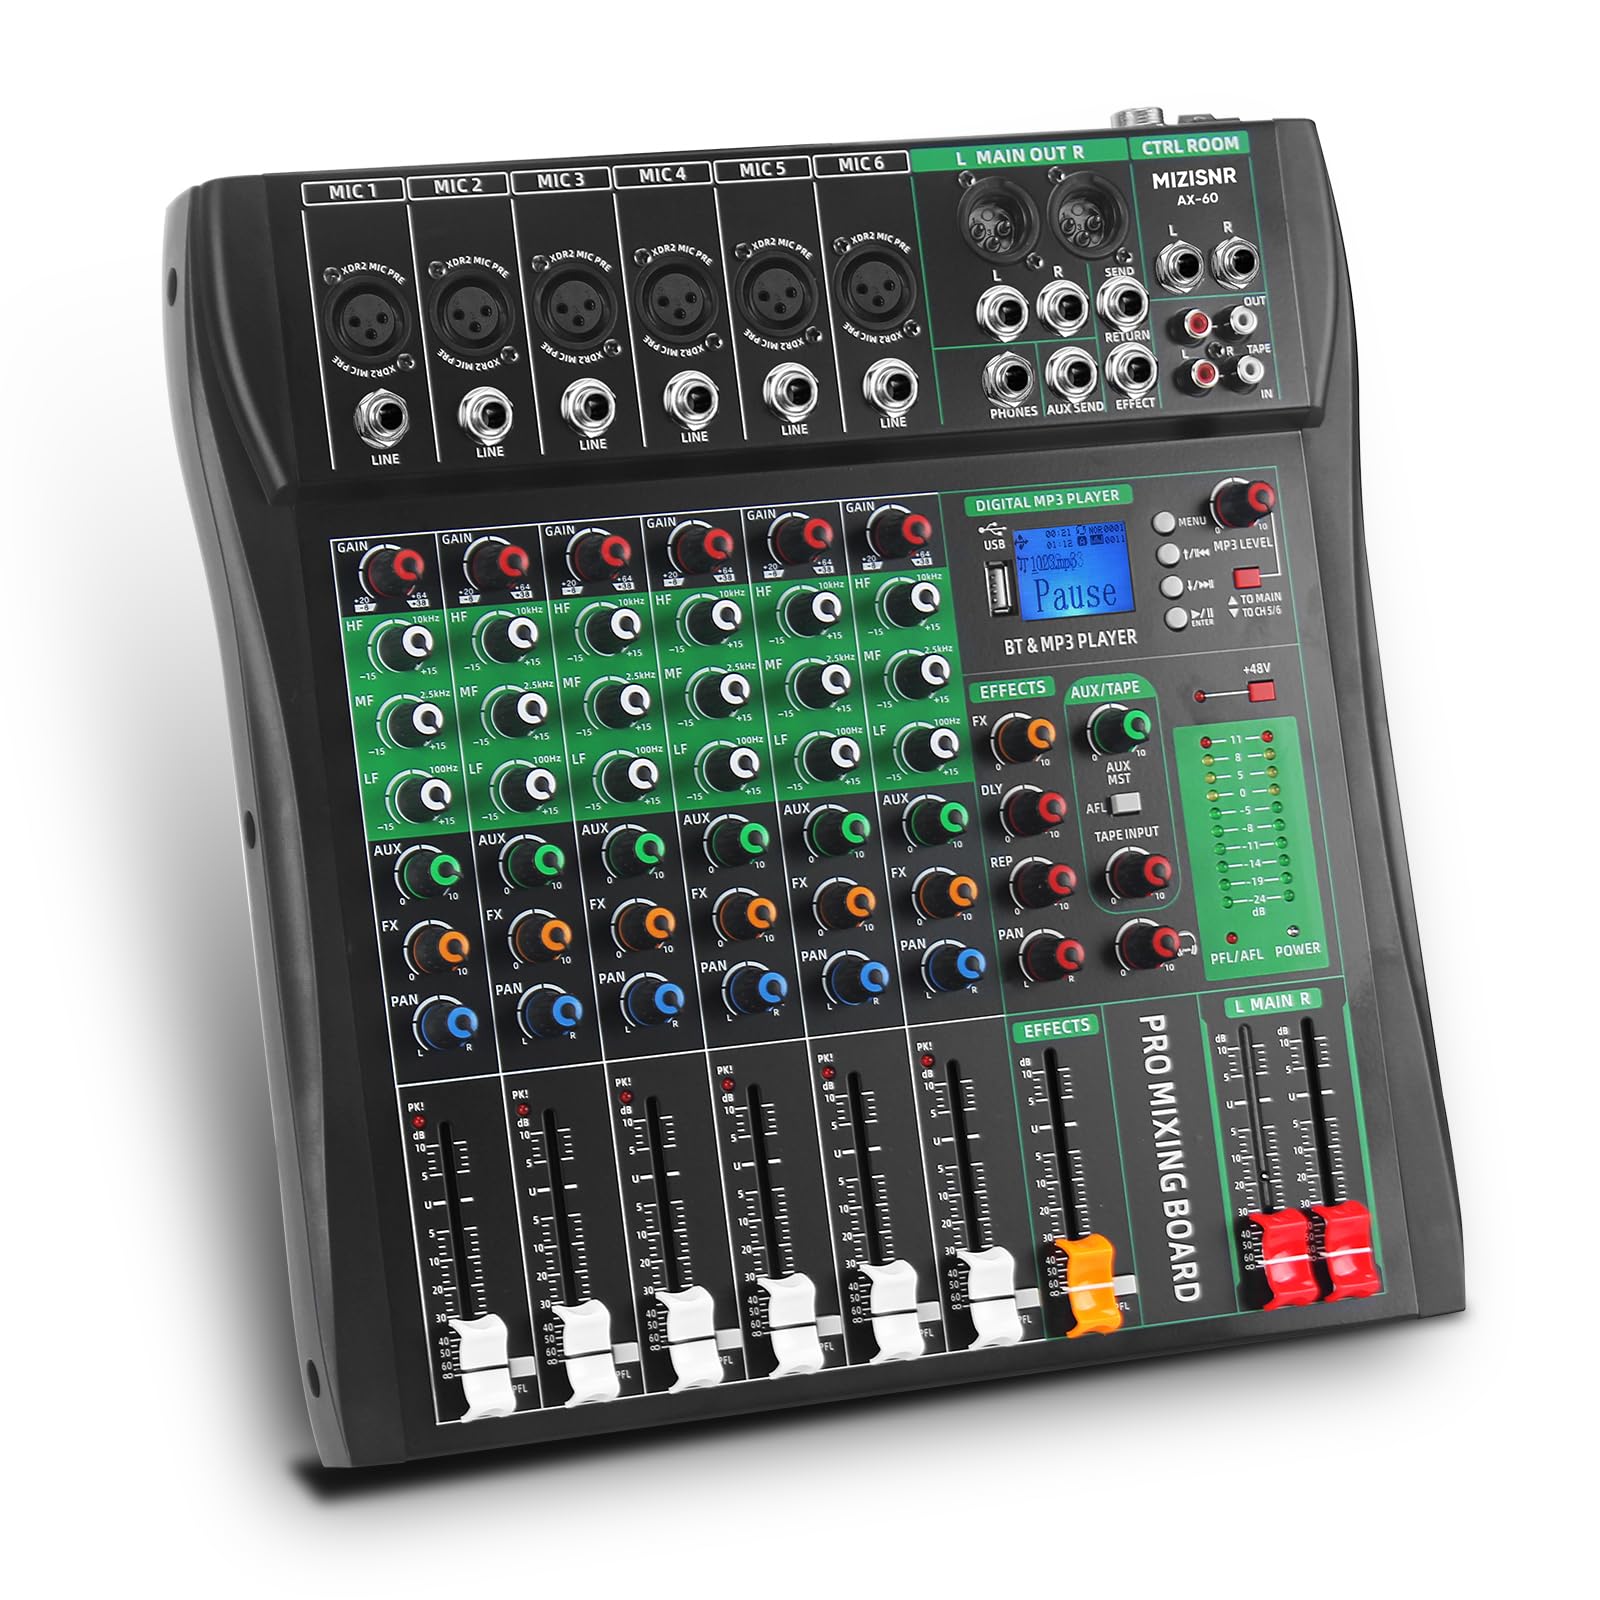
Image: Front view of the MIZISNR AX-60 6-Channel Audio Mixer, showcasing its compact design and control layout.
The MIZISNR AX-60 is a compact yet powerful 6-channel audio mixer, ideal for various sound reinforcement and recording scenarios. It offers a range of features for precise audio control and flexible connectivity.
Key Features:
- 6-Channel Mono Input: Each channel features a 3-band equalizer for independent high, mid, and low sound adjustments.
- Integrated Bluetooth Playback: Seamlessly connect external devices like mobile phones and computers wirelessly.
- USB MP3 Interface: Direct input from USB devices (MP3 players, U disks) with built-in MP3 player/recorder supporting MP3, WAV, and WMA formats. Supports computer recording and sound editing via USB.
- +48V Phantom Power: Provides stable power for wired, wireless, and condenser microphones, ensuring clear and delicate sound capture.
- Real-Time Ear Monitoring: A 6.5mm interface allows for direct headphone connection to monitor sound feedback instantly.
- Wide Device Compatibility: Connects with various electronic devices with audio input interfaces, suitable for home KTV, band performances, campus events, and conferences.
Component Identification:
Familiarize yourself with the various controls and connection points on your AX-60 mixer.

Image: Detailed view of the MIZISNR AX-60 mixer's front panel, highlighting various controls and input/output interfaces. Labels include Microphone/Instrument interface, Gain control, Balanced control, Auxiliary stereo input, Effect control, Sound balance control, Peak indicator, Volume adjustment, Effect sending/return, Audio input, Multifunctional Playback/Switching Window, Phantom Power Meter, Left and right channels Master volume control, Reverb volume fader, Main power switch, Power input, and High efficiency cooling network.
- Microphone/Instrument Interface (MIC 1-6): XLR and 1/4" TRS combo jacks for connecting microphones or instruments.
- Gain Control: Adjusts the input sensitivity for each channel.
- 3-Band EQ (High, Mid, Low): Controls the treble, midrange, and bass frequencies for each channel.
- AUX/FX Send: Sends signal to external effects processors or monitor mixes.
- PAN Control: Positions the channel's signal in the stereo field (left to right).
- Channel Faders: Adjust the volume level of individual channels.
- +48V Phantom Power Button: Activates phantom power for condenser microphones.
- Digital MP3 Player/BT & MP3 Player Section: USB port, display, and controls for Bluetooth and USB playback/recording.
- Main Output (L/R): XLR and 1/4" TRS outputs for connecting to main speakers or amplifiers.
- Phones Output: 6.5mm stereo jack for headphone monitoring.
- Power Switch & Input: Located on the rear panel for power connection and unit activation.
Setup Guide
Follow these steps to set up your MIZISNR AX-60 mixer for operation.
1. Unpacking and Placement:
- Carefully remove the mixer from its packaging.
- Place the mixer on a stable, flat surface, ensuring adequate ventilation.
2. Power Connection:
- Ensure the mixer's power switch is in the OFF position.
- Connect the provided power adapter to the "Power Input" on the rear of the mixer.
- Plug the power adapter into a suitable electrical outlet.
3. Connecting Audio Devices:
The AX-60 supports various input and output devices. Refer to the connection diagram below for visual guidance.

Image: Diagram illustrating various device connections to the MIZISNR AX-60 mixer. Examples include microphones, guitars, bass, active speakers, auxiliary output devices, and headphones. It shows XLR and 6.5mm inputs, main L/R outputs, and monitor headset connection.
- Microphones/Instruments: Connect microphones (XLR) or instruments (1/4" TRS) to the "MIC/LINE" inputs (Channels 1-6). If using condenser microphones, ensure +48V phantom power is activated for the respective channel (see Operating Instructions).
- Main Speakers/Amplifiers: Connect your main speakers or power amplifier to the "L MAIN OUT R" XLR or 1/4" TRS outputs.
- Headphones: Plug your headphones into the "PHONES" 6.5mm stereo jack for monitoring.
- External Audio Devices (AUX): Connect external audio sources to the AUX input if available.
Operating Instructions
This section details the operation of the MIZISNR AX-60 mixer's various functions.
1. Powering On/Off:
- Before powering on, ensure all channel faders and the main output fader are set to their minimum positions.
- Flip the "POWER" switch on the rear panel to the ON position.
- To power off, reverse the process: lower all faders, then switch off the unit.
2. Channel Control (Channels 1-6):
- GAIN: Adjust this knob to set the input level for each channel. Aim for a strong signal without clipping (distortion).
- 3-Band EQ:

Image: Close-up of the 3-band EQ controls on the MIZISNR AX-60 mixer, showing knobs for High, Mid, and Low frequencies. Accompanying graphs illustrate the frequency response curves for Hi EQ (boost/cut above 12kHz), Mid EQ (sweeps from 250Hz to 6KHz), and Lo EQ (boost/cut below 80Hz).
- HIGH: Adjusts treble frequencies (above 12kHz).
- MID: Adjusts midrange frequencies (sweeps from 250Hz to 6kHz).
- LOW: Adjusts bass frequencies (below 80Hz).
- AUX/FX: Controls the amount of signal sent to the auxiliary or effects bus.
- PAN: Adjusts the stereo position of the channel's signal.
- Channel Fader: Controls the output volume of the individual channel to the main mix.
3. +48V Phantom Power:

Image: Illustration showing the activation of the +48V phantom power button on the MIZISNR AX-60 mixer, with a condenser microphone connected. The image emphasizes powering wired and condenser microphones for optimal performance.
To use condenser microphones, press the "+48V PHANTOM POWER" button. An indicator light will illuminate. Ensure dynamic microphones or other non-phantom powered devices are not connected when activating phantom power to prevent damage.
4. Bluetooth Playback:

Image: Diagram showing the MIZISNR AX-60 mixer connecting wirelessly via Bluetooth to a smartphone playing music. The image highlights a 33ft transmission distance and the Bluetooth pairing name "BT-Speaker".
- Press the "MODE" button in the Digital MP3 Player section until "BT" or "Bluetooth" appears on the display.
- On your external device (smartphone, tablet), search for Bluetooth devices and select "BT-Speaker" to pair.
- Once paired, audio from your device will play through the mixer. Adjust the volume using the MP3 player section's controls and the main fader.
5. USB MP3 Player/Recorder:

Image: Illustration of the MIZISNR AX-60 mixer's USB functionality, showing a USB drive connected and a laptop displaying music software. Text indicates support for lossless audio playback, plug and play, and audio input/output via USB. A note mentions long-pressing ENTER for recording and short-pressing to stop.
- Playback: Insert a USB flash drive containing MP3, WAV, or WMA files into the USB port. The mixer will automatically switch to USB mode or you may need to press the "MODE" button. Use the controls (Play/Pause, Next/Previous) on the MP3 player section to navigate and play tracks.
- Recording: To record, ensure a USB drive is inserted. Long-press the "ENTER" button (or equivalent record button) on the MP3 player section to start recording. Short-press it again to stop recording. The mixer will record the main stereo mix.
- Computer Connection: Connect the mixer to a computer via a USB cable for recording and sound editing. The mixer acts as an audio interface.
6. Real-Time Monitoring:

Image: A close-up of the MIZISNR AX-60 mixer's control room section, showing headphones plugged into the 6.35mm monitor jack. The text emphasizes instant sound feedback for recording.
Plug 6.5mm headphones into the "PHONES" jack. Adjust the "PHONES" level knob to control the headphone volume. This allows you to hear the mixed audio in real-time without affecting the main output.
7. Master Volume Control:
Use the "L MAIN R" faders to control the overall output volume of the stereo mix to your main speakers or amplifier.
Maintenance
- Cleaning: Use a soft, dry cloth to clean the exterior of the mixer. Do not use liquid cleaners or solvents.
- Storage: When not in use, store the mixer in a cool, dry place, away from direct sunlight and extreme temperatures.
- Cable Management: Ensure cables are not excessively bent or tangled to prevent damage.
Troubleshooting
| Problem | Possible Cause | Solution |
|---|---|---|
| No sound output | Power off; cables disconnected; faders down; incorrect input/output selection. | Check power connection and switch; ensure all audio cables are securely connected; raise channel and main faders; verify correct input source and output routing. |
| Distorted sound | Input gain too high; damaged cables; faulty speaker/microphone. | Reduce input GAIN for the affected channel; check and replace damaged cables; test with different speakers/microphones. |
| Microphone not working (condenser mic) | +48V Phantom Power not activated. | Press the +48V Phantom Power button. Ensure the indicator light is on. |
| Bluetooth not connecting | Mixer not in Bluetooth mode; device too far; interference. | Ensure mixer is in BT mode; move device closer to the mixer; minimize interference from other wireless devices. |
| USB playback/recording issues | Unsupported file format; USB drive not recognized; incorrect operation. | Ensure files are MP3, WAV, or WMA. Try reformatting the USB drive to FAT32. Refer to the USB operation section for correct recording/playback steps. Note: Some USB drives or formats may not be fully compatible. |
Specifications
| Feature | Detail |
|---|---|
| Model | AX-60 |
| Number of Channels | 6 |
| Phantom Power | +48V |
| Connectivity Technology | Bluetooth, USB |
| Audio Input | USB |
| Output Connector Type | TRS, XLR |
| Power Source | Corded Electric |
| Voltage | 110 volts AC |
| Product Dimensions (D x W x H) | 33.5 x 32.5 x 4 cm (13.2 x 12.8 x 1.57 inches) |
| Item Weight | 2.81 kg |
| Manufacturer | MIZISNR |
| Country of Origin | China |

Image: Diagram showing the dimensions of the MIZISNR AX-60 mixer, indicating a width of 12.8 inches, height of 13.2 inches, and depth of 1.57 inches. Also shows close-ups of the U Disk/MP3 Playback with LED Display, Headphone Volume Control, and Comfortable Damping Feel.
Warranty and Support
The MIZISNR AX-60 Audio Mixer comes with a 2-Year Warranty from the date of purchase. This warranty covers manufacturing defects and malfunctions under normal use.
For technical support, warranty claims, or any questions regarding your product, please contact MIZISNR customer service through the retailer where the product was purchased or visit the official MIZISNR website (if available).
Please retain your proof of purchase for warranty service.