Introduction
Thank you for choosing the AUTOSOLO Wheel Alignment Tool Tire Clamp. This professional-grade tool is designed to provide accurate and efficient wheel alignment for a wide range of vehicles. Its robust construction and versatile features make it an essential addition to any automotive workshop or for serious DIY mechanics.
This manual provides detailed instructions for the setup, operation, and maintenance of your new tire clamp. Please read it thoroughly before use to ensure safe and optimal performance.
Package Contents:
- 1x Tire Clamp for Front End Wheel Alignment
- 1x User Manual (this document)
Product Overview
The AUTOSOLO Tire Clamp is engineered for precision and durability. It features an adjustable design to accommodate various tire sizes and includes a magnetic adapter plate for compatibility with different alignment gauges.

Figure 1: Overview of the AUTOSOLO Wheel Alignment Tool Tire Clamp, showing the main body, interchangeable legs, and the magnetic adapter plate.
Key Features:
- Adjustable Tire Clamp: Legs adjust from 18.5" to 43.3" for wide compatibility.
- Universal Compatibility: Designed for use with existing camera-tracking targets.
- Tire-Direct Attachment: Ideal for wheels with irregular rims where traditional rim clamps are unsuitable.
- Magnetic Adapter Plate: Enables attachment of magnetic alignment gauges (camber, caster, kingpin inclination).
- Spring-Loaded Pins: Facilitate quick and effortless switching of interchangeable legs.
- Effortless Adjustment Knob: For quick fine-tuning of clamping length and grip.
- Heavy-Duty Construction: Made from robust steel injection with a chrome-plated finish for durability and corrosion resistance.
Setup
- Unpacking: Carefully remove all components from the packaging. Verify that all parts listed in the "Package Contents" section are present.
- Attaching Legs: The tire clamp comes with interchangeable legs. Select the appropriate leg size for your tire. Insert the legs into the designated slots on the clamp body. The spring-loaded pins will secure them in place. Ensure they are fully seated and locked.
- Attaching Magnetic Adapter Plate: If using magnetic alignment gauges, attach the magnetic adapter plate to the top of the clamp's central hub. It should fit securely.
- Initial Adjustment: Before placing on the tire, use the adjustment knob to roughly set the clamping width to match your tire size. The clamp accommodates tire sizes from 18.5 inches to 43.3 inches.

Figure 2: Illustration of how to change the clamp legs using the spring-loaded pins. Two different leg sizes are shown.

Figure 3: The magnetic adapter plate in position, ready for magnetic tools. A digital camber gauge is shown attached.
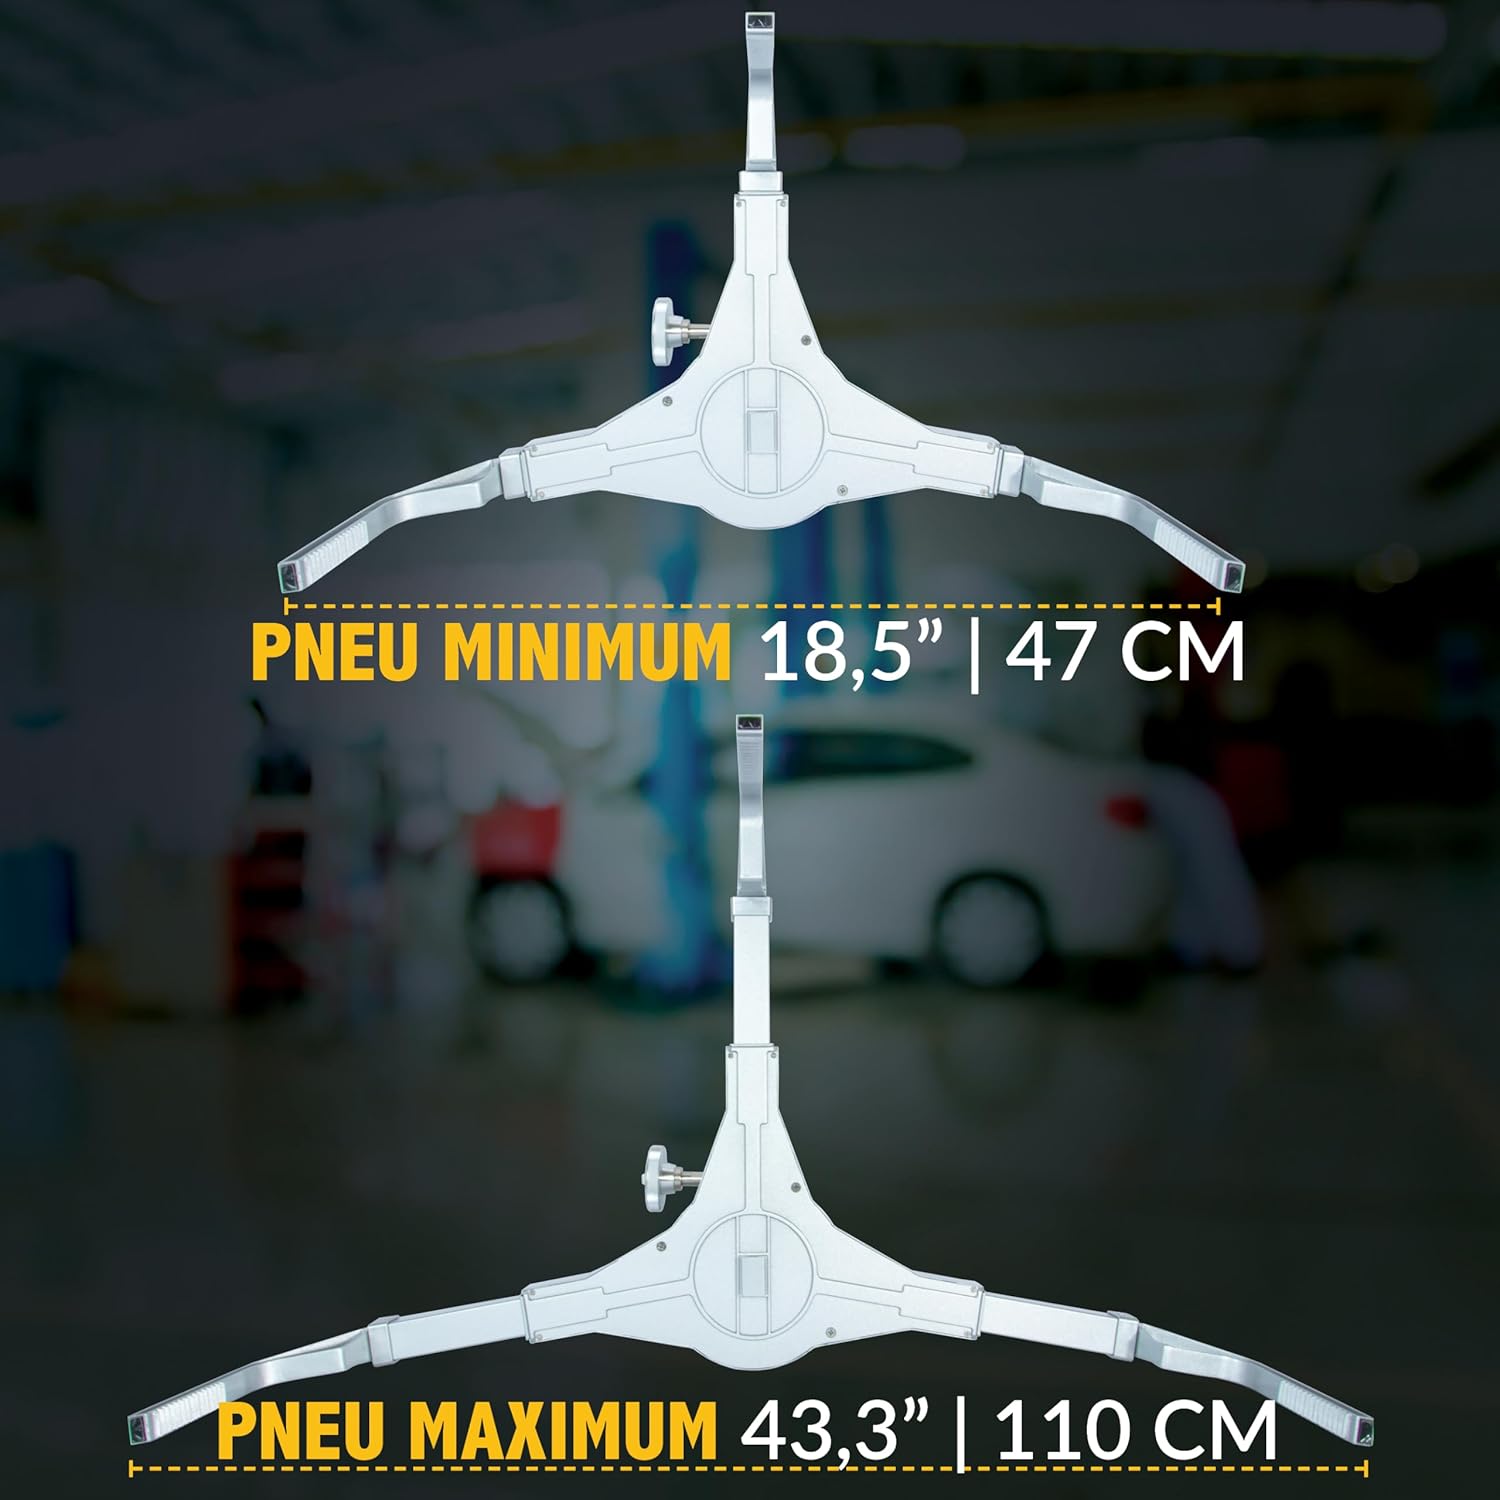
Figure 4: Tire size compatibility range, from 18.5 inches minimum to 43.3 inches maximum.
Operating Instructions
- Vehicle Preparation: Park the vehicle on a level surface. Ensure the steering wheel is centered and locked.
- Attaching the Clamp to the Tire: Position the tire clamp against the tire. Use the adjustment knob to tighten the clamp securely onto the tire. Ensure the clamp is centered and stable. The clamp is designed to grip the tire directly, making it suitable for wheels with irregular rims.
- Using the Bubble Level: The clamp features a built-in bubble level to assist in ensuring the clamp is horizontally aligned before taking measurements. Adjust the clamp until the bubble is centered.
- Zeroing Technique for Accuracy: For maximum precision, use a digital level or a straight rod method to compare the clamp’s angle with the wheel’s outer rim. Adjust the clamp or the vehicle's position as needed to match for precision alignment. This ensures the clamp is perfectly parallel to the wheel's rotational axis.
- Performing Alignment Measurements: Once the clamp is securely and accurately mounted, attach your preferred alignment gauge (e.g., digital camber gauge, camera-tracking target) to the magnetic adapter plate or directly to the clamp's mounting points. Follow the instructions for your specific alignment gauge to perform the necessary measurements (camber, caster, toe, etc.).
- Removing the Clamp: After measurements are complete, loosen the adjustment knob and carefully remove the clamp from the tire.

Figure 5: The tire clamp properly installed on a vehicle's tire.
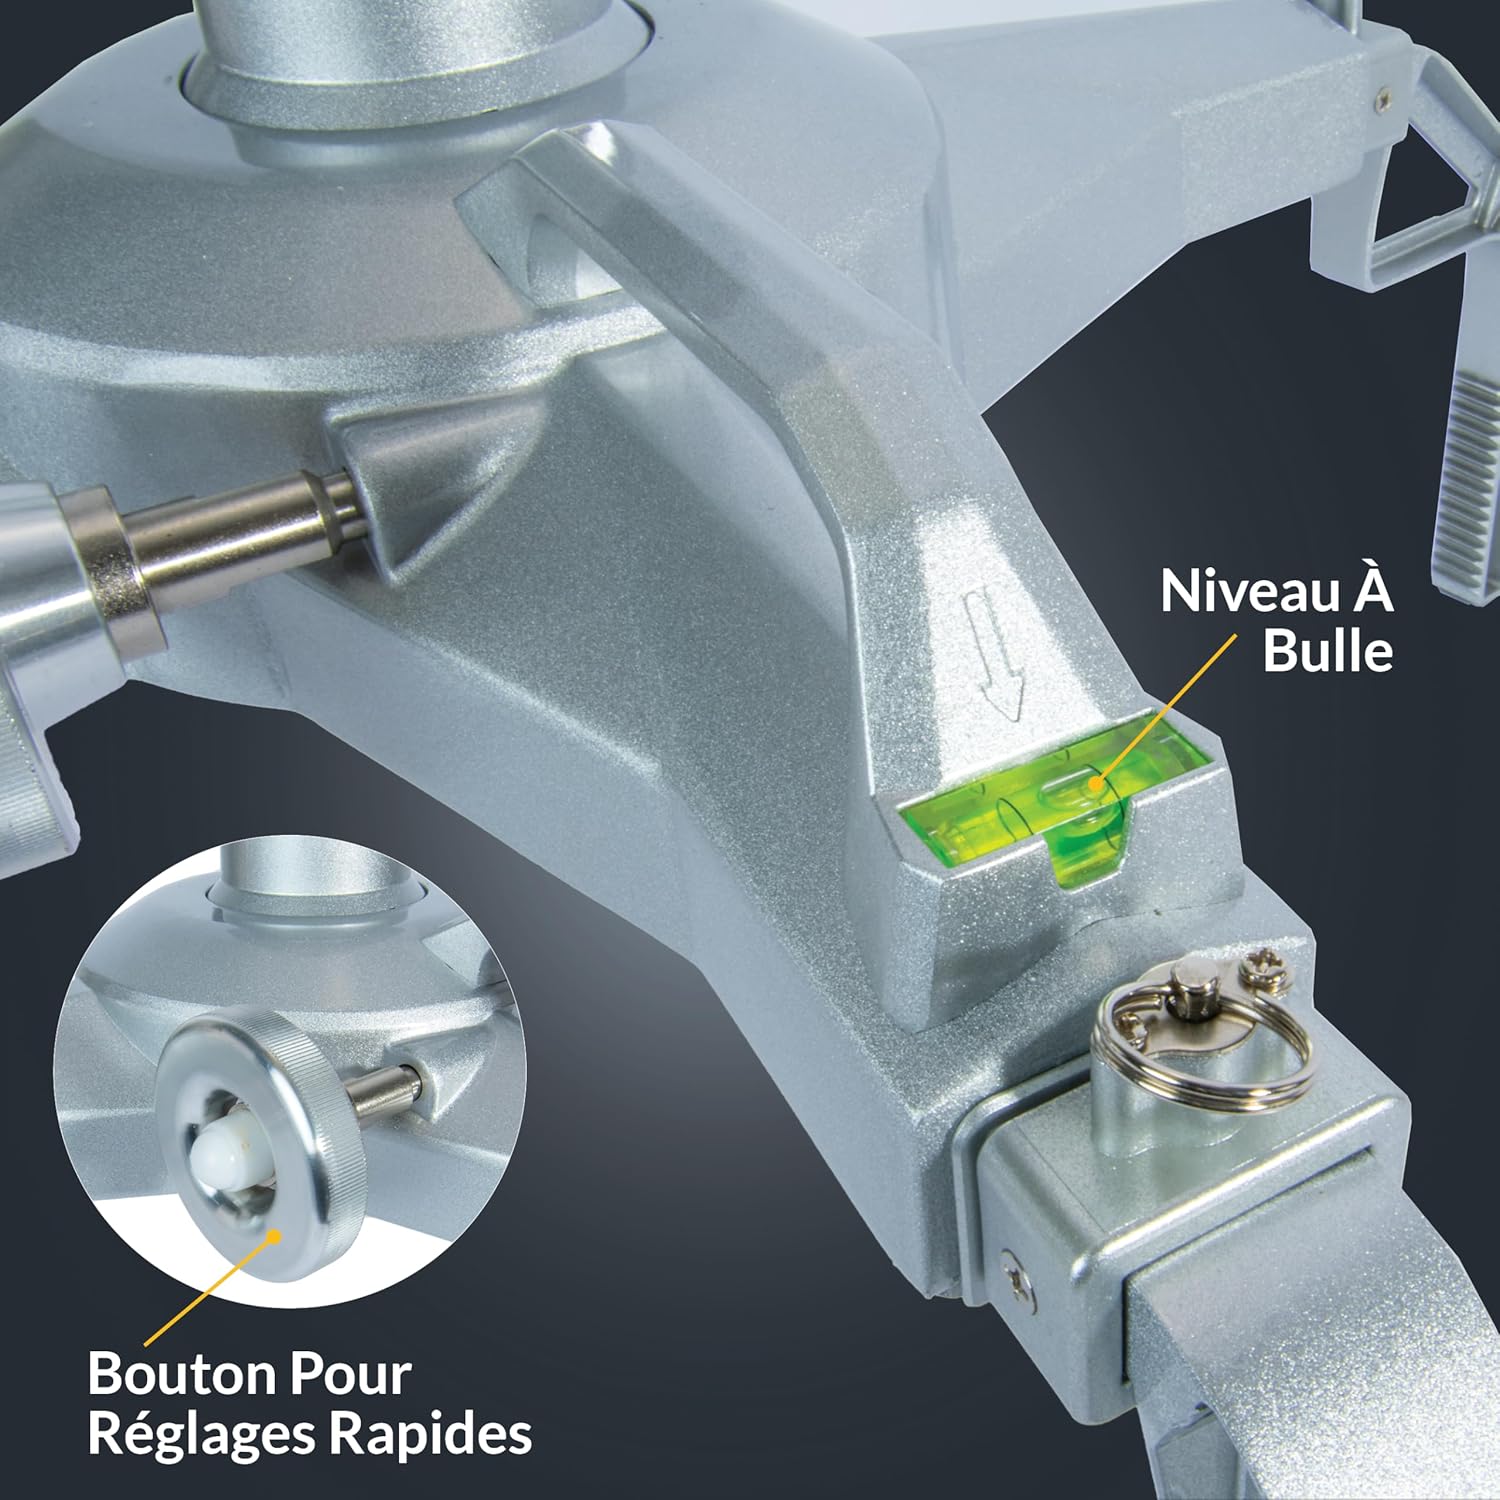
Figure 6: The integrated bubble level for precise horizontal positioning.
Maintenance
- Cleaning: After each use, wipe down the tire clamp with a clean, dry cloth to remove any dirt, grease, or debris. For stubborn grime, a mild detergent solution can be used, followed by thorough drying.
- Inspection: Regularly inspect the clamp for any signs of wear, damage, or corrosion. Pay close attention to the adjustment knob, spring-loaded pins, and the gripping surfaces of the legs.
- Lubrication: Periodically apply a light lubricant to the adjustment screw mechanism to ensure smooth operation.
- Storage: Store the tire clamp in a clean, dry environment, away from extreme temperatures and direct sunlight. Keeping it in its original packaging or a protective case can help prevent damage.
- Component Replacement: If any part of the clamp becomes damaged or excessively worn, contact AUTOSOLO customer support for replacement parts. Do not attempt to use a damaged tool.
Troubleshooting
| Problem | Possible Cause | Solution |
|---|---|---|
| Clamp does not grip tire securely. | Adjustment knob not tightened sufficiently; incorrect leg size used; tire surface is excessively dirty or oily. | Ensure adjustment knob is fully tightened. Verify correct leg size for tire. Clean tire surface before attachment. |
| Legs are difficult to switch. | Spring-loaded pins are stiff or dirty; debris in leg slots. | Clean and lubricate spring-loaded pins. Clear any debris from leg slots. |
| Magnetic adapter plate does not hold gauges firmly. | Plate or gauge magnet is dirty; magnetic strength reduced. | Clean both the adapter plate and the gauge magnet. If magnetic strength is permanently reduced, the plate may need replacement. |
| Inaccurate alignment readings. | Clamp not level; clamp not securely attached; vehicle not on level surface; steering wheel not centered. | Use the built-in bubble level and zeroing technique to ensure the clamp is perfectly level and parallel to the wheel. Ensure the clamp is tightly secured. Verify vehicle is on a level surface and steering wheel is centered. |
Specifications
- Model: ASWL470
- Brand: AUTOSOLO
- Tire Compatibility: 18.5 inches to 43.3 inches (47 cm to 110 cm)
- Construction Material: Heavy-duty steel injection, ABS High Impact Plastic, Chrome-plated finish
- Item Weight: Approximately 9 pounds (4.08 kg)
- Product Dimensions: Approximately 43.3 x 43.3 x 13.2 inches (110 x 110 x 33.5 cm) when fully extended
- Features: Adjustable legs, magnetic adapter plate, spring-loaded pins, adjustment knob, built-in bubble level.

Figure 7: Detailed dimensions of the AUTOSOLO Tire Clamp.
Warranty and Support
AUTOSOLO stands behind the quality of its products. For warranty information, please refer to the warranty card included with your purchase or visit the official AUTOSOLO website. Keep your proof of purchase for any warranty claims.
For technical support, troubleshooting assistance, or to inquire about replacement parts, please contact AUTOSOLO customer service:
- Website: AUTOSOLO Official Store on Amazon
- Email: Refer to product packaging or official website for contact email.
- Phone: Refer to product packaging or official website for contact phone number.
When contacting support, please have your product model number (ASWL470) and purchase date available.
