1. Introduction
This manual provides detailed instructions for the installation, operation, and maintenance of your SHANGZHAOYUAN X99 MR9S LGA 2011-3 Motherboard. Please read this manual thoroughly before proceeding with installation to ensure proper setup and optimal performance. This motherboard is designed for Intel E5 V3/V4 and 5th/6th gen Core i7 Series Processors, offering robust performance for various computing needs.
2. Product Overview
2.1 Key Features
- LGA 2011-3 Socket: Supports Intel 5th/6th gen Core i7 processors and Xeon E5 V3/V4 series processors.
- 4-Channel DDR4 Slots: Compatible with ECC and non-ECC DDR4 memory, supporting up to 256GB (8*32GB) at 2133/2400MHz.
- High-speed M.2 Slots: Equipped with NVME M.2 (PCIe 3.0 X4 bandwidth, up to 3600M/S) and NGFF/SATA M.2 (SATA 6Gbps) slots.
- PCIe Expansion Slots: Includes 2 * PCIe 3.0 X16, 1 * PCIe 3.0 X4 (with steel casing), and 2 * PCIe 2.0 X1 slots.
- Robust Power Design: Features an 8-phase power supply, 8-layer PCB, VRM cooling fan, and aluminum heat sink for stable operation.
- Diagnostic Card: Integrated digital diagnostic card for quick fault identification.
2.2 Motherboard Components
Familiarize yourself with the layout and key components of the X99 MR9S motherboard.

Figure 2.2.1: Overall view of the SHANGZHAOYUAN X99 MR9S Motherboard.

Figure 2.2.2: Detail of the LGA 2011-3 CPU Socket, supporting Intel E5 V3/V4 and 5th/6th gen Core i7 processors.

Figure 2.2.3: The eight DDR4 memory slots, supporting 4-channel memory configurations.
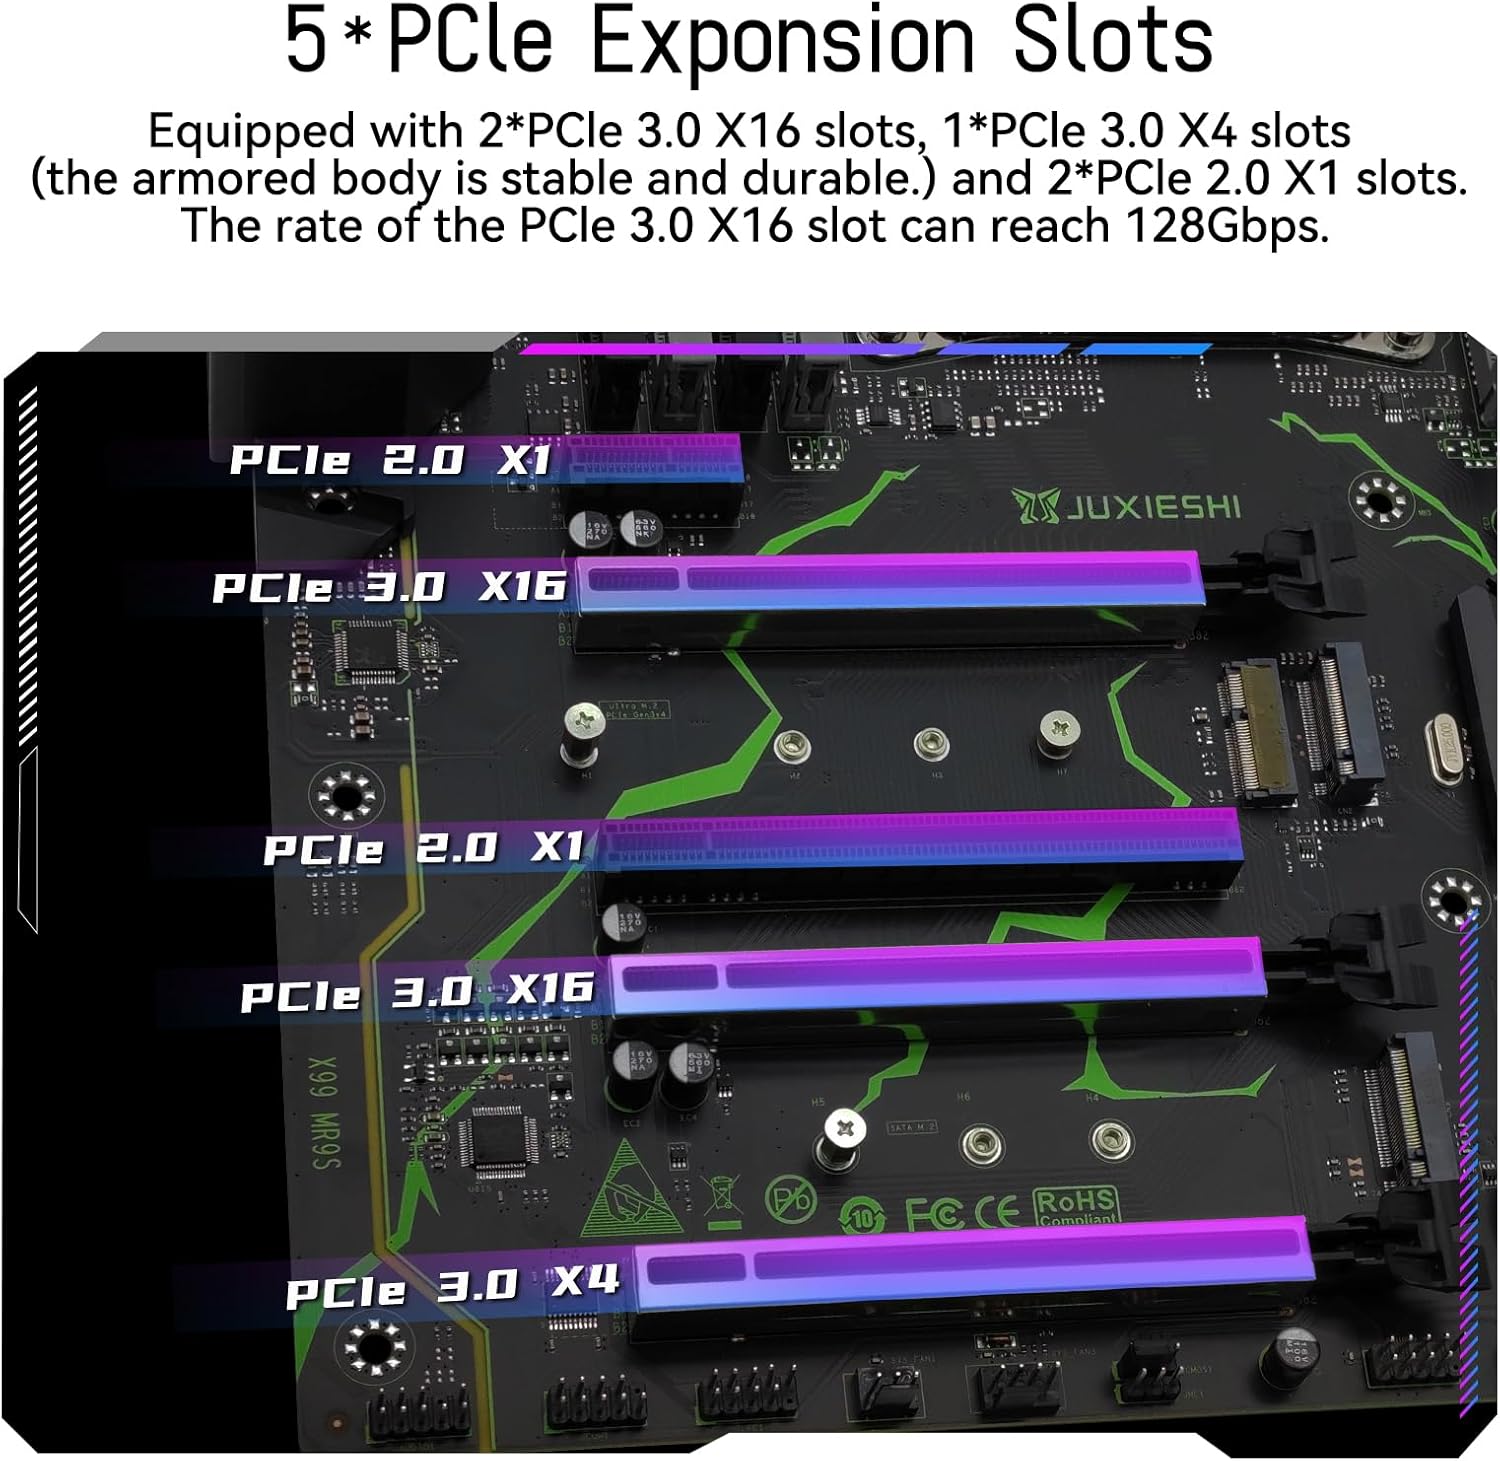
Figure 2.2.4: The five PCIe expansion slots, including PCIe 3.0 X16, X4, and PCIe 2.0 X1.

Figure 2.2.5: The NVME M.2, NGFF/SATA M.2, and WiFi M.2 slots for high-speed storage and wireless connectivity.

Figure 2.2.6: Diagram illustrating various ports and connectors on the X99 MR9S motherboard, including USB, audio, Ethernet, and fan headers.
3. Setup Guide
3.1 Pre-Installation Checklist
- Ensure you have a compatible CPU (LGA 2011-3 Intel E5 V3/V4 or 5th/6th gen Core i7 series).
- Acquire DDR4 RAM modules (ECC or non-ECC).
- Prepare a suitable ATX PC case.
- Obtain a compatible power supply unit (PSU).
- Ensure you have an external graphics card, as this motherboard does not support integrated graphics.
- A CR2032 battery is required for the motherboard (not included in package).
3.2 Component Installation
- CPU Installation: Carefully open the CPU socket lever, align the CPU with the triangle marker on the socket, gently place the CPU, and close the lever to secure it.
- CPU Cooler Installation: Install the LGA 2011-v3 cooler bracket and then mount your CPU cooler according to its specific instructions.
- RAM Installation: Refer to the diagram below for optimal RAM slot population based on the number of modules. Ensure modules are fully seated until the clips lock into place.
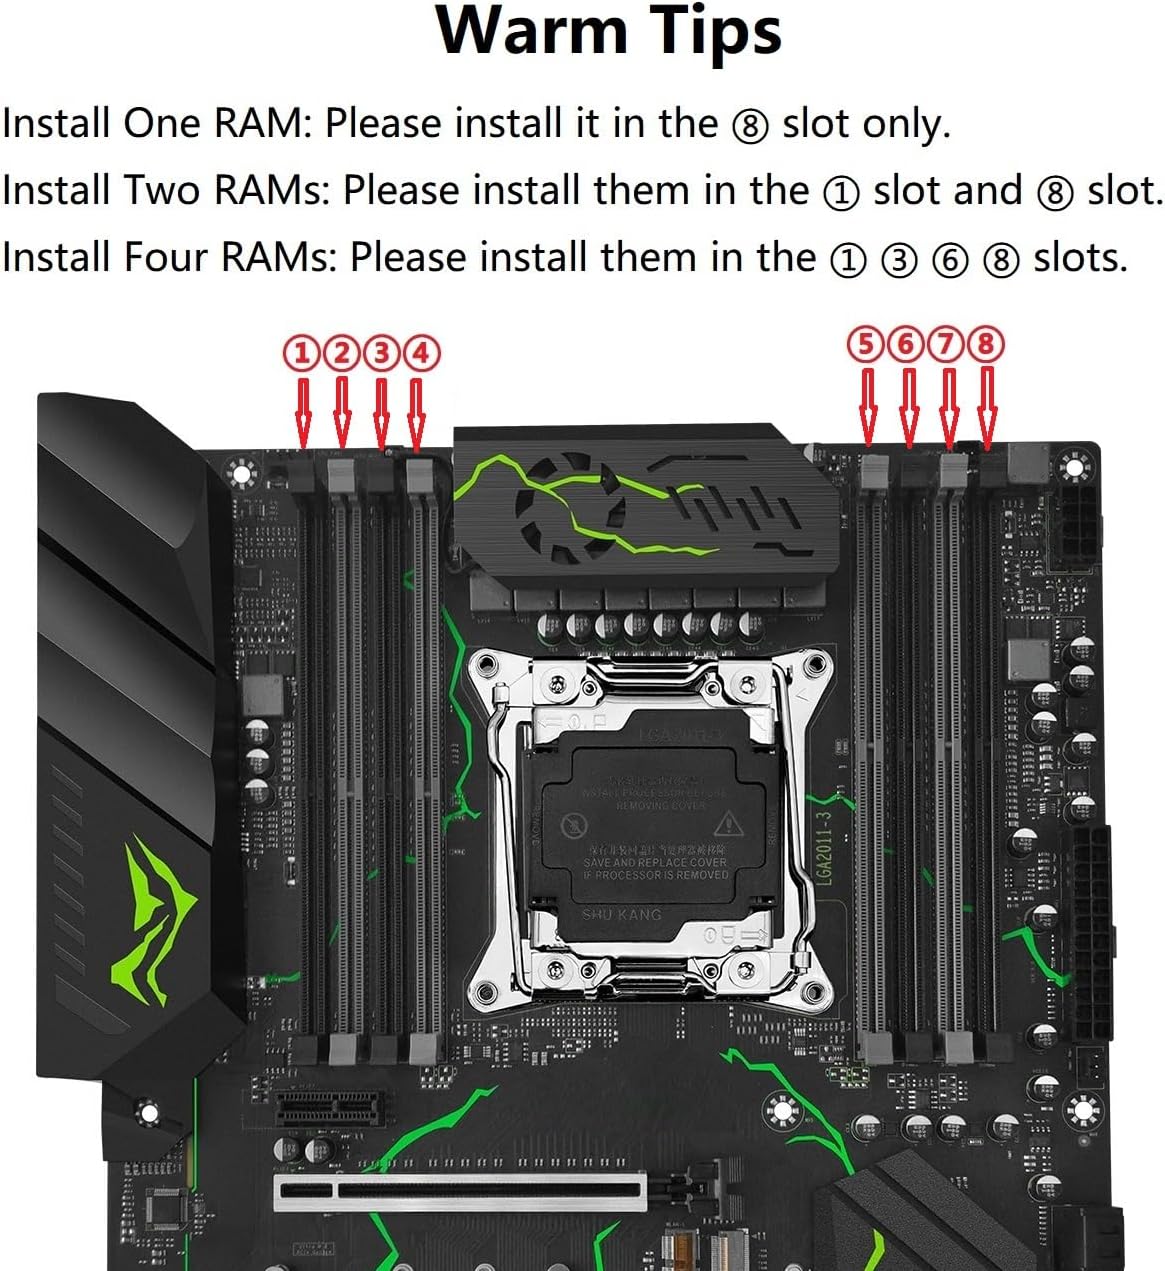
Figure 3.2.1: Recommended RAM installation slots for 1, 2, or 4 modules to ensure proper channel configuration.
- Install One RAM: Please install it in the ⑧ slot only.
- Install Two RAMs: Please install them in the ① slot and ⑧ slot.
- Install Four RAMs: Please install them in the ① ③ ⑥ ⑧ slots.
- Storage Device Installation: Install NVME M.2, NGFF/SATA M.2 SSDs into their respective slots. Connect SATA drives using the provided SATA cables.
- Graphics Card Installation: Insert your external graphics card into one of the PCIe 3.0 X16 slots. Secure it with the case screw.
- Power Supply Connection: Connect the 24-pin ATX power connector and the 8-pin CPU power connector from your PSU to the motherboard.
- Front Panel Connections: Connect the power button, reset button, HDD LED, power LED, and USB/audio headers from your PC case to the corresponding pins on the motherboard. Refer to the motherboard parameters diagram (Figure 2.2.6) for pin locations.
- Mounting in Case: Secure the motherboard to the standoffs in your PC case.
4. Operating Instructions
4.1 First Boot
- After all components are installed and connected, connect your monitor, keyboard, and mouse.
- Connect the power cable to your PSU and turn on the power switch on the PSU.
- Press the power button on your PC case. The system should power on, and you should see a display on your monitor.
- Access the BIOS/UEFI setup (usually by pressing DEL or F2 during boot) to configure boot order, system time, and other settings as needed.
- Install your operating system (e.g., Windows 10) from a bootable USB drive or DVD.
4.2 Driver Installation
After installing the operating system, it is crucial to install the necessary drivers for optimal performance. It is recommended to use a driver management tool like "Driver Talent" or rely on the Windows 10 operating system's automatic driver detection. Ensure drivers for chipset, LAN, audio, and any other integrated components are installed.
5. Maintenance
- Dust Removal: Regularly clean dust from the motherboard and components using compressed air. Ensure the system is powered off and unplugged before cleaning.
- BIOS Updates: Check the manufacturer's website for BIOS updates. Only update the BIOS if necessary and follow the instructions precisely to avoid system instability.
- Cable Management: Ensure cables are neatly routed to improve airflow and prevent interference.
- CMOS Battery Replacement: The CR2032 battery powers the CMOS for BIOS settings and system time. If settings are lost after power-off, the battery may need replacement.
5.1 How to Clear CMOS
Clearing the CMOS can resolve certain boot issues or reset BIOS settings to default. Disconnect power from the motherboard before proceeding.

Figure 5.1.1: Visual guide for clearing CMOS using the jumper.
- Disconnect the power of the motherboard. There is no need to remove the CMOS battery.
- Locate the CMOS clear jumper (usually labeled JBAT1 or similar).
- Pull out the jumper cap from pins "1" and "2" and install it on pins "2" and "3".
- Wait for 5 seconds.
- Place the jumper cap back on pins "1" and "2".
6. Troubleshooting
This section addresses common issues you might encounter with your motherboard.
- No Display/No Boot:
- Ensure all power cables (24-pin ATX, 8-pin CPU) are securely connected.
- Verify RAM modules are correctly seated in the recommended slots (refer to Section 3.2).
- Confirm the external graphics card is properly installed and connected to the monitor.
- Check the diagnostic card on the motherboard for error codes. Consult the motherboard's diagnostic code list (if available) for interpretation.
- Try clearing the CMOS (refer to Section 5.1).
- No Network/Sound:
- Ensure all necessary drivers are installed (refer to Section 4.2).
- Check physical connections for Ethernet cable or audio jacks.
- System Instability/Crashes:
- Verify CPU and RAM compatibility.
- Ensure adequate cooling for CPU and VRM components.
- Check for loose connections or short circuits.
If problems persist, please contact SHANGZHAOYUAN support via Amazon for assistance.
7. Specifications
| Feature | Specification |
|---|---|
| Brand | SHANGZHAOYUAN |
| Model Name | E5 MR9S |
| CPU Socket | LGA 2011-3 |
| Compatible Processors | Intel 5th/6th gen Core i7 series, Intel Xeon E5 V3/V4 series |
| RAM Memory Technology | DDR4 |
| Memory Clock Speed | 2400 MHz |
| Max RAM Capacity | 256GB (8*32GB) |
| Chipset Type | B85 |
| PCIe Expansion Slots | 2x PCIe 3.0 X16, 1x PCIe 3.0 X4, 2x PCIe 2.0 X1 |
| M.2 Slots | NVME M.2 (PCIe 3.0 X4), NGFF/SATA M.2, WiFi M.2 |
| SATA Ports | SATA 6Gbps |
| LAN | Gigabit Ethernet |
| Product Dimensions | 11.93 x 9.61 x 9.61 inches |
| Item Weight | 3.17 pounds |
| Platform | Windows |
8. Warranty and Support
This product is covered by the standard manufacturer's warranty. For specific warranty terms and conditions, please refer to the product listing on Amazon or contact SHANGZHAOYUAN directly.
8.1 Important Notes
- The physical user manual is not included in the product package. This digital manual serves as the official guide.
- A CR2032 battery is required for the motherboard's CMOS functionality and is not included in the package. Please purchase one separately.
8.2 Customer Support
For any technical issues, questions, or support requests, please contact SHANGZHAOYUAN customer service through the Amazon platform. We are committed to assisting you with any problems you may encounter.
You can also visit the official SHANGZHAOYUAN Store on Amazon for more product information and support resources: SHANGZHAOYUAN Amazon Store