1. Important Safety Instructions
Please read and understand all safety instructions before using this product. Keep this manual for future reference.
- Power Source: Use only the provided DC 5V 1A power adapter. Ensure the voltage matches the power supply before connecting.
- Water and Moisture: Do not expose the unit to rain, moisture, or liquids. Do not place objects filled with liquids, such as vases, on the unit.
- Heat: Keep the unit away from heat sources such as radiators, heat registers, stoves, or other apparatus (including amplifiers) that produce heat.
- Ventilation: Ensure proper ventilation. Do not block any ventilation openings.
- Cleaning: Clean only with a dry cloth. Unplug the unit from the power outlet before cleaning.
- Servicing: Do not attempt to service this product yourself. Refer all servicing to qualified service personnel.
- Placement: Place the unit on a stable, flat surface to prevent it from falling.
- Stylus: Handle the stylus carefully to avoid damage. Keep out of reach of children.
2. Package Contents
Verify that all items listed below are included in your package:
- 1x Linen Suitcase Turntable
- 1x User Manual
- 1x 7-inch Turntable Pad & Extra Stylus
- 1x 45RPM Adapter & DC 5V 1A Power Adapter
3. Product Overview
3.1 Main Components

Figure 1: Overall view of the TANLANIN TE-001D Record Player. This image shows the open suitcase design, the turntable platter with a pink record, the tone arm, and the built-in speakers.
The TANLANIN TE-001D is a portable suitcase-style vinyl record player designed for ease of use and versatility. Key components include:
- Turntable Platter: Where vinyl records are placed for playback.
- Tone Arm: Holds the stylus and tracks the grooves of the record.
- Stylus: The needle that reads the record's grooves.
- Built-in Speakers: For direct audio output.
- Control Panel: Located on the top surface, featuring various buttons and ports.
- Suitcase Casing: Provides portability and protection.
3.2 Control Panel and Connections
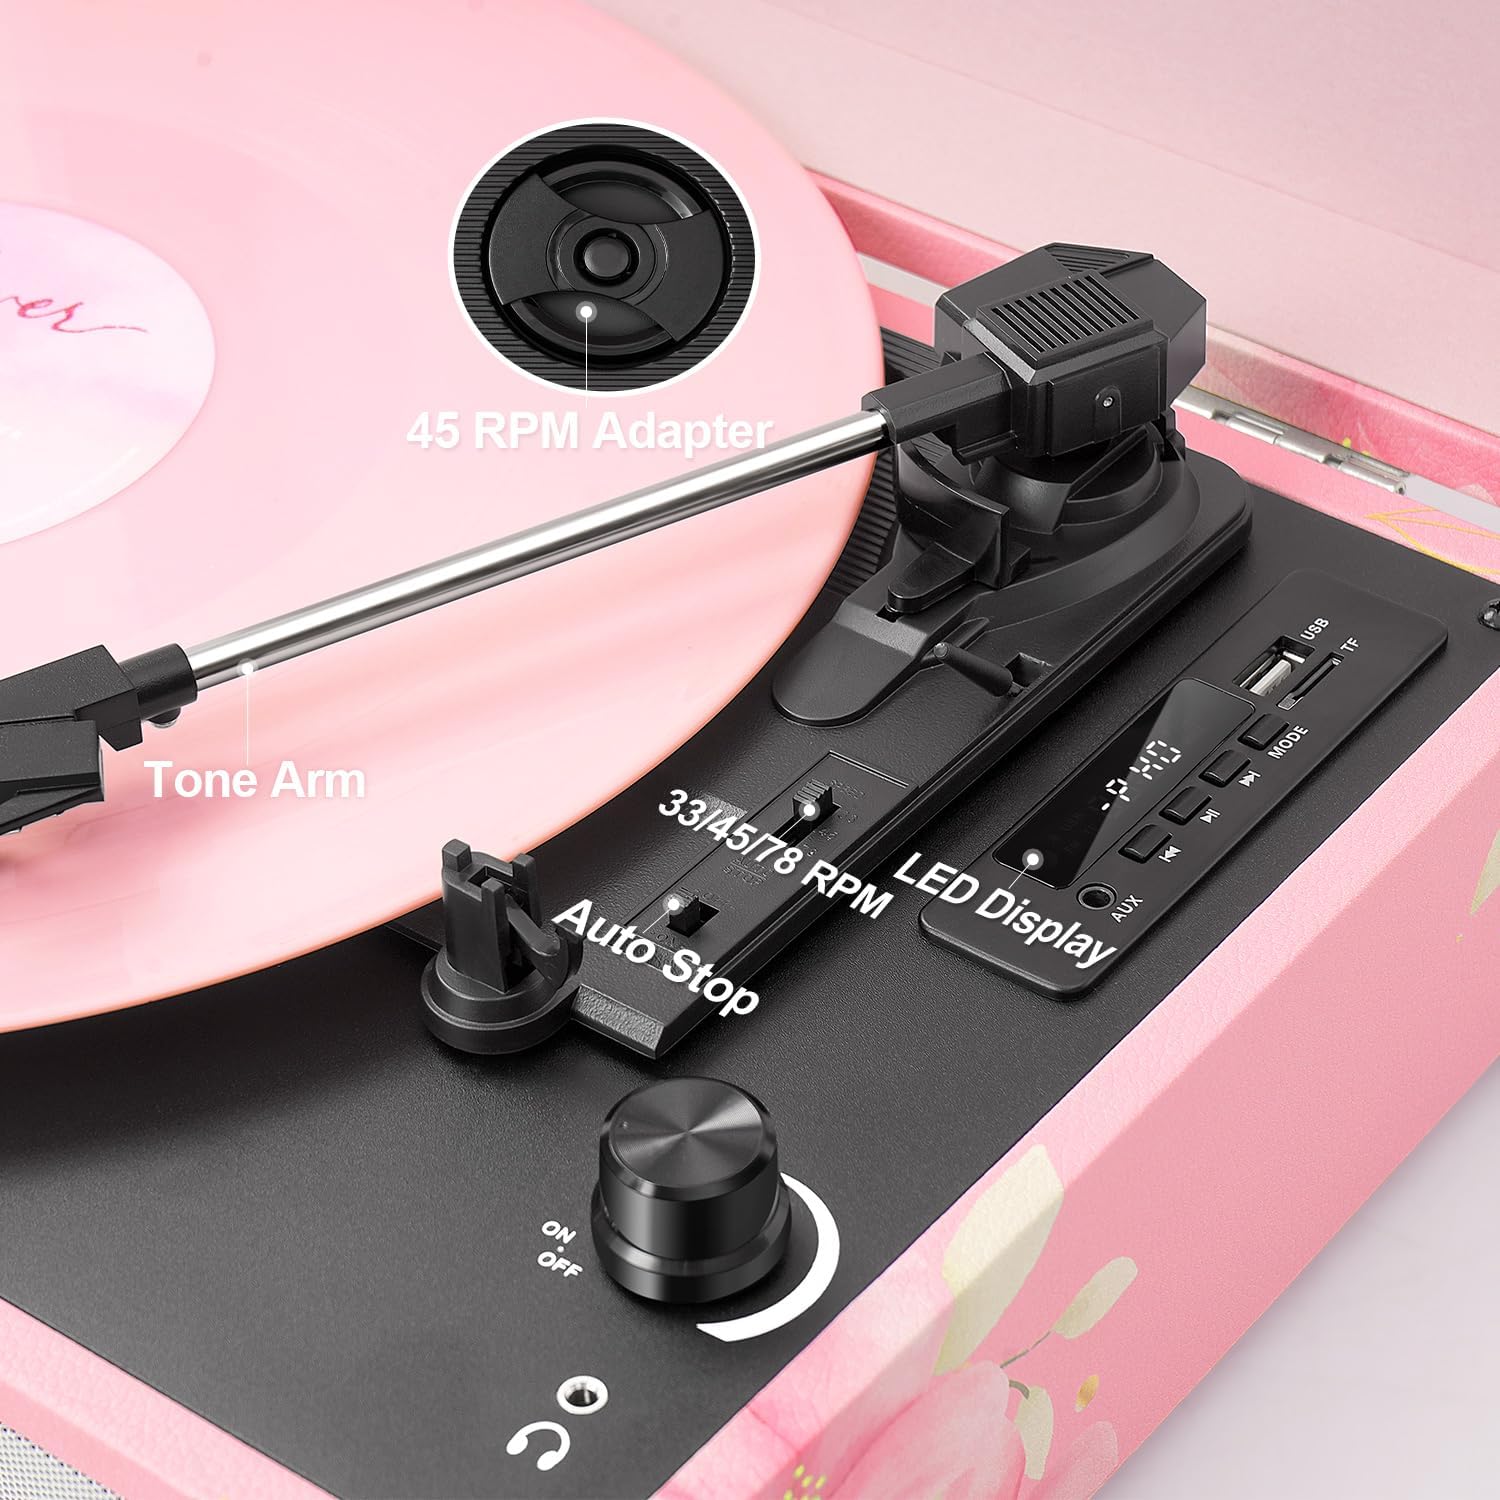
Figure 2: Close-up of the turntable's control area, showing the speed selector, auto-stop switch, and tone arm components.
Familiarize yourself with the following controls and connections:
- 33/45/78 RPM Selector: Switch to select playback speed for vinyl records.
- Auto Stop Switch: Enables or disables the automatic stop function at the end of a record.
- Power ON/OFF & Volume Knob: Turns the unit on/off and adjusts speaker volume.
- Mode Button: Cycles through input modes (Phono, Bluetooth, AUX, USB, TF).
- EQ Modes: Selectable sound equalization presets (Pop, Rock, Jazz, Classic, Flat).
- USB Port: For USB drive playback and recording.
- TF Card Slot: For TF card playback and recording.
- LED Display: Shows current mode and track information.
- AUX Input: 3.5mm jack for connecting external audio devices.
- RCA Output: For connecting to external amplifiers or powered speakers.
- Headphone Jack: 3.5mm jack for private listening.
- DC IN Port: For connecting the power adapter.
4. Setup
- Unpack: Carefully remove the record player from its packaging.
- Placement: Place the unit on a flat, stable surface away from direct sunlight, heat sources, and excessive dust or vibration.
- Power Connection: Connect the DC 5V 1A power adapter to the DC IN port on the back of the unit, then plug the adapter into a wall outlet.
- Dust Cover: Open the suitcase lid. Remove any protective materials from the turntable platter and tone arm.
- Turntable Pad: Place the included 7-inch turntable pad on the platter.
5. Operating Instructions
5.1 Playing Vinyl Records
- Power On: Turn the Power ON/OFF & Volume knob clockwise to power on the unit.
- Select Mode: Press the Mode button until 'PHONO' is displayed.
- Place Record: Place a vinyl record on the turntable platter. If playing a 45 RPM single, place the 45 RPM adapter on the center spindle first.
- Select Speed: Set the 33/45/78 RPM selector to match the speed of your record.
- Auto Stop: Set the Auto Stop switch to ON if you want the platter to stop automatically at the end of the record. Set to OFF for continuous play or for some records that may trigger auto-stop prematurely.
- Start Playback: Gently lift the tone arm using the cue lever and position the stylus over the desired starting groove of the record. Slowly lower the tone arm onto the record.
- Adjust Volume: Rotate the Power ON/OFF & Volume knob to adjust the sound level.
- End Playback: At the end of the record (or when manually stopping), gently lift the tone arm using the cue lever and return it to the tone arm rest. Secure it with the tone arm clip.
5.2 Bluetooth Mode

Figure 3: The record player connected via Bluetooth to a smartphone, enabling wireless music streaming.
- Select Mode: Press the Mode button until 'BLUE' (or 'BT') is displayed on the LED screen. The unit will emit an audible tone, indicating it is in pairing mode.
- Enable Bluetooth: On your mobile device (smartphone, tablet, etc.), enable Bluetooth and search for available devices.
- Pair: Select 'TANLANIN' (or similar device name) from the list of found devices. Once paired, the unit will emit another audible tone.
- Play Music: You can now play music from your device through the record player's speakers. Adjust volume using both the record player's knob and your device's volume controls.
5.3 USB/TF Card Playback

Figure 4: The control panel showing a USB drive inserted, indicating readiness for USB/TF playback or recording.
- Insert Media: Insert a USB drive into the USB port or a TF card into the TF card slot.
- Select Mode: Press the Mode button until 'USB' or 'TF' is displayed. The unit will automatically begin playing MP3 files from the inserted media.
- Controls: Use the playback control buttons (Play/Pause, Next Track, Previous Track) on the control panel to manage your music.
5.4 USB/TF Card Recording (Vinyl to Digital)
- Insert Media: Ensure a USB drive or TF card is inserted into the corresponding slot.
- Select Phono Mode: Press the Mode button until 'PHONO' is displayed.
- Start Recording: While a record is playing, press and hold the 'REC' button (often combined with the Play/Pause button) on the control panel. The LED display may indicate 'REC' or a recording timer.
- Stop Recording: Press the 'REC' button again to stop recording. The recorded audio will be saved as an MP3 file on your USB drive or TF card.
5.5 EQ Modes
The unit features five equalization modes to customize your listening experience:
- Pop
- Rock
- Jazz
- Classic
- Flat (default, no equalization)
To select an EQ mode, press the 'EQ' button (often combined with the Mode button or a dedicated button) repeatedly until the desired mode is displayed on the LED screen.
5.6 External Connections
- AUX Input: Connect an external audio source (e.g., MP3 player, smartphone) to the AUX IN jack using a 3.5mm audio cable. Select 'AUX' mode on the record player.
- RCA Output: Connect the RCA OUT jacks (red for right, white for left) to an external amplifier or powered speakers for enhanced sound.
- Headphone Jack: Plug 3.5mm headphones into the headphone jack for private listening. The built-in speakers will be muted when headphones are connected.
6. Maintenance
6.1 Cleaning the Unit
- Always unplug the unit from the power outlet before cleaning.
- Use a soft, dry cloth to wipe the exterior surfaces. Do not use abrasive cleaners, waxes, or solvents.
- Gently wipe the dust cover with a soft cloth.
6.2 Stylus Care
- The stylus is delicate. Handle it with extreme care.
- Clean the stylus periodically using a soft brush, brushing gently from back to front.
- A worn stylus can damage records and degrade sound quality. Replace the stylus after approximately 200-300 hours of playback.
6.3 Replacing the Stylus
Refer to the diagram below for stylus replacement. If unsure, consult a qualified technician.
- Gently pull the old stylus cartridge downwards and forwards to detach it.
- Align the new stylus cartridge and push it upwards and backwards until it clicks into place.
7. Troubleshooting
| Problem | Possible Cause | Solution |
|---|---|---|
| No power | Power adapter not connected; Power switch off | Ensure power adapter is securely connected and plugged into a working outlet. Turn the Power ON/OFF knob clockwise. |
| No sound | Volume too low; Headphones connected; Incorrect mode selected | Increase volume. Disconnect headphones. Select the correct input mode (e.g., PHONO for records). |
| Record skipping | Dirty record; Worn stylus; Unit not level | Clean the record. Replace the stylus. Place the unit on a stable, level surface. |
| Bluetooth not connecting | Not in Bluetooth mode; Device too far; Already connected to another device | Ensure unit is in Bluetooth mode. Move device closer. Disconnect from other Bluetooth devices. |
| USB/TF not playing | Incorrect mode; Unsupported file format; Corrupted media | Select USB/TF mode. Ensure files are MP3 format. Try different USB/TF media. |
8. Specifications

Figure 5: Product dimensions for the TANLANIN TE-001D.
| Feature | Detail |
|---|---|
| Model Name | TE-001D |
| Brand | TANLANIN |
| Product Dimensions | 13.5 x 10.5 x 5 inches |
| Item Weight | 6 pounds |
| Maximum Rotational Speed | 78 RPM (Supports 33, 45, 78 RPM) |
| Connectivity | Bluetooth 5.0, USB, TF Card, AUX Input, RCA Output, Headphone Jack |
| Special Features | Anti-Resonance, Digital Recorder (Vinyl to USB/TF), Headphone Jack Output, EQ Modes |
| Material | Engineered Wood, Metal, Plastic |
| Power Consumption (On-mode) | 5 watts |
| Included Components | 1x 45RPM Adapter, 1x DC 5V 1A Power Adapter, 1x 7-inch Turntable Pad, 1x Extra Stylus, 1x Linen Suitcase Turntable, 1x User Manual |
9. Warranty and Support
This product comes with a standard manufacturer's warranty. For detailed warranty information, please refer to the warranty card included in your package or contact TANLANIN customer support.
If you encounter any issues or have questions regarding your TANLANIN TE-001D record player, please contact our customer support team through the retailer's platform or the contact information provided in your product documentation. Please have your model number (TE-001D) and purchase date ready when contacting support.


