1. Introduction
This manual provides essential instructions for the safe and efficient use of your FNRIDS Type 2 Electric Car Charging Cable. Please read this manual thoroughly before operating the device and retain it for future reference. This charging cable is designed to provide a reliable and convenient charging solution for electric vehicles equipped with a Type 2 charging port.
2. Safety Instructions
To ensure safe operation and prevent damage, observe the following safety precautions:
- Always ensure the charging cable and connectors are free from damage before use. Do not use if any part is damaged.
- Do not attempt to open, disassemble, or modify the charging cable or control box.
- Keep the charging cable away from children and pets.
- Ensure the power outlet used is properly grounded and rated for the charger's specifications (AC 1PH 230V, 16A).
- Avoid submerging the control box or connectors in water, despite its IP65 rating.
- Do not use the charger in explosive or flammable environments.
- Disconnect the charger from the power source and the vehicle before cleaning or maintenance.
- The intelligent chip provides protection against leaks, overcharging, and overheating. The cable is also IP65 waterproof, suitable for various weather conditions.
This product is certified by UKCA, CE, and TUV, ensuring compliance with relevant safety standards.

Image 2.1: Overview of the FNRIDS charging cable's comprehensive safety protections and certifications.
3. Package Contents
Verify that all items are present in the package:
- 1 x Electric Vehicle Charger (Type 2 Charging Cable with Control Box)
- 1 x User Manual
- 1 x Portable Bag
- 1 x USB Charger (Note: This item is listed in the product details but may not be directly related to the EV charger's primary function.)
- 2 x USB Cables (Note: These items are listed in the product details but may not be directly related to the EV charger's primary function.)
- 1 x Remote Control (Note: This item is listed in the product details but may not be directly related to the EV charger's primary function.)
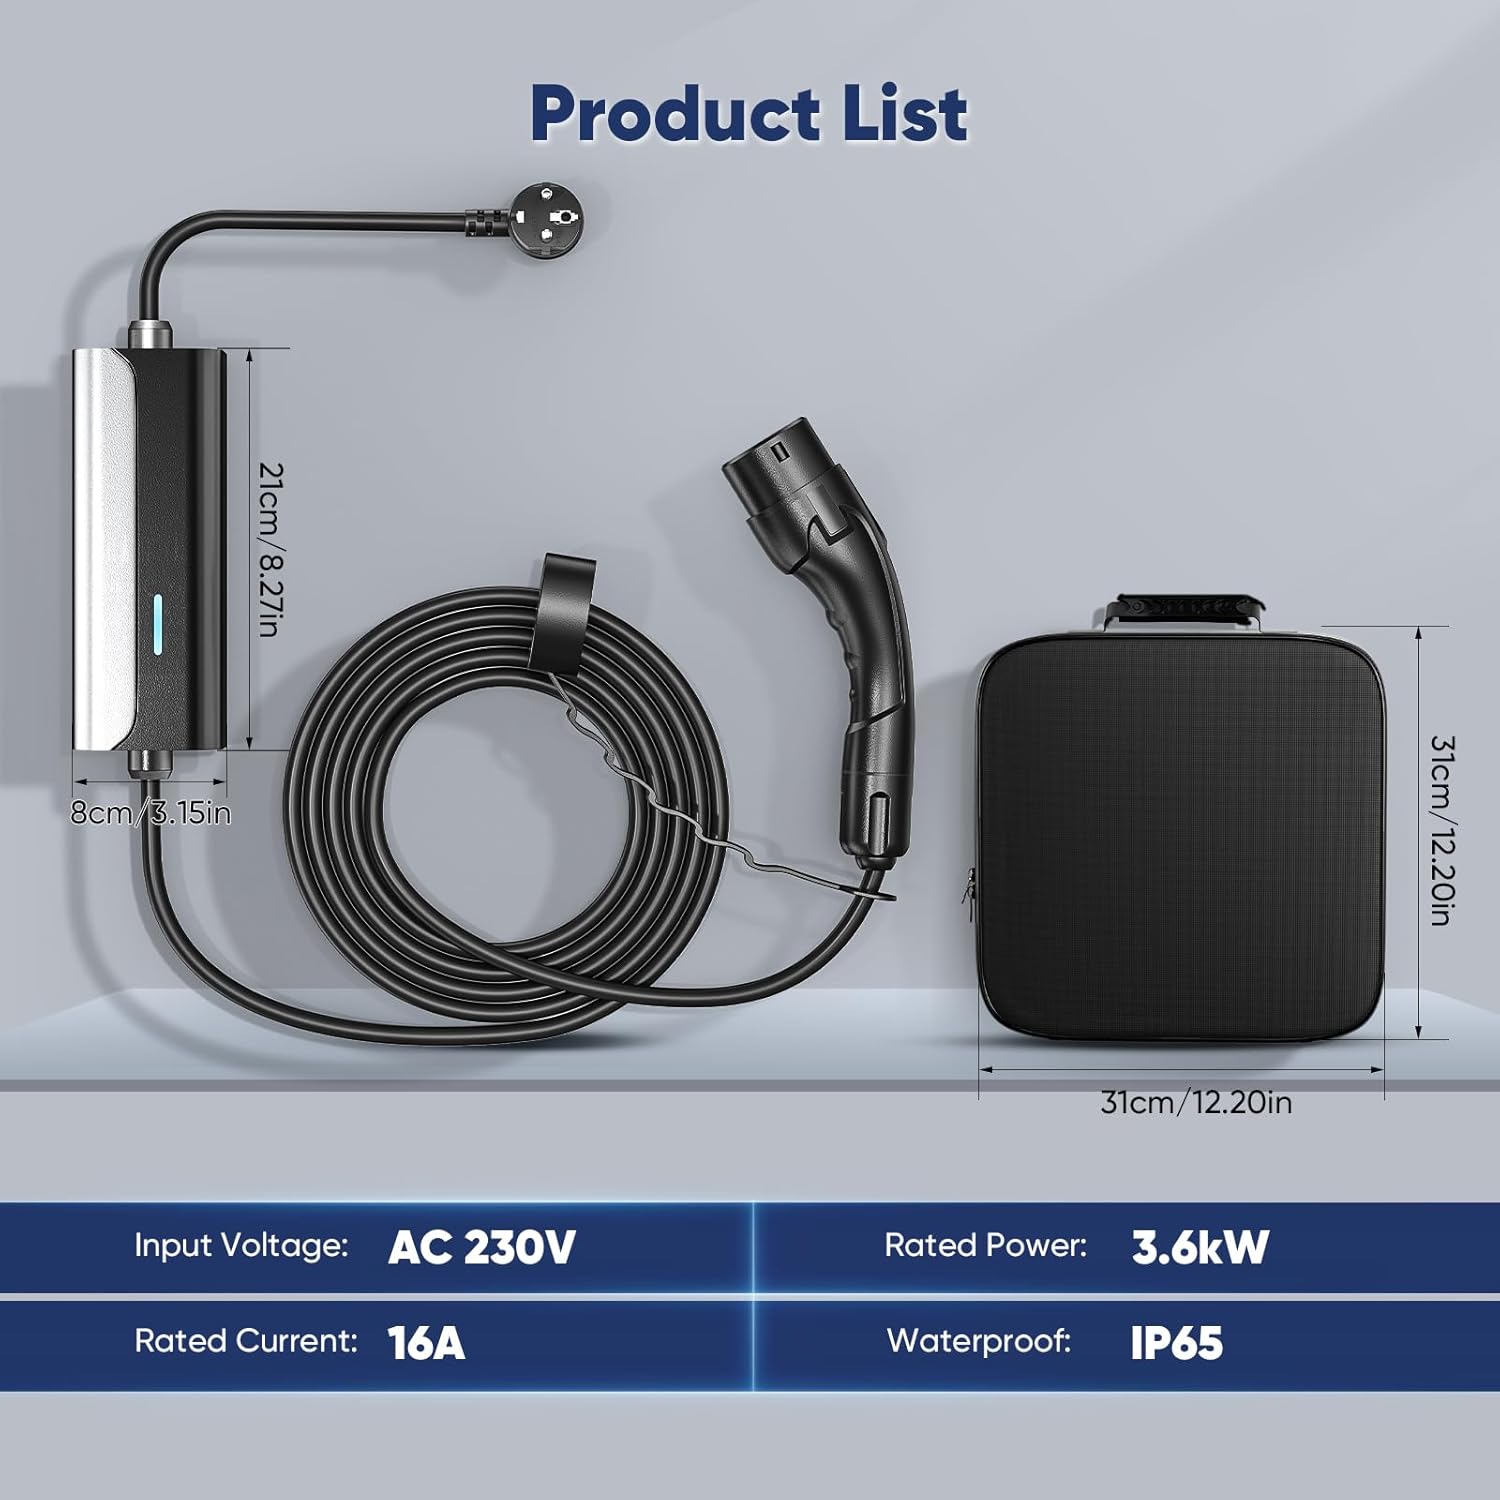
Image 3.1: Contents of the FNRIDS charging cable package, including the charger, control box, and carry bag.
4. Product Overview
4.1. Key Features
- Efficient Charging: Delivers 16A output current and 3.6kW rated power, offering faster charging compared to standard 10A chargers.
- Universal Compatibility: Complies with IEC 62196-2 standards, making it compatible with most Type 2 electric vehicles and plug-in hybrid cars in Europe.
- Intuitive Monitoring: Features an LED indicator on the control box for real-time charging status and error identification.
- Reliable Protection: Equipped with an intelligent chip for protection against leaks, overcharging, overheating, and is IP65 waterproof.
- Unmatched Convenience: Portable design with an included carry bag allows for charging at home, office, garage, or during travel.

Image 4.1: The FNRIDS Type 2 Electric Car Charging Cable and its components.

Image 4.2: The FNRIDS charging cable demonstrating universal compatibility with Type 2 electric vehicles.

Image 4.3: Visual representation of the FNRIDS charging cable's efficient charging capabilities.

Image 4.4: The FNRIDS charging cable's control box demonstrating its robust and durable construction.

Image 4.5: The FNRIDS charging cable's suitability for both indoor and outdoor use in various weather conditions.
5. Specifications
| Specification | Value |
|---|---|
| Model Number | YH-0E7W-HH8M |
| Cable Length | 8 meters (Other lengths may be available) |
| Input Voltage | AC 1PH 230V ±20% |
| Input Frequency | 50 ±3Hz |
| Rated Power | 3.6 kW |
| Output Voltage | AC 1PH 230V ±20% |
| Output Current | 16A |
| Standby Power Consumption | <5W |
| Operating Temperature | -25°C to +50°C |
| Storage Temperature | -25°C to +50°C |
| Working Height | <2000m |
| Protection Rating | IP65 |
| Certifications | UKCA, CE, TUV, IEC 62196-2 |
| Connector Type | Type 2 |
| Compatible Devices | Electric Vehicles, Plug-in Hybrid Cars |
6. Setup
Follow these steps to prepare your charging cable for use:
- Unpack: Carefully remove the charging cable and all accessories from the portable bag.
- Inspect: Visually inspect the cable, connectors, and control box for any signs of damage. Do not proceed if damage is found.
- Position: Place the control box on a stable surface or hang it securely if possible, ensuring it is not in a position where it can be driven over or damaged. Ensure the cable reaches both the power outlet and your vehicle without being stretched or creating a tripping hazard.
- Connect to Power: Insert the Schuko power plug firmly into a compatible, properly grounded AC 230V 16A wall outlet.
- Initial Check: The LED indicator on the control box should illuminate blue, indicating standby mode.
7. Operating Instructions
Charging your electric vehicle is a simple plug-and-play process:
- Prepare Vehicle: Ensure your electric vehicle is turned off and the charging port cover is open.
- Connect to Vehicle: Firmly insert the Type 2 connector into your vehicle's charging port. Ensure it clicks into place.
- Initiate Charging: Once connected, the charging process should begin automatically. The LED indicator on the control box will flash green to indicate active charging.
- Monitor Charging: Observe the LED indicator for charging status. Refer to Section 8 for details on LED indications.
- Complete Charging: When charging is complete, the LED indicator will turn solid green.
- Disconnect from Vehicle: Safely disconnect the Type 2 connector from your vehicle's charging port. Some vehicles may require unlocking the charging port via the vehicle's controls before disconnection.
- Disconnect from Power: Unplug the Schuko power plug from the wall outlet.
- Store: Coil the cable neatly and store it in the provided portable bag in a dry, safe place.
8. LED Indicator Guide
The LED indicator on the control box provides visual feedback on the charging status:
- Solid Blue Light: Indicates the charger is in standby mode, connected to power but not actively charging.
- Flashing Green Light: Indicates the charger is actively charging the vehicle.
- Solid Green Light: Indicates charging is completed.
- Solid Red Light: Indicates an error or safety precaution. Refer to the Troubleshooting section for assistance.

Image 8.1: FNRIDS charging cable LED indicator status guide.
9. Maintenance
Proper maintenance ensures the longevity and safe operation of your charging cable:
- Cleaning: Disconnect the charger from both the power source and the vehicle before cleaning. Use a soft, dry cloth to wipe down the cable, connectors, and control box. Do not use abrasive cleaners or solvents.
- Storage: When not in use, coil the cable neatly and store it in the provided portable bag. Keep it in a dry, cool place, away from direct sunlight and extreme temperatures.
- Inspection: Regularly inspect the cable and connectors for any signs of wear, cuts, cracks, or corrosion. If any damage is observed, discontinue use immediately and contact customer support.
- Environmental Conditions: The IP65 rating allows for outdoor use, but prolonged exposure to harsh weather conditions should be minimized when possible. Ensure connectors are clean and dry before use.
10. Troubleshooting
If you encounter issues, refer to the following troubleshooting guide:
| Problem | Possible Cause | Solution |
|---|---|---|
| No LED light when plugged into power. | No power from the outlet; faulty outlet; damaged cable/control box. | Check the power outlet with another device. Try a different outlet. Inspect the cable for damage. If damaged, discontinue use. |
| LED shows solid red light. | Error detected (e.g., over-voltage, under-voltage, over-current, leakage, overheating, short-circuit). | Disconnect the charger from both the vehicle and the power outlet. Wait a few minutes, then reconnect. If the error persists, contact customer support. |
| Charging does not start (LED remains blue). | Type 2 connector not fully inserted into vehicle; vehicle not ready to charge; vehicle charging port issue. | Ensure the Type 2 connector is firmly and correctly inserted into the vehicle's charging port. Check vehicle's dashboard or app for charging status. Try restarting the vehicle. |
| Charging stops unexpectedly. | Power interruption; vehicle charging fault; charger safety mechanism activated. | Check the power supply. Check vehicle for error messages. If the LED is red, refer to the 'Solid red light' solution. |
For issues not covered here or if problems persist, please contact FNRIDS customer support.
11. Warranty and Support
For warranty information, technical support, or service inquiries, please refer to the warranty card included with your product or contact FNRIDS customer service directly. Keep your purchase receipt as proof of purchase for warranty claims.
Manufacturer: FNRIDS
Date First Available: January 25, 2024


