Introduction
Thank you for choosing the Topsolar 30W 12V/24V Solar Panel Kit. This kit is designed to provide a reliable and efficient solution for charging and maintaining 12V batteries in various off-grid applications. It is ideal for use with cars, RVs, boats, motorcycles, cabins, and other remote power systems. This manual provides detailed instructions for installation, operation, and maintenance to ensure optimal performance and longevity of your solar panel kit.
Safety Information
Please read all safety instructions carefully before installing or operating the solar panel kit. Failure to follow these instructions may result in electric shock, fire, or serious injury.
- Always wear appropriate personal protective equipment (PPE), including safety glasses and insulated gloves, during installation.
- Ensure all connections are secure and properly insulated to prevent short circuits.
- Do not attempt to disassemble or repair the solar panel or charge controller. Refer to qualified personnel for service.
- Keep the solar panel and electrical components away from flammable materials and sources of ignition.
- Avoid touching the exposed ends of wires when the solar panel is exposed to sunlight, as it generates electricity.
- Ensure proper ventilation around the charge controller to prevent overheating.
- Connect the battery to the charge controller first, then the solar panel, and finally the load (if any). Disconnect in reverse order.
Package Contents
Verify that all components listed below are included in your package:
- 1 x 30 Watt 12V Monocrystalline Solar Panel
- 1 x 10A PWM LCD Display Solar Charge Controller
- 1 x 6.5 ft Extension Cable with Battery Clips
- 1 x 6.5 ft Extension Cable with O-Ring Terminal
- 1 x U Shape Mount Tilt Rack (Adjustable Mount Bracket)

Setup and Installation
Follow these steps for proper installation of your solar panel kit.
1. Solar Panel Placement
Choose a location for the solar panel that receives maximum direct sunlight throughout the day, unobstructed by shadows from trees, buildings, or other objects. The adjustable mount bracket allows for optimal angling towards the sun.


2. Charge Controller Connection
The 10A PWM charge controller manages the power flow from the solar panel to the battery, preventing overcharging and protecting against discharge, over-voltage, short circuits, and reversed polarity.

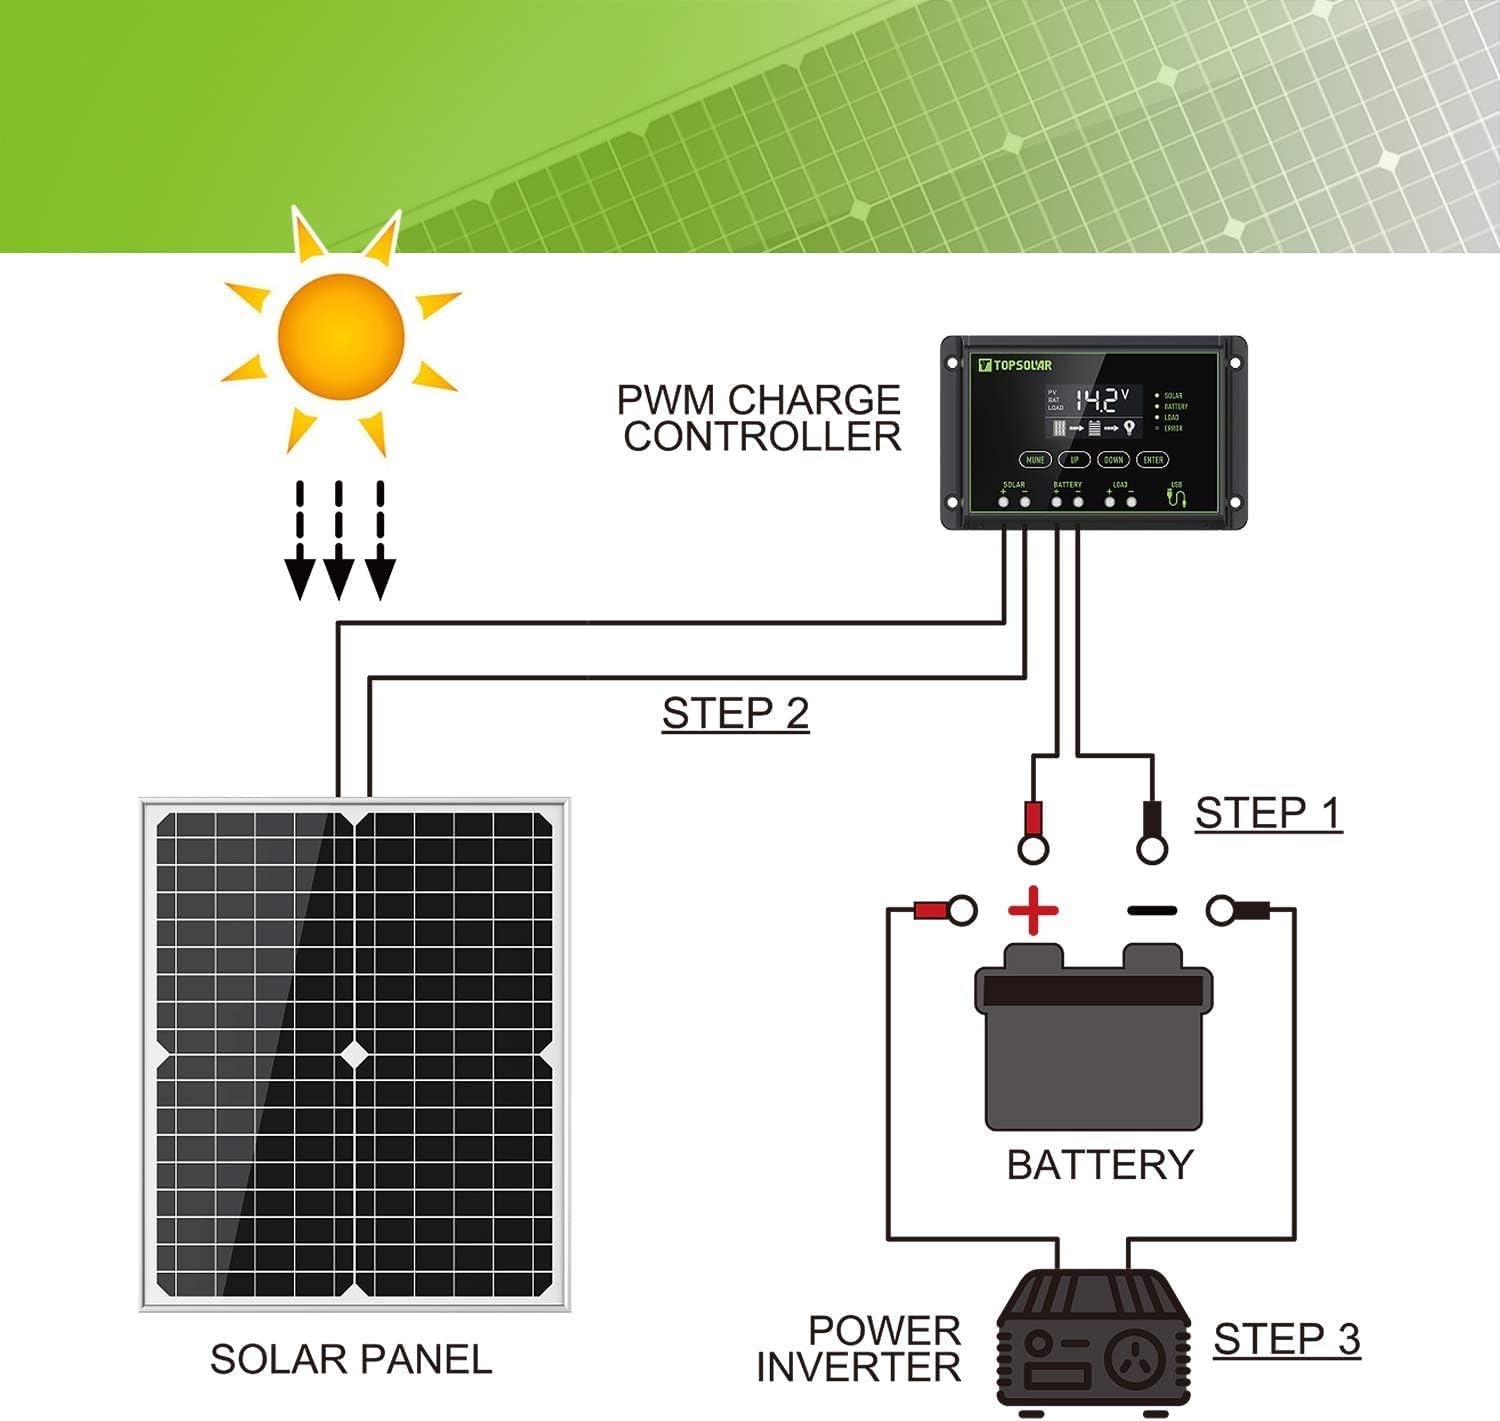
3. Wiring Diagram and Connection Steps
Follow the connection sequence carefully to avoid damage to the components.
- Step 1: Connect the Battery to the Charge Controller. Connect the positive (+) and negative (-) terminals of your 12V battery to the corresponding battery terminals on the charge controller. Ensure a secure connection. The charge controller display should light up.
- Step 2: Connect the Solar Panel to the Charge Controller. Connect the positive (+) and negative (-) cables from the solar panel to the corresponding solar panel terminals on the charge controller.
- Step 3: Connect the Load (Optional). If you are connecting a DC load directly to the charge controller, connect its positive (+) and negative (-) wires to the load terminals on the controller. For AC loads, connect a power inverter to the battery (not the controller's load terminals), and then connect your AC devices to the inverter.
Disconnection Sequence: To disconnect the system, reverse the order: first disconnect the load, then the solar panel, and finally the battery.
Operating Instructions
The 10A PWM charge controller features an LCD display for monitoring system status and buttons for setting parameters.
- LCD Display: Shows battery voltage, charging current, discharging current, battery state of charge, and various system icons (solar charging, load status, battery type).
- Buttons: Typically include 'Menu', 'Up', and 'Down' buttons to navigate through display screens and adjust settings such as battery type (lead-acid, gel, flood), load control modes (e.g., 24-hour output, dusk-to-dawn), and charge/discharge parameters. Refer to the specific charge controller's mini-manual for detailed button functions and programming.
- Charging: When the solar panel receives sufficient sunlight, the controller will automatically begin charging the connected battery. The display will indicate charging activity.
- Load Control: If a DC load is connected to the controller, it can be configured to turn on/off based on time or battery voltage.

Maintenance
Regular maintenance ensures the longevity and efficiency of your solar panel kit.
- Solar Panel Cleaning: Periodically clean the surface of the solar panel with a soft, damp cloth to remove dust, dirt, and debris. A clean panel ensures maximum sunlight absorption. Avoid abrasive cleaners or harsh chemicals.
- Connection Checks: Regularly inspect all electrical connections (solar panel to controller, controller to battery, controller to load) to ensure they are tight and free from corrosion.
- Cable Inspection: Check cables for any signs of wear, fraying, or damage. Replace damaged cables immediately.
- Battery Maintenance: Follow the manufacturer's recommendations for your specific battery type. Ensure battery terminals are clean and free of corrosion.
- Environmental Factors: While the panel is built with strong tempered glass and an aluminum frame for weather resistance, extreme conditions may require additional protection or inspection.
Troubleshooting
Here are some common issues and their potential solutions:
| Problem | Possible Cause | Solution |
|---|---|---|
| No power output from solar panel / Controller display off | No sunlight; Panel dirty; Loose connections; Reversed polarity (battery); Faulty component. | Ensure panel is in direct sunlight. Clean panel surface. Check all wiring connections for tightness and correct polarity. Verify battery voltage. |
| Battery not charging or charging slowly | Insufficient sunlight; Panel partially shaded; Dirty panel; Undersized panel for battery/load; Faulty battery. | Relocate panel for better sun exposure. Remove any shading. Clean panel. Check battery health. |
| Load not working | Low battery voltage; Overload; Incorrect load settings on controller; Loose load connection. | Check battery voltage. Reduce load. Verify load settings on controller. Check load wiring. |
| Controller displaying error code | Specific error (e.g., over-voltage, short circuit). | Consult the charge controller's specific manual for error code definitions and solutions. Often involves checking connections or reducing load. |
Specifications
| Feature | Detail |
|---|---|
| Brand | Topsolar |
| Model | 30W-KIT (Solar Panel: mc4) |
| Material | Monocrystalline Silicon |
| Maximum Power | 30 Watts |
| Maximum Voltage | 24 Volts (System Voltage) |
| AC Adapter Current (Charge Controller) | 10 Amps |
| Product Dimensions (Solar Panel) | 22.05"L x 13.3"W x 0.78"H |
| Item Weight | 5.59 pounds |
| Efficiency | High Efficiency |
| Connector Type | MC4 (for solar panel connection) |
Warranty and Support
The Topsolar 30W Solar Panel Kit comes with a 12-month worry-free warranty. For technical support, warranty claims, or any questions regarding your product, please contact Topsolar customer service through the retailer's platform or the official Topsolar website. Please have your purchase details and model number ready when contacting support.
Applications
This solar panel kit is versatile and suitable for a wide range of off-grid 12V battery charging and maintenance applications, including:
- Maintaining car, RV, boat, and motorcycle batteries.
- Powering remote cabins, sheds, and gate openers.
- Providing backup power for small systems.
- Off-grid lighting and small electronic devices.


