1. Product Overview
The Vinsetto Modern Computer Desk is designed to provide a functional and stylish workspace for your home or office. It features a compact design with ample storage solutions, including a pull-out keyboard tray, side shelves, and a fabric drawer. Constructed from durable E1 grade particle board with a melamine coating, this desk offers robustness and ease of cleaning. Its elegant design incorporates rounded corners for safety and smooth-gliding rails for the keyboard tray.

Image 1.1: The Vinsetto Modern Computer Desk, showcasing its design and storage features in a typical room setup.
2. Safety Information
- Read all instructions carefully before assembly and use.
- Keep all small parts and packaging materials away from children and pets to prevent choking hazards.
- Assemble the desk on a soft, clean surface to prevent scratches.
- Ensure all screws and fasteners are securely tightened before use. Periodically check and re-tighten as necessary.
- Do not overload the desk or its shelves. The maximum load capacity is 50 kg.
- Avoid standing or sitting on the desk.
- Use caution when moving the desk to prevent injury or damage.
3. Package Contents
Please check that all components are present and undamaged before beginning assembly. If any parts are missing or damaged, contact customer support.
- Desk panels (various sizes)
- Hardware pack (screws, dowels, cam locks, keyboard tray rails)
- Fabric drawer
- Assembly instructions (diagrams)
4. Setup and Assembly
Assembly typically requires two adults. Tools required (not included): Phillips head screwdriver, hammer.
- Unpack and Identify Parts: Carefully unpack all components and lay them out on a clean, soft surface. Refer to the included assembly diagrams to identify each panel and hardware piece.
- Assemble Main Desk Frame: Follow the step-by-step diagrams to connect the main desk panels using the provided hardware. Ensure all connections are snug but do not overtighten screws.
- Install Keyboard Tray Rails: Attach the metal rails for the keyboard tray to the designated desk panels. Ensure they are aligned correctly for smooth operation.
- Attach Keyboard Tray: Secure the keyboard tray to the installed rails. Test its movement to ensure it slides in and out freely.
- Assemble Side Shelves and Drawer Compartment: Construct the side shelving unit and the compartment for the fabric drawer according to the diagrams.
- Insert Fabric Drawer: Fold and assemble the fabric drawer, then slide it into its designated compartment.
- Final Check: Once assembled, gently lift and place the desk in its desired location. Check all connections for stability.

Image 4.1: Detailed dimensions of the desk, useful for planning placement and assembly.
5. Operating Instructions
This desk is designed for general computer and office use. Utilize its features as follows:
- Main Desktop Surface: Place your monitor, laptop, or other primary work items on the main desktop. Ensure weight is distributed evenly.
- Pull-out Keyboard Tray: Gently pull the tray forward to extend it for keyboard and mouse use. Push it back in when not in use to save space.
- Side Shelves: Use the open shelves for books, documents, small printers, or decorative items.
- Fabric Drawer: The fabric drawer is suitable for storing office supplies, files, or personal items. Pull it out by its handle.

Image 5.1: Overview of the desk's storage capabilities, including the keyboard tray, shelves, and fabric drawer.

Image 5.2: The pull-out keyboard tray in use, demonstrating its functionality for a keyboard and mouse.

Image 5.3: A printer positioned on the top side shelf, illustrating the practical use of the storage areas.
6. Maintenance
Proper maintenance will extend the life of your desk.
- Cleaning: Wipe surfaces with a soft, damp cloth. Avoid using abrasive cleaners, harsh chemicals, or solvents, as these can damage the melamine coating.
- Hardware Check: Periodically inspect all screws, bolts, and fasteners to ensure they remain tight. Re-tighten as needed to maintain stability.
- Avoid Moisture: Protect the desk from excessive moisture and direct sunlight to prevent warping or discoloration.
- Fabric Drawer Care: The fabric drawer can be spot cleaned with a mild detergent and damp cloth. Allow to air dry completely.
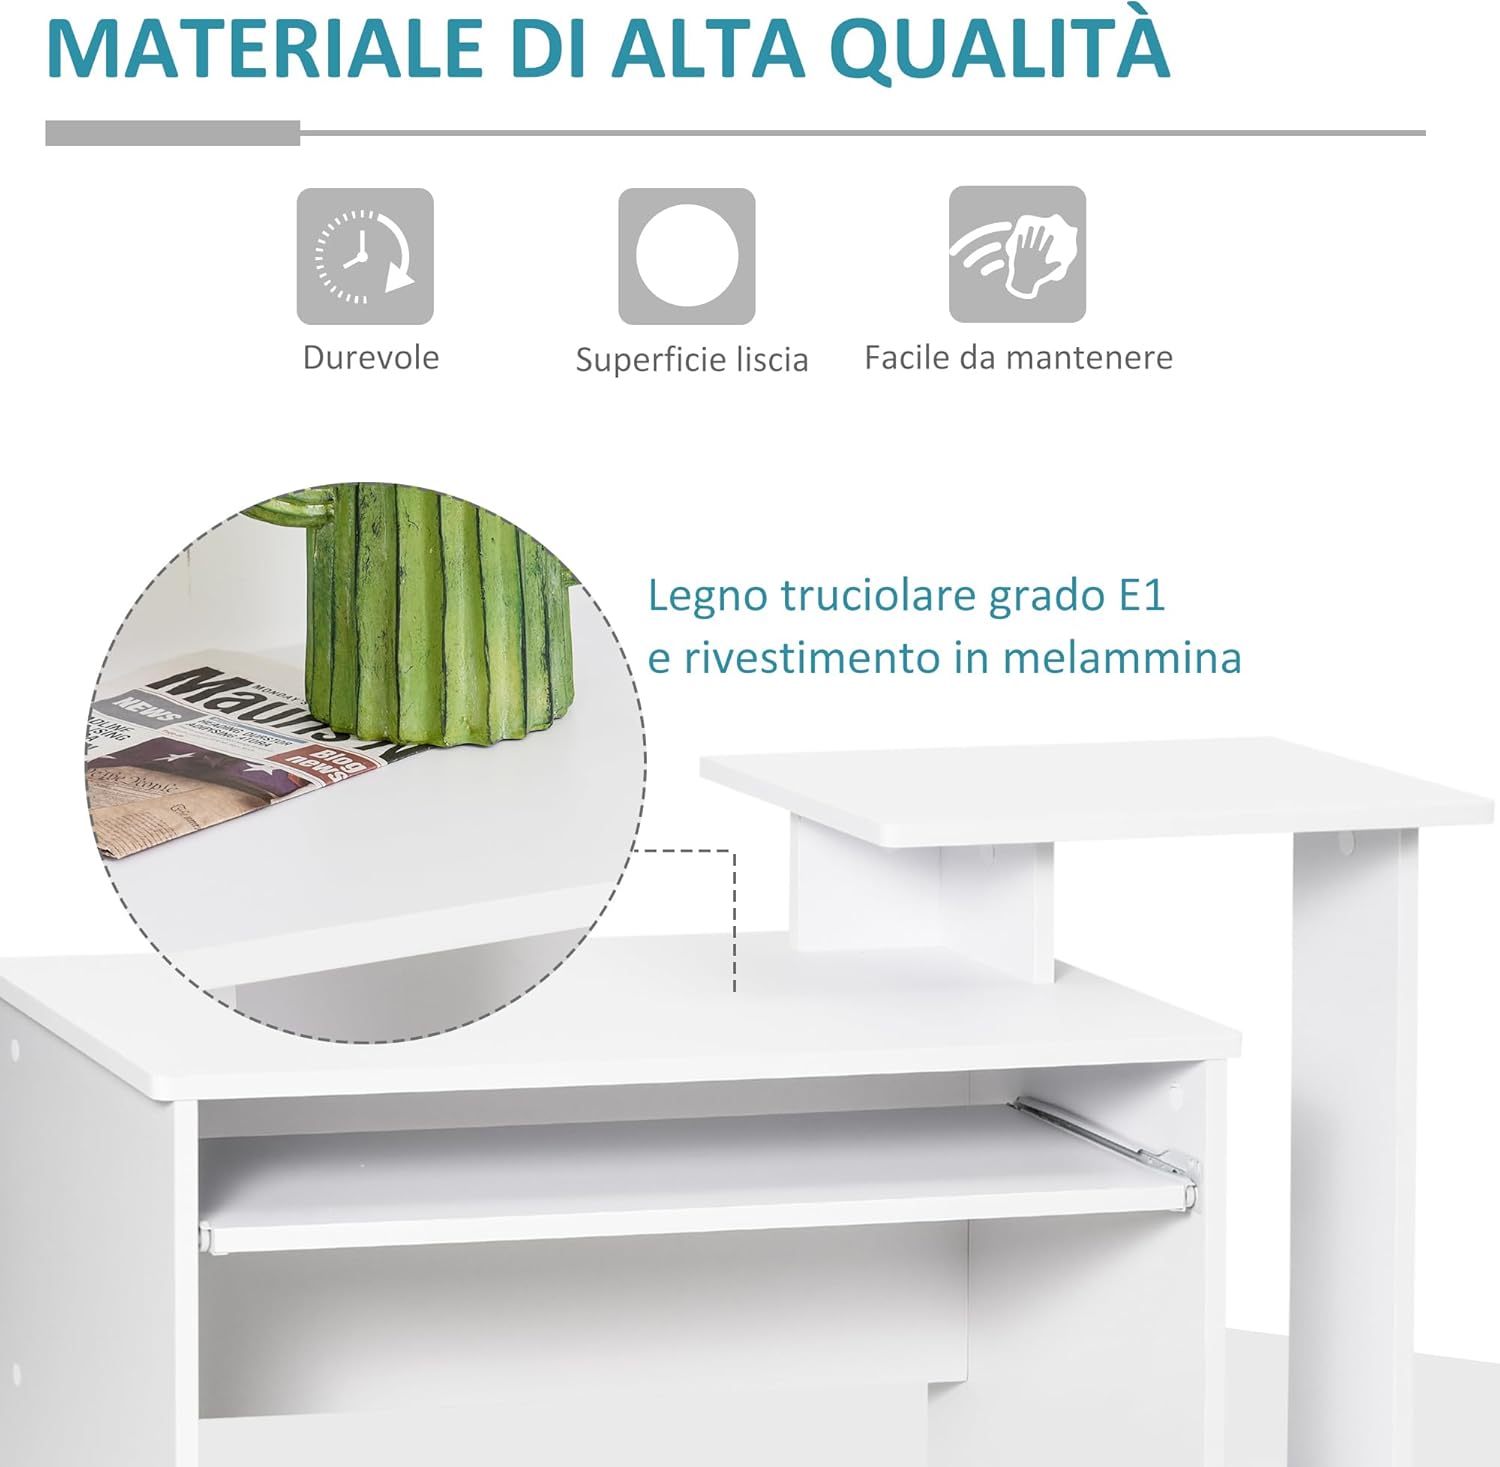
Image 6.1: Detail of the desk's high-quality E1 grade particle board with melamine coating, highlighting its durable and easy-to-clean surface.
7. Troubleshooting
If you encounter any issues with your desk, refer to the following common problems and solutions:
- Desk is Wobbly:
Solution: Ensure all screws and fasteners are fully tightened. Check that the desk is placed on a level surface. Adjust leg levelers if applicable (this model does not have explicit levelers, so ensure even floor contact). - Keyboard Tray Does Not Slide Smoothly:
Solution: Check that the rails are installed correctly and are free of obstructions. Ensure all screws securing the rails are tight. Apply a small amount of silicone lubricant to the rails if necessary. - Parts Do Not Align During Assembly:
Solution: Double-check the assembly diagrams to ensure you are using the correct parts for each step and that they are oriented correctly. Loosen previously tightened screws slightly to allow for adjustment, then re-tighten.
8. Specifications
| Feature | Detail |
|---|---|
| Overall Dimensions (L x W x H) | 100 cm x 40 cm x 86.6 cm |
| Material | E1 Grade Particle Board with Melamine Coating |
| Color | White (Desk), Black (Fabric Drawer) |
| Maximum Load Capacity | 50 kg |
| Special Features | Pull-out keyboard tray, Side shelves, Fabric drawer, Rounded corners |
| Desk Design | Computer Desk |
9. Warranty and Support
For warranty information or technical support, please refer to the purchase documentation or contact the retailer/manufacturer directly. Keep your proof of purchase for any warranty claims.


