1. Introduction
The AOOCOO 2 Displayport + HDMI USB 3.0 KVM Switch is designed to streamline your workspace by allowing three computers to share three monitors and four USB 3.0 peripheral devices. This KVM switch supports high resolutions up to 8K@60Hz and 4K@144Hz, making it ideal for demanding professional and gaming environments. It offers a convenient solution for managing multiple systems with a single set of keyboard, mouse, and monitors, enhancing efficiency and reducing cable clutter.

Figure 1.1: AOOCOO Triple Monitor KVM Switch with accessories.
2. Key Features
- Triple Monitor Support: Connects up to three computers to three monitors simultaneously, supporting 2x DisplayPort 1.4 and 1x HDMI 2.1 connections per computer.
- High Resolution & Refresh Rate: Supports resolutions up to 8K@60Hz (HDMI) and 4K@144Hz (DisplayPort), with backward compatibility for lower resolutions.
- USB 3.0 Connectivity: Features four USB 3.0 ports for sharing peripherals such as keyboards, mice, printers, and scanners, offering data transfer speeds up to 5Gbps.
- Multiple Switching Methods: Easily switch between connected computers using the physical button on the KVM panel or the included wired remote controller.
- Extended & Copy Display Modes: Supports both extended desktop mode (different content on each monitor) and copy/duplicate mode (same content on all monitors).
- Plug and Play: Driver-free operation for quick and easy setup across various operating systems.
- Broad Compatibility: Compatible with Linux, Windows, Chrome OS, and macOS.

Figure 2.1: High resolution support for the KVM switch.

Figure 2.2: Operating system compatibility.
3. Package Contents
Verify that all items are present in your package:
- 1 x Triple Monitor USB 3.0 HDMI+DP KVM Switch
- 3 x USB 3.0 Cables (1.5m/4.9ft)
- 1 x Wired Remote Controller (1.52m/5ft)
- 1 x User Manual
- 1 x 12V Power Adapter (1.52m/5ft)

Figure 3.1: Package contents diagram.
4. Setup Instructions
Follow these steps to properly set up your AOOCOO Triple Monitor KVM Switch:
4.1 Connection Overview
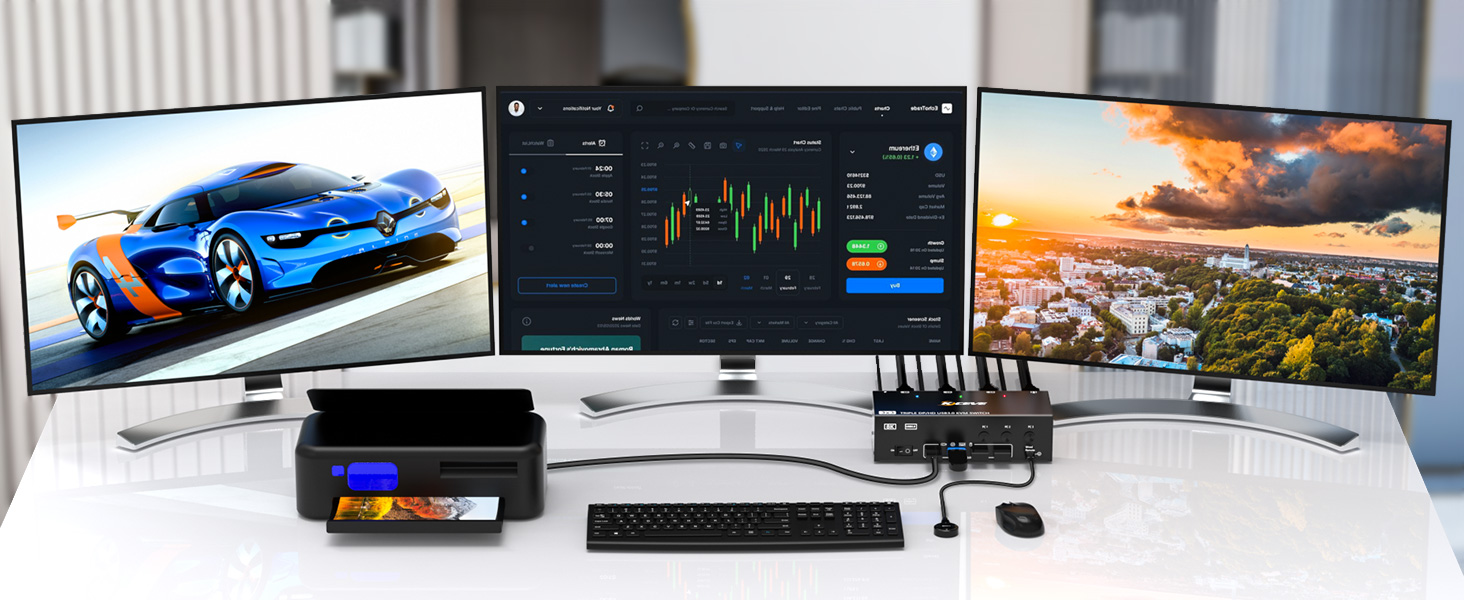
Figure 4.1: KVM Switch connection diagram.
4.2 Step-by-Step Connection
- Power Connection: Connect the included 12V power adapter to the DC/12V port on the KVM switch and plug it into a power outlet.
- Computer to KVM Connections: For each computer (PC1, PC2, PC3), connect the following cables to the corresponding input ports on the KVM switch:
- One HDMI 2.1 cable to the HDMI input port (e.g., INPUT C1 for PC1).
- Two DisplayPort 1.4 cables to the DP input ports (e.g., INPUT B1 DP and INPUT A1 DP for PC1).
- One USB 3.0 cable from a USB 3.0 port on your computer to the USB 3.0 input port on the KVM switch (e.g., USB 3.0 for PC1).
Important Note: Ensure your computer supports triple display output. Both DisplayPort and HDMI connections from the computer must belong to the same discrete graphics card for optimal performance. If your computer lacks sufficient ports, a reliable adapter or docking station may be required.

Figure 4.2: KVM Switch port layout.

Figure 4.3: DC 12V Power Port.
- KVM to Monitor Connections: Connect your three monitors to the KVM switch's output ports:
- Connect one HDMI cable from the KVM's OUT C HD port to your third monitor.
- Connect one DisplayPort cable from the KVM's OUT B DP port to your second monitor.
- Connect one DisplayPort cable from the KVM's OUT A DP port to your first monitor.
- Peripheral Connections: Connect your keyboard, mouse, and other USB 3.0 devices (e.g., printer, U disk) to the four USB 3.0 ports on the front of the KVM switch.
- Wired Remote Connection: Plug the wired remote controller into the dedicated "Wired Remote" port on the KVM switch.
- Power On: Flip the ON/OFF switch on the KVM to the 'ON' position.

Figure 4.4: USB 3.0 peripheral connections.

Figure 4.5: USB 3.0 Ports for peripherals.

Figure 4.6: Wired remote connection.

Figure 4.7: ON/OFF Switch.
4.3 Setup Video Guide
For a visual guide on connecting your KVM switch, please refer to the video below:
Video 4.1: Comprehensive setup and feature demonstration of the AOOCOO Triple Monitor KVM Switch.
5. Operating Instructions
5.1 Switching Between Computers
The KVM switch offers two convenient methods for switching between connected computers:
- Physical Button: Press the corresponding PC1, PC2, or PC3 button on the front panel of the KVM switch to select the desired computer. The three color lights above the buttons indicate the currently active computer.
- Wired Remote Controller: Press the button on the wired remote controller to cycle through the connected computers.

Figure 5.1: PC indicator lights on the KVM switch.
5.2 Display Modes (Extended & Copy)
The KVM switch supports both extended and copy display modes, which are configured via your computer's operating system settings.
- Extended Mode: Each monitor displays different content, extending your desktop across all three screens. This is ideal for multitasking and productivity.
- Copy Mode (Duplicate Mode): All three monitors display the same content, mirroring your desktop. This is useful for presentations or sharing content.
To switch between display modes, press "Windows + P" on your keyboard simultaneously and select the desired display mode from the pop-up window.

Figure 5.2: Extended Mode vs. Copy Mode demonstration.

Figure 5.3: Extended Mode in action.

Figure 5.4: Copy Mode in action.
6. Specifications
| Attribute | Value |
|---|---|
| Product Dimensions | 4.72 x 2.6 x 1.73 inches |
| Item Weight | 1.81 Pounds |
| Manufacturer | AOOCOO |
| Operation Mode | ON-OFF |
| Current Rating | 1 Amps |
| Operating Voltage | 12 Volts |
| Contact Type | Normally Open |
| Connector Type | USB |
| Terminal | Physical |
| Mounting Type | Panel Mount |
| Actuator Type | Push Button |
7. Troubleshooting
If you encounter issues with your KVM switch, please refer to the following common solutions:
- No Display on Monitors:
- Ensure all HDMI and DisplayPort cables are securely connected to both the KVM switch and your computers/monitors.
- Verify that the KVM switch is powered on and the correct PC input is selected.
- Confirm that your computer's graphics card supports triple display output. Test by connecting monitors directly to your PC without the KVM.
- Use high-quality HDMI 2.1 and DisplayPort 1.4 cables, especially for high resolutions (8K/4K). Shorter cables are generally preferred for optimal signal integrity.
- Flickering or Unstable Display:
- This can often be resolved by using higher quality or shorter HDMI/DisplayPort cables.
- Ensure your power adapter is providing sufficient power. If flickering persists, consider using a more robust 12V 4A power supply.
- Adjust the refresh rate of your monitors in your computer's display settings to a slightly lower value if necessary (e.g., from 200Hz to 144Hz).
- Check your monitor's settings for DisplayPort version (e.g., DP 1.1) if applicable.
- USB Devices (Keyboard/Mouse/Printer) Not Recognized:
- Ensure the USB 3.0 cables from each computer are correctly connected to the KVM's USB 3.0 input ports. If these are not connected or are connected incorrectly, USB devices will not be recognized.
- Try reconnecting the USB devices to the KVM.
- Some wireless keyboard/mouse combos with a single receiver may require direct connection to the KVM's dedicated USB 3.0 ports for keyboard/mouse.
- Switching Delays or Malfunctions:
- Power cycle the KVM switch (turn off, unplug power, wait 10 seconds, plug back in, turn on).
- Ensure all cables are firmly seated.
- Computer Requires Adapter/Docking Station:
- If your desktop or laptop does not have the required 2 DisplayPort + 1 HDMI output ports, you will need to use a reliable adapter or docking station to achieve triple monitor display.
8. Maintenance
To ensure the longevity and optimal performance of your AOOCOO Triple Monitor KVM Switch, follow these maintenance guidelines:
- Cleaning: Use a soft, dry cloth to clean the exterior of the KVM switch. Do not use liquid cleaners or aerosol sprays, as they may damage the device.
- Ventilation: Ensure the KVM switch is placed in a well-ventilated area to prevent overheating. Do not block any ventilation openings.
- Cable Management: Keep cables organized and untangled to prevent damage to the ports and cables themselves. Avoid sharp bends or excessive tension on the cables.
- Storage: When not in use for extended periods, store the KVM switch in a cool, dry place away from direct sunlight and extreme temperatures.
- Power Off: If you are not using the KVM switch for an extended period, it is recommended to power it off and unplug the power adapter.
9. Warranty and Support
AOOCOO products are designed for reliability and performance. This product comes with a standard manufacturer's warranty. For specific warranty terms and conditions, please refer to the warranty card included in your package or visit the official AOOCOO website.
If you experience any issues or have questions regarding your KVM switch, please contact AOOCOO customer support through the following channels:
- Manufacturer's Website: Visit the AOOCOO official website for FAQs, troubleshooting guides, and contact information.
- Email Support: Refer to your product packaging or the official website for the customer support email address.
- Online Retailer Support: If purchased from an online retailer, you may also contact their customer service for assistance.
Please have your product model and purchase information ready when contacting support to ensure a faster resolution.


