Introduction
Thank you for purchasing the Giantex L Shaped Computer Desk. This manual provides detailed instructions for assembly, operation, maintenance, and troubleshooting to ensure safe and efficient use of your new desk. Please read all instructions carefully before beginning assembly and retain this manual for future reference.
Safety Information
- Ensure all parts are present and undamaged before assembly. Do not use if any parts are missing or broken.
- Assemble the desk on a soft, clean surface to prevent scratches.
- Tighten all screws securely, but do not overtighten. Periodically check and retighten fasteners as needed.
- Do not exceed the maximum weight capacities specified in the 'Specifications' section.
- Keep small parts away from children during assembly.
- For electrical components (charging station), ensure proper grounding and avoid liquid contact.
Package Contents
Verify that all components listed below are included in your package:
| Item | Description | Quantity |
|---|---|---|
| Desk Panels | Engineered wood panels for desktop and shelves | Various |
| Metal Frame Components | Powder-coated metal tubes and mesh shelves | Various |
| Fabric Drawers | Non-woven fabric drawers with handles | 3 |
| Charging Station | 2 AC outlets, 2 USB ports, power cord | 1 |
| Hardware Pack | Screws, Allen wrench, screwdriver, adjustable foot pads | 1 Set |
| Instruction Manual | This document | 1 |
Setup and Assembly
Follow these steps to assemble your Giantex L Shaped Computer Desk. It is recommended that two people assemble this product.
Assembly Video Guide
Official assembly video for the Giantex L Shaped Computer Desk. This video provides a visual guide to each step of the assembly process.
Step-by-Step Instructions
- Prepare Components: Unpack all components and lay them out. Identify parts A, B, C, D, E, F, G, H, I, J, K, L, M, N, and hardware.
- Assemble Side Cabinet Frame (Part 1): Attach adjustable foot pads (9) to the bottom of frame K. Connect frame C and frame I to frame K using screws (8).
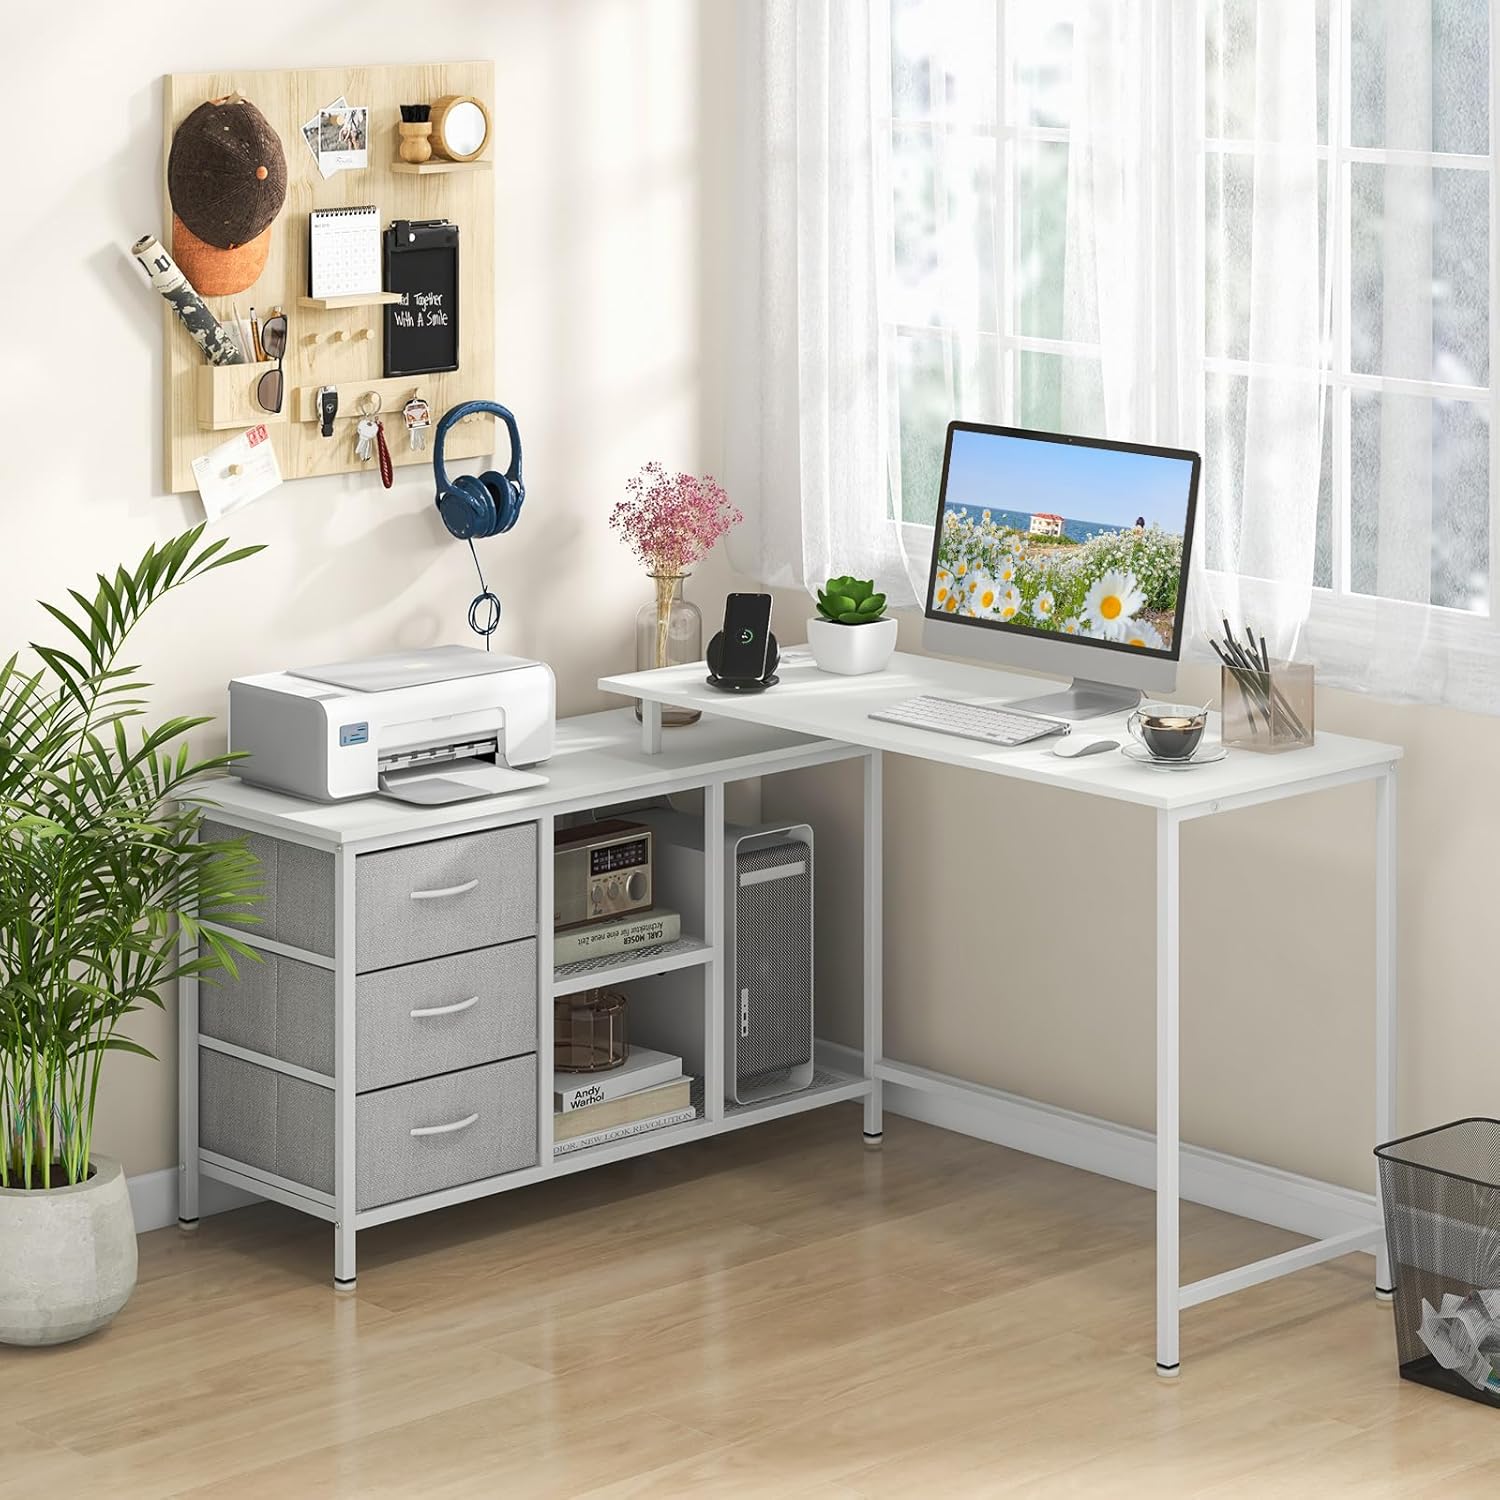
Image showing various desk components laid out on the floor, ready for assembly.
- Assemble Side Cabinet Frame (Part 2): Attach frame E to frame I using screws (8). Secure crossbars G to the side cabinet frame using screws (8).

This image highlights the storage components, including drawers, shelves, and a host stand, indicating their positions within the desk structure.
- Install Mesh Shelf: Place mesh shelf H into the designated slots within the side cabinet frame and secure with screws (1) and (8).
- Attach Top Panel for Side Cabinet: Place panel A onto the assembled side cabinet frame and secure it using screws (2).
- Assemble Fabric Drawers: Fold fabric drawers N into shape. Insert the bottom panel and attach handles (7) using screws (6). Repeat for all three drawers.
- Insert Fabric Drawers: Slide the assembled fabric drawers N into the designated compartments of the side cabinet.
- Assemble Main Desk Frame: Attach crossbars L to the underside of panel B using screws (2). Attach frame K and frame J to panel B using screws (8).
- Connect Desk Sections: Position the main desk section next to the side cabinet. Secure the main desk frame to the side cabinet using screws (3) and (4). Ensure all connections are tight.
- Install Charging Station: Insert the charging station (8) into the pre-cut opening on the desktop. Secure it with screws (5).
- Final Adjustments: Ensure the desk is stable. Adjust the foot pads (9) if necessary to level the desk on uneven floors. Apply screw hole covers (12) for a clean finish.
Operating Instructions
Convertible Design
The Giantex L Shaped Computer Desk offers a versatile design that can be configured in two primary ways:
- L-Shaped Configuration: The desk can be set up in an L-shape, providing ample workspace and corner utilization. This configuration is ideal for multitasking and fitting into room corners.
- Straight Desk Configuration: The tall tabletop section is detachable, allowing you to separate it from the side cabinet to create a long straight desk or a smaller study writing desk. This flexibility adapts to various room layouts and user needs.

This image illustrates the desk's flexible combinations, showing how it can adapt to different spaces by converting between L-shaped and straight configurations.
Charging Station
The integrated charging station provides convenient power access for your electronic devices.
- AC Outlets: Two 125V/12A AC outlets are available for powering laptops, monitors, and other standard electronics.
- USB Ports: Two 5V/Max 2.1A USB ports are included for charging smartphones, tablets, and other USB-powered devices.
- To use, simply plug the desk's power cord into a wall outlet.
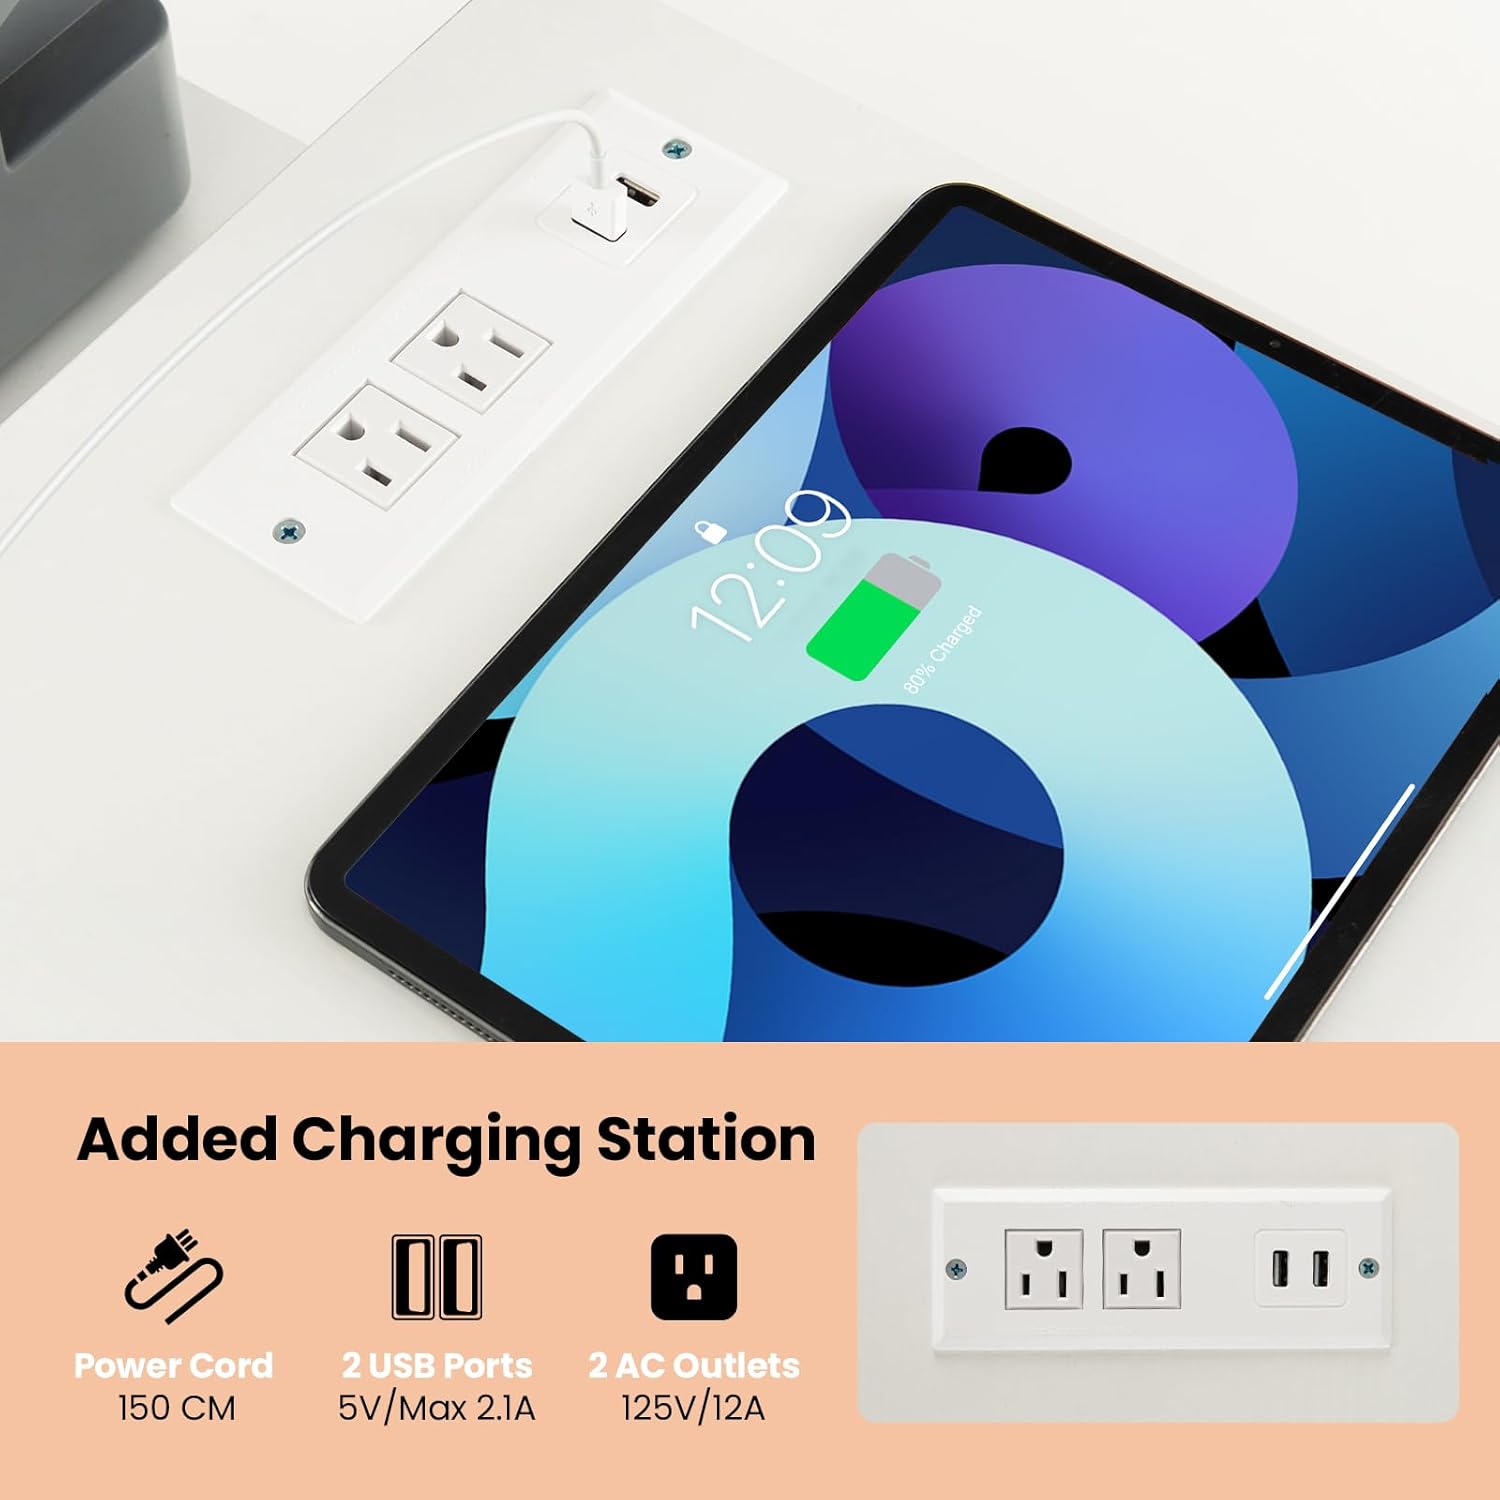
A close-up view of the desk's charging station, featuring two AC outlets and two USB ports for convenient device power.
Storage Solutions
The desk features multiple storage options to keep your workspace organized:
- Fabric Drawers: Three removable fabric drawers provide enclosed storage for stationery, documents, and personal items.
- Open Shelves: Two-tier open shelves are suitable for books, decorative items, or frequently accessed supplies.
- Host Stand: A spacious host stand is designed to accommodate a computer tower or other larger equipment.

This image illustrates the desk's robust construction, highlighting features like screw hole covers for a clean look, strong powder-coated metal tubes, and adjustable foot pads for stability.
Product Display Video
This video showcases the Giantex L Shaped Desk in various configurations and highlights its key features, including the charging station and storage options.
Maintenance
- Cleaning: Wipe surfaces with a soft, damp cloth. Avoid harsh chemicals or abrasive cleaners that may damage the finish.
- Dusting: Regularly dust the desk with a dry, soft cloth to prevent buildup.
- Fasteners: Periodically check all screws and bolts to ensure they remain tight. Retighten if necessary to maintain stability.
- Spills: Clean up spills immediately to prevent staining or damage to the engineered wood surfaces.
Troubleshooting
If you encounter any issues with your desk, refer to the following common problems and solutions:
- Desk is Wobbly:
- Ensure all screws are securely tightened.
- Adjust the foot pads on the bottom of the desk legs to compensate for uneven flooring.
- Parts Do Not Align During Assembly:
- Double-check the orientation of the parts against the assembly diagrams.
- Loosen screws slightly on connected parts, adjust alignment, then retighten.
- Charging Station Not Working:
- Ensure the desk's power cord is fully plugged into a functional wall outlet.
- Check if the wall outlet itself is receiving power.
Specifications
| Feature | Detail |
|---|---|
| Model Number | GX10583-CB |
| Overall Dimension (L Desk) | 55" x 41.5" x 29.5" (L x W x H) |
| Overall Dimension (Long Desk) | 81" x 19" x 29.5" (L x W x H) |
| Material | Engineered Wood, Metal, Non-Woven Fabric |
| Color | White |
| Load Capacity (Tall Table) | 200 lbs |
| Load Capacity (Side Cabinet Top) | 110 lbs |
| Load Capacity (Middle Shelf) | 25 lbs |
| Load Capacity (Bottom Shelf) | 35 lbs |
| Load Capacity (Each Drawer) | 15 lbs |
| AC Outlet | 125V/12A |
| USB Port | 5V/Max. 2.1A |
| Power Cord Length | 4.9 ft |
| Net Weight | 45.5 lbs |
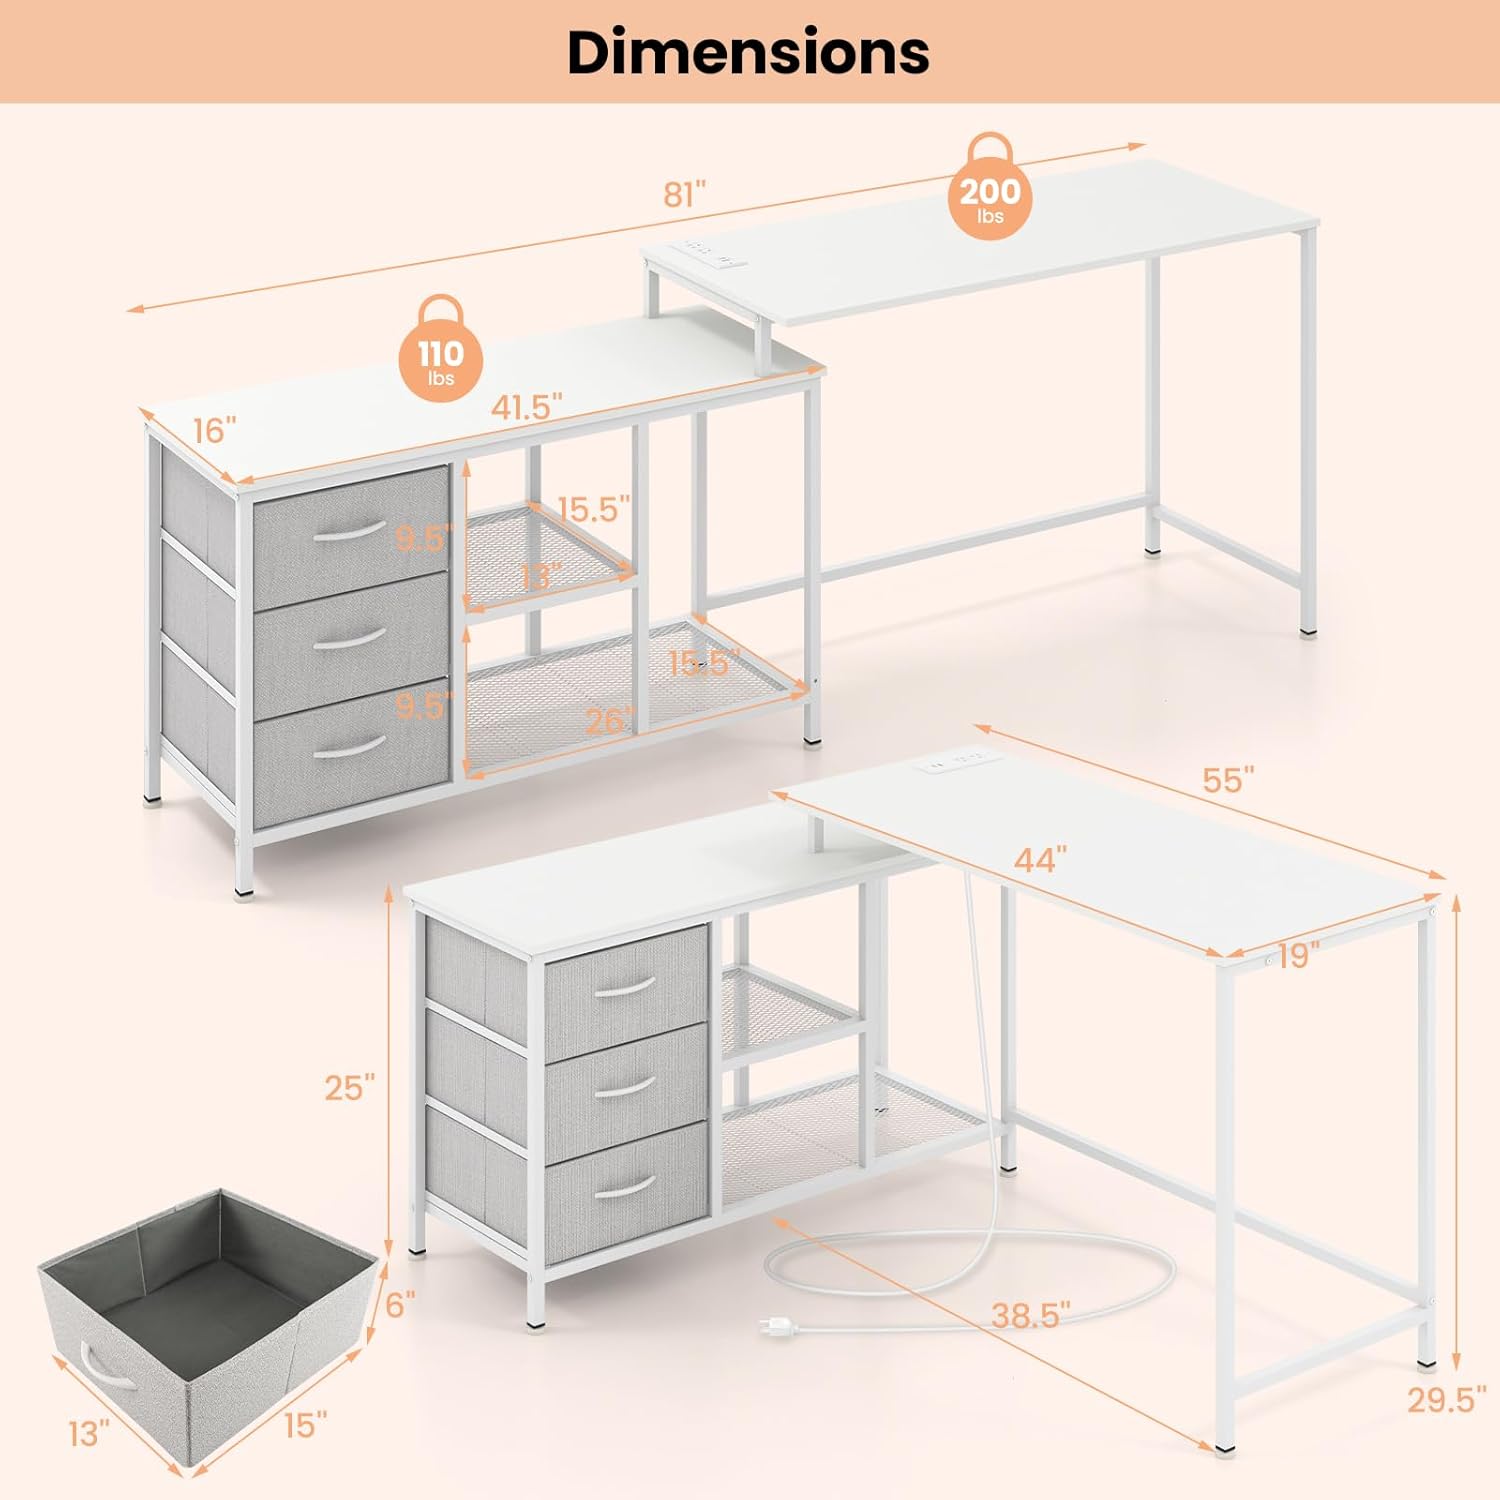
This image provides a comprehensive diagram of the desk's dimensions in both L-shaped and straight configurations, including load capacities for different sections.
Warranty
This Giantex L Shaped Computer Desk comes with a Limited Lifetime Warranty. Please refer to the warranty documentation included with your purchase for specific terms and conditions. This warranty covers manufacturing defects and material flaws under normal use.
Support
For further assistance, missing parts, or warranty claims, please contact Giantex customer service. Refer to the contact information provided on the product packaging or the official Giantex website. When contacting support, please have your model number (GX10583-CB) and purchase information readily available.


