Introduction
Welcome to the user manual for your BOYI GMK104 Barebones Mechanical Keyboard Kit. This guide provides detailed instructions for setting up, operating, and maintaining your keyboard. The GMK104 is a full-size, QMK/VIA programmable, tri-mode (Bluetooth 5.0, 2.4GHz, Type-C wired) keyboard kit featuring a gasket-mounted, hot-swappable PCB, RGB backlighting, and an integrated screen with a multi-functional knob.
What's in the Box
- Keycap Puller
- USB Cable
- 2.4G Receiver
- 104 Keyboard Kit
Video demonstrating the unboxing of the GMK104 barebones keyboard kit, showcasing its components.
Setup
1. Installing Switches and Keycaps
The GMK104 is a barebones kit, meaning switches and keycaps are not pre-installed. You will need to install your preferred mechanical switches and keycaps.
- Align the pins of your desired mechanical switches with the hot-swap sockets on the PCB.
- Gently press each switch until it clicks into place. Ensure pins are straight to avoid bending.
- Place your chosen keycaps onto the installed switches, pressing firmly until they are seated.

Image shows the GMK104 barebones keyboard kit with hot-swap sockets and RGB lighting, ready for switch and keycap installation.
2. Connecting the Keyboard
The GMK104 supports three connection modes: wired, 2.4GHz wireless, and Bluetooth 5.0 wireless.
Wired Connection (Type-C)
Connect the provided USB Type-C cable to the keyboard's Type-C port and to your computer's USB port. The keyboard will automatically switch to wired mode and begin charging.
2.4GHz Wireless Connection
Locate the 2.4G USB receiver, typically stored in a compartment on the underside of the keyboard.
Plug the 2.4G receiver into an available USB port on your computer.
On the keyboard, switch the mode selector to 2.4GHz mode. The keyboard should connect automatically.

Image showing the underside of the GMK104 keyboard, highlighting the storage slot for the 2.4G USB receiver.
Bluetooth 5.0 Wireless Connection
On the keyboard, switch the mode selector to Bluetooth mode.
Press FN + Q, FN + W, or FN + E to select one of three available Bluetooth channels. The corresponding key will flash, indicating pairing mode.
On your device (computer, tablet, smartphone), enable Bluetooth and search for "GMK104".
Select "GMK104" to pair. The flashing key will become solid once connected.
To switch between paired Bluetooth devices, press FN + Q/W/E for the desired channel.

Image illustrating the GMK104 keyboard connected to a laptop, tablet, and smartphone, demonstrating its tri-mode connectivity.
Operating Instructions
Smart Display and Knob Functions
The keyboard features a smart display and a multi-functional knob.
The display shows time, date, connection status, and battery level.
The knob controls volume by default. Pressing the knob can mute/unmute.
Two buttons next to the screen control backlight and screen display settings.
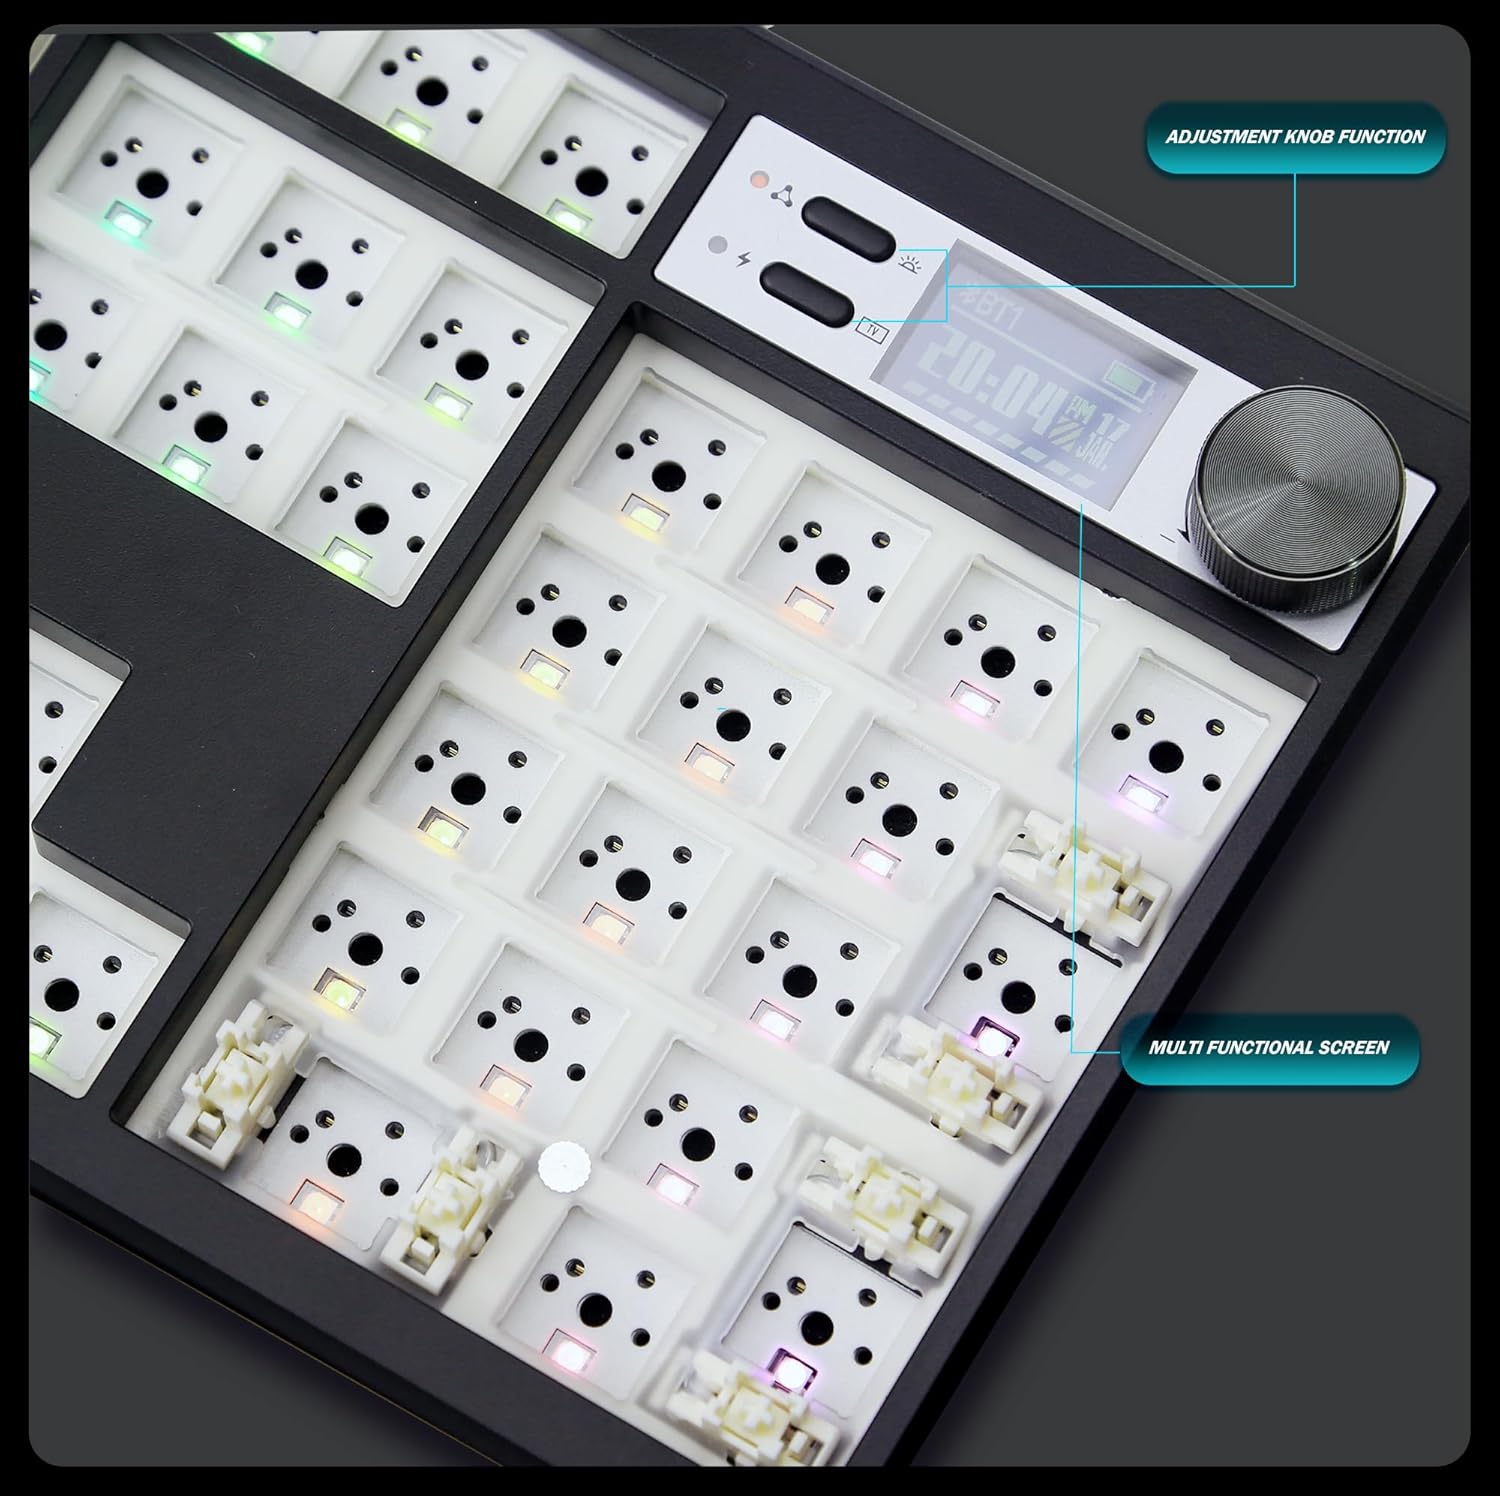
Close-up image of the GMK104 keyboard's smart display and multi-functional knob, showing the screen displaying time and battery status, and the two control buttons.
Video demonstrating the customization options for the smart display on the GMK104 keyboard, including changing images.
RGB Backlighting
The keyboard features south-facing RGB backlighting with multiple effects.
Use FN + | to cycle through different RGB lighting modes.
Adjust brightness and speed using dedicated function key combinations (refer to the quick guide or VIA software for specific commands).

Image showcasing the vibrant RGB backlighting of the GMK104 keyboard with various color patterns.
QMK/VIA Programmability
The GMK104 is fully programmable using QMK/VIA software. This allows for key remapping, macro creation, and advanced lighting customization.
To use VIA, connect the keyboard via USB-C. Download the VIA software from the official website.
The software will automatically detect the keyboard, allowing you to customize key assignments and lighting layers.

Screenshot of the VIA software interface, demonstrating how to remap keys and customize keyboard functions.
Video illustrating the VIA programmability of the GMK104 keyboard kit, showing how users can customize key functions and layouts.
Maintenance
Cleaning
Disconnect the keyboard from all devices before cleaning.
Use a soft, lint-free cloth to wipe the surface. For deeper cleaning, remove keycaps and switches.
Use compressed air to remove dust and debris from between keys.
Battery Care
The keyboard has a built-in 4000mAh rechargeable battery.
Charge the keyboard using the provided USB Type-C cable.
Avoid fully discharging the battery frequently to prolong its lifespan.
Troubleshooting
Keyboard Not Responding
- Ensure the keyboard is properly connected (wired, 2.4GHz receiver, or Bluetooth paired).
- Check the battery level. Recharge if necessary.
- Try switching between connection modes.
- Restart your computer/device.
RGB Lights Not Working
- Ensure the keyboard is powered on.
- Cycle through RGB modes using FN + |.
- Check VIA software for lighting settings.
Keys Not Registering
- For hot-swappable switches, ensure they are fully seated in the PCB sockets.
- Check for bent switch pins.
- Test with different switches if available.
Screen Not Displaying Correctly
- Ensure the keyboard is powered on.
- Use the screen control buttons next to the display to adjust settings or reset.
- If using custom GIFs, ensure the software is correctly installed and the files are compatible.
Specifications
| Feature | Detail |
|---|---|
| Model | GMK104 |
| Connectivity | Bluetooth 5.0 / 2.4GHz Wireless / USB Type-C Wired |
| Layout | Full Size (104 keys) |
| Mounting Style | Gasket Mounted |
| Hot-Swappable | Yes (3-pin/5-pin switches) |
| Backlighting | South-Facing RGB |
| Programmability | QMK/VIA |
| Battery Capacity | 4000mAh |
| Compatibility | Windows, macOS |
| Dimensions | 10 x 4 x 1 inches |
| Item Weight | 1.5 pounds |
Warranty and Support
For warranty information and technical support, please contact BOYI customer service.
Email: boyiservice2020@163.com
You can also visit the official BOYI store on Amazon for additional resources and contact options.

Image showing customer service representatives, indicating available support channels.


