
1. Introduction
This manual provides detailed instructions for the installation, operation, and maintenance of your DEWENWILS Outdoor Wireless Light Switch and Receiver Kit (Model HWLS11L). Please read this manual thoroughly before installation and use to ensure proper function and safety. This kit is designed to provide convenient wireless control for outdoor and indoor lighting fixtures.
2. Product Overview
2.1 Components
- 1 x Wireless Receiver (HWLS11L)
- 1 x Wireless Remote Switch (Key Fob Style)
- 1 x CR2032 Battery (pre-installed in remote)
2.2 Key Features
- IP65 Waterproof Rating: The receiver is designed for outdoor use, resistant to dust and water jets, suitable for various weather conditions.
- No In-Wall Wiring Required: Simplifies installation by eliminating the need for complex in-wall wiring for the switch.
- 100Ft RF Range: Provides reliable wireless control up to 100 feet in open areas, with signals capable of penetrating walls, doors, and windows.
- High Power Capacity: Supports up to 15A/1800W, compatible with a wide range of lighting fixtures and appliances.
- Compact Size: The receiver's small design allows for installation in tight spaces, including standard electrical junction boxes.
- Expandable System: Easily expand your lighting system by adding more DEWENWILS transmitters and receivers.
- FCC Certified: Ensures reliable performance and minimal interference with other electronic devices.

Image 2.1: The DEWENWILS wireless receiver and remote switch.

Image 2.2: The receiver demonstrating its IP65 waterproof rating in rainy conditions.

Image 2.3: Illustration of the 100-foot remote control range, allowing operation through walls.
3. Safety Information
- Always disconnect power at the circuit breaker before installing or servicing the receiver.
- Installation should be performed by a qualified electrician if you are unfamiliar with electrical wiring.
- Ensure all wire connections are secure and properly insulated.
- The receiver requires a neutral wire for operation. Verify your electrical box has a neutral wire before installation.
- Do not exceed the maximum load rating of 15A/1800W.
- While the receiver is IP65 waterproof, ensure all connections to the power source and lighting fixture are also properly sealed and protected, especially in outdoor environments. Use waterproof connectors where necessary.
- The remote switch is not waterproof; keep it dry.
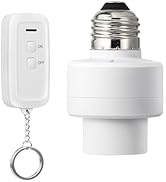
Image 3.1: The receiver is constructed from V0 level fireproof material for enhanced safety.
4. Setup and Installation
4.1 Wiring the Receiver
- Disconnect Power: Turn off the power to the circuit at the main breaker before beginning any wiring.
- Identify Wires: In your electrical box or fixture, identify the Live (usually black), Neutral (usually white), and Load (wire going to the light fixture, often red or black) wires. A ground wire (green or bare copper) may also be present.
- Connect Receiver:
- Connect the Black wire (L) from the receiver to the Live wire from your power source.
- Connect the White wire (N) from the receiver to the Neutral wire from your power source.
- Connect the Red wire (L) from the receiver to the Load wire of your lighting fixture.
- Connect the Blue wire (N) from the receiver to the Neutral wire of your lighting fixture.
- Ensure the Green wire (G) from the receiver is connected to the Ground wire of your electrical system.
- Secure Connections: Use appropriate wire nuts or connectors to secure all connections. Ensure no bare wires are exposed.
- Mount Receiver: The compact receiver can be installed inside a weatherproof box, junction box, or electrical box. The threaded port of the receiver can be screwed into a threaded hole of a junction box for secure outdoor installation.
- Restore Power: Once all connections are secure and the receiver is mounted, restore power at the circuit breaker.

Image 4.1: Wiring diagram and installation example of the receiver in a junction box.

Image 4.2: Visual comparison highlighting the simplicity of wireless switch installation over traditional wiring.
4.2 Pairing (Pre-paired)
The wireless remote switch and receiver are pre-paired at the factory. No initial pairing is required for basic operation. Simply install the receiver and use the remote.
4.3 Expanding Your System
The DEWENWILS wireless system is expandable. You can add multiple remote switches to control one receiver, or multiple receivers to be controlled by one remote switch. Refer to the specific instructions provided with additional DEWENWILS transmitters or receivers for pairing procedures.

Image 4.3: Illustration of programmable and expandable configurations for the wireless system.
5. Operating Instructions
Once the receiver is correctly installed and powered, and the remote switch has its battery, operation is straightforward:
- Press the "ON" button on the remote switch to turn the connected lighting fixture ON.
- Press the "OFF" button on the remote switch to turn the connected lighting fixture OFF.
The remote switch is designed for durability and comfort, with an ergonomically designed button tested for 100,000 presses.
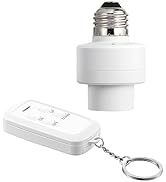
Image 5.1: The remote switch features a durable and comfortable button for reliable operation.
6. Maintenance
6.1 General Care
- Keep the remote switch dry and clean. Avoid exposure to moisture or extreme temperatures.
- Periodically check the receiver and its connections for any signs of wear or damage, especially in outdoor installations.
- Clean the exterior of the receiver and remote with a soft, dry cloth. Do not use harsh chemicals or abrasive cleaners.
6.2 Battery Replacement (Remote Switch)
The remote switch uses one CR2032 battery. If the remote's range decreases significantly or it stops responding, the battery may need replacement.
- Locate the battery compartment on the back of the remote switch.
- Use a small screwdriver or coin to open the compartment.
- Remove the old CR2032 battery.
- Insert a new CR2032 battery with the positive (+) side facing up.
- Close the battery compartment securely.
7. Troubleshooting
- Light does not turn ON/OFF:
- Check if the power to the receiver circuit is ON at the breaker.
- Verify all wiring connections to the receiver are secure and correct (Live, Neutral, Load). Ensure a neutral wire is connected to the receiver.
- Check the battery in the remote switch and replace if necessary.
- Ensure the lighting fixture itself is functional.
- Remote range is poor:
- Replace the remote battery.
- Ensure there are no large metal objects or thick concrete walls directly between the remote and receiver that could obstruct the signal.
- Move closer to the receiver to test if the range improves.
- Interference with other devices:
- The device is FCC certified to minimize interference. If interference occurs, try repositioning the receiver or the interfering device.
8. Specifications
| Model Number | HWLS11L |
| Product Dimensions | 3.94 x 1.77 x 1.38 inches |
| Item Weight | 4.16 ounces |
| Operation Mode | ON-OFF |
| Current Rating | 15 Amps |
| Operating Voltage | 120 Volts |
| Max Power Rating | 1800W (Tungsten) / 600W (LED Lamp) |
| Contact Type | Normally Open |
| Connector Type | Wireless |
| Circuit Type | 3-way (expandable) |
| Material | Plastic (V0 fireproof) |
| International Protection Rating | IP65 |
| Remote Battery | 1 x CR2032 (included) |
| RF Range | Up to 100 feet (open area) |
9. Warranty and Support
For warranty information or technical support, please contact DEWENWILS customer service. Details can typically be found on the product packaging or the official DEWENWILS website.