1. Introduction
Thank you for choosing the HIBREW H1B 6-in-1 Coffee Machine. This versatile appliance is designed to provide a wide range of coffee experiences, from hot espresso to cold brews, accommodating various capsule types and coffee powder. With adjustable temperature and cup volume settings, it offers personalized brewing to suit your preferences. Please read this manual thoroughly before first use to ensure proper operation, maintenance, and safety.
2. Safety Information
To prevent injury or damage, always observe basic safety precautions when using electrical appliances. This machine is for household use only.
- Do not immerse the machine, power cord, or plug in water or other liquids.
- Ensure the voltage indicated on the appliance matches your local power supply before connecting.
- Always unplug the machine from the power outlet before cleaning, maintenance, or if it will be left unattended for a long period.
- Do not operate the machine with a damaged cord or plug, or if it malfunctions or has been damaged in any way.
- Keep hands and cords away from hot surfaces. The brewing head and hot water dispenser can reach high temperatures.
- Use only clean, fresh water in the water tank. Do not fill above the MAX level.
- Do not open the brewing chamber during operation. Hot water or steam may escape.
- Keep the appliance out of reach of children.
3. Product Overview and Components
Familiarize yourself with the parts of your HIBREW H1B coffee machine for optimal use.

Figure 3.1: HIBREW H1B Coffee Machine with various compatible pods and coffee types, showcasing its versatility.

Figure 3.2: The 6-in-1 compatibility of the HIBREW H1B, supporting N-Pods, D-Pods, Coffee Powder, E-Pods, K-Pods, and a Reusable Filter.
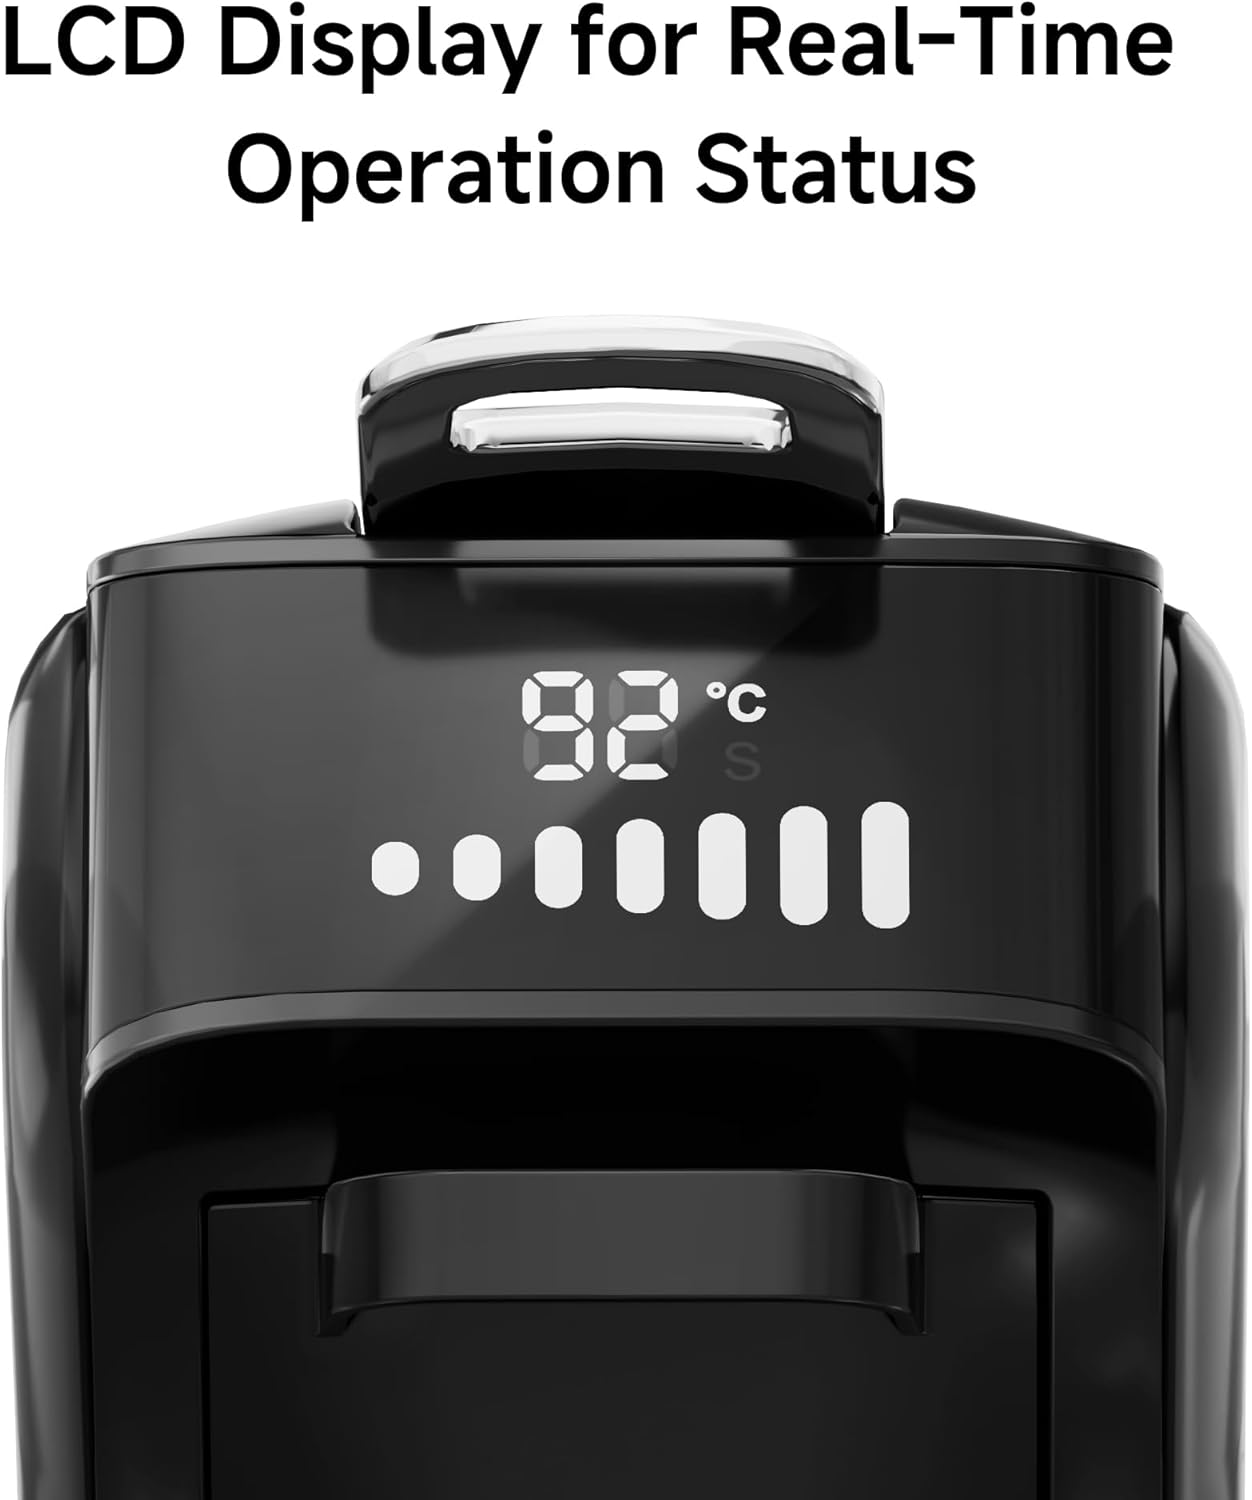
Figure 3.3: Close-up view of the LCD display, providing real-time operation status including temperature and brewing progress.

Figure 3.4: Included accessories: Scoop & Tamper, Product Manuals, Inflator (for cleaning), and Four Pod Adapters.
Main Components:
- Water Tank: Removable tank for water supply.
- Control Panel/LCD Display: For setting temperature, volume, and monitoring brewing status.
- Brewing Head: Where pods/filters are inserted.
- Drip Tray: Collects excess liquid and removable for cleaning.
- Pod Adapters: Interchangeable holders for different capsule types (K-cup, Nes*, DG*, E.S.E.) and coffee powder.
- Power Button: To turn the machine on/off.
- Brew Button: To start the brewing process.
4. Setup
Follow these steps for the initial setup of your coffee machine.
- Unpacking: Carefully remove all packaging materials. Inspect the machine for any damage.
- Initial Cleaning: Wash the water tank, drip tray, and all pod adapters with warm, soapy water. Rinse thoroughly and dry.
- Positioning: Place the machine on a stable, flat, heat-resistant surface, away from walls or other appliances to allow for proper ventilation.
- Fill Water Tank: Remove the water tank, fill it with fresh, clean water up to the MAX line, and place it back securely.
- First Use / Priming:
- Plug the machine into a grounded power outlet.
- Press the Power Button to turn on the machine.
- Place an empty cup on the drip tray.
- Without inserting any pod or coffee, press the Brew Button to run a full cycle of hot water through the machine. This cleans the internal components and primes the system. Repeat this process 2-3 times.
- Discard the water. Your machine is now ready for brewing.
5. Operating Instructions
Learn how to brew your favorite beverages with the HIBREW H1B.
5.1 Brewing a Beverage
- Ensure the water tank is filled with fresh water.
- Select the appropriate pod adapter for your chosen coffee type (K-cup, Nes*, DG*, E.S.E. pod, or reusable filter for coffee powder/tea). Insert your coffee/tea into the adapter.
- Open the brewing head, insert the filled adapter, and close the brewing head firmly until it clicks.
- Place your cup on the drip tray. Ensure the cup fits under the dispenser (fits cups under 3.9 inches).

Figure 5.1: The machine accommodates coffee cups up to 3.9 inches in height.
- Press the Power Button to turn on the machine. The display will show the current temperature.
- Select Brew Mode (Hot/Cold): The machine supports both hot and cold brewing.

Figure 5.2: Choose between Hot Brew for traditional coffee or Iced Brew for cold beverages.
- For Hot Brew: The machine will preheat (approx. 35 seconds).
- For Cold Brew: The machine will dispense cold water.
- Adjust Temperature (for Hot Brew): Long press the Brew button to enter temperature adjustment mode. The display will cycle through temperatures (e.g., 90°C, 91°C, 92°C, 93°C, 94°C, 95°C). Release the button at your desired temperature. For cold brew, the temperature is fixed at 25°C.

Figure 5.3: Adjust water temperature for hot brewing by long-pressing the brew button. Cold brew is set to 25°C.
- Adjust Volume: Long press the Power On/Off button and the water volume button simultaneously to adjust the cup volume. The display will show volume options (e.g., 20ml, 60ml, 90ml, 120ml, 150ml, 180ml, 210ml). Release at your desired volume. The maximum volume for each setting is also indicated (e.g., 50ml Max for 20ml setting).

Figure 5.4: Adjust the brewing volume from 20ml to 210ml by pressing the power and water volume buttons.
- Set Pre-infusion Time: Long press the Power On/Off button and the Brew button simultaneously to adjust the pre-infusion time (0-10 seconds). Pre-infusion wets the coffee grounds before full brewing to enhance extraction.

Figure 5.5: Set the pre-infusion time to moisten the coffee puck for improved extraction.
- Press the Brew Button to start brewing. The machine will dispense the beverage into your cup.
- Once brewing is complete, wait for the machine to finish dripping and for two beeps before opening the brewing head to remove the used pod/filter.
5.2 Unit Conversion (°C/°F)
To switch between Celsius and Fahrenheit temperature units on the display:
- Press and hold all three buttons (Power, Brew, and Volume) simultaneously until the unit changes on the display.

Figure 5.6: Convert temperature display between Celsius and Fahrenheit by holding all three buttons.
6. Maintenance
Regular cleaning and maintenance will ensure the longevity and optimal performance of your HIBREW H1B coffee machine.
6.1 Daily Cleaning
- Drip Tray: Empty and rinse the drip tray after each use or when the indicator shows it's full. Wipe it dry.
- Water Tank: Rinse the water tank daily and refill with fresh water. Clean it thoroughly with mild soap and water weekly.
- Brewing Head & Adapters: After each use, remove the pod adapter and rinse it under running water. Wipe the brewing head area with a damp cloth to remove any coffee residue. None of the parts are dishwasher safe.
- Exterior: Wipe the exterior of the machine with a soft, damp cloth. Do not use abrasive cleaners or scouring pads.
6.2 Descaling
Descaling is crucial to remove mineral deposits that can build up over time, affecting performance and taste. The frequency depends on water hardness and usage, but generally every 1.5 to 2 months is recommended.
- Use a descaling solution specifically designed for coffee machines or a citric acid solution. Do NOT use vinegar, as it may void the warranty or damage the machine.
- Follow the instructions on the descaling solution packaging.
- Typically, you will fill the water tank with the descaling solution, run several brewing cycles without a pod until the tank is empty, then rinse the tank and run several cycles with fresh water to flush out any remaining solution.
6.3 Reusable Filter
If you use the reusable filter for coffee powder, ensure it is cleaned thoroughly after each use to prevent clogging and maintain coffee quality. Consider using reusable filters to reduce waste.

Figure 6.1: The reusable filter allows for brewing with coffee powder, promoting environmental sustainability.
7. Troubleshooting
If you encounter issues with your HIBREW H1B, refer to the following common problems and solutions.
| Problem | Possible Cause | Solution |
|---|---|---|
| Machine does not turn on. | No power supply. | Check if the power cord is securely plugged into a working outlet. |
| No water dispenses / Machine makes loud noise. | Water tank empty or improperly seated. | Refill the water tank and ensure it is correctly placed. Prime the machine if necessary. |
| Coffee is too weak or too strong. | Incorrect volume setting or coffee grind/amount. | Adjust the volume setting. For coffee powder, ensure correct grind size and amount. |
| Error Code E-3 or E-4 displayed. | Internal system error. | Press the Power button to restart the machine. The error code should clear and return to normal status. |
| Error Code 'Hot' displayed. | Machine is too hot. | Press the Brew button to release hot water and allow the machine to cool down until 25°C is displayed. |
| Seven water level indicators blinking simultaneously. | Water tank empty or sensor issue. | After filling the water tank, press the Power button again to restart the machine. The screen should return to normal. If the error persists, the machine may require repair. |

Figure 7.1: Visual guide for common error codes and their resolutions.
8. Specifications
| Feature | Specification |
|---|---|
| Brand | HIBREW |
| Model Number | H1B |
| Color | Ferrous |
| Dimensions (L x W x H) | 28 x 14.3 x 30 cm (11 x 5.6 x 11.8 inches) |
| Weight | 3.67 Kilograms (8.09 lbs) |
| Capacity | 18 Grams (coffee capacity) |
| Power | 1450 Watts |
| Voltage | 220 Volts |
| Material | Plastic |
| Auto Shut-off | Yes |
| Special Feature | Portable |
| Coffee Maker Type | Espresso Machine |
| Recommended Uses | Office, Home |
9. Warranty and Support
HIBREW products are manufactured to high-quality standards. For information regarding warranty coverage, please refer to the warranty card included with your product or visit the official HIBREW website.
If you require technical assistance, troubleshooting beyond this manual, or have questions about your product, please contact HIBREW customer support. Contact details can typically be found on the product packaging, the official website, or through your retailer.


