Liiiyuan M1 white
Liiiyuan M1 White Windshield Projection Heads Up Display User Manual
Model: M1 white
1. Introduction
The Liiiyuan M1 is a GPS-enabled Head-Up Display (HUD) designed to project essential driving information, primarily speed, directly onto your vehicle's windshield. This device enhances driving safety by allowing drivers to view critical data without diverting their eyes from the road. Its simple, plug-and-play design makes it compatible with all vehicles.

Figure 1: Liiiyuan M1 Heads Up Display unit.
2. Product Features
- GPS Mode HUD: Utilizes GPS for accurate speed display, projected onto the windshield for easy viewing.
- Simple Display: Designed to show only essential data like speed, minimizing driver distraction.
- Main Functions: Displays speed (MPH/KM/H adjustable), includes overspeed alarm, fatigue driving warning, and GPS compass for direction.
- Automated Brightness: Features advanced light-sensitive elements that automatically adjust display brightness based on ambient light conditions. Manual brightness adjustment is also available.
- Plug and Play: Easy installation via USB connection to the car.
- Universal Compatibility: Suitable for all vehicles.

Figure 2: Overview of M1 GPS Speedometer functions.

Figure 3: Detailed view of the M1 HUD projection display on a windshield.
3. What's in the Box
The Liiiyuan M1 package includes the following components:
- M1 HUD Unit
- USB Cable
- Reflective Film
- User Manual
- Anti-slip Mat

Figure 4: All accessories included with the M1 HUD.
Video 1: M1 unboxing video, showing the contents of the package and initial look at the device.
4. Setup & Installation
The M1 HUD is designed for easy installation. Follow these steps to set up your device:
- Connect Power: Use the provided USB cable to connect the M1 HUD to a USB port in your car. Ensure the working voltage is 5V.
- Placement: Place the M1 HUD unit on your dashboard, ideally under the windshield, where the projection will be visible. Use the anti-slip mat to secure the device.
- Power On: Start your car engine. The M1 HUD will automatically power on.
- Satellite Acquisition: A small icon on the display will flash constantly while the device is acquiring satellite signals. The speed will be displayed once sufficient satellites are found.
- Apply Reflective Film (Optional but Recommended): For optimal visibility, especially in bright daylight, apply the reflective film to the windshield where the HUD projects.
- Clean the glass in the projection area thoroughly.
- Paste the film vertically onto the glass.
- Remove any air bubbles using a soft cloth or card.
- Carefully peel off the protective film.

Figure 5: Instructions for applying the reflective film.
Video 2: Demonstration of M1 HUD installation and operation in a vehicle, showing both day and night visibility.
5. Operation
The M1 HUD provides real-time speed and direction information. Here's how to operate and adjust its settings:
5.1 Speed Display
Once the device acquires satellite signals, your current speed will be displayed. You can switch between MPH and KM/H units in the settings.
5.2 Alarms
- Overspeed Alarm: The device will emit a beeping sound if you exceed a preset speed limit.
- Fatigue Driving Warning: The device will alert you if you have been driving continuously for an extended period, reminding you to take a break.
5.3 Adjusting Speed Accuracy
If the speed displayed by the M1 HUD differs from your vehicle's speedometer, you can adjust the speed parameter. This adjustment compensates for discrepancies between the GPS speed and your car's instrument speed.
To adjust speed:
- Press and hold the "M" button on the product for three seconds to enter the settings menu. The screen will display "1".
- Press the "M" button again. The screen will display "107" (default parameter value).
- Use the "+" or "-" buttons to adjust this parameter.
- If your vehicle's instrument speed is higher than the HUD, increase the parameter value.
- If your vehicle's instrument speed is lower than the HUD, decrease the parameter value.
- Once adjusted, the setting will be saved automatically.

Figure 6: Guide to adjusting speed accuracy on the M1 HUD.
6. Troubleshooting
If you encounter issues with your M1 HUD, refer to the following common problems and solutions:
| Problem | Possible Cause | Solution |
|---|---|---|
| Slow Satellite Search / No Speed Display |
|
|
| Display not turning on | No power supply or faulty USB connection. | Check USB cable connection. Ensure the car's USB port is supplying power. Try a different USB port or power source. |
| Inaccurate Speed Reading | Calibration needed. | Follow the "Adjusting Speed Accuracy" instructions in Section 5.3. |
| Display too bright/dim | Automatic brightness adjustment not optimal for current conditions. | Manually adjust the brightness setting on the device. |
7. Specifications
| Attribute | Detail |
|---|---|
| Product Dimensions | 3.38 x 0.63 x 1.46 inches |
| Item Weight | 1.28 ounces (0.08 Pounds) |
| Model Number | M1 white |
| Material | Plastic |
| Manufacturer | Liiiyuan |
| First Available Date | January 12, 2024 |
| Screen Size | 3.38 Inches |
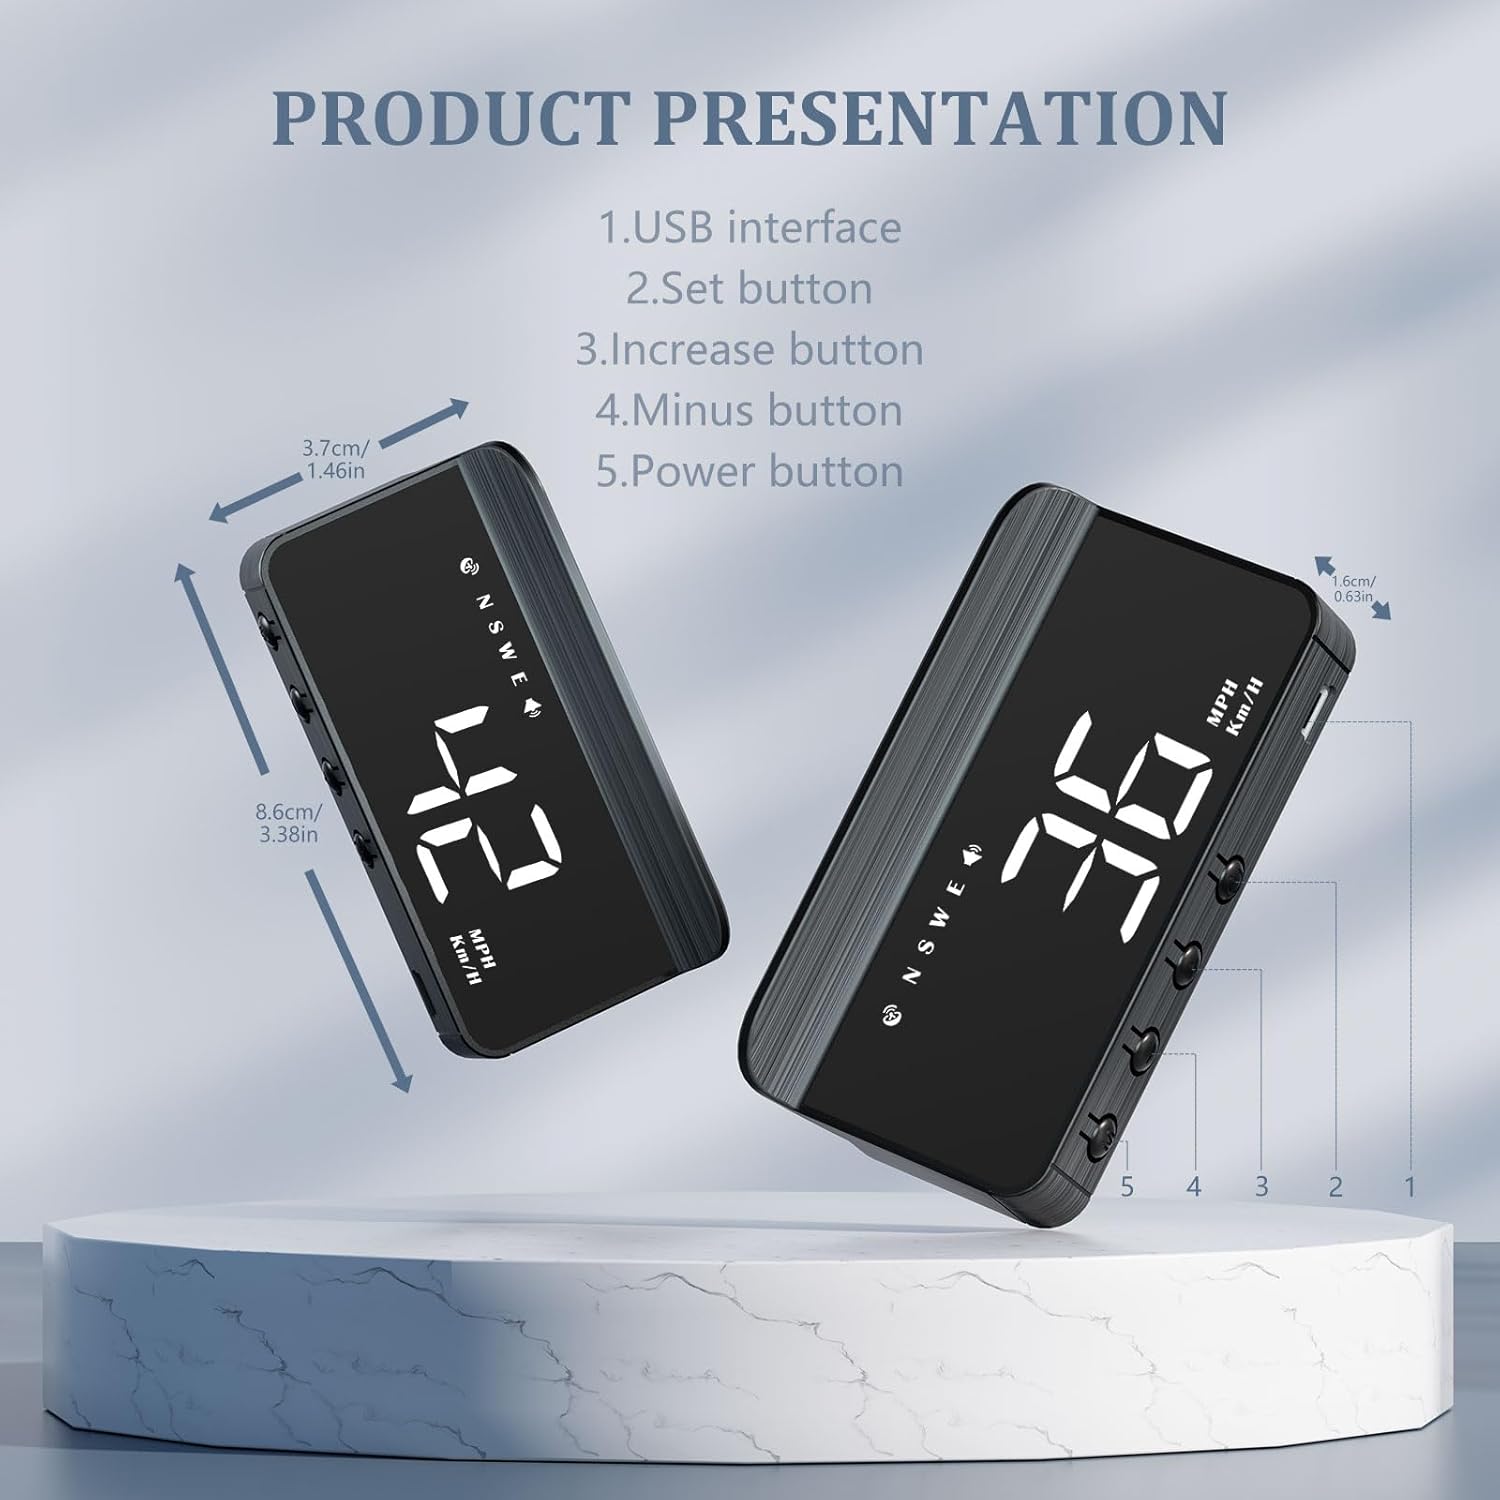
Figure 7: M1 HUD dimensions and button layout.
8. Warranty & Support
Liiiyuan products undergo two inspections by the quality inspection department before leaving the factory. For any unresolved issues or questions regarding your M1 HUD within one year of purchase, please contact Liiiyuan directly for after-sales service.
For further assistance, you may visit the official Liiiyuan store on Amazon: Liiiyuan Store.
Related Documents - M1 white
 |
Liiiyuan G12 GPS Speedometer: User Manual and Features A comprehensive guide to the Liiiyuan G12 GPS Speedometer, detailing its display functions, dial button operations, setting modes, and troubleshooting FAQs for enhanced driving safety and information. |
 |
AWOLIMEI M1 GPS Speed Meter HUD User Manual User manual for the AWOLIMEI M1 GPS Speed Meter, providing instructions on display functions, button operations, settings, and troubleshooting for this Heads Up Display device. |
 |
AMROOLOO M1 GPS Speed Meter User Manual User manual for the AMROOLOO M1 GPS Speed Meter, detailing display functions, button operations, settings, and troubleshooting for this car heads-up display (HUD). |
 |
AWOLIMEI M1/G10 GPS Speedometer HUD User Manual Comprehensive user manual for the AWOLIMEI M1/G10 GPS Speedometer Heads-Up Display (HUD). Learn about its functions, settings, and troubleshooting for all vehicles. |
 |
Digital Projection Alarm Clock User Manual User manual for the Digital Projection Alarm Clock, detailing features, setup, alarm settings, radio functions, sleep timer, projection, brightness control, night mode, thermometer/humidity display, charging, and factory reset. |
Ask a question about this manual
Ask about setup, troubleshooting, compatibility, parts, safety, or missing instructions. Manuals+ will review the question and use this page’s manual context to help answer it.