Important Safety Information
Read all instructions carefully before installing or using this heater. Failure to follow these instructions may result in electric shock, fire, property damage, or personal injury. Keep this manual for future reference.
- Electrical Connection: This heater requires a 240V hardwired connection. It must be grounded and connected to an appropriately sized current-protected circuit breaker (45A minimum) that complies with the National Electrical Code and local codes. A power cord is not included.
- Professional Installation: Installation of electrical wiring should be performed by a qualified electrician to ensure safety and compliance.
- Overheat Protection: The heater is equipped with a built-in thermostat and fuse that automatically shuts off the unit if the internal temperature exceeds 167°F (75°C). The unit will resume operation once the temperature returns to a safe level.
- Clearance: Maintain adequate clearance from combustible materials. Refer to installation diagrams for specific distances from walls and ceilings.
- Indoor Use Only: This heater is designed for indoor use in garages, workshops, and similar spaces. Do not use outdoors or in wet locations.
- Do Not Cover: Never cover the heater or block its air inlets/outlets, as this can lead to overheating and fire.
- Children and Pets: Keep children and pets away from the heater during operation.
Product Overview
The Dimaferr HGA75 is a 7500 Watt electric garage heater designed for efficient and uniform heating of spaces up to 1300 square feet. Its innovative 360-degree airflow design ensures rapid and even heat distribution.

Image: The Dimaferr HGA75 heater mounted in a garage, illustrating its 360-degree heating capability and wide heat coverage.
Key Features:
- 360-Degree Heating: Multi-directional airflow for uniform heat distribution.
- High Power Output: 7500 Watts (25,589 BTU) for fast heating.
- Digital Thermostat: Adjustable temperature range from 40°F to 95°F.
- Infrared Remote Control: Convenient operation from a distance.
- Adjustable Fan Speeds: Two settings (170 CFM / 200 CFM).
- Programmable Timer: Set operation duration from 1 to 9 hours.
- Overheat Protection: Automatic shutdown at 167°F (75°C) for safety.
- 180-Second Delay Protection: Fan continues to run after shutdown to dissipate residual heat.
- Adjustable Louvers: Direct heat flow to specific areas.
- Variable Mounting Height: Bracket allows for 4.5-inch and 6.5-inch height options.
- Durable Construction: Made with heavy-duty steel.

Image: Close-up views highlighting the heater's internal components and design features, such as the overheat protection, adjustable louvers, turbo fan, and mounting bracket.
Setup and Installation
The Dimaferr HGA75 heater is designed for ceiling-mount installation and requires hardwiring. Ensure all safety precautions are followed during installation.
Tools and Materials Required (Not Included):
- Appropriate mounting hardware for ceiling type
- 8 AWG electrical wire
- 45A circuit breaker
- Wire strippers, screwdriver, drill
- Voltage tester
- Safety glasses and gloves
Installation Steps:
- Choose Location: Select a suitable ceiling location in your garage or workshop. Ensure there is at least 50 inches (127 cm) clearance from walls and other obstructions, and sufficient structural support for the heater's weight (approximately 22 lbs / 10 kg).
- Mounting Bracket: Securely attach the ceiling mounting bracket to a sturdy ceiling joist or support structure. The bracket offers two height options: 4.5 inches and 6.5 inches from the ceiling.
- Mount Heater: Carefully lift and attach the heater unit to the installed mounting bracket. Ensure it is securely fastened.
- Electrical Wiring:
- WARNING: Ensure power to the circuit is OFF at the main breaker panel before beginning any wiring.
- This heater requires a dedicated 240V circuit. Connect the heater's wiring (black, white, green) to the appropriate terminals in your breaker panel.
- Use 8 AWG wire for the connection.
- Install a 45A circuit breaker for protection.
- Consult a qualified electrician if you are unsure about any wiring procedures.
- Verify Connections: Double-check all electrical connections for tightness and correctness.
- Restore Power: Once installation is complete and verified, restore power to the circuit at the main breaker panel.
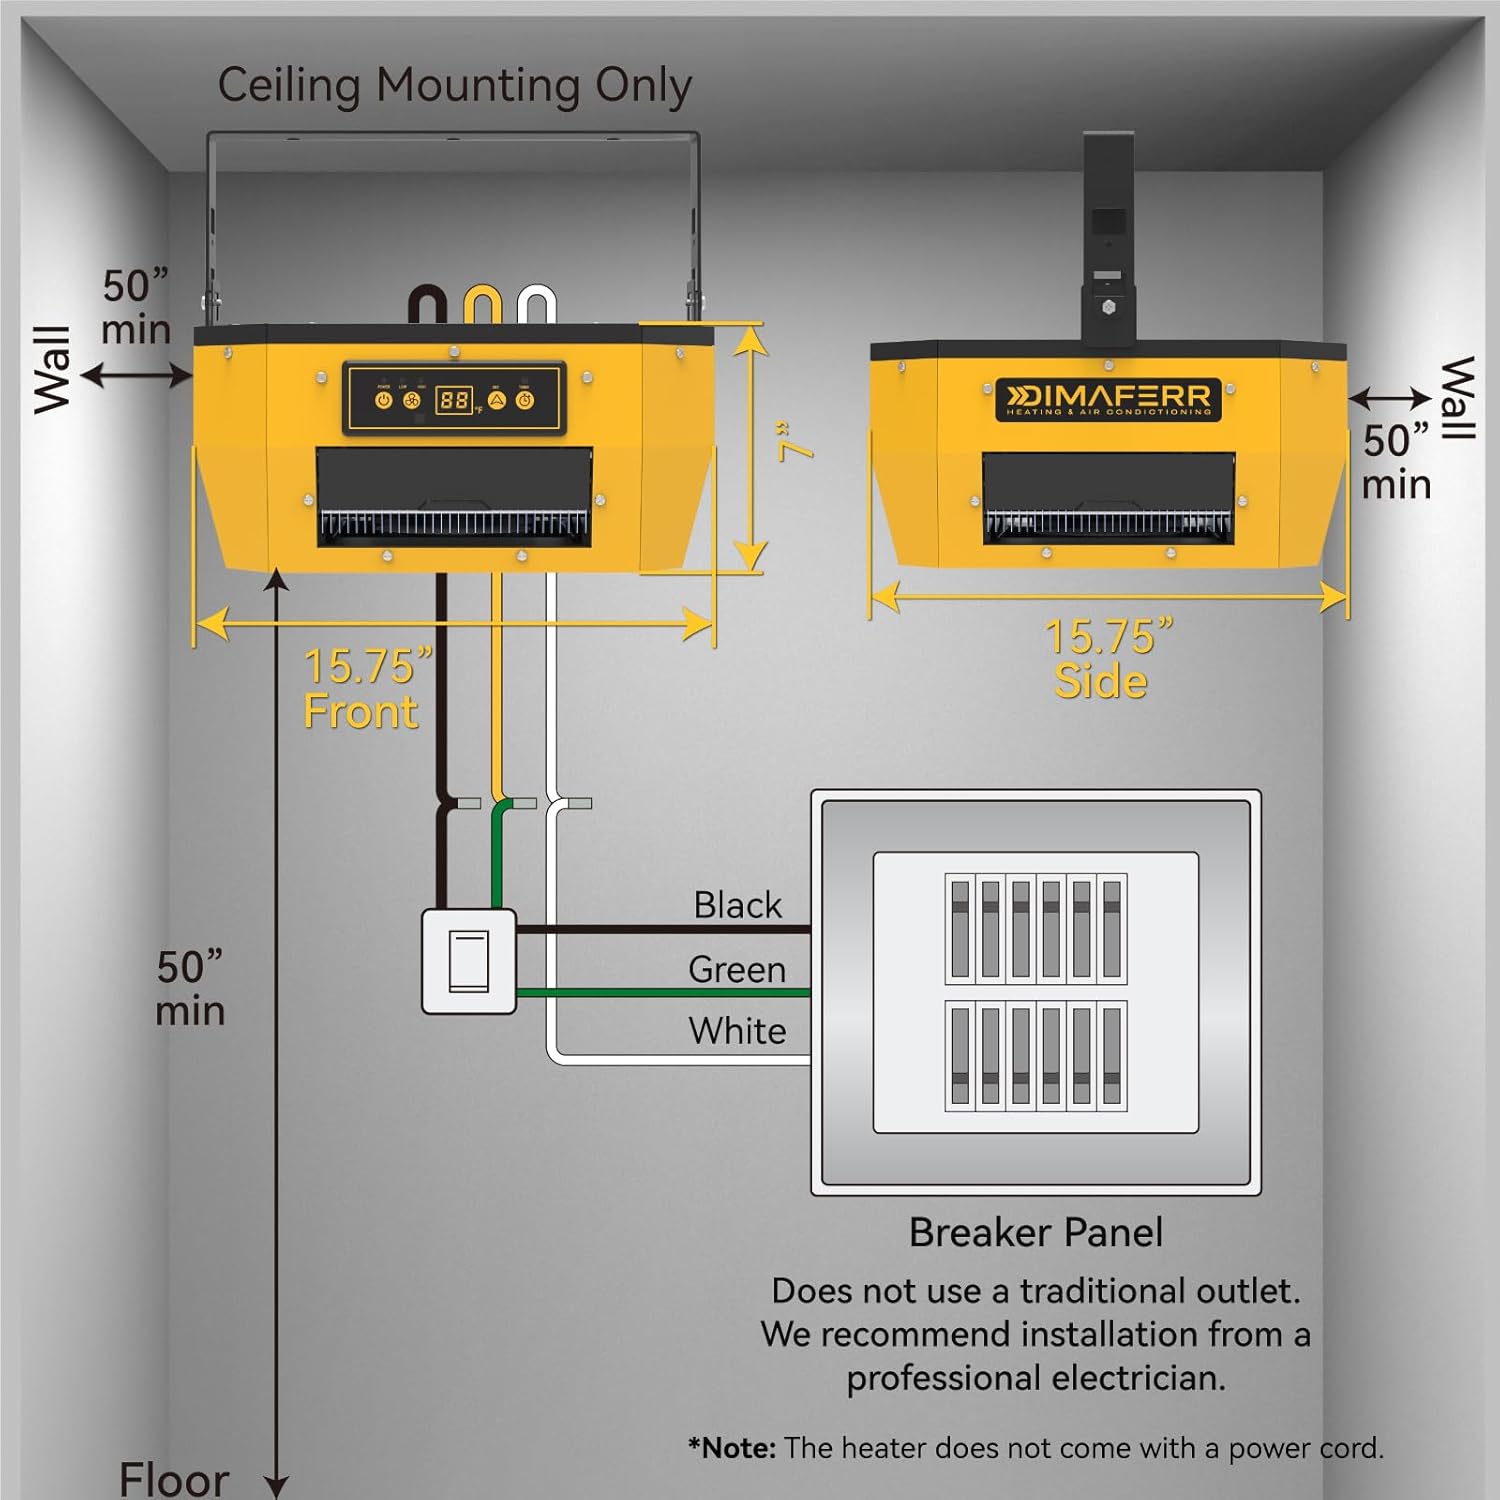
Image: Installation diagram detailing ceiling mounting, required clearances (50 inches from walls/floor), and the hardwired electrical connection to a breaker panel (Black, Green, White wires).
Operating Instructions
The Dimaferr HGA75 heater can be operated using the control panel on the unit or the included infrared remote control.
Control Panel and Remote Functions:

Image: The heater's control panel displaying temperature and fan speed, alongside the infrared remote control with its various function buttons.
- Power On/Off: Press the power button ($) on the control panel or remote to turn the heater on or off.
- Temperature Adjustment: Use the Up (▲) and Down (▼) arrows on the remote or control panel to set the desired temperature between 40°F and 95°F (4°C and 35°C). The heater will cycle on and off to maintain the set temperature.
- Fan Speed: Press the fan speed button (☺) to cycle between two fan speeds: 170 CFM (Low) and 200 CFM (High).
- Timer Function: Press the timer button (⏱) to set an automatic shut-off time from 1 to 9 hours. Each press increases the timer by one hour. The display will show the remaining time.
- Adjustable Louvers: Manually adjust the louvers on the heater's outlets to direct the airflow and heat to specific areas as needed.
Special Functions:
- 180-Second Time Delay Protection: After the heater is turned off, the fan will continue to run for 180 seconds (3 minutes) to dissipate residual heat from the heating elements, extending the product's lifespan.
- Overheat Protection: As mentioned in Safety Information, the heater will automatically shut down if it overheats and restart once it cools down.
Maintenance
Regular maintenance ensures optimal performance and longevity of your Dimaferr HGA75 heater. Always disconnect power before performing any maintenance.
- Cleaning:
- Ensure the heater is completely off and cooled down.
- Use a soft, damp cloth to wipe the exterior surfaces. Do not use abrasive cleaners or solvents.
- Gently vacuum or brush dust from the air inlets and outlets to ensure unobstructed airflow.
- Inspection:
- Periodically check the mounting hardware to ensure the heater remains securely attached to the ceiling.
- Inspect the electrical wiring for any signs of damage or wear. If damage is found, contact a qualified electrician for repair.
- Storage: If storing the heater for an extended period, ensure it is clean and dry. Store in a cool, dry place.
Troubleshooting
If you experience issues with your Dimaferr HGA75 heater, refer to the following common problems and solutions:
| Problem | Possible Cause | Solution |
|---|---|---|
| Heater does not turn on. |
|
|
| Heater runs but no heat. |
|
|
| Remote control not working. |
|
|
| Unusual noise during operation. |
|
|
If the problem persists after attempting these solutions, please contact Dimaferr customer service.
Specifications
| Feature | Detail |
|---|---|
| Model Number | HGA75 |
| Brand | Dimaferr |
| Power Output | 7500 Watts |
| BTU Output | 25,589 BTU |
| Voltage | 240 Volts (AC) |
| Amperage | 31.3 Amps |
| Heating Coverage | Up to 1300 sq. ft. |
| Temperature Range | 40°F - 95°F (4°C - 35°C) |
| Fan Speeds | 2 (170 CFM, 200 CFM) |
| Timer | 1-9 Hours |
| Overheat Protection | Automatic shut-off at 167°F (75°C) |
| Time Delay Protection | 180 seconds |
| Mounting Type | Ceiling Mount |
| Product Dimensions (L x W x H) | 15.75" x 15.75" x 7.17" (40cm x 40cm x 18.2cm) |
| Item Weight | 22 lbs (10 kg) |
| Material | Heavy-duty steel |
Warranty and Customer Support
Dimaferr provides a one-year after-sales service for the HGA75 electric garage heater. If you have any questions, suggestions, or feedback regarding your product, or require technical assistance, please do not hesitate to contact our customer service team.
Contact Information:
- Refer to the contact details provided with your purchase or on the official Dimaferr website.
- Please have your model number (HGA75) and purchase date ready when contacting support.
