
Introduction
This manual provides essential information for the safe and efficient operation, maintenance, and troubleshooting of your PowerSmart 26-Inch Two-Stage Gas Snow Blower. Please read all instructions carefully before assembly and operation to ensure proper use and to prevent injury or damage.

Image: The PowerSmart 26-inch two-stage gas snow blower, showcasing its clearing width, snow depth capacity, 208cc engine, and two-stage technology.
Setup and Assembly
Your PowerSmart snow blower requires some assembly before first use. Basic tools, such as wrenches, will be needed. Follow the detailed instructions provided in the packaging for step-by-step assembly.
Key Components and Initial Checks:
- Handle Warmer: The snow blower is equipped with a handle warmer for comfort in cold conditions. Ensure connections are secure.
- Electric Start: For convenient starting, connect the electric start cord as instructed. The electric start button is designed for short bursts (max 5 seconds, 3 seconds rest) to prevent damage.
- Skid Shoes: Adjustable steel skid shoes protect surfaces from scratches and scuffing. Adjust them according to the terrain you will be clearing.
- Chute Cleaner Tool: A chute cleaner tool is included for safely clearing blockages. Keep it accessible.
- Engine Oil: Ensure the engine oil level is correct before starting. Refer to the engine manual for specific oil type and capacity.

Image: Close-up view of the snow blower's control panel and heated handles, indicating the handle warmer function.

Image: Detail of the electric start mechanism, showing the power input and start button.
Operating Instructions
Starting the Engine:
- Ensure the fuel tank is filled with fresh, clean gasoline.
- Check the oil level.
- Insert the key switch.
- Engage the choke (if cold starting).
- Use the electric start or pull the recoil starter.
- Once started, gradually disengage the choke.
Snow Clearing Operation:
- Clearing Width & Intake Height: This model features a 26-inch clearing width and 20-inch intake height, suitable for snow depths of 1 to 12 inches.
- Self-Propelled Drive: The self-propelled drive system offers variable speed control for both forward and reverse movement. Adjust speed according to snow conditions. Do not change speed when the machine is moving forward or reverse.
- Two-Stage Technology: The all-steel auger cuts through tough, icy snow, while the high-speed steel impeller throws snow up to 45 feet away.
- Chute Control: The one-hand 180° chute control allows for easy adjustment of snow discharge direction.

Image: A user operating the self-propelled snow blower, demonstrating its ease of movement across a snowy surface.

Image: The snow blower in action, effectively throwing snow a significant distance, highlighting its powerful discharge capabilities.

Image: Detailed view of the two-stage auger system, designed for efficient snow intake and discharge.
Video: Official PowerSmart video demonstrating the 26-inch snow blower with Briggs & Stratton engine in operation, highlighting its features and performance.
Maintenance
Regular maintenance ensures the longevity and optimal performance of your snow blower. Always turn off the engine and remove the key before performing any maintenance.
Recommended Maintenance Schedule:
- After Each Use: Clean the unit, check for loose fasteners, and inspect the auger and impeller for damage.
- Seasonally: Change engine oil, inspect spark plug, check belts, and lubricate moving parts.
Common Replacement Parts:
Refer to the diagram below for common replacement parts and their identification.
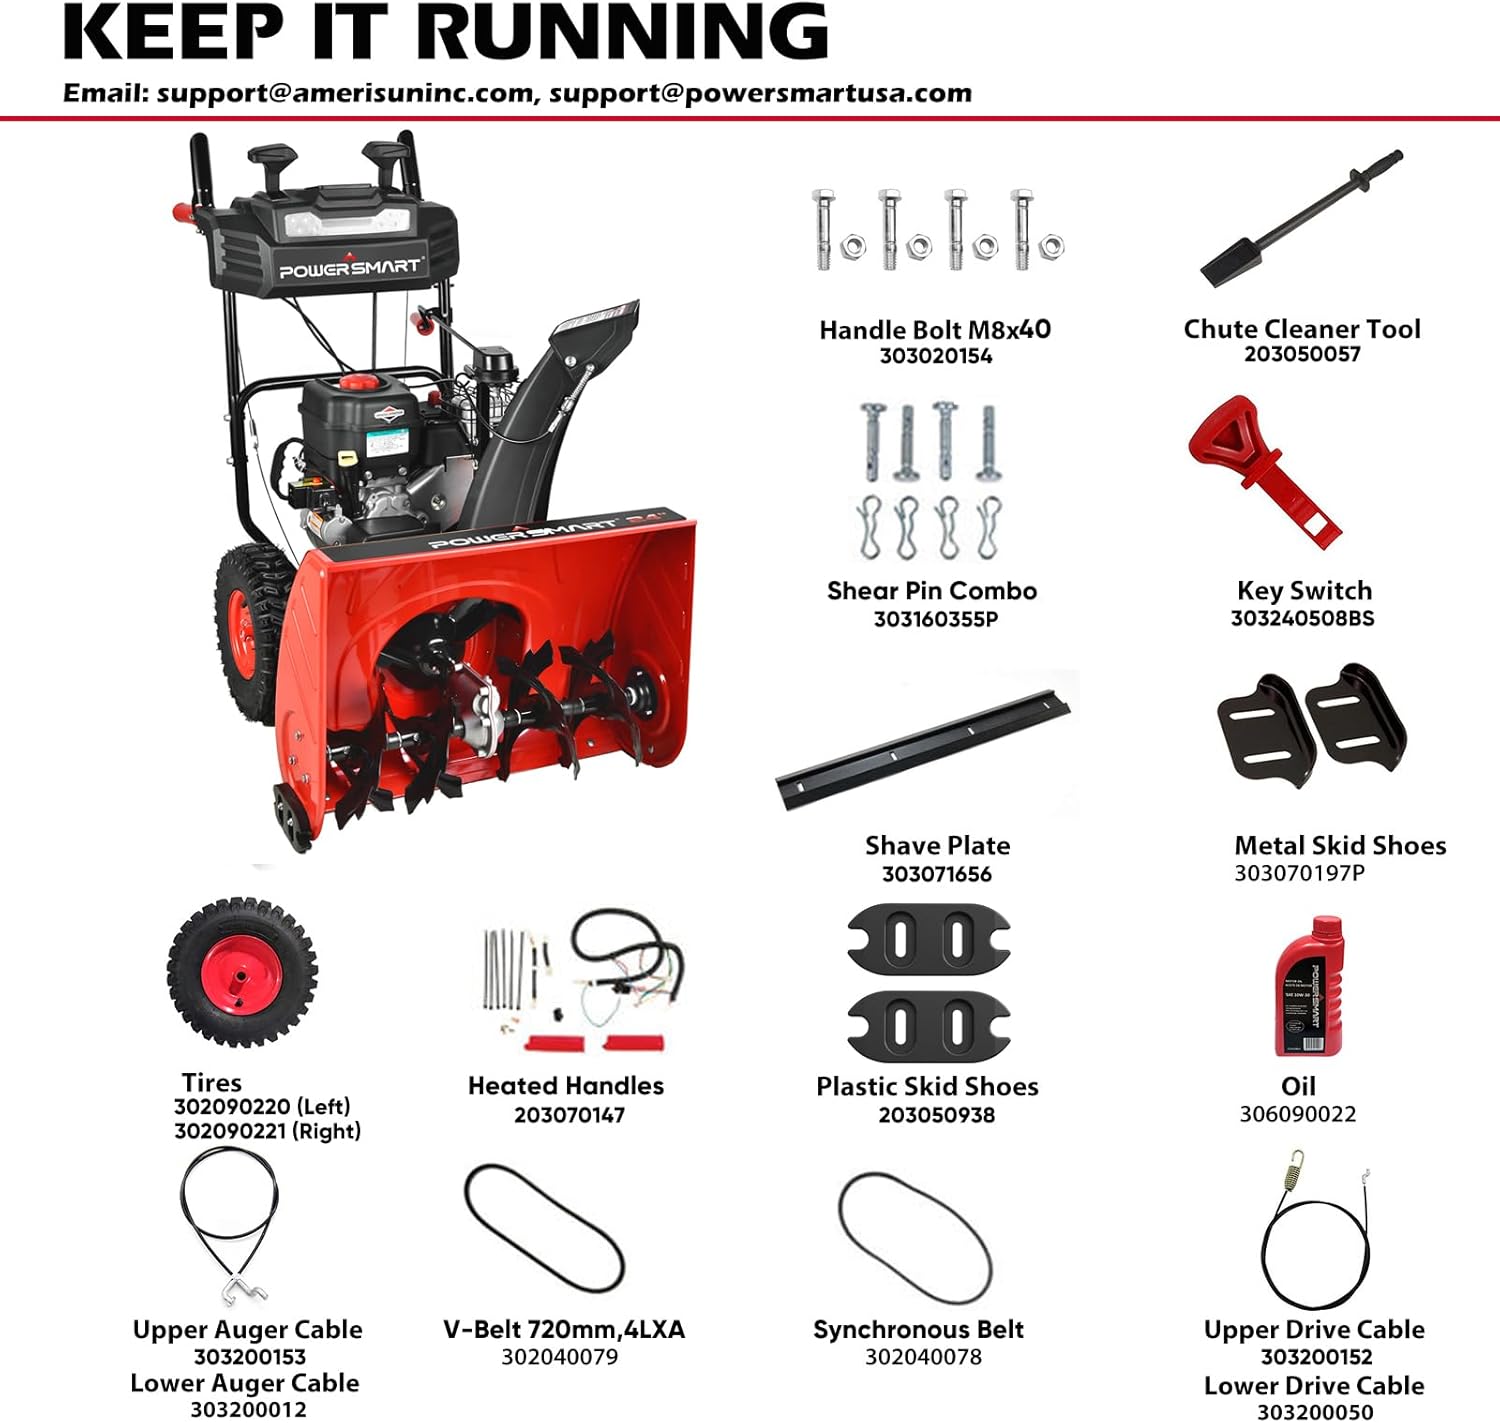
Image: An exploded view diagram of the snow blower with various labeled parts, including bolts, shear pins, shave plates, skid shoes, tires, heated handles, belts, and cables, for maintenance and replacement.
- Handle Bolt M8x40 (303020154)
- Chute Cleaner Tool (203050057)
- Shear Pin Combo (303160355P)
- Key Switch (303240508BS)
- Shave Plate (303071656)
- Metal Skid Shoes (303070197P)
- Plastic Skid Shoes (203050938)
- Tires (302090220 Left, 302090221 Right)
- Heated Handles (203070147)
- V-Belt 720mm, 4LXA (302040079)
- Synchronous Belt (302040078)
- Upper Auger Cable (303200153)
- Lower Auger Cable (303200012)
- Upper Drive Cable (303200152)
- Lower Drive Cable (303200050)
Troubleshooting
This section addresses common issues you might encounter with your snow blower.
Engine Related Issues:
- Engine Fails to Start:
- Ensure the key switch is fully inserted.
- Check fuel level and quality.
- Verify the choke is engaged for cold starts.
- If using electric start, do not run the starter for more than 5 seconds at a time, with 3-second rests. If the engine still does not start, consult the operations manual.
- Engine Runs Roughly: Check spark plug, fuel filter, and air filter.
Operation Related Issues:
- Snow Not Discharging Properly:
- Check for blockages in the auger or discharge chute. Always use the chute cleaner tool and ensure the engine is off before clearing blockages.
- Inspect the auger and impeller for damage.
- Loss of Drive: Check drive belts for wear or damage.
- Machine Not Moving Smoothly: Do not change speed when the machine is moving forward or reverse. This can cause strain on the drive system.
Specifications
| Feature | Specification |
|---|---|
| Brand | PowerSmart |
| Model | BS26 |
| Power Source | Gas Powered |
| Engine Type | 4 Cycle Briggs & Stratton 950 Snow Series |
| Engine Displacement | 208 cubic centimeters |
| Clearing Width | 26 inches |
| Intake Height | 20 inches |
| Ideal Snow Depth | 1-12 inches |
| Maximum Throw Distance | 45 feet |
| Product Dimensions (D x W x H) | 48.7" x 27.8" x 44.2" |
| Item Weight | 145 pounds |
| Wheel Size | 13 inches |
| Certifications | ETL, cUL |

Image: A visual representation of the snow blower's key dimensions, including height, width, and depth.
Warranty and Support
PowerSmart is committed to providing reliable outdoor power equipment. For warranty service or repairs, please contact an Authorized Service Dealer.
Support Information:
- Authorized Service: Over 500 certified repair centers are available nationwide.
- Parts Availability: A full replacement parts inventory is maintained at our Itasca, IL HQ. EU spare part availability is guaranteed for 10 years.
- Direct Support: Receive support directly from the team that built your equipment.
- Contact Email: support@amerisuninc.com, support@powersmartusa.com
For further assistance or to locate an authorized service center, please visit the official PowerSmart website or contact customer support via the provided email addresses.