
1. Introduction
Thank you for choosing the Langtu LT84 Mechanical Keyboard. This manual provides detailed instructions on how to set up, operate, and maintain your new keyboard. Please read this manual carefully before use to ensure optimal performance and longevity of your device.
2. Product Overview
The Langtu LT84 is an 84-key mechanical keyboard designed for gaming and general computer use. It features vibrant RGB backlighting, hot-swappable switches for easy customization, and supports both wired and Bluetooth wireless connections.
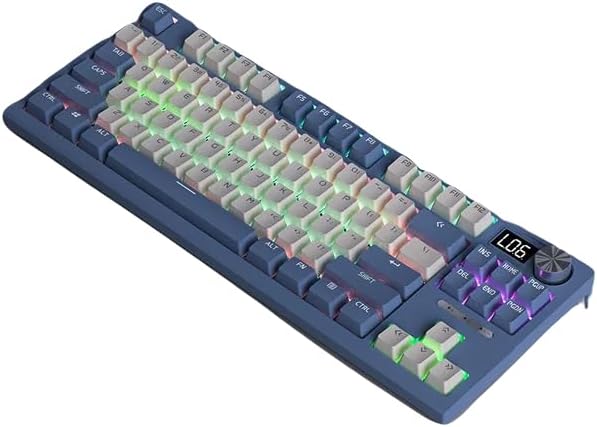
Figure 2.1: Top-down view of the Langtu LT84 Mechanical Keyboard, showcasing its compact 84-key layout and illuminated RGB backlighting.

Figure 2.2: A closer perspective of the Langtu LT84 keyboard, highlighting the keycap design and overall aesthetic.
3. Setup
3.1 Connecting the Keyboard
The LT84 keyboard supports both wired and wireless (Bluetooth) connections.
Wired Connection:
- Locate the USB-C port on the keyboard.
- Connect the provided USB-C cable to the keyboard.
- Plug the other end of the USB-C cable into an available USB port on your computer.
- The keyboard will be automatically recognized by your operating system.
Bluetooth Wireless Connection:
- Ensure the keyboard is charged or has sufficient power.
- Toggle the connection switch on the keyboard to Bluetooth mode (if available).
- On your computer or device, go to Bluetooth settings.
- Search for new devices and select "Langtu LT84" from the list.
- Follow any on-screen prompts to complete the pairing process.
4. Operating Instructions
4.1 RGB Lighting Control
The LT84 keyboard features customizable RGB backlighting. Use the following key combinations to adjust the lighting effects:

Figure 4.1: The keyboard displaying various RGB lamp effects, illustrating the customizable backlighting.
- Fn + \|: Cycle through different RGB lighting modes.
- Fn + ↑: Increase backlight brightness.
- Fn + ↓: Decrease backlight brightness.
- Fn + ←: Slow down lighting effect speed.
- Fn + →: Speed up lighting effect speed.
4.2 Key Functions and Shortcuts
The keyboard includes various function key shortcuts for enhanced productivity:
- Fn + F1-F12: Access multimedia controls and system functions (e.g., volume, media playback, calculator). Refer to the keycaps for specific icons.
- Fn + Win: Lock/Unlock Windows key.
- Full Key Non-Impact Design: The keyboard features a full key non-impact design, ensuring that all key presses are registered accurately, even during rapid typing or intense gaming sessions. This prevents key conflicts and ghosting.
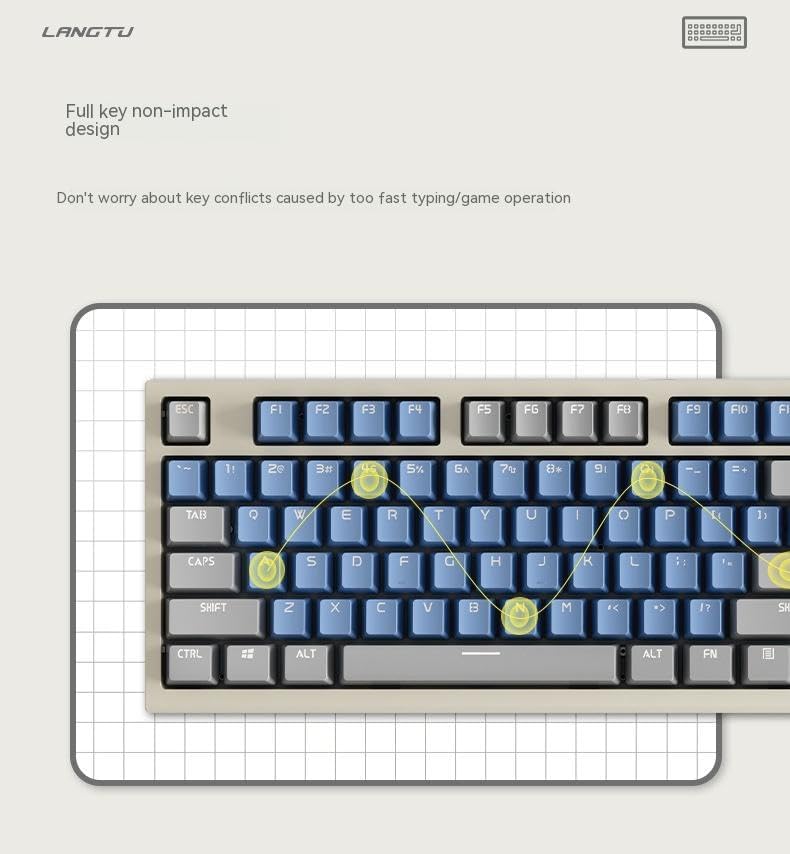
Figure 4.2: Illustration of the full key non-impact design, ensuring accurate registration of every keystroke.
4.3 Hot-Swappable Switches
The LT84 keyboard features hot-swappable switches, allowing you to easily change mechanical switches without soldering. This enables customization of typing feel and sound.
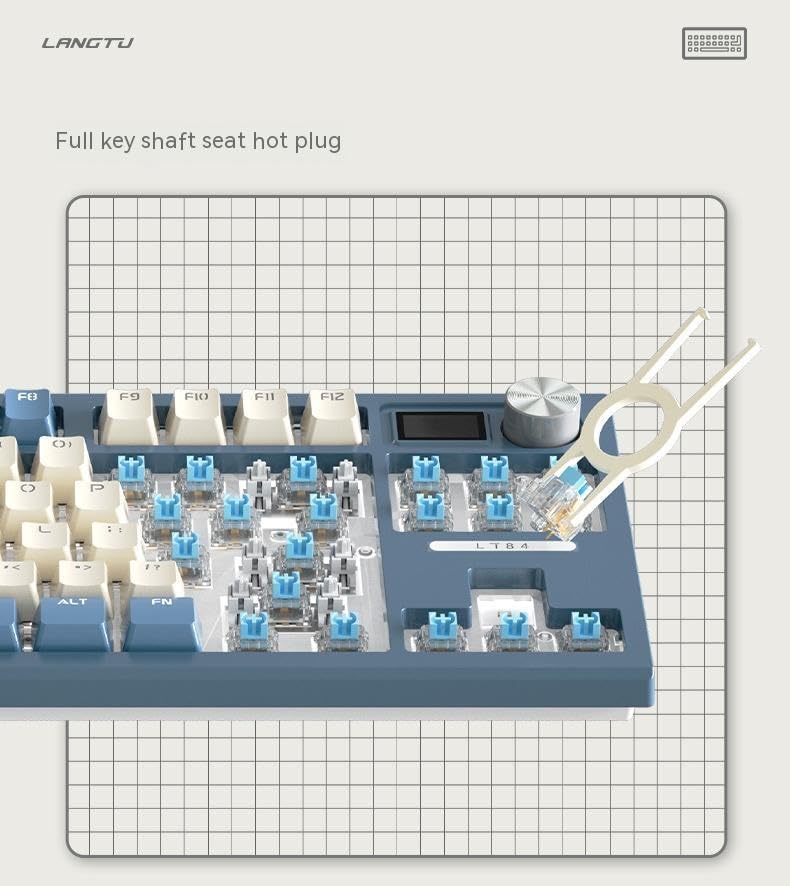
Figure 4.3: A key puller demonstrating the hot-swappable switch feature, allowing for easy switch replacement.

Figure 4.4: A close-up view of a mechanical key switch and its corresponding keycap, highlighting the individual components.
- Use the provided keycap puller to gently remove the desired keycap.
- Use the switch puller to carefully grip and pull out the mechanical switch.
- Align the pins of the new switch with the holes on the PCB.
- Gently push the new switch into place until it clicks securely.
- Replace the keycap.
5. Maintenance
Proper maintenance ensures the longevity and performance of your keyboard.
- Cleaning: Regularly clean the keyboard with a soft, dry cloth. For deeper cleaning, use a can of compressed air to remove dust and debris from between the keycaps. You may also remove keycaps for thorough cleaning.
- Avoid Liquids: Do not expose the keyboard to liquids. In case of spills, immediately disconnect the keyboard and allow it to dry completely before reconnecting.
- Storage: Store the keyboard in a cool, dry place away from direct sunlight and extreme temperatures.
6. Troubleshooting
If you encounter any issues with your Langtu LT84 keyboard, please refer to the following table for common problems and solutions:
| Problem | Possible Cause | Solution |
|---|---|---|
| Keyboard not responding (wired) | Loose cable connection, faulty USB port, driver issue. | Ensure USB cable is securely connected. Try a different USB port. Restart your computer. |
| Keyboard not connecting (Bluetooth) | Keyboard not in pairing mode, low battery, Bluetooth disabled on device, interference. | Ensure keyboard is in Bluetooth pairing mode. Charge the keyboard. Enable Bluetooth on your device. Move closer to the device. |
| RGB lighting not working or stuck | Incorrect lighting mode, software glitch. | Cycle through lighting modes using Fn + \|. Try resetting the keyboard (refer to advanced functions if available). |
| Certain keys not working | Dust/debris under keycap, faulty switch. | Remove keycap and clean. If hot-swappable, try replacing the switch with a known working one. |
7. Specifications
Detailed technical specifications for the Langtu LT84 Mechanical Keyboard:
| Feature | Detail |
|---|---|
| Brand | Langtu |
| Model | LT84 |
| Number of Keys | 84 |
| Operation Style | Mechanical |
| Connectivity Technology | Bluetooth, Wired |
| Special Feature | Hot-Swappable Switches, RGB Backlight |
| Keyboard Backlight Color Support | RGB (Red, Green, Blue) |
| Compatible Devices | Tablet, Desktop Computer, Laptop |
| Recommended Uses For Product | Gaming |
| Power Source | Wired |
| Color | Wired Blue |
| Material | Other |
8. Warranty and Support
Langtu is committed to providing high-quality products and customer satisfaction.
- Warranty: All Langtu products come with a 12-month warranty from the date of purchase. This warranty covers manufacturing defects and ensures your product functions as intended.
- Customer Support: If you encounter any problems with your product, such as damaged or incorrect items, please do not hesitate to contact us. We are committed to responding to your inquiries within 24 hours. You can reach us through the messaging system on the platform where you purchased the product.
