Introduction
Thank you for choosing the Clatronic NM 3795 Sewing Machine. This high-quality free-arm sewing machine is designed for both beginners and sewing enthusiasts, offering 12 selectable stitch patterns and convenient features for various sewing projects. This manual provides essential information for safe operation, setup, maintenance, and troubleshooting to ensure optimal performance of your machine.
Safety Instructions
Please read all safety instructions carefully before using the appliance to prevent injury or damage. Keep this manual for future reference.
- Always disconnect the sewing machine from the power supply when not in use, when changing needles, or during maintenance.
- Keep fingers away from the needle, presser foot, and handwheel during operation.
- Do not operate the machine if the power cord or plug is damaged.
- Ensure the machine is placed on a stable, flat surface.
- This appliance is not intended for use by persons (including children) with reduced physical, sensory or mental capabilities, or lack of experience and knowledge, unless they have been given supervision or instruction concerning use of the appliance by a person responsible for their safety.
- Use only the accessories specified by the manufacturer.
Product Overview and Parts Identification
Familiarize yourself with the main components of your sewing machine:

Image: Diagram of the Clatronic NM 3795 sewing machine with numbered labels pointing to key components.
- Handwheel: Manually raises and lowers the needle.
- Lamp: LED work light for illuminating the sewing area.
- Drawer: Storage compartment for accessories.
- Program Selection: Dial to choose from 12 stitch patterns.
- Reverse Button: For reverse stitching.
- Thread Guide: Guides the upper thread.
- Thread Cutter: Conveniently cuts thread.
- Upper Thread Tension: Adjusts the tension of the upper thread.
- On/Off & Speed Switch: Controls power and selects sewing speed (Low/High).
Setup
1. Power Supply
The Clatronic NM 3795 can be powered by either the included AC adapter or 4x AA batteries (not included) for flexible use.
- AC Adapter: Insert the DC plug into the machine's power input jack and plug the adapter into a standard wall outlet (220-240V, 50-60Hz).
- Battery Operation: Open the battery compartment on the rear of the machine and insert 4x 1.5V AA batteries, ensuring correct polarity.

Image: Rear view of the Clatronic NM 3795 sewing machine, showing the battery compartment.
2. Foot Pedal Connection
If using the foot pedal for speed control, plug the foot pedal cable into the designated jack on the machine.
3. Threading the Machine
Proper threading is crucial for good stitch quality. Refer to the diagrams in the full manual for detailed steps.
- Upper Thread: Place a spool of thread on the spool pin. Guide the thread through the various thread guides and tension discs, then through the take-up lever, and finally through the needle eye.
- Bobbin Winding: Follow the instructions to wind thread onto an empty bobbin.
- Bobbin Insertion: Insert the wound bobbin into the bobbin case, ensuring the thread feeds correctly.
Operating Instructions
1. Stitch Selection
Turn the Program Selection dial (4) to choose one of the 12 built-in stitch patterns. The machine offers pre-set stitch widths and lengths for ease of use.
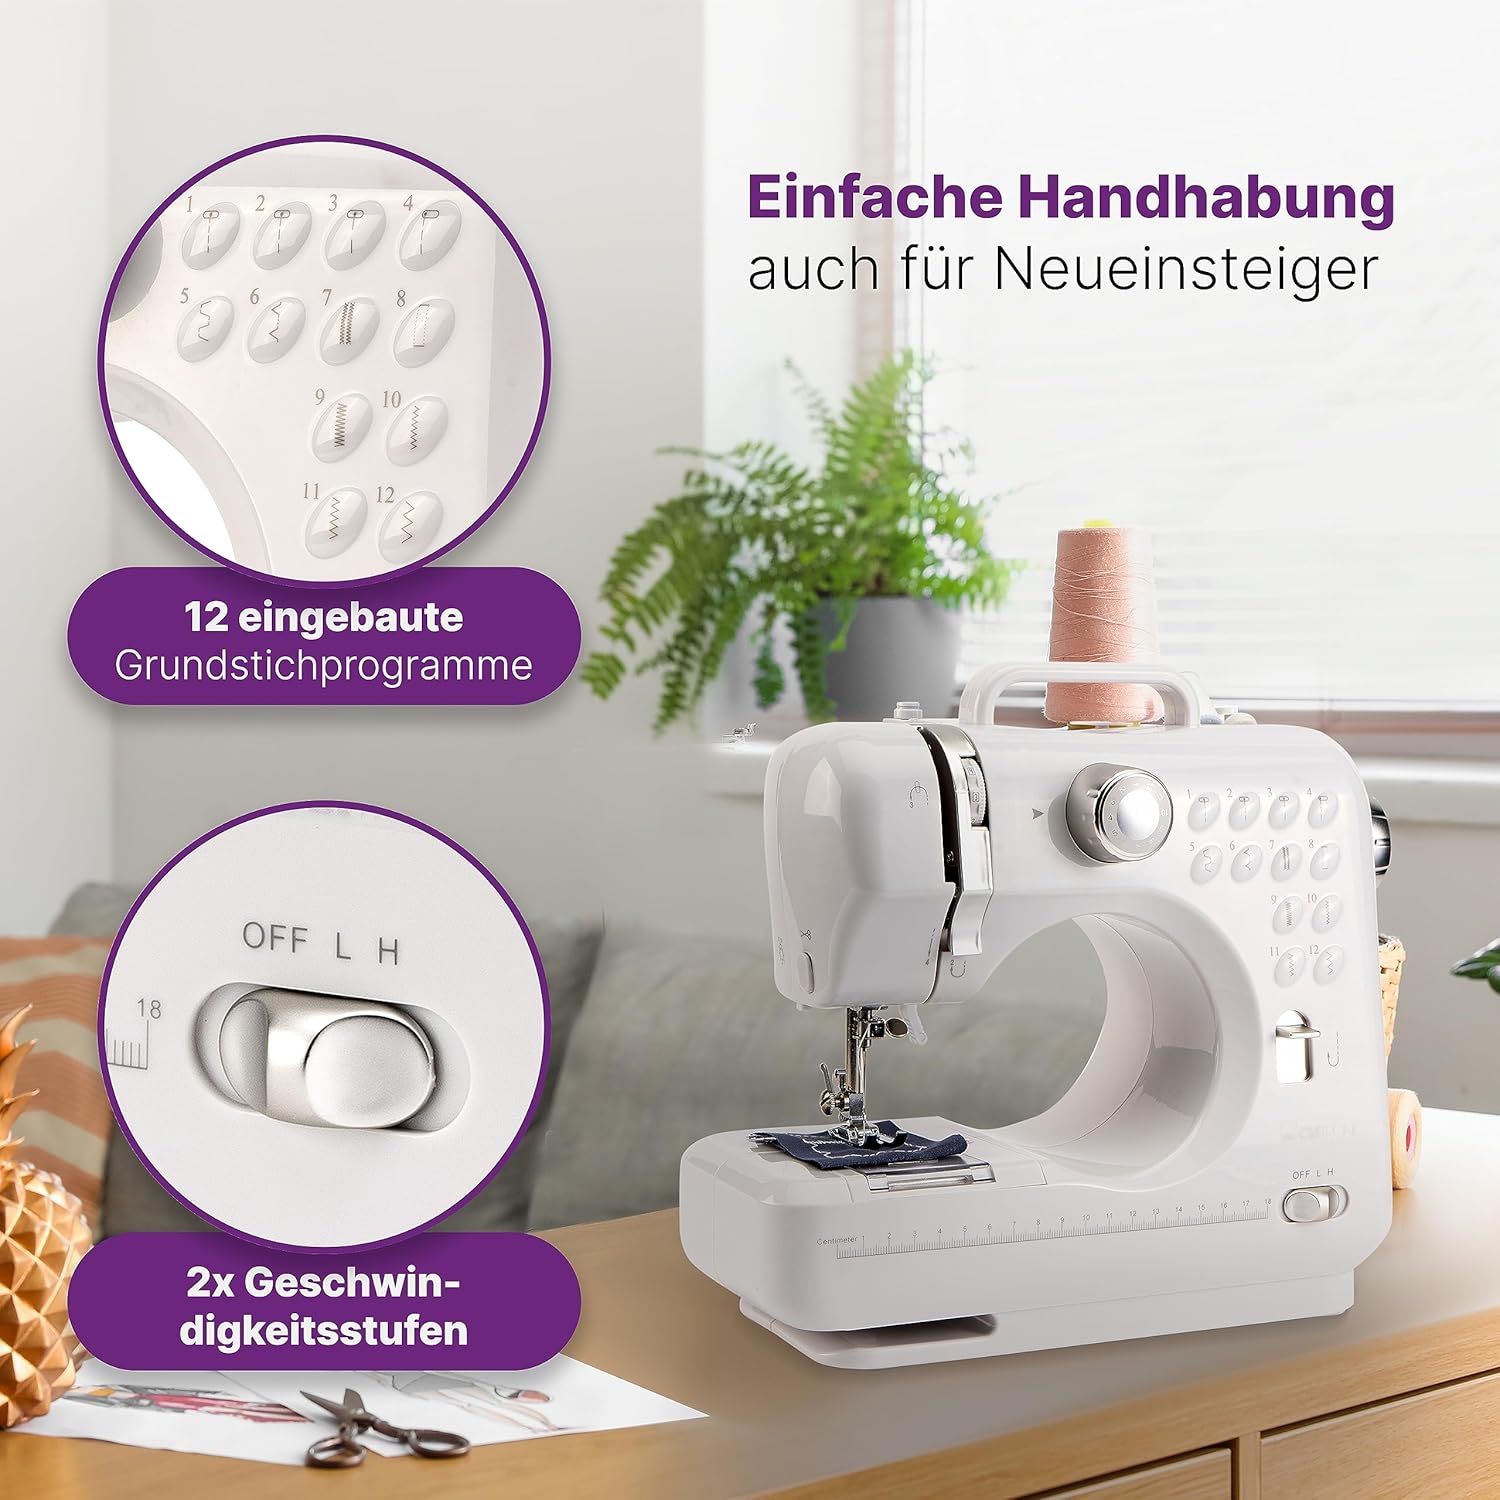
Image: Clatronic NM 3795 sewing machine showing the stitch pattern selector dial and speed switch.
2. Speed Control
Use the On/Off & Speed Switch (9) to select between two sewing speeds: Low (L) or High (H). Alternatively, the foot pedal can be used for variable speed control.
3. Forward and Reverse Stitching
Press and hold the Reverse Button (5) to sew in reverse. This is useful for securing stitches at the beginning and end of seams.
4. LED Work Light
The integrated glare-free LED work light (2) illuminates your sewing area, providing clear visibility for precise work.

Image: Close-up of the sewing area with the LED work light active.
5. Buttonhole Function
The machine features a 2-level buttonhole system for creating neat and consistent buttonholes. Refer to the full manual for specific steps on using this function.
6. Thread Cutter
After completing a seam, use the integrated thread cutter (7) to quickly trim threads.
Maintenance
Regular maintenance ensures the longevity and smooth operation of your sewing machine.
- Cleaning: Regularly clean lint and dust from the bobbin area and feed dogs using a small brush. Always disconnect power before cleaning.
- Needle Replacement: Replace needles frequently, especially if they become bent or dull, to prevent skipped stitches and fabric damage.
- Storage: Store the machine in a dry, dust-free environment. Use the practical carrying handle for easy transport.
Troubleshooting
If you encounter issues, refer to the following common problems and solutions:
- Thread Breaking: Check if the machine is threaded correctly, if the thread tension is too high, or if the needle is bent or dull. Ensure the bobbin is inserted correctly.
- Skipped Stitches: Replace the needle, ensure it is inserted correctly, and check that the machine is threaded properly.
- Machine Not Starting: Verify that the power adapter is securely plugged in or that the batteries are correctly inserted and not depleted. Check the On/Off switch.
- Uneven Stitches: Re-thread both the upper thread and bobbin. Adjust the upper thread tension if necessary.
Specifications
- Brand:
- Clatronic
- Model Number:
- 3795
- Color:
- White/Silver
- Product Dimensions (L x W x H):
- 12 x 29 x 26 cm
- Material:
- Plastic
- Item Weight:
- 1.96 Kilograms
- Power Source:
- Cable Electric (AC Adapter) or 4x 1.5V AA Batteries (not included)
- Power Consumption:
- 7.2 W
- Voltage:
- 220-240 V, 50-60 Hz
- Year of Manufacture:
- 2024
Accessories
The Clatronic NM 3795 comes with practical accessories to get you started:

Image: Sewing machine with its accessory drawer open.
- 1x Spare Needle
- 2x Upper Thread Spools
- 2x Bobbins (wound)
- 1x Needle Threader
- Foot Pedal
- AC Power Adapter

Image: Clatronic NM 3795 sewing machine with included accessories.
Warranty and Support
This product comes with a 2-year availability for spare parts within the EU. For further support or warranty claims, please contact your retailer or the manufacturer's customer service.


