
1. Introduction
This manual provides detailed instructions for the installation, operation, and maintenance of your AnyTone AT-500M II 40 Channel CB Radio. Please read this manual thoroughly before using the radio to ensure proper function and to maximize your user experience. This CB radio is designed for reliable communication in various mobile environments, featuring both AM and FM modes, noise reduction capabilities, and weather channel access.
2. Product Overview
Familiarize yourself with the main components and controls of your AT-500M II CB Radio.
2.1 Radio Unit and Microphone

Image: The AnyTone AT-500M II CB Radio unit connected to its microphone, showcasing the compact design.
2.2 Front Panel Controls
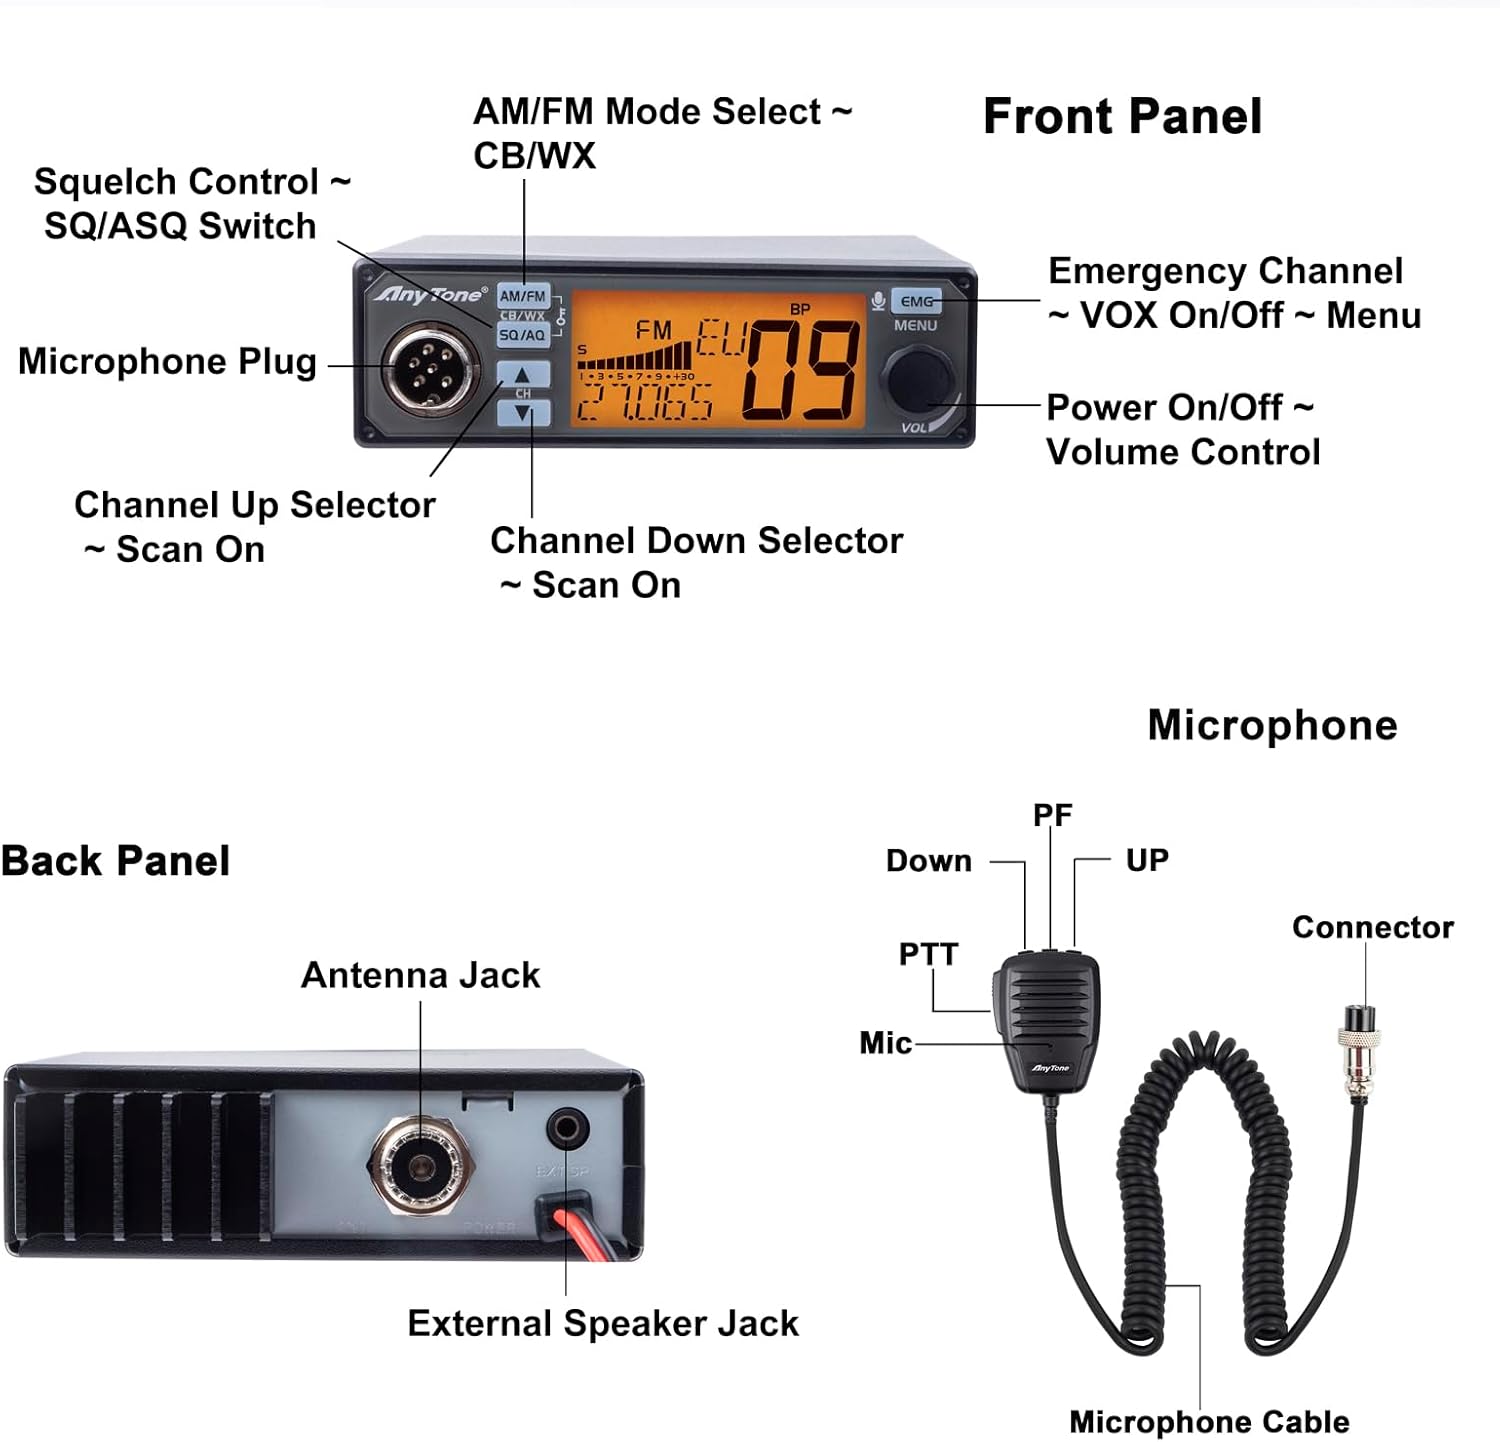
Image: Detailed diagram illustrating the front panel controls, back panel connections, and microphone functions of the AT-500M II CB Radio.
- AM/FM Mode Select: Toggles between AM, FM, CB, and WX (Weather) modes.
- SQ/AQ Switch: Squelch Control for adjusting receiver sensitivity and Automatic Squelch (ASQ).
- Microphone Plug: Connector for the included microphone.
- Channel Up/Down Selectors: Buttons to change communication channels and activate scan functions.
- EMG/MENU Button: Accesses emergency channels and the radio's menu settings, including VOX On/Off.
- VOL Knob: Power On/Off and Volume Control.
2.3 Back Panel Connections
- Antenna Jack: Connects to your external CB antenna.
- External Speaker Jack: Allows connection of an optional external speaker for enhanced audio output.
- Power Input: Connects to the vehicle's 12V or 24V power supply.
2.4 Microphone Functions
- PTT (Push-To-Talk) Button: Activates transmission when pressed.
- UP/DOWN Buttons: Used for channel selection.
- PF (Programmable Function) Button: May be assigned various functions via the menu.
- Mic: Integrated microphone for voice input.
3. Package Contents
Verify that all items are present in your product package:

Image: Visual representation of all components included in the AnyTone AT-500M II CB Radio package.
- CB Radio Transceiver Unit (1 piece)
- Microphone (1 piece)
- CB Radio Mounting Bracket (1 piece)
- Power Cord (1 piece)
- User Manual (1 piece)
- Other small objects (screws, washers for mounting)
4. Specifications
| Feature | Specification |
|---|---|
| Model Number | AT-500M II |
| Input Voltage | 12V / 24V DC (Built-in converter) |
| Frequency Range | 26.965 - 27.405 MHz (40 Channels) |
| Output Power (AM/FM) | 4W |
| Modulation Modes | AM, FM |
| Special Features | Automatic Squelch, Noise Reduction (NR), CTCSS/DCS, Echo Function, VOX, Talkback, PA Function, Hi-cut, Roger Beep, NB, ANL, WX Weather Channel, 7-color Backlit LCD Display |
| Dimensions (Radio Unit) | 185 x 124 x 38 mm (7.48 x 4.9 x 1.57 inches) |
| Weight (Radio Unit) | 620g (1.37 pounds) |
| Microphone Support | Electret and Dynamic microphone |
| Color | Black |
| Water Resistance Level | Not Water Resistant |
4.1 Product Dimensions

Image: Diagram showing the physical dimensions of the AT-500M II radio unit and its microphone in both inches and centimeters.
5. Setup and Installation
5.1 Mounting the Radio
- Select a suitable location in your vehicle that allows for easy access to controls and clear visibility of the display, without obstructing driving.
- Use the provided mounting bracket as a template to mark drilling locations.
- Drill pilot holes and secure the mounting bracket using the supplied screws.
- Slide the radio unit into the bracket and secure it with the side knobs.
5.2 Power Connection
The AT-500M II features a built-in 12V/24V converter, allowing direct connection to most vehicle electrical systems.
- Connect the red wire of the power cord to the positive (+) terminal of your vehicle's power source (e.g., battery or fuse box).
- Connect the black wire of the power cord to the negative (-) terminal or a suitable ground point on the vehicle chassis.
- Ensure connections are secure and properly insulated to prevent short circuits.
5.3 Antenna Connection
A properly installed and tuned CB antenna is crucial for optimal performance.
- Connect your CB antenna's coaxial cable to the Antenna Jack on the back of the radio unit.
- Ensure the antenna is correctly installed and tuned for the CB frequency band (26.965-27.405 MHz) to achieve a low Standing Wave Ratio (SWR). High SWR can damage the radio.
5.4 Microphone Connection
Plug the microphone connector into the Microphone Plug on the front panel of the radio.
6. Operating Instructions
6.1 Basic Operation
- Power On/Off: Rotate the VOL knob clockwise to turn on the radio. Rotate counter-clockwise until it clicks to turn off.
- Volume Adjustment: Adjust the VOL knob to your desired listening level.
- Channel Selection: Use the Channel Up/Down selectors on the front panel or the UP/DOWN buttons on the microphone to change channels (1-40).
- Mode Selection (AM/FM/WX): Press the AM/FM button to cycle through AM, FM, CB, and WX (Weather) modes.
- Squelch Control (SQ/AQ):
- Manual Squelch (SQ): Rotate the SQ/AQ knob to adjust the squelch level. Turn it clockwise until background noise disappears.
- Automatic Squelch (AQ): Press the SQ/AQ button to activate Automatic Squelch, which automatically mutes weak signals below a certain threshold.
- Transmission: Press and hold the PTT button on the microphone to transmit. Release to receive.
6.2 Display Icons and Functions

Image: Explanation of various icons and indicators displayed on the AT-500M II's LCD screen.
- NR: Noise Reduction function is active.
- AQ: Automatic Squelch function is active.
- ANL: Automatic Noise Limiter filter is active (AM mode only).
- NB: Noise Blanker filter is active.
- RFG: RF GAIN function is active.
- HIC: HI-CUT filter is active.
- ECHO: Echo function is active.
- Keypad Lock: Keypad lock is active.
- EMG12: Emergency Channel 1 or 2 is selected.
- PR: PA (Public Address) mode is selected.
- AM: AM mode is selected.
- FM: FM mode is selected.
- SRF Bar Graph: Indicates TX (Transmit) and RX (Receive) signal strength.
- Alert: Alert function is active.
- Frequency/Menu Items/Status: Displays current frequency, menu options, or radio status.
- TX: Indicates Transmission.
- Roger Beep: Roger Beep function is active.
- Repeater Offset (+100kHz/-100kHz): Repeater offset function is active.
- CTC: CTCSS is used on the active channel.
- DCS: DCS is used on the active channel.
- TBK: TALKBACK function is active.
- VOX: VOX function is active.
- Alpha Channel: Indicates an Alpha channel.
- Scan Skip: The channel is stored in the Scan Skip memory.
- Frequency Band or WX Mode: Indicates the current frequency band or Weather mode.
- Active Channel: Indicates the currently active channel number.
6.3 Advanced Functions
- Noise Reduction (NR): The NR function (TX and RX Noise reduction in 5 Levels) provides clearer audio in noisy environments. Access and adjust via the menu.
- VOX Function: Enables voice-activated transmission without pressing the PTT button. Adjust sensitivity via the menu.
- CTCSS/DCS Code: Continuous Tone-Coded Squelch System / Digital Coded Squelch. Used for selective calling, allowing you to hear only transmissions with a matching tone/code.
- Echo Function: Adds an echo effect to your transmitted audio.
- Alert Function: Provides audible alerts for specific conditions.
- Talkback: Allows you to monitor your own transmitted audio through the radio's speaker.
- PA Function: Public Address mode, allowing the radio to function as a PA system when connected to an external PA speaker.
- Hi-cut Function: Filters out high-frequency noise for clearer audio.
- Roger Beep: Transmits a short tone at the end of your transmission to signal that you have finished speaking.
- NB (Noise Blanker) / ANL (Automatic Noise Limiter): These filters help reduce impulse noise (e.g., ignition noise). ANL is active only in AM mode.
- Scan Mode: The radio supports two scan modes to automatically search for active channels.
- WX Weather Channel: Provides access to NOAA weather channels for real-time weather alerts.
- RF Gain / Mic Gain Control: Adjusts the sensitivity of the receiver (RF Gain) and microphone (Mic Gain) for optimal performance.
- 2K/4K FM Deviation Selection: Allows selection of narrow (2K) or wide (4K) FM deviation for compatibility with different systems or preferences.
7. Maintenance
- Cleaning: Use a soft, dry cloth to clean the radio's exterior. Do not use abrasive cleaners or solvents.
- Connections: Periodically check all connections (power, antenna, microphone) for tightness and corrosion.
- Antenna SWR: Regularly check your antenna's SWR to ensure optimal performance and prevent damage to the radio's final amplifier.
- Storage: If storing the radio for an extended period, disconnect it from power and store it in a dry, dust-free environment.
8. Troubleshooting
| Problem | Possible Cause | Solution |
|---|---|---|
| Radio does not power on. | No power supply; incorrect wiring; blown fuse. | Check power cord connections; verify vehicle power; inspect fuse in power cord. |
| No reception or weak signals. | Antenna not connected; high SWR; squelch set too high; incorrect mode. | Ensure antenna is connected; check SWR; lower squelch level; select correct AM/FM mode. |
| Cannot transmit. | Microphone not connected; PTT button faulty; antenna issue. | Verify microphone connection; test PTT button; check antenna and SWR. |
| Excessive noise on reception. | Squelch too low; vehicle electrical interference; NR/NB/ANL not active. | Increase squelch level; activate NR, NB, or ANL functions; check vehicle grounding. |
| Display is dim or unreadable. | Backlight setting; power issue. | Adjust backlight brightness via menu; ensure stable power supply. |
9. Warranty and Support
The AnyTone AT-500M II CB Radio comes with a 12-month warranty from the date of purchase, covering manufacturing defects.
For any queries regarding product operation, troubleshooting, or warranty claims, please contact the seller directly. Prompt assistance will be provided.
You can also visit the AnyTone Store on Amazon for additional product information and support resources.


