1. Product Overview
The Irfora Portable Receipt Printer MP210 is a versatile 58mm thermal receipt printer designed for various business environments. It offers flexible connectivity options and high-quality printing capabilities, making it an ideal solution for small businesses, restaurants, and retail stores.
- Versatile Connectivity: Supports both Bluetooth (BT) and USB connections, compatible with Android, iOS, and Windows systems. Seamlessly integrates with popular apps like Loyverse, iREAP, CasierStock, and Kyte.
- High-Quality Printing: Achieves a maximum print speed of 70mm/s with a resolution of 203dpi, ensuring clear and fast output. Utilizes 58mm thermal paper with a valid print width of 48mm. Capable of printing receipts, orders, barcodes, QR codes, and text.
- Cost-Effective and Convenient: Operates without ink cartridges or ribbons, reducing running costs. Thermal paper is widely available and easy to replace.
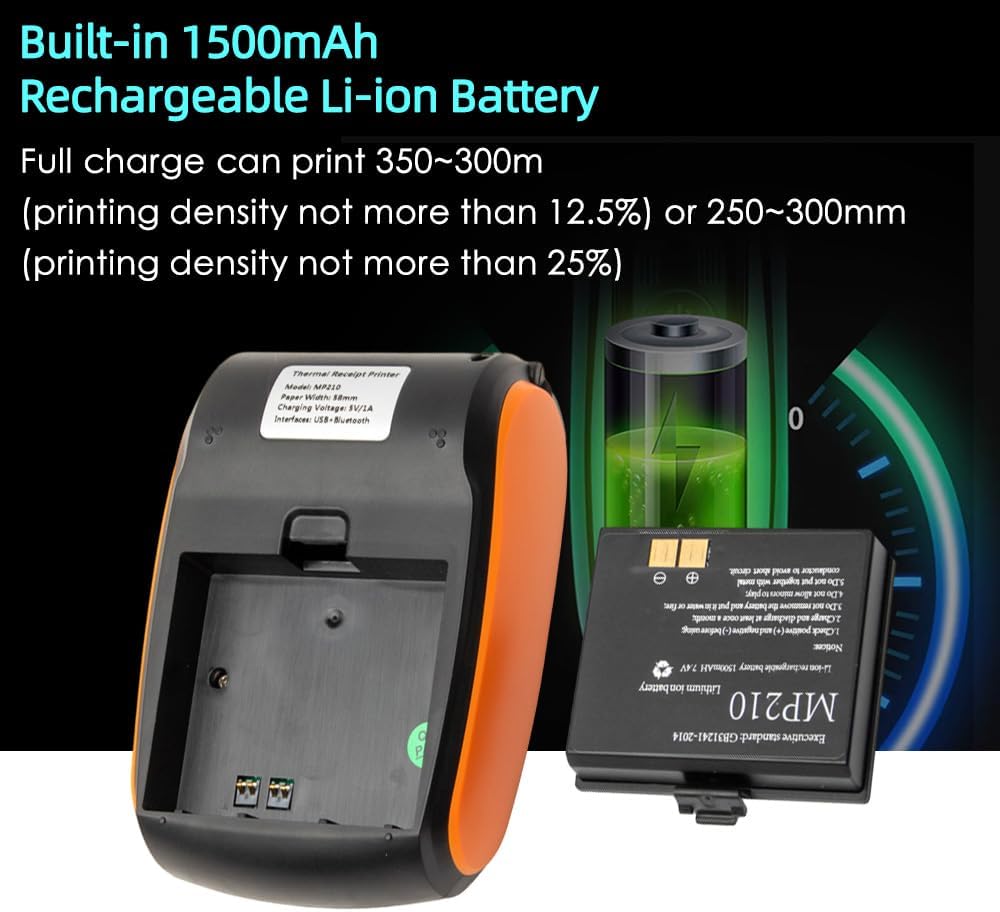
- Long-Lasting Battery: Equipped with a built-in 1500mAh rechargeable Li-ion battery, allowing for portable printing anytime, anywhere. Lightweight and easy to carry.
- Wide Application: Suitable for supermarkets, shopping malls, restaurants, fast food outlets, cake shops, and various retail industries.
2. Specifications
| Model | MP210 |
| Dimensions | 121 x 83.5 x 54.8 mm |
| Printing Method | Thermal dot line printing |
| Resolution | 203dpi, 8dots/mm |
| Printing Speed (Max) | 70mm/s |
| Paper Width | 58mm |
| Valid Printing Width | 48mm |
| Paper Thickness | 60~80μm |
| Paper Roller Diameter | ≤40mm |
| Interface | BT and USB |
| Character Set Font | ASCII:9×17,12×24, Multiple code pages support |
| Barcode Symbologies | 1D: UPC-A, UPC-E, EAN8, EAN13, CODE39, ITF, CODEBAR, CODE128, CODE93; 2D: QR code |
| Graphics | Support bitmap printing with different density and user defined bitmap printing (Max. 40K for per bitmap, and Max. 64K for total) |
| Battery | 1500mAh/7.4V rechargeable Li-ion battery. Full charge can print 250~300m (printing density not more than 25%) or 350~300m (printing density not more than 12.5%). |
| Support System | Android, iOS, Win7/Win8/Win10 |
3. Package Contents
- 1 x Thermal Printer
- 1 x Thermal Paper Roll
- 1 x USB Cable
- 1 x User Manual
4. Getting Started
4.1. Printer Components Overview
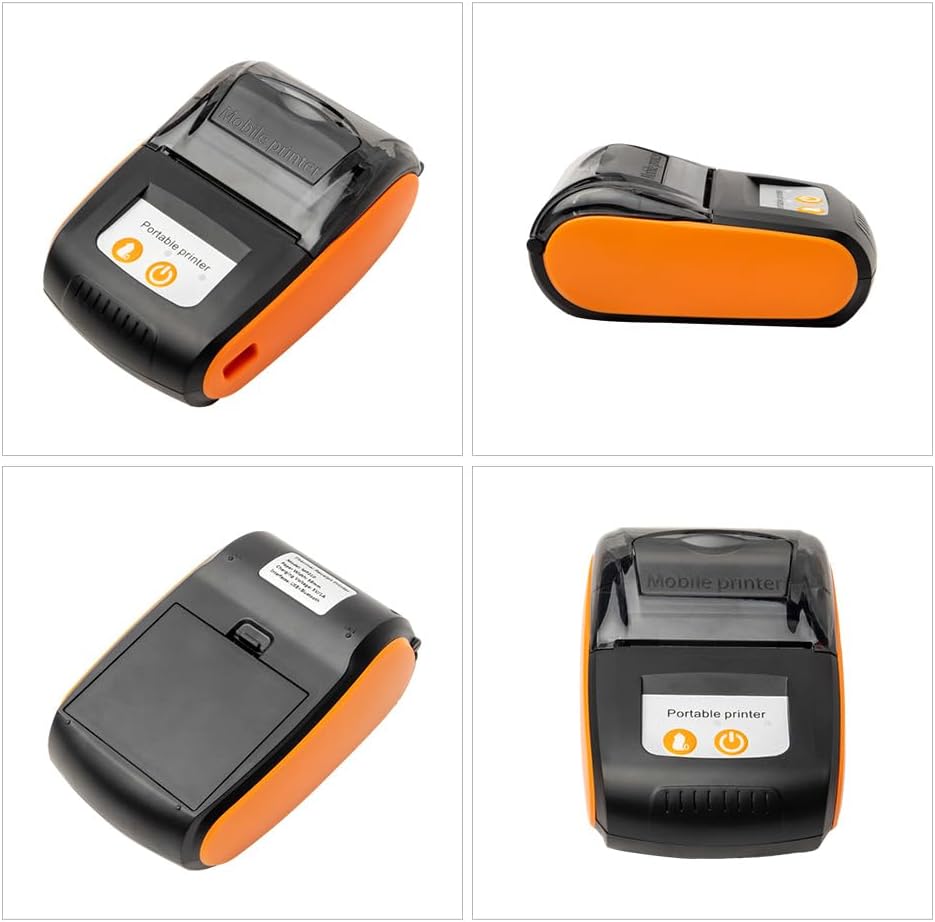
4.2. Battery Installation
The MP210 printer comes with a removable rechargeable Li-ion battery. Ensure the battery is properly installed before first use or charging.
- Locate the battery compartment cover on the bottom of the printer.
- Slide the cover to open the compartment.
- Insert the 1500mAh Li-ion battery into the compartment, ensuring the contacts align correctly.
- Close the battery compartment cover securely.

4.3. Paper Roll Loading
The printer uses 58mm thermal paper rolls. Follow these steps to load a new paper roll:
- Press the cover open button (usually on the side or front) to open the paper compartment.
- Insert the thermal paper roll with the printing side facing outwards (the paper should feed from the bottom of the roll).
- Pull a small length of paper out beyond the cutting edge.
- Close the paper compartment cover firmly until it clicks into place.

4.4. Powering On/Off
Press and hold the power button (usually marked with a power symbol) for a few seconds to turn the printer on or off. The indicator lights will illuminate when the printer is on.
5. Connectivity
5.1. Bluetooth Connection (Android/iOS)
The MP210 printer supports Bluetooth connectivity for mobile devices.
- Ensure the printer is powered on and Bluetooth is enabled on your mobile device.
- On your mobile device, go to Bluetooth settings and search for available devices.
- Select the printer (e.g., "Bluetooth Printer" or a device name starting with "MP210") from the list.
- If prompted for a PIN, enter "0000" or "1234".
- Once paired, you can connect the printer through your printing application.

This video demonstrates the process of loading paper into the 58mm Bluetooth Receipt Printer and connecting it to a mobile phone via Bluetooth for printing. It shows the steps for pairing the device and initiating a print job from a mobile application.
5.2. USB Connection (Windows)
For Windows systems, connect the printer via USB and install the necessary drivers.
- Connect the printer to your computer using the provided USB cable.
- Download the printer driver from the official website (refer to the links in the product description: http://www.asia-printer.com/software or http://www.weinprinter.com/products_detail.aspx?ProductsID=126&ProductsCateId=74&CurrCateID=74&CateID=74).
- Follow the on-screen instructions to install the driver.
- After installation, you can print a test page to confirm successful setup.
This video demonstrates the process of installing the printer driver on a Windows operating system and printing a test page via USB connection. It guides users through the software setup and verification of printer functionality.
6. Operation
6.1. Printing from Mobile Applications
The MP210 is compatible with various POS applications. Ensure your mobile device is paired via Bluetooth.
- Open your preferred POS application (e.g., Loyverse, iREAP, CasierStock, Kyte).
- Navigate to the printer settings within the app.
- Select the paired Bluetooth printer.
- Configure print settings such as paper width (58mm) and receipt/bill options.
- Initiate a print test or print a transaction receipt.
This video illustrates the process of connecting the Bluetooth Receipt Printer to a mobile device and using the Loyverse POS application to print a receipt. It covers Bluetooth pairing, printer setup within the app, and completing a transaction print.
6.2. Printing Text, Images, and Barcodes
The printer supports various content types:
- Text Printing: Send plain text or formatted text from your application.
- Image Printing: Print logos or other graphic elements.
- Barcode/QR Code Printing: Generate and print 1D and 2D barcodes for product scanning or information.
7. Maintenance
7.1. Cleaning the Print Head
Regular cleaning of the print head ensures optimal print quality and extends the printer's lifespan.
- Turn off the printer and disconnect the power cable.
- Open the paper compartment cover.
- Use a cotton swab lightly dampened with isopropyl alcohol to gently wipe the print head surface.
- Allow the print head to dry completely before closing the cover and powering on the printer.
7.2. Battery Care
To maximize battery life:
- Charge the battery fully before first use.
- Avoid completely draining the battery frequently.
- If storing the printer for an extended period, charge the battery to about 50% and store in a cool, dry place.
8. Troubleshooting
8.1. Printer Not Responding
- Check if the printer is powered on and the battery is charged.
- Verify the power adapter is securely connected.
- If using Bluetooth, ensure the printer is paired and connected to your device.
- If using USB, ensure the cable is connected and drivers are correctly installed.
8.2. Poor Print Quality
- Clean the print head as described in the Maintenance section.
- Ensure you are using high-quality thermal paper.
- Check if the paper roll is loaded correctly.
8.3. Paper Jam
- Turn off the printer and open the paper compartment cover.
- Carefully remove any jammed paper. Avoid pulling forcefully to prevent damage.
- Ensure the paper roll is correctly seated and the cover is closed properly.
9. Warranty and Support
For warranty information, technical support, or service inquiries, please refer to the contact information provided with your purchase or visit the official Irfora website.
