
1. Introduction
Thank you for choosing the iJoy Disney Lilo & Stitch Expressions Bluetooth Over-Ear Headphones. These wireless headphones are designed to provide a comfortable audio experience with the added charm of Lilo & Stitch designs. This manual will guide you through the setup, operation, and maintenance of your new headphones.

Image: iJoy Disney Lilo & Stitch Bluetooth Over-Ear Headphones.
2. Product Overview
Key Features:
- Wireless Bluetooth Connection: Enjoy audio without tangled cords.
- Built-in Microphone: For clear communication during calls.
- LED Indicators: Provide battery and connection status.
- Foldable Design: For easy portability and storage.
- Micro SD Card Plug-in: Play music directly from a Micro SD card.
- Built-in Radio Receiver: Tune into your favorite radio stations.
- Aux Cable Included: Option for wired listening when battery is low or Bluetooth is not available.
What's in the Box:
- iJoy Disney Lilo & Stitch Expressions Bluetooth Over-Ear Headphones
- Protective Case
- Charging Cable (USB)
- Auxiliary Audio Cable with Microphone
3. Setup
3.1 Charging the Headphones
Before initial use, fully charge your headphones. Connect the provided USB charging cable to the charging port on the headphones and to a compatible USB power source. The LED indicator will show charging status and turn off or change color when fully charged. A full charge provides approximately 15 hours of playtime.

Image: Headphones highlighting 15 hours of playtime.
3.2 Bluetooth Pairing
- Ensure the headphones are turned off.
- Press and hold the Power button until the LED indicator flashes blue and red, indicating pairing mode.
- On your device (smartphone, tablet, etc.), enable Bluetooth and search for available devices.
- Select "iJoy Stitch Headphones" (or similar name) from the list.
- Once connected, the LED indicator will typically show a solid blue light or flash blue slowly.

Image: Headphones demonstrating universal compatibility with Apple and Android devices.
4. Operating Instructions
4.1 Controls Overview
The headphone controls are located on the ear cup. Refer to the diagram below for button functions:
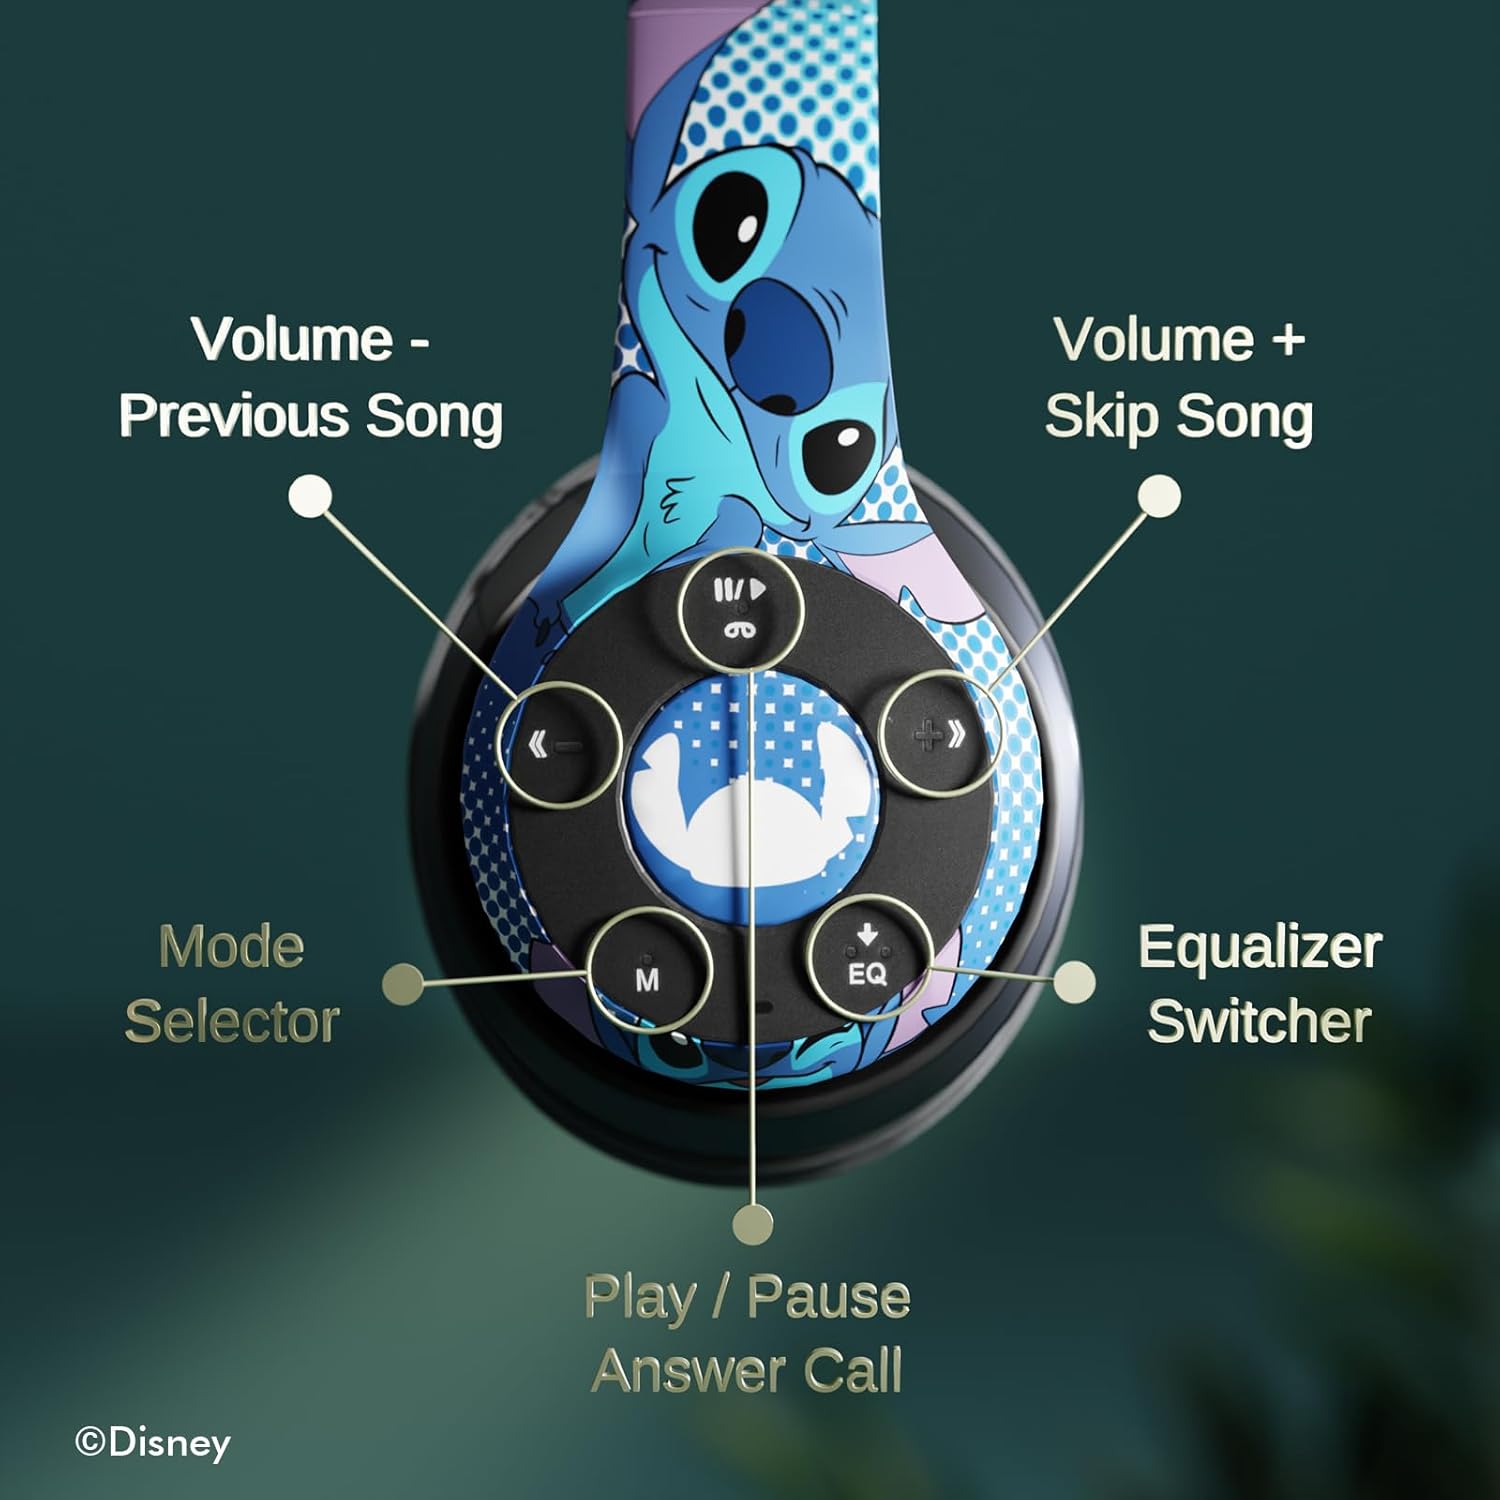
Image: Detailed view of the headphone controls, including Volume -, Previous Song, Volume +, Skip Song, Mode Selector, Equalizer Switcher, and Play/Pause/Answer Call buttons.
- Play/Pause/Answer Call Button: Press once to play/pause music or answer/end a call. Press and hold to reject a call.
- Volume + / Skip Song Button: Press once for Volume Up. Press and hold to skip to the next song.
- Volume - / Previous Song Button: Press once for Volume Down. Press and hold to go to the previous song.
- Mode Selector (M): Press to switch between Bluetooth, Micro SD card, and FM Radio modes.
- Equalizer Switcher (EQ): Press to cycle through different equalizer presets.
4.2 Making and Receiving Calls
With the built-in microphone, you can make and receive calls when connected via Bluetooth:
- Answer/End Call: Press the Play/Pause/Answer Call button once.
- Reject Call: Press and hold the Play/Pause/Answer Call button.
4.3 Music Playback
- Bluetooth Mode: After pairing, music from your connected device will play through the headphones. Use the controls to manage playback.
- Micro SD Card Mode: Insert a Micro SD card with MP3 files into the designated slot. Press the 'M' button to switch to Micro SD card mode. The headphones will automatically begin playing music from the card.
4.4 FM Radio Mode
Press the 'M' button to switch to FM Radio mode. Use the Volume +/- buttons to scan for stations or adjust volume.
5. Maintenance
- Cleaning: Use a soft, dry cloth to clean the headphones. Do not use harsh chemicals or abrasive materials.
- Storage: When not in use, store the headphones in the provided protective case. The foldable design allows for compact storage.
- Avoid Moisture: Keep the headphones away from water and excessive humidity.
- Temperature: Avoid exposing the headphones to extreme temperatures.

Image: Headphones demonstrating their foldable design for easy storage.
6. Troubleshooting
| Problem | Possible Solution |
|---|---|
| Headphones do not turn on. | Ensure the headphones are fully charged. |
| Cannot pair with device. | Ensure headphones are in pairing mode (flashing blue/red LED). Turn off and on Bluetooth on your device. Move closer to the device. |
| No sound. | Check volume levels on both headphones and connected device. Ensure headphones are correctly paired. Try using the auxiliary cable. |
| Poor sound quality. | Move closer to the connected device to avoid interference. Check audio source quality. |
| Microphone not working. | Ensure headphones are properly connected. Check microphone settings on your device. |
7. Specifications
| Feature | Detail |
|---|---|
| Model Name | Disney Lilo & Stitch Expressions |
| Model Number | DS20137 |
| Connectivity Technology | Wireless (Bluetooth) |
| Wireless Communication Technology | Bluetooth |
| Bluetooth Version | 4.0 |
| Bluetooth Range | 10 Meters |
| Ear Placement | Over Ear |
| Form Factor | Over Ear |
| Noise Control | Sound Isolation |
| Control Type | Volume Control, Touch |
| Special Features | Built-in Radio Receiver, Foldable and Adjustable headband, Micro SD Card Plug-in, Microphone Included |
| Compatible Devices | Bluetooth-enabled devices (e.g. smartphones, tablets, laptops) |
| Material | Memory Foam, Plastic |
| Item Weight | 0.29 Kilograms (10.2 ounces) |
| Batteries | 1 Lithium Polymer battery (included) |
| Package Dimensions | 8.78 x 6.26 x 3.62 inches |
| UPC | 810116712489 |
8. Official Product Video
Video: An official product video showcasing the Disney Lilo & Stitch Bluetooth Headphones, highlighting their features and design.
9. Warranty and Support
For warranty information and customer support, please refer to the documentation included with your product or visit the official iJoy website. Keep your purchase receipt for warranty claims.
