
1. Important Safety Information
Please read all instructions and safety warnings before using the ZURU X-Shot Hyper Gel Clutch Blaster. Failure to follow these instructions may result in injury.
- Recommended Age: This product is intended for users aged 14 years and older.
- Eye Protection: ALWAYS wear the included safety glasses or other approved eye protection when operating or near the blaster. Do not remove eye protection during use.
- Gel Pellets: Use only official ZURU X-Shot Hyper Gel Pellets. Do not use other projectiles as they may damage the blaster or cause injury.
- Aiming: Do not aim or shoot at people's faces or eyes, or at animals.
- Modification: Do not modify the blaster or gel pellets. Unauthorized modifications can affect performance and safety.
- Storage: Store the blaster and gel pellets out of reach of young children.
2. Package Contents
Verify that all items are present in your package:
- 1 x ZURU X-Shot Hyper Gel Clutch Blaster
- 1 x Magazine
- 1 x Safety Glasses
- 5,000 x Hyper Gel Pellets (dehydrated)

Image 2.1: The ZURU X-Shot Hyper Gel Clutch Blaster in its retail packaging, displaying the blaster, a bottle of gel pellets, and safety glasses.

Image 2.2: All components of the ZURU X-Shot Hyper Gel Clutch Blaster set, laid out to show the blaster, safety glasses, and the container of 5,000 gel pellets.
3. Setup
3.1. Preparing Gel Pellets
- Open the container of dehydrated Hyper Gel Pellets.
- Pour the desired amount of pellets into a large container (e.g., a bucket or bowl).
- Add a generous amount of clean water to fully submerge the pellets.
- Allow the pellets to soak for approximately 2 to 4 hours. They will expand significantly.
- Once fully expanded, drain any excess water. The pellets are now ready for use.

Image 3.1: A hand pouring prepared gel pellets from their container into the blaster's magazine, demonstrating the loading process.
3.2. Loading the Blaster
- Ensure your safety glasses are on.
- Fill the magazine with the prepared Hyper Gel Pellets. The magazine has a capacity of 500 gel pellets.
- Insert the filled magazine firmly into the blaster's magazine well until it clicks into place.
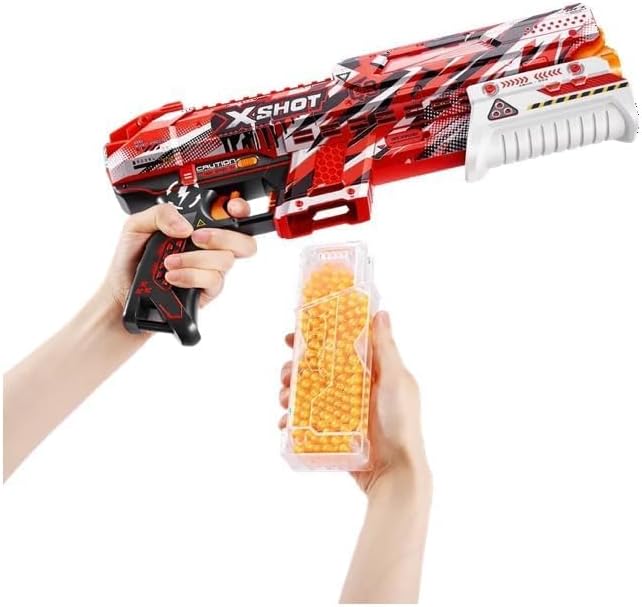
Image 3.2: A user inserting a magazine filled with gel pellets into the bottom of the ZURU X-Shot Hyper Gel Clutch Blaster.

Image 3.3: The ZURU X-Shot Hyper Gel Clutch Blaster shown with its magazine fully inserted and loaded with gel pellets, ready for use.
4. Operating the Blaster
Always ensure you are wearing safety glasses before operating the blaster.
- Wear Eye Protection: Put on your safety glasses.
- Prime the Blaster: The X-Shot Hyper Gel Clutch Blaster features a manual winding mechanism. Pull back the priming grip located at the front of the blaster until it locks into place. This action prepares the blaster to fire.
- Aim: Point the blaster at your target, ensuring it is a safe and appropriate target.
- Fire: Pull the trigger to launch a gel pellet. The blaster supports both fully automatic and semi-automatic firing modes, depending on how the trigger is operated and the priming mechanism.

Image 4.1: A user holding the ZURU X-Shot Hyper Gel Clutch Blaster in a ready position, illustrating how it is held during operation.

Image 4.2: A detailed side view of the blaster, indicating its firing speed of 150 feet per second (FPS) and a gel pellet capacity of 500.
5. Maintenance
- Cleaning: After use, wipe down the blaster with a clean, damp cloth. Do not submerge the blaster in water.
- Gel Pellet Storage: Store unused hydrated gel pellets in an airtight container, submerged in water, to prevent them from dehydrating. They can last for several weeks when stored properly.
- Dehydrated Pellets: Store dehydrated pellets in a cool, dry place away from direct sunlight.
- Blaster Storage: Store the blaster in a cool, dry place. Ensure the magazine is empty before storing.
6. Troubleshooting
- Blaster Not Firing:
- Ensure the blaster is properly primed by pulling back the priming grip until it locks.
- Check if the magazine is correctly inserted and full of hydrated gel pellets.
- Gel Pellets Getting Stuck/Jams:
- Ensure gel pellets are fully hydrated. Under-hydrated pellets can be too small and cause jams.
- Over-hydrated pellets can be too soft and break apart, causing jams. Ensure they are drained of excess water.
- Carefully remove the magazine and clear any visible obstructions from the feeding mechanism. Do not force anything.
- Low Firing Velocity:
- Ensure the blaster is fully primed.
- Verify that the gel pellets are correctly hydrated.
7. Specifications
| Model Number | 36622 |
| Dimensions (L x W x H) | 28.45 x 6.35 x 48.26 cm |
| Weight | 725.75 g |
| Material | Plastic |
| Recommended Age | 14 - 15 years |
| Gel Pellet Capacity | 500 (magazine) |
| Firing Speed | Up to 150 FPS (Feet Per Second) |
| Batteries Required | No (manual winding) |
8. Warranty and Support
ZURU products are manufactured to high-quality standards. For any questions, concerns, or warranty inquiries regarding your X-Shot Hyper Gel Clutch Blaster, please contact ZURU customer support.
Please visit the official ZURU website for the most up-to-date contact information and support resources.
Keep your proof of purchase for warranty validation.


