
1. Introduction
Thank you for purchasing the LoopTone 10-in-1 Vinyl Record Player with Dual 15W External Speakers. This versatile audio system combines vintage aesthetics with modern functionality, allowing you to enjoy music from various sources including vinyl records, CDs, cassette tapes, AM/FM radio, USB drives, SD cards, and Bluetooth devices. This manual provides detailed instructions for setup, operation, maintenance, and troubleshooting to ensure optimal performance and longevity of your device.
2. Safety Instructions
Please read these safety instructions carefully before using the product and retain them for future reference. Failure to follow these instructions may result in electric shock, fire, or other hazards.
- Do not expose the unit to rain or moisture.
- Do not block any ventilation openings.
- Ensure the power cord is not pinched or walked on.
- Unplug the unit during lightning storms or when unused for long periods.
- Refer all servicing to qualified service personnel.
- Do not open the unit's casing; there are no user-serviceable parts inside.
- Keep the unit away from direct sunlight, heat sources, and strong magnetic fields.
3. Package Contents
Carefully unpack your LoopTone Vinyl Record Player and ensure all items are present and in good condition. If any items are missing or damaged, please contact your retailer.
- LoopTone Vinyl Record Player Unit
- External Speaker x 2
- 45 RPM Adapter
- Remote Control (with 1 CR2032 battery included)
- User Manual (this document)
4. Product Overview
Familiarize yourself with the main components and controls of your record player.

Figure 4.1: Front view of the LoopTone 10-in-1 Vinyl Record Player with its two external speakers. The main unit features a turntable on top, a cassette player on the left, a CD player below the display, and various controls and ports on the front panel.

Figure 4.2: An illustrative diagram highlighting the 10-in-1 multi-functionality of the system, including 3-speed LP, CD Player, Bluetooth, Cassette, Radio, USB Player, SD Player, Headphone jack, RCA Line Out, and AUX In, along with remote control capability.

Figure 4.3: Detailed view of the turntable components, showing the 45 RPM adapter, lift lever, auto stop control switch, and the speed selector for 33/45/78 RPM records.

Figure 4.4: A composite image illustrating the various media playback options: the cassette tape player, the CD player with disc tray, the FM/AM radio display, and the USB/SD/MMC card slots.
5. Setup
Follow these steps to set up your LoopTone Vinyl Record Player.
- Placement: Place the main unit and external speakers on a stable, flat surface, away from direct sunlight, heat sources, and strong magnetic fields. Ensure adequate ventilation around the unit.
- Connect Speakers: Connect the included external speakers to the speaker terminals on the back of the main unit. Ensure correct polarity (red to red, black to black) for optimal sound.
- Power Connection: Plug the power cord into a standard 110V AC outlet.
- Remote Control Battery: The remote control comes with a CR2032 battery pre-installed. Remove any protective tab before first use.
6. Operating Instructions
6.1 General Operation
- Power On/Off: Press the POWER button to turn the unit on or off.
- Function Selection: Use the FUNCTION SELECT knob or buttons on the unit/remote to switch between Vinyl, CD, Cassette, Bluetooth, FM/AM Radio, USB, and AUX modes.
- Volume Control: Adjust the VOLUME knob on the unit or use the volume buttons on the remote control.
6.2 Vinyl Record Playback
- Lift the dust cover.
- Place a record on the turntable platter. If playing a 45 RPM single, place the 45 RPM adapter on the center spindle.
- Select the appropriate speed (33, 45, or 78 RPM) using the SPEED SELECTOR switch.
- Move the AUTO STOP CONTROL switch to ON if you want the turntable to stop automatically at the end of the record.
- Gently lift the tone arm using the LIFT LEVER and position the stylus over the desired track of the record.
- Lower the tone arm slowly using the LIFT LEVER to begin playback.
- At the end of the record, the turntable will stop (if Auto Stop is ON). Lift the tone arm, return it to the rest, and lower the LIFT LEVER.
6.3 CD Playback
- Select CD function.
- Press the OPEN/CLOSE button to open the CD tray.
- Place a CD with the label side facing up into the tray.
- Press the OPEN/CLOSE button again to close the tray. The unit will read the disc.
- Press PLAY/PAUSE to start playback. Use SKIP buttons to navigate tracks.
6.4 Cassette Tape Playback
- Select TAPE function.
- Press the EJECT/STOP button to open the cassette door.
- Insert a cassette tape with the open side facing down.
- Close the cassette door.
- Press PLAY to begin playback. Use FAST FORWARD and REWIND buttons as needed.
6.5 Bluetooth Operation (Receiver & Transmitter)
This unit supports both receiving Bluetooth audio from your devices and transmitting Bluetooth audio to headphones or speakers.
6.5.1 Bluetooth Receiver Mode
- Select BT (Bluetooth) function. The display will show "BT" and the unit will enter pairing mode.
- On your Bluetooth-enabled device (smartphone, tablet), enable Bluetooth and search for available devices.
- Select "LoopTone" from the list. Once paired, the display will show "CONNECTED".
- You can now play audio from your device through the record player's speakers.
6.5.2 Bluetooth Transmitter Mode
- Ensure your Bluetooth headphones or speaker are in pairing mode.
- While playing audio from any source (Vinyl, CD, Cassette, USB/SD, AUX), press and hold the Bluetooth button on the unit. The unit will search for nearby Bluetooth receiving devices.
- Once connected, audio will be transmitted to your Bluetooth headphones/speaker.
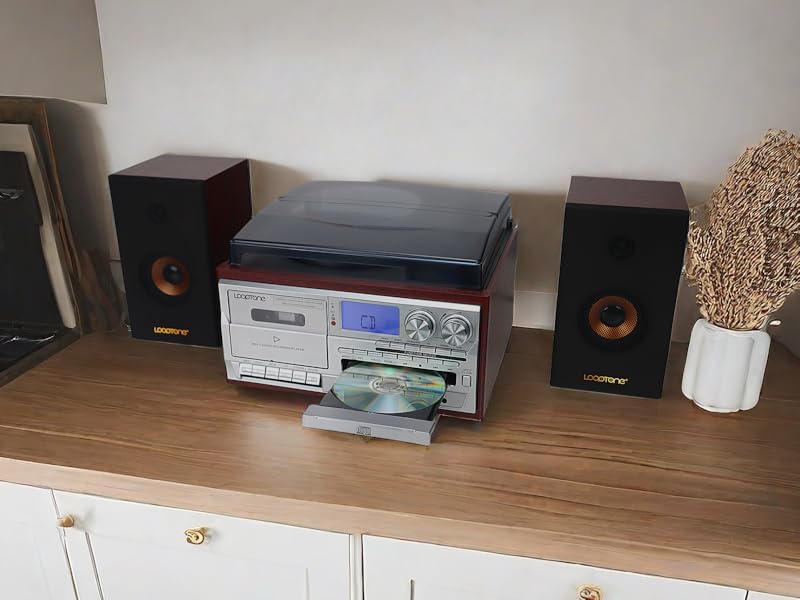
Figure 6.1: The record player acting as a Bluetooth receiver, streaming music from a smartphone to its speakers.

Figure 6.2: The record player acting as a Bluetooth transmitter, sending audio to a pair of wireless headphones.
6.6 AM/FM Radio
- Select RADIO function.
- Use the TUNING knob to scan for radio stations.
- Extend the FM antenna for better reception. For AM, rotate the unit for best reception.
6.7 USB/SD Playback
- Insert a USB drive into the USB port or an SD/MMC card into the SD/MMC slot.
- Select USB or SD function. The unit will automatically detect and begin playing compatible audio files (MP3/WMA).
- Use the PLAY/PAUSE and SKIP buttons to control playback.
6.8 Recording Audio to USB/SD
The unit can record audio from Vinyl, CD, Cassette, AUX, or Radio directly to a USB drive or SD card in MP3/WMA format.
- Insert a USB drive or SD card into the respective slot.
- Select the desired source (Vinyl, CD, Cassette, AUX, or Radio).
- Begin playback of the source audio.
- Press the RECORD button. The display will indicate recording is in progress.
- Press the RECORD button again to stop recording. The recorded file will be saved to the USB drive or SD card.

Figure 6.3: The recording feature allows conversion of vinyl, CD, cassette, or radio audio into MP3/WMA files on a USB drive or SD card.
6.9 AUX-in Connection
Connect external audio devices (e.g., MP3 players, smartphones) to the unit using a 3.5mm audio cable (not included) plugged into the AUX-in port.
- Connect one end of the 3.5mm audio cable to the AUX-in port on the front of the unit.
- Connect the other end to the headphone jack or audio output of your external device.
- Select AUX function.
- Play audio from your external device.
6.10 RCA Line-Out Connection
Connect the unit to an external amplifier or powered speakers using RCA cables (not included) for enhanced audio output.
- Connect RCA cables (red for right channel, white for left channel) to the RCA Line-Out ports on the back of the unit.
- Connect the other end of the RCA cables to the audio input of your amplifier or powered speakers.
- Ensure the external audio system is powered on and set to the correct input.
7. Maintenance
Proper care and maintenance will help prolong the life of your record player.
- Cleaning the Unit: Use a soft, dry cloth to wipe the exterior of the unit. Do not use abrasive cleaners, waxes, or solvents.
- Dust Cover: Keep the dust cover closed when not in use to protect the turntable from dust and debris.
- Stylus Care: Gently clean the stylus regularly with a soft brush designed for stylus cleaning, brushing from back to front. Avoid touching the stylus with your fingers.
- Record Care: Keep records clean and free of dust. Store them vertically in their sleeves to prevent warping.
- CD/Cassette Care: Handle CDs by the edges. Keep cassettes in their cases when not in use.
8. Troubleshooting
If you experience issues with your unit, please consult the following table before seeking professional service.
| Problem | Possible Cause | Solution |
|---|---|---|
| No power | Power cord not securely plugged in. | Ensure the power cord is firmly connected to the unit and the wall outlet. |
| No sound from speakers | Volume is too low or muted. Speakers not connected properly. Incorrect function selected. | Increase volume. Check speaker connections. Select the correct function (Vinyl, CD, etc.). |
| Turntable not spinning | Unit not powered on. Auto Stop switch is ON and record has ended. | Ensure unit is on. If record has ended, lift tone arm and reset. Try turning Auto Stop OFF. |
| Poor sound quality from vinyl | Record is dirty or scratched. Stylus is dirty or worn. Incorrect speed selected. | Clean the record. Clean or replace the stylus. Ensure correct speed (33/45/78 RPM) is selected. |
| Bluetooth pairing issues | Unit not in pairing mode. Device too far away. | Ensure BT function is selected and unit is discoverable. Move device closer to the unit. |
| CD tray not opening/closing | Obstruction in tray. | Check for any foreign objects. Gently try to open/close. Do not force. |
9. Specifications
| Feature | Specification |
|---|---|
| Brand | LoopTone |
| Model | TR-18CDSP |
| Power Source | Corded Electric, 110 Volts |
| Turntable Speeds | 33 1/3, 45, 78 RPM |
| Speaker Output | Dual 15W External Speakers |
| Connectivity | Bluetooth (Receiver & Transmitter), Auxiliary (3.5mm), USB, RCA Line-Out |
| Media Playback | Vinyl, CD, Cassette, AM/FM Radio, USB, SD/MMC |
| Recording Format | MP3/WMA (to USB/SD) |
| Special Features | Adjustable Speed, Digital Recorder, Dust Cover, Remote Control |
| Material | Wood, Plastic, Metal |
| Included Batteries | 1 x CR2032 (for remote control) |
| Dimensions (Main Unit) | Approx. 12.6" (W) x 10.6" (D) x 8.1" (H) (with cover closed) |
| Dimensions (Each Speaker) | Approx. 5.1" (W) x 5.9" (D) x 9.1" (H) |
| Weight | Approx. 7.24 kg (total parcel weight) |
10. Warranty and Support
LoopTone products are manufactured with quality and performance in mind. For any questions, technical support, or warranty inquiries, please contact the retailer or manufacturer directly. Please retain your proof of purchase for warranty claims.