
SOLITY AT10
Solity Smart Digital Electric Deadbolt Keypad Lock
Model AT10 User Manual
Introduction
This manual provides comprehensive instructions for the installation, operation, and maintenance of your Solity Smart Digital Electric Deadbolt Keypad Lock, Model AT10. Please read this manual thoroughly before installation and use to ensure proper function and to maximize the security features of your new lock. Keep this manual for future reference.

Image: Front view of the Solity Smart Digital Electric Deadbolt Keypad Lock.
Package Contents
Before beginning installation, verify that all components are present in the package:
- Deadbolt Assembly (Exterior and Interior Units)
- Mounting Hardware
- Keys (if applicable)
- Installation Template
- User Manual
Note: 4 AA batteries are required for operation and are not included.
Setup and Installation
The Solity AT10 is designed for straightforward DIY installation on standard American doors. Ensure your door meets the compatibility requirements before proceeding.
1. Compatibility Check
Before installation, confirm your door's specifications:
- Door Thickness: Only suitable for 1-3/4 inches (44mm).
- Door Hole Diameter: Only suitable for 2-1/8 inches (54mm).
- Backset: Compatible with 2-3/8 inches (60mm) or 2-3/4 inches (70mm).
The lock is adaptable for both left-handed and right-handed door orientations.

Image: Diagram illustrating door thickness, hole diameter, backset, and overall lock dimensions for compatibility verification.
2. Installation Steps
Follow the instructions provided in the installation template. Pay close attention to the following critical checkpoints:
- Key Tail Insertion: Ensure the key tail is correctly inserted horizontally when installing the exterior body. The deadbolt should pop out when rotating the key tail.
- Locking Direction Setting: After installation, ensure the locking direction is set correctly. The deadbolt must be unlocked before setting the direction. Press the SOLITY button for 2 seconds to lock and verify the setting.

Image: Front and rear views of the Solity AT10 lock, showing the exterior keypad and interior battery cover/thumb turn.
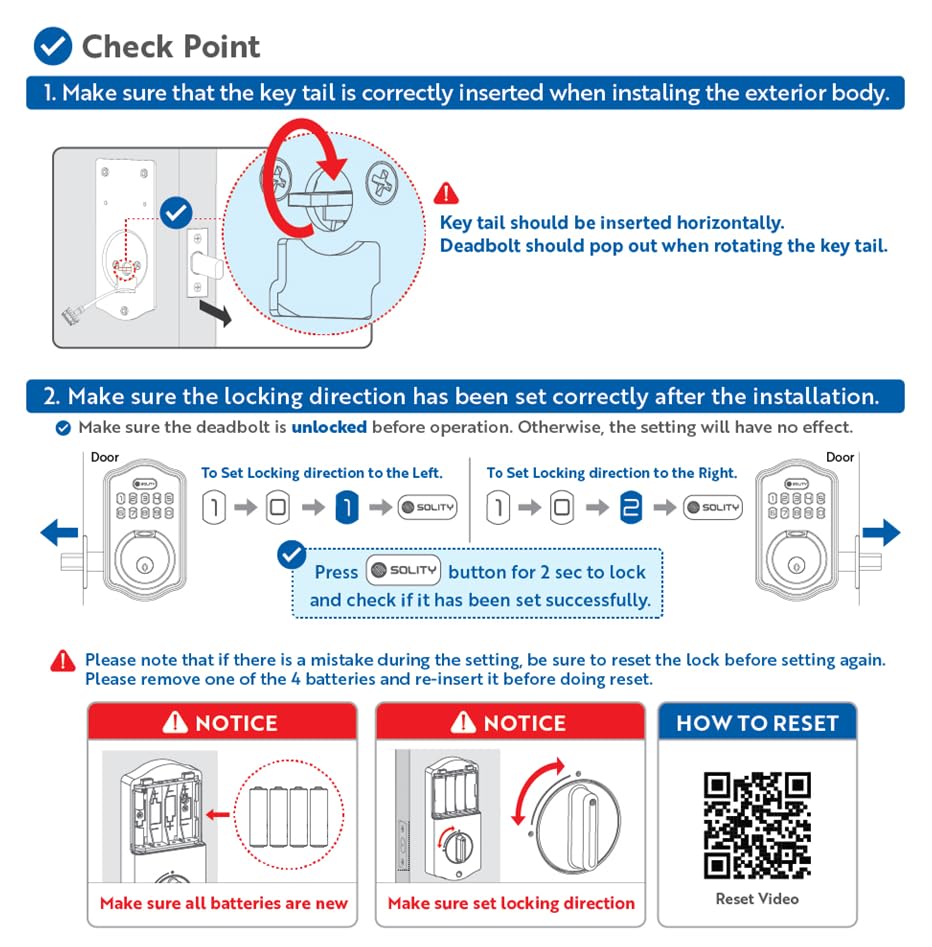
Image: Visual guide for critical installation steps, including correct key tail insertion and setting the locking direction for left or right-handed doors. Also shows notices for new batteries and setting locking direction.
3. Battery Installation
Install 4 new AA batteries into the interior unit. Ensure all batteries are new for optimal performance. Refer to the battery compartment diagram for correct polarity.
Operating Instructions
The Solity AT10 offers multiple convenient and secure access options.
1. Access Options
Your smart deadbolt supports the following access methods:
- Fingerprint Recognition: Up to 50 unique fingerprints can be registered for quick access in approximately 0.3 seconds.
- Customizable Password Codes: Store up to 50 customizable password codes for regular use.
- One-Time Password Feature: Generate secure, temporary codes for guests that automatically erase after a single use.
- One-Touch Locking: Simply press a button to lock the door.

Image: Illustration of various user types (family, roommates, guests) who can utilize the lock's versatile access options, including one-time codes, 50 user codes, and 50 fingerprints.

Image: Overview of the lock's key functions and security features, such as capacity for user codes and fingerprints, auto-lock, IP55 water resistance, one-time PIN, and one-touch locking.
2. Auto-Lock Feature
Enhance your home's security with the customizable auto-lock feature. This can be set to automatically lock the door after a delay of 10 to 99 seconds once it has been closed.
3. Emergency Power Terminal
In case of a dead battery, the lock is equipped with a C-type USB port for emergency charging. Connect a power bank to this port to temporarily power the lock and gain access.

Image: Details on the lock's battery management, showing low battery alerts, the use of long-lasting batteries, easy battery replacement, and the emergency USB Type-C port for external power.
Maintenance
Proper maintenance ensures the longevity and reliable performance of your Solity AT10 lock.
1. Battery Replacement
The lock features a low battery alert. When indicated, replace all 4 AA batteries promptly. Always use new, high-quality alkaline batteries. Ensure correct polarity during installation.
2. Cleaning
Clean the exterior of the lock with a soft, damp cloth. Avoid using abrasive cleaners, solvents, or harsh chemicals, as these can damage the finish and electronic components.
3. Environmental Resilience
The Solity AT10 is IP55 rated, providing protection against dust and water exposure. It has undergone rigorous testing, including a 240-hour salt spray test and endurance against up to 3000N of force, ensuring durability in various environmental conditions.
Troubleshooting
If you encounter issues with your Solity AT10 lock, refer to the following common problems and solutions:
- Lock Not Responding: Check battery levels. If batteries are low or dead, replace them or use the emergency USB-C power terminal.
- Programming Issues / Codes Not Saving: Ensure batteries are new and properly installed. If issues persist, a reset may be necessary.
- Difficulty Setting Locking Direction: Ensure the deadbolt is in the unlocked position before attempting to set the direction. Refer to the installation section for detailed steps.
- Fingerprint Not Recognized: Ensure your finger is clean and dry. Try re-registering your fingerprint if the issue persists.
Resetting the Lock
If you need to reset the lock to factory settings, remove one of the 4 batteries and re-insert it after a few seconds. For a visual guide on how to reset, please refer to the official reset video: Watch Reset Video Here.
Specifications
| Brand | SOLITY |
| Model Name | AT10 |
| Lock Type | Biometric Deadbolt |
| Material | Bronze |
| Color | Oil Rubbed Bronze |
| Item Dimensions (LxWxH) | 38 x 191 x 89 Millimeters (1.5 x 7.5 x 3.5 inches) |
| Item Weight | 1 kg 10 g (2.45 lbs) |
| Special Features | Anti-Peeping Password, Alarm, Battery Indicator, Auto-Lock, Back-Lit Keypad, Fingerprint Access, One-Time Codes, Emergency USB-C Power |
| Connectivity Protocol | Wi-Fi |
| Manufacturer | Solity |
| Country of Origin | USA |
Warranty and Support
Solity is committed to your security and satisfaction.
Warranty Information
Your Solity AT10 Smart Digital Electric Deadbolt comes with:
- A lifetime warranty on mechanical parts.
- A 1-year warranty on the electronic components.
Please retain your proof of purchase for warranty claims.
Customer Support
Our dedicated customer support team is available 24/7 to address any inquiries, provide assistance, or help with troubleshooting. For support, please refer to the contact information provided on the product packaging or the official Solity website.
Ask a question about this manual
Ask about setup, troubleshooting, compatibility, parts, safety, or missing instructions. Manuals+ will review the question and use this page’s manual context to help answer it.