
1. Introduction
Thank you for choosing the WALI Triple Monitor Wall Mount (Model 013ARM). This manual provides detailed instructions for the safe and proper installation, operation, and maintenance of your new monitor mount. Please read this manual thoroughly before installation and retain it for future reference.
This wall mount is designed to support three monitors, each ranging from 17 to 32 inches in size and weighing up to 15.4 lbs. It features VESA mounting compatibility for 75x75mm or 100x100mm patterns. The mount offers full adjustability, including swivel, tilt, and rotation, to optimize your viewing experience and maximize desk space.
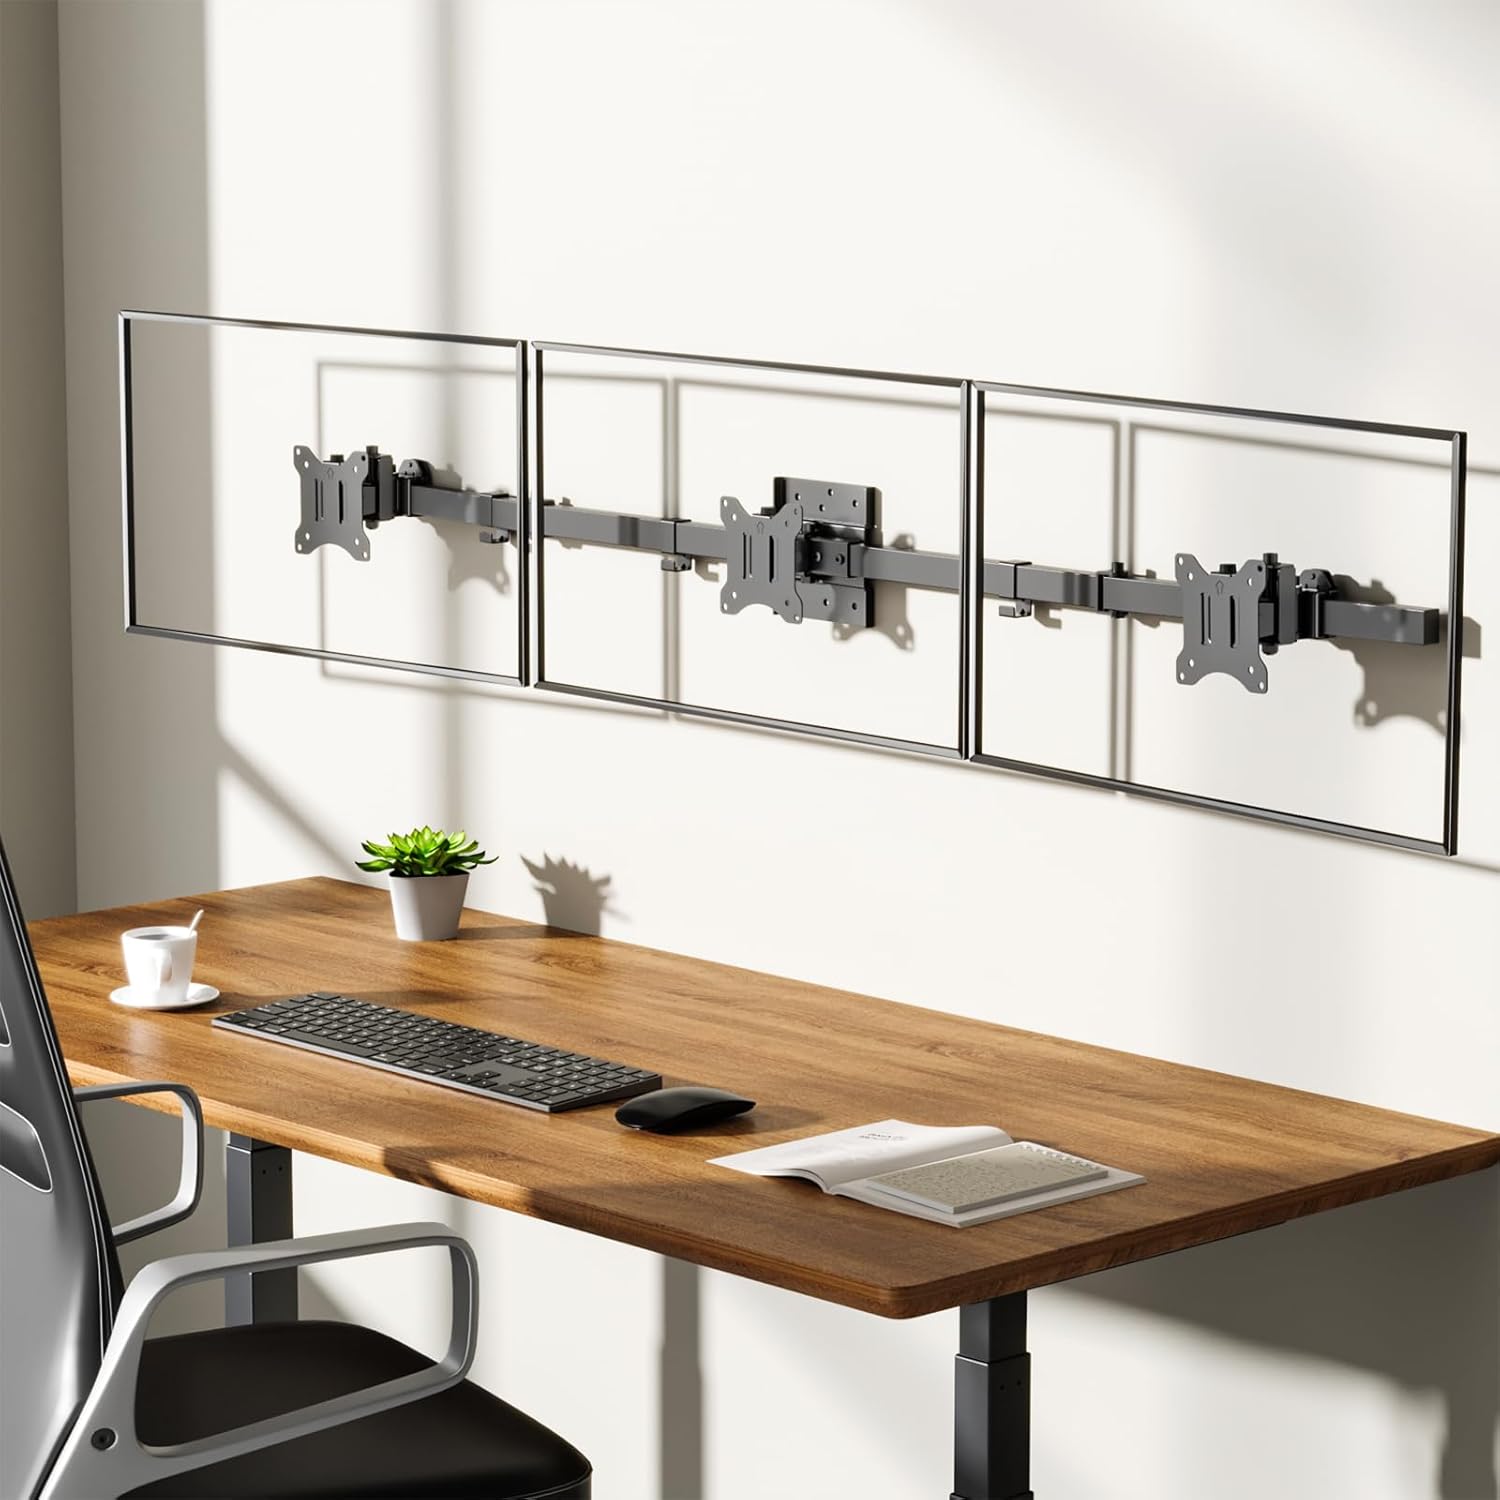
Image: The WALI Triple Monitor Wall Mount (013ARM) with three monitors mounted above a desk, showcasing a clean and organized workspace.
2. Safety Information
WARNING: Failure to read and follow all instructions, warnings, and cautions in this manual may result in serious personal injury, property damage, or voiding of your warranty.
- Do not begin installation until you have read and understood all instructions and warnings contained in this installation sheet.
- Ensure the mounting surface can safely support the combined weight of the mount and all attached equipment.
- This product is designed for installation on solid concrete walls, brick walls, or wood studs. DO NOT install on drywall alone.
- Use only the hardware provided. Do not use parts that are damaged or missing. Contact WALI for replacement parts.
- Never exceed the maximum weight capacity of 15.4 lbs (7 kg) per arm.
- Always have two people for installation to prevent injury or damage.
- Tighten all screws firmly but do not overtighten. Overtightening can damage the screws and components.
- Regularly check the mount for stability and security.

Image: Illustration of compatible wall types for installation: Brick Wall, Wood Stud, and Concrete Wall. Emphasizes not to mount on drywall alone.
3. Package Contents
Verify that all components are present and undamaged before installation. If any parts are missing or damaged, please contact WALI customer support.
- 1 x WALI Triple Monitor Wall Mount (Black)
- Mounting Hardware Kit (screws, washers, anchors)
- User Manual
- Cable Clips

Image: All components of the WALI Triple Monitor Wall Mount (013ARM) laid out, including the main frame, monitor arms, and VESA plates.
4. Setup and Installation
Before starting, ensure you have the necessary tools (e.g., drill, stud finder, level, screwdriver) and that your wall type is compatible. Remember to have assistance for safety.
4.1. Wall Plate Installation
- Determine the desired height and location for your monitors. Use a stud finder to locate wood studs if applicable.
- Place the wall plate (Part A) against the wall at the desired height and use a level to ensure it is straight. Mark the drilling points.
- Drill pilot holes according to your wall type (wood stud, concrete, or brick). For concrete/brick, insert wall anchors.
- Secure the wall plate to the wall using the appropriate screws and washers from the hardware kit.

Image: Detailed diagram illustrating the process of marking and drilling holes, then securing the wall plate to different wall types.
4.2. Attaching Monitor Arms
- Slide the monitor arms (Part B) onto the main rail of the wall plate. Ensure they are securely seated.
- Adjust the position of the arms along the rail to accommodate your monitor sizes and desired spacing. Tighten the locking screws on the arms.
4.3. Attaching VESA Plates to Monitors
- Attach the VESA plates (Part C) to the back of each monitor using the appropriate screws and washers from the hardware kit. Ensure the VESA plate is oriented correctly (arrow pointing up).

Image: Step-by-step visual guide for attaching the VESA mounting plate to the rear of a monitor.
4.4. Mounting Monitors to Arms
- Carefully lift each monitor with the attached VESA plate and slide it onto the monitor arm's mounting head. The quick-release mechanism will secure it.
- Ensure each monitor is fully seated and locked into place.

Image: Visual instruction for securely attaching a monitor, with its VESA plate, to the arm of the wall mount.
4.5. Cable Management
Route all monitor cables through the provided cable clips (Part D) along the arms and main rail for a neat and organized setup.

Image: Example of how to route monitor cables neatly along the mount arms using the included cable clips.
Video: An official video demonstrating the features and installation process of the WALI Triple Monitor Wall Mount (Model 013ARM).
5. Operating Instructions (Adjustments)
The WALI Triple Monitor Wall Mount offers various adjustment options to customize your viewing experience:
- Height Adjustment: Loosen the height adjustment screw on the VESA plate, slide the monitor to the desired height, and re-tighten the screw.
- Swivel: Monitors can swivel up to ±90° at the arm joints to achieve optimal viewing angles.
- Tilt: Adjust the monitor tilt up to ±45° to reduce glare and improve ergonomics.
- Rotation: Rotate monitors 360° for easy switching between landscape and portrait orientations.
- Adjustable Distance: The monitor arms can be extended or retracted to adjust the distance between monitors, with a maximum span of 57.87 inches and a minimum of 34.25 inches.
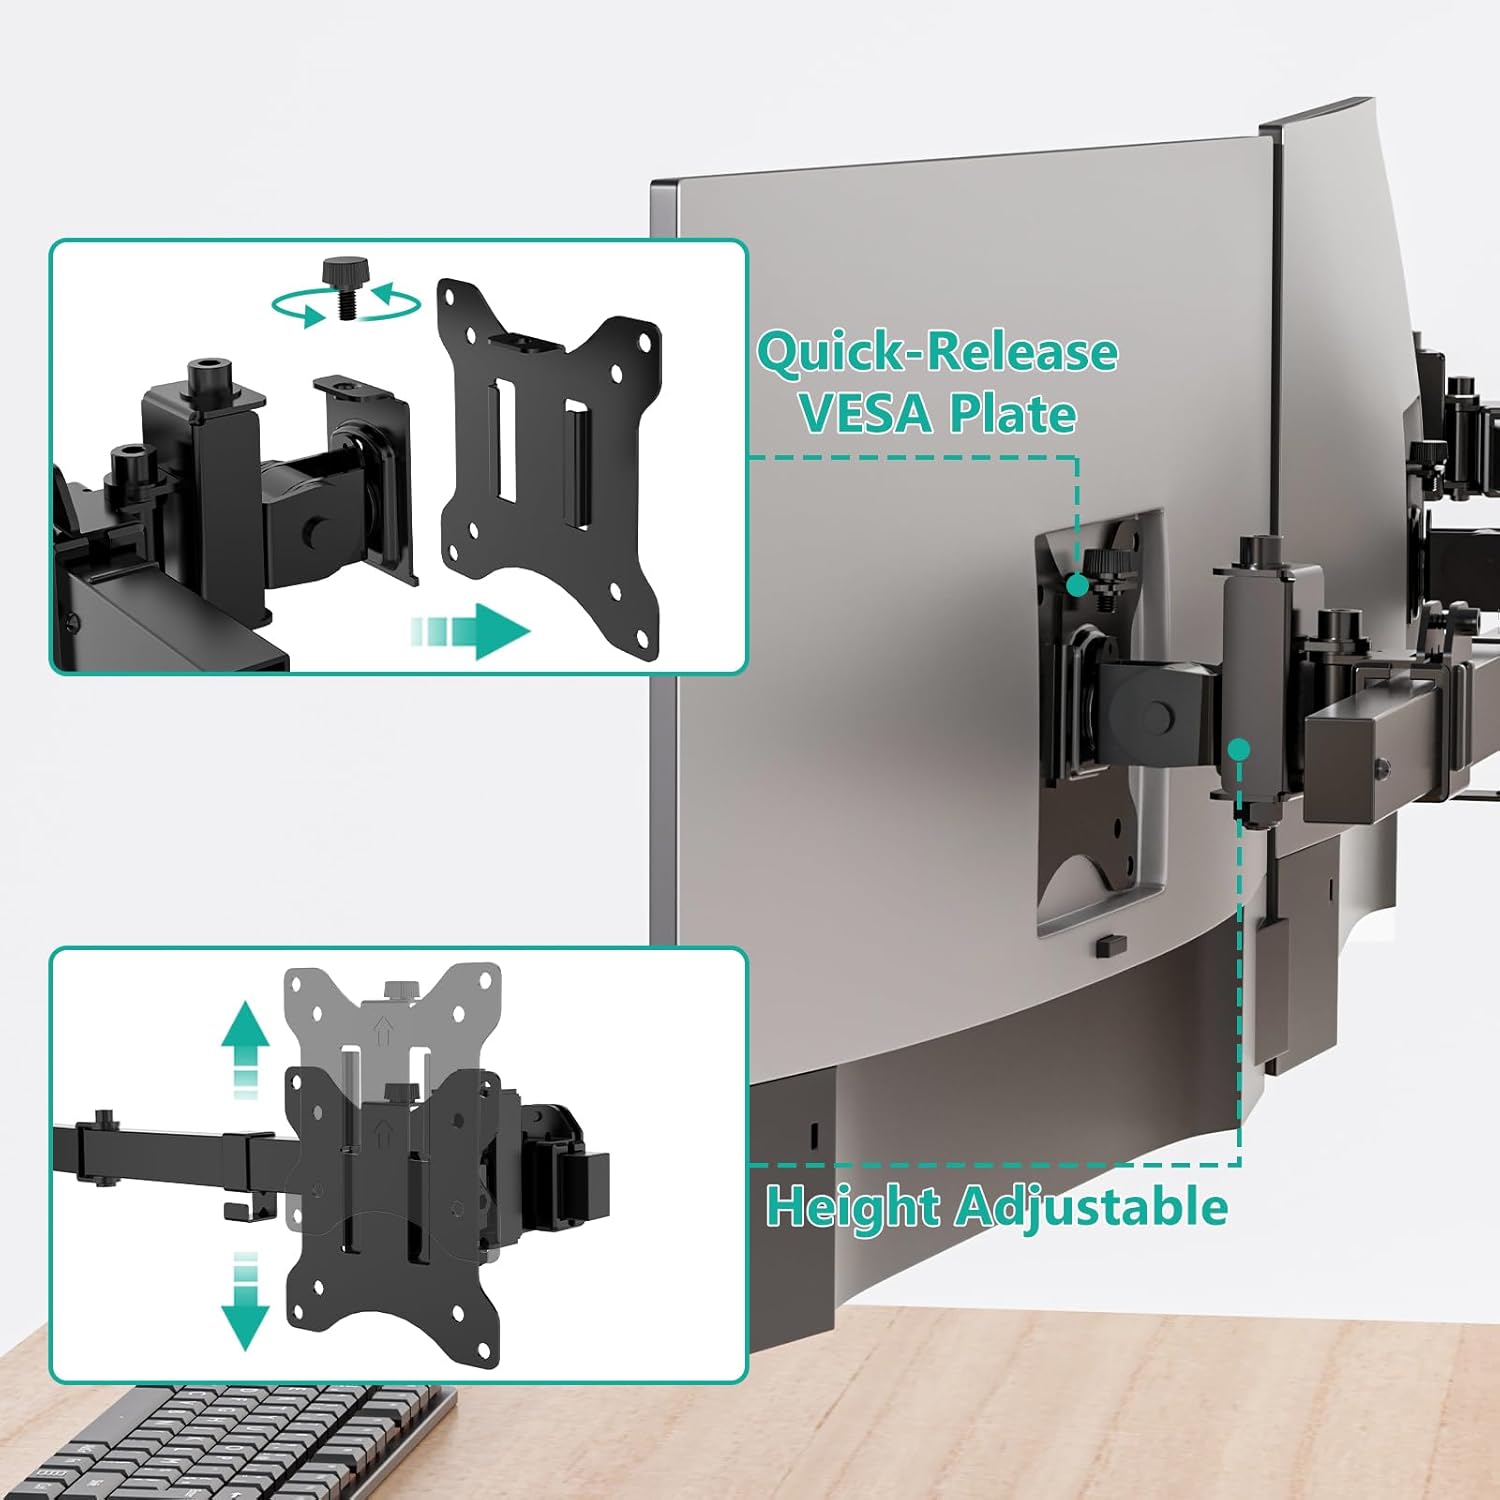
Image: Illustration of the quick-release VESA plate and how to adjust monitor height vertically.
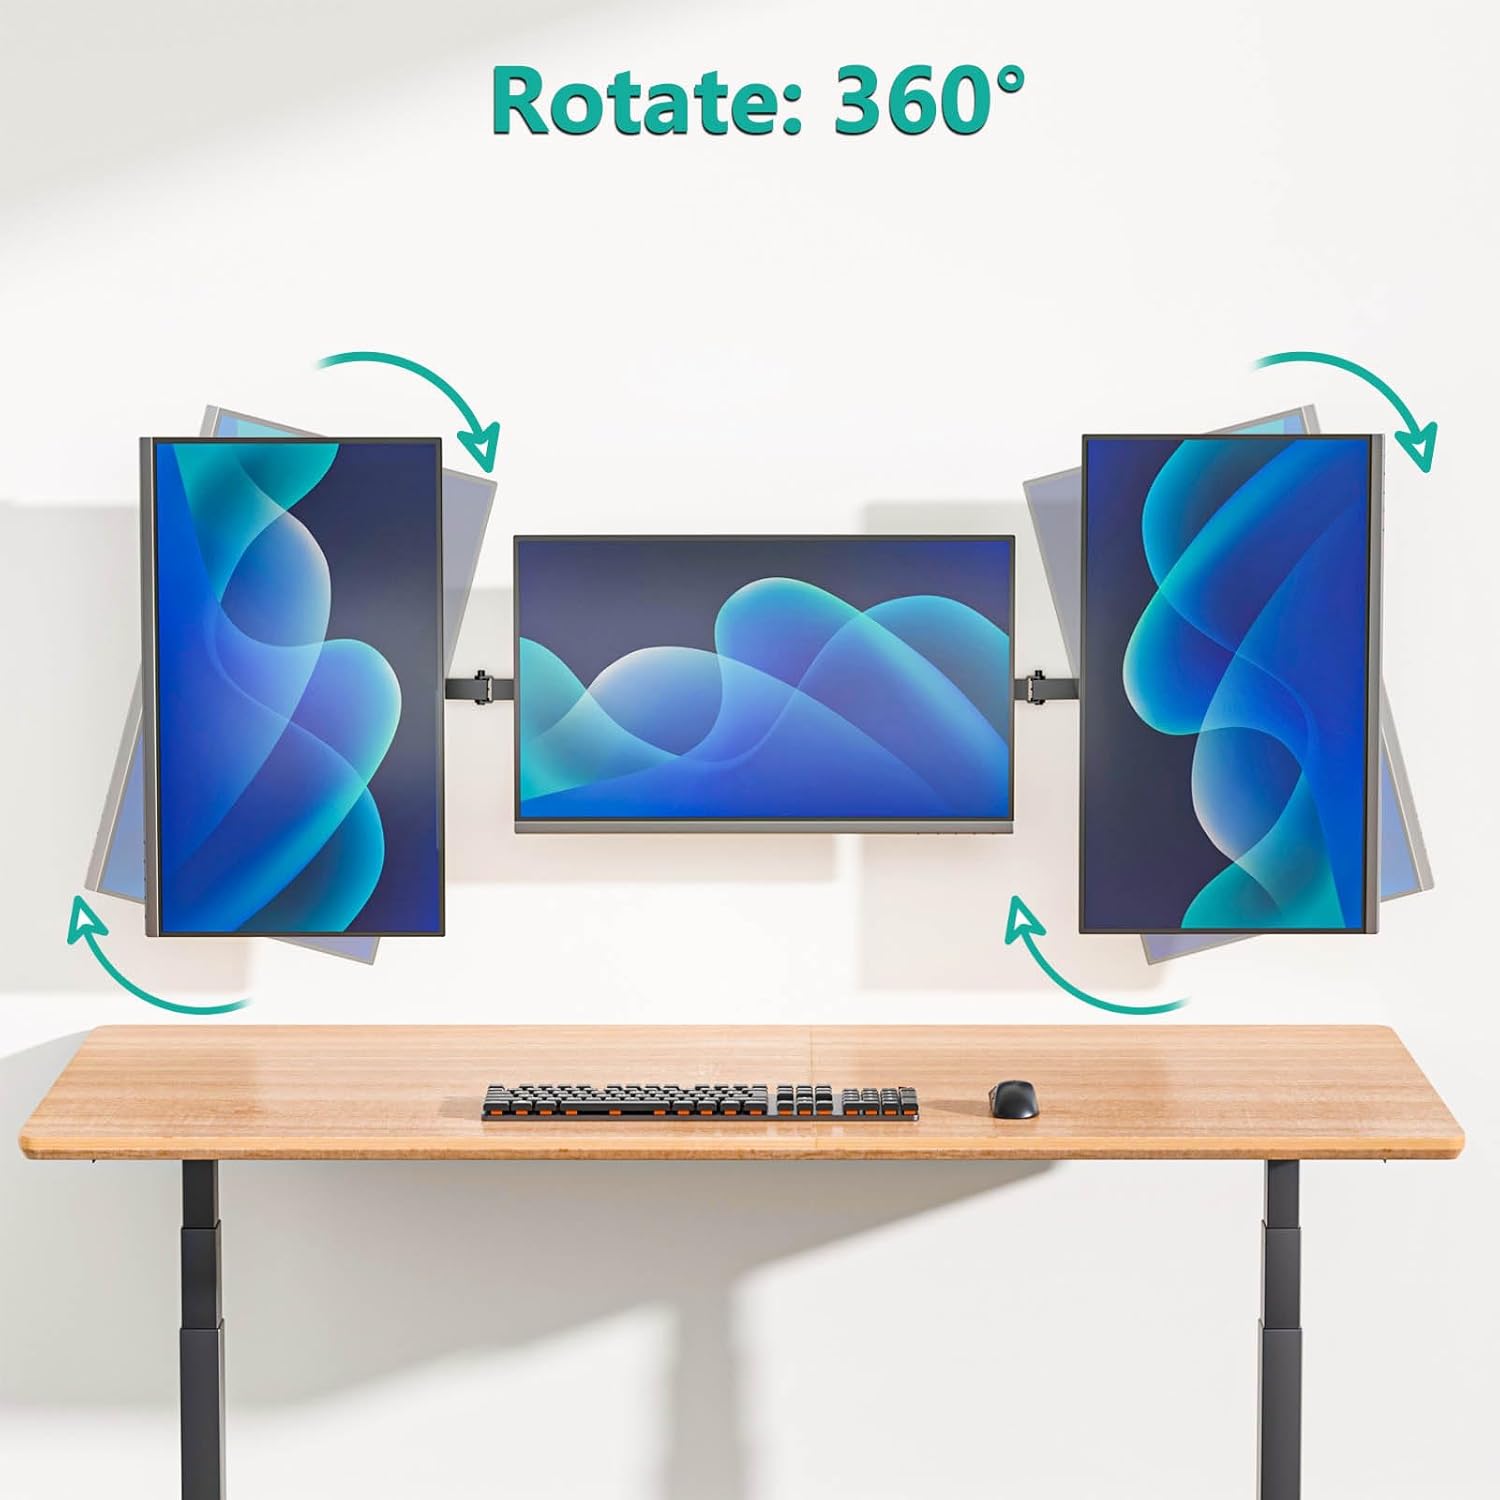
Image: Demonstrates the 360-degree rotation feature, allowing monitors to be oriented in either landscape or portrait mode.

Image: Visual guide for adjusting the tilt and swivel angles of the mounted monitors.

Image: Diagram illustrating the adjustable distance feature, allowing users to customize the spacing between monitors.
6. Maintenance
To ensure the longevity and proper functioning of your WALI Triple Monitor Wall Mount, follow these maintenance guidelines:
- Regular Inspection: Periodically check all screws and connections to ensure they remain tight and secure. Re-tighten if necessary.
- Cleaning: Wipe the mount with a soft, dry cloth to remove dust. For stubborn marks, use a slightly damp cloth with mild soap, then dry thoroughly. Avoid abrasive cleaners or solvents.
- Lubrication: Moving parts generally do not require lubrication. If any joints become stiff, contact customer support for advice.
7. Troubleshooting
If you encounter issues with your WALI Triple Monitor Wall Mount, refer to the following common problems and solutions:
- Monitors are not level: Ensure the wall plate is installed perfectly level. Individual monitor height can be fine-tuned using the height adjustment feature on each VESA plate.
- Monitors sag or tilt unexpectedly: Verify that the weight of your monitors does not exceed the 15.4 lbs per arm capacity. Check all adjustment screws for tightness, especially those controlling tilt and height.
- Mount feels unstable: Re-check all wall mounting screws and ensure they are securely fastened to a compatible wall type (wood stud, concrete, or brick). Ensure the monitor arms are properly seated on the main rail.
- Difficulty adjusting monitor position: Loosen the relevant adjustment screws slightly before attempting to reposition. Do not force adjustments.
If the problem persists after following these steps, please contact WALI customer support for further assistance.
8. Specifications
| Feature | Detail |
|---|---|
| Brand | WALI |
| Model Number | 013ARM |
| Mounting Type | Wall Mount |
| Movement Type | Articulating |
| Material | Metal |
| Color | Black |
| Compatible Devices | Monitors (17-32 inches) |
| Weight Capacity | 15.4 lbs (7 kg) per arm |
| VESA Compatibility | 75x75mm, 100x100mm |
| Maximum Tilt Angle | 45 Degrees |
| Item Weight | 9.83 pounds |
| Package Dimensions | 16.93 x 7.52 x 4.72 inches |
| UPC | 811278026452 |

Image: Key compatibility specifications for the WALI Triple Monitor Wall Mount, including weight capacity, VESA patterns, and supported screen sizes.
9. Warranty and Support
WALI products are designed for durability and performance. This product comes with a standard manufacturer's warranty. Please refer to the warranty card included in your package or visit the official WALI website for detailed warranty information.
For any questions, technical assistance, or to report missing/damaged parts, please contact WALI customer support. Our experienced and friendly US-based customer support team is available to assist 7 days a week.
Contact Information: Please refer to the contact details provided on the WALI website or your product packaging.

