
Introduction
This manual provides detailed instructions for the proper setup, operation, and maintenance of your NEEWER LL35 Carbon Fiber Video Tripod. Designed for professional photography and videography, this tripod offers stability, smooth camera movements, and quick adjustments. Please read this manual thoroughly before using the product to ensure optimal performance and longevity.

The NEEWER LL35 Carbon Fiber Video Tripod set up for outdoor shooting.
Package Contents
Verify that all the following items are included in your package:
- 1 x NEEWER LEGLOCK LL35 Carbon Fiber Video Tripod with Fluid Head
- 1 x Dual-Mode Quick Release Plate
- 1 x L-Shaped Hex Key
- 1 x Carrying Bag
- 1 x User Manual (this document)

Illustration of the NEEWER LL35 tripod and its included accessories: tripod, dual-mode quick release plate, L-shaped hex key, and carrying bag.
Setup Guide
1. Unpacking and Initial Inspection
Carefully remove all components from the packaging. Inspect the tripod and accessories for any signs of damage. If any parts are missing or damaged, please contact customer support.
2. Extending and Retracting Legs (One-Click Lock)
- To extend a leg, rotate the LegLock button 90° counter-clockwise.
- Gently lift the leg to extend the 3-section tubular legs to your desired height.
- Rotate the LegLock button 90° clockwise to securely lock the leg in place.
- Repeat for all three legs. Ensure the triangular mid-spreader lever is engaged for added stability.
- To retract, reverse the process: rotate the LegLock button, push the leg down, and then lock.
Detail of the one-click leg lock for rapid height adjustment and the 3K twill carbon fiber leg construction.
3. Attaching the Fluid Head
The LL35 features a 75mm removable bowl head. Ensure it is securely seated and tightened onto the tripod base. The bowl head allows for quick leveling on uneven surfaces.
4. Leveling the Tripod
Utilize the integrated bubble level on the fluid head to ensure your tripod is perfectly level before mounting your camera. Adjust the leg lengths or the bowl head until the bubble is centered.

Visual guide for fluid bowl adjustment and the location of the integrated bubble level for precise leveling.
5. Attaching the Quick Release Plate
The dual-mode quick release plate is compatible with DJI RS2/RS3/RS3 PRO gimbals and Manfrotto 501PL systems. Choose the appropriate mode for your equipment:
- For DJI RS2/RS3/RS3 PRO: Set the lock on the quick release plate to the "For RS2/RS3" position.
- For Manfrotto 501PL: The plate is compatible with 501PL systems.
- Attach the quick release plate to the bottom of your camera or camera cage using the 1/4" or 3/8" screws.
- To mount the camera, press and lock the QR plate onto the fluid head's clamp. To release, use the side button.

Instructions for using the dual-mode quick release plate for compatibility with DJI RS/RSC gimbals and Manfrotto 501PL systems.
6. Adjusting the Telescopic Handle
The removable telescopic handle can be adjusted from 9.1" to 14.2" (23-36cm) to suit different dominant hands and shooting preferences. Loosen the locking mechanism, extend or retract the handle, and then tighten to secure.
The removable telescopic handle can be adjusted for comfortable operation.
Operating Instructions
1. Mounting Your Camera
Ensure the quick release plate is securely attached to your camera. Align the plate with the fluid head's clamp and press down until it locks into place. Verify the camera is stable before releasing your grip.
2. Adjusting Fluid Head Movements (Pan and Tilt)
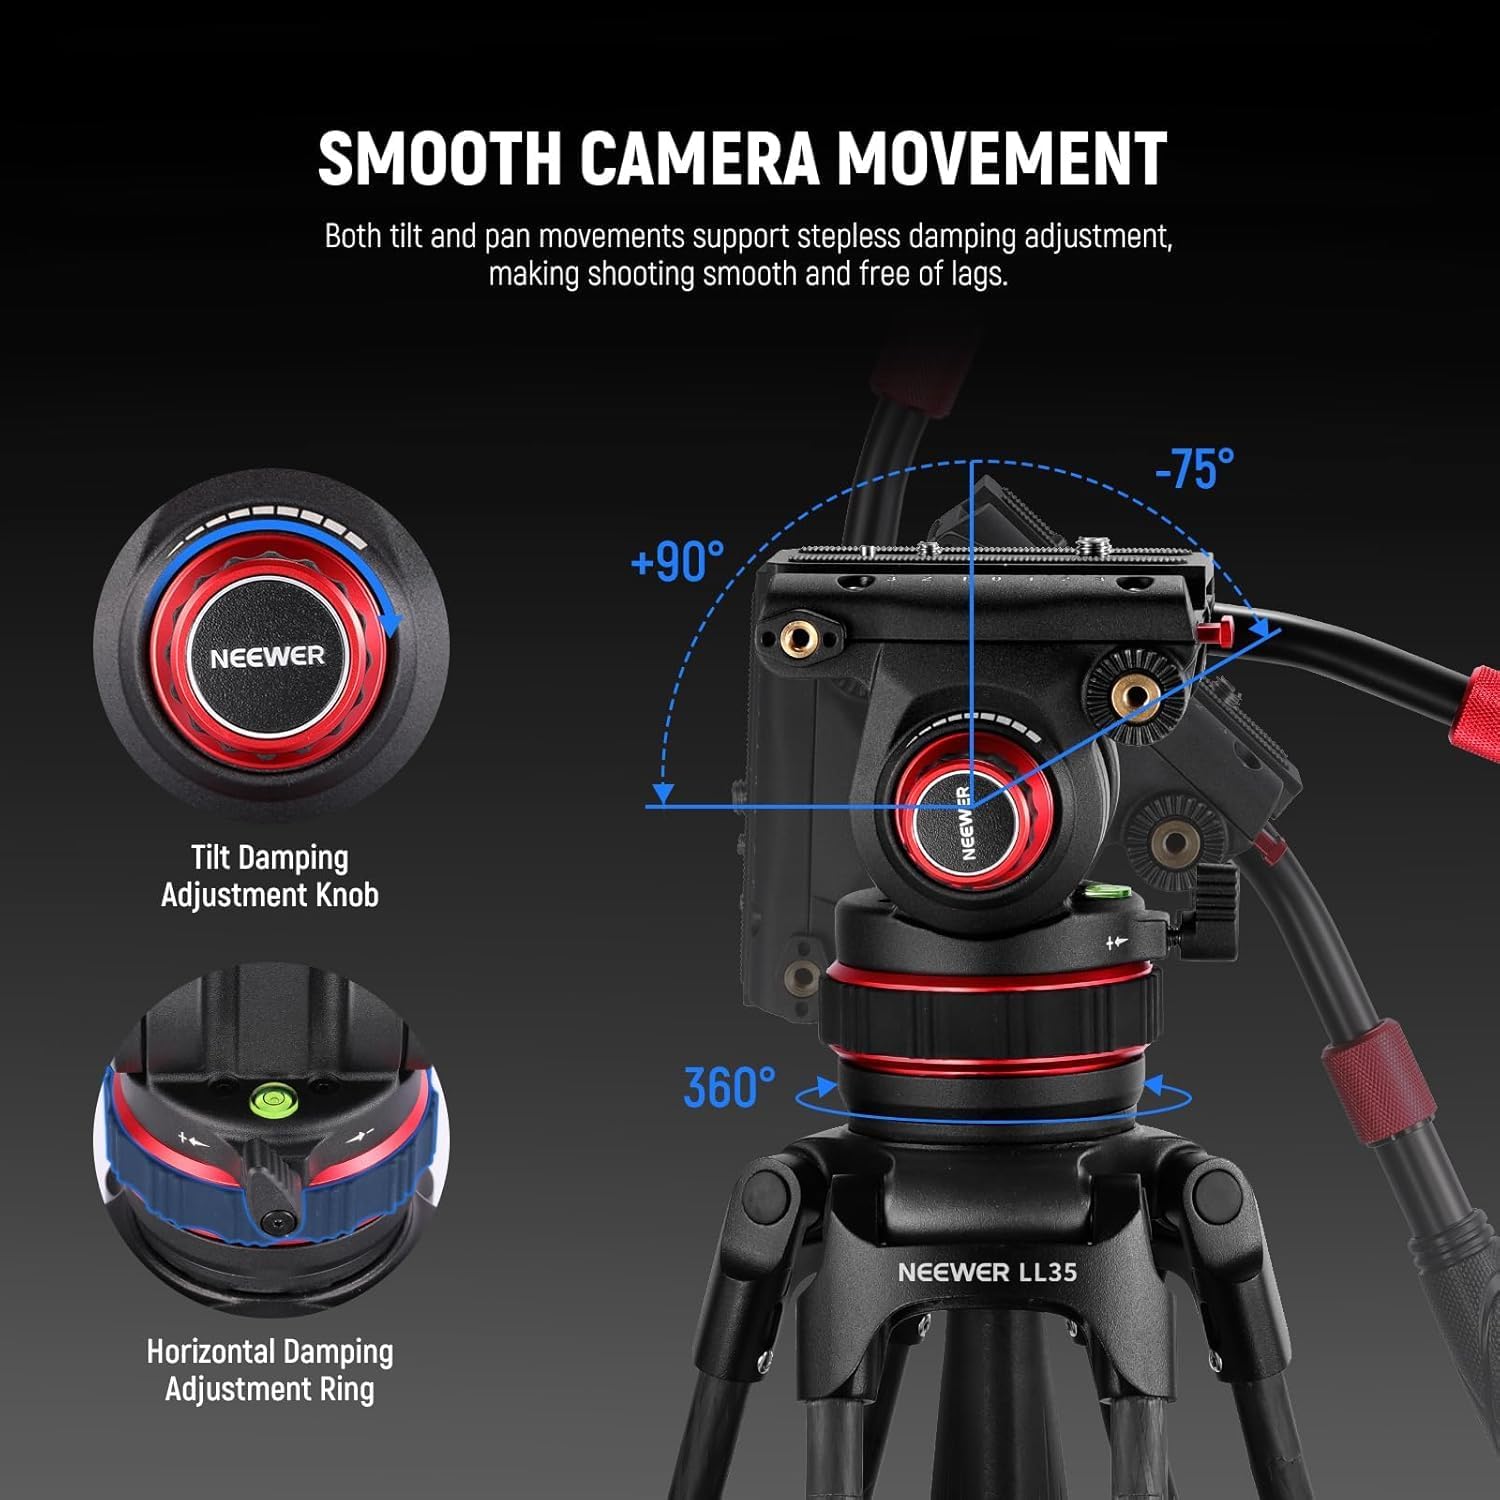
The fluid head allows for smooth 360° panning and +90°/-75° tilting. Separate damping mechanisms control friction for each axis:
- Tilt Damping: Use the side damping adjustment knob to control the fluid drag for tilt movements.
- Pan Damping: Rotate the bottom ring to adjust the fluid drag for panoramic movements.
Adjust these controls to achieve your desired level of resistance for smooth, shake-free shots.

Controls for adjusting tilt damping and horizontal damping on the fluid head for smooth camera movements.
3. Load Capacity Guidelines
The NEEWER LL35 tripod is designed to support equipment up to 22 lb (10 kg). Always ensure your camera, lens, and accessories do not exceed this weight limit to maintain stability and prevent damage to the tripod or your gear.

The tripod supports a maximum load of 22lb (10kg), suitable for various photography and video equipment.
4. Interchanging Feet
The tripod comes with interchangeable anti-slip rubber feet and steel spikes. The rubber feet are suitable for indoor use or smooth surfaces, while the steel spikes provide better grip on soft ground or uneven outdoor terrain. To change the feet, simply unscrew the current feet and screw on the desired type.
Maintenance
To ensure the longevity and optimal performance of your NEEWER LL35 tripod, follow these maintenance guidelines:
- Cleaning: Wipe down the tripod with a soft, dry cloth after each use. For stubborn dirt, use a slightly damp cloth and mild soap, then dry thoroughly. Avoid harsh chemicals or abrasive materials.
- Lubrication: The fluid head is factory-lubricated. Do not attempt to disassemble or lubricate the fluid head yourself, as this may void the warranty and impair performance.
- Storage: Store the tripod in its carrying bag in a cool, dry place away from direct sunlight and extreme temperatures.
- Inspection: Periodically check all screws, knobs, and locking mechanisms to ensure they are tight and functioning correctly. Use the provided L-shaped hex key for any necessary adjustments.
Troubleshooting
If you encounter any issues with your NEEWER LL35 tripod, refer to the following common problems and solutions:
- Tripod is unstable: Ensure all leg locks are fully engaged. Check that the triangular mid-spreader is properly extended and locked. Verify the ground surface is stable, or use the steel spikes if on soft terrain.
- Camera movement is not smooth: Adjust the tilt and pan damping knobs on the fluid head. Ensure the camera is balanced on the quick release plate.
- Quick release plate not locking: Ensure the plate is correctly aligned with the clamp and that no obstructions are present. Check the locking mechanism for debris.
- Legs not extending/retracting smoothly: Check for any dirt or debris in the leg sections. Ensure the LegLock buttons are fully disengaged before attempting to adjust height.
For issues not covered here, please contact NEEWER customer support.
Specifications
| Feature | Specification |
|---|---|
| Model Number | LL35 |
| Material | Carbon Fiber |
| Maximum Height | 78 inches (198 cm) |
| Minimum Height | 36 inches (91.5 cm) |
| Folded Length | 37.4 inches (95 cm) |
| Net Weight | 10.2 lb (4.6 kg) |
| Load Capacity | 22 lb (10 kg) |
| Leg Sections | 3 |
| Head Type | Fluid Head (75mm bowl) |
| Pan Range | 360° |
| Tilt Range | +90° / -75° |
| Quick Release Plate Compatibility | DJI RS2/RS3/RS3 PRO, Manfrotto 501PL |
| Mounting Points | 1/4", 3/8" |
| Compatible Devices | DSLR cameras, Mirrorless cameras, Camcorders, Telescopes, Sliders |
Warranty Information
Warranty information for the NEEWER LL35 Carbon Fiber Video Tripod is not available in this document. Please refer to the product packaging or the official NEEWER website for detailed warranty terms and conditions.
Customer Support
For technical assistance, troubleshooting, or inquiries regarding your NEEWER LL35 Carbon Fiber Video Tripod, please visit the official NEEWER website or contact their customer service department directly. Contact details are typically provided on the product packaging or within the official product documentation.


