
iVIGA 2316702B
iVIGA Stainless Steel High-Pressure Kitchen Faucet
Model: 2316702B (Black) - Instruction Manual
Introduction
This manual provides comprehensive instructions for the installation, operation, and maintenance of your iVIGA Stainless Steel High-Pressure Kitchen Faucet, Model 2316702B. Please read this manual thoroughly before installation and retain it for future reference. Proper installation and care will ensure optimal performance and longevity of your faucet.
Safety Information
- Always turn off the main water supply before beginning any installation or maintenance.
- Wear appropriate personal protective equipment, such as safety glasses and gloves, during installation.
- Ensure all connections are secure to prevent leaks. Do not overtighten.
- If you are unsure about any part of the installation process, consult a qualified plumber.
- Keep small parts away from children.
Package Contents
Verify that all components listed below are present in your package before starting installation.
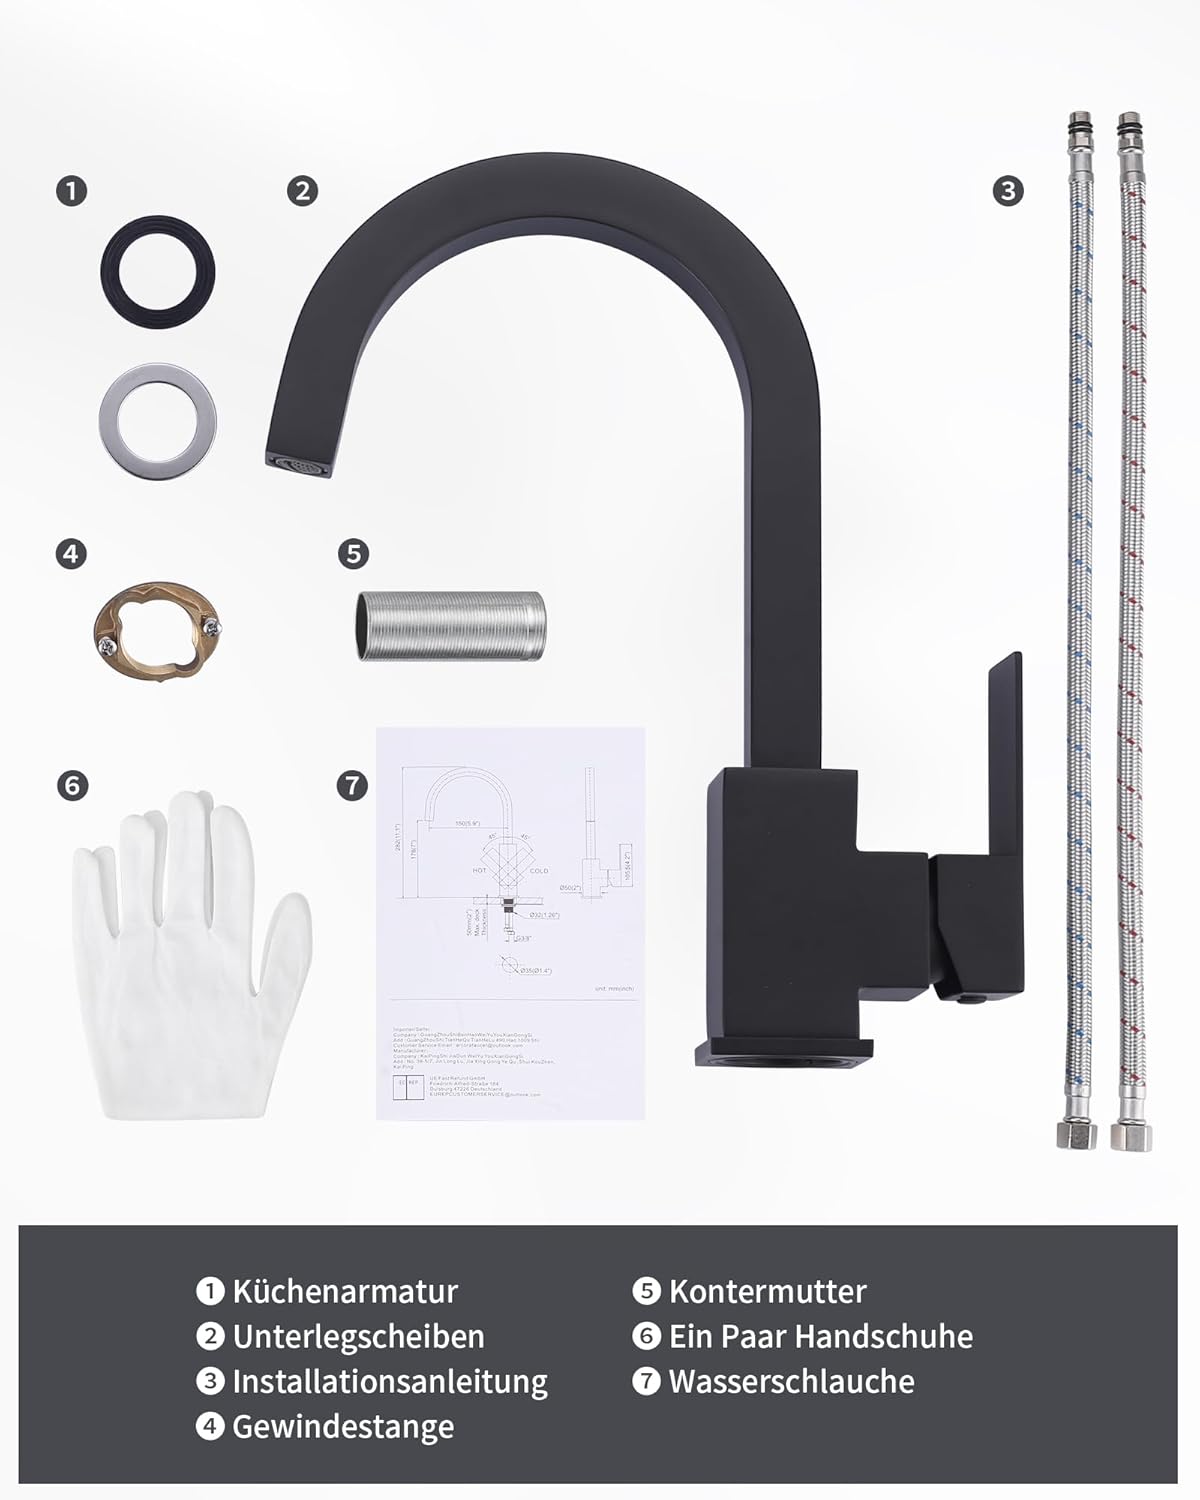
Image: All components included in the iVIGA kitchen faucet package, laid out for inspection.
- Kitchen Faucet (1 unit)
- Washers (2 units)
- Installation Manual (1 unit)
- Threaded Rod (1 unit)
- Lock Nut (1 unit)
- Pair of Gloves (1 pair)
- Water Hoses (2 units)
Specifications
| Feature | Specification |
|---|---|
| Brand | iVIGA |
| Model Number | 2316702B |
| Material | Stainless Steel |
| Finish | Stainless Steel (Black) |
| Dimensions (L x W x H) | 33.5 x 22.5 x 7.5 cm |
| Weight | 1.9 kg |
| Installation Method | Single Hole |
| Number of Handles | 1 (Lever) |
| Special Feature | 360° Swivel Spout |
| Valve Type | Ceramic Valve Core |

Image: Technical diagram illustrating the precise dimensions of the iVIGA kitchen faucet in millimeters.

Image: Internal view of the faucet highlighting the ceramic valve core, which is free of heavy metals and ensures food safety.
Installation Guide
Pre-Installation Checklist:
- Ensure you have all the components listed in the 'Package Contents' section.
- Gather necessary tools: adjustable wrench, screwdriver, plumber's tape (optional).
- Turn off the main water supply to your kitchen.
- Clear the area under the sink for easy access.
Step-by-Step Installation:
- Prepare the Mounting Hole: Ensure your sink has a single mounting hole of appropriate size (typically 35-40mm diameter).
- Install the Faucet: Insert the faucet body into the mounting hole from above the sink. Ensure the base is flush with the sink surface.
- Secure the Faucet: From underneath the sink, slide the rubber washer, metal washer, and then the lock nut onto the threaded rod. Tighten the lock nut securely with an adjustable wrench to hold the faucet firmly in place.
- Connect Water Hoses: Attach the hot and cold water supply hoses to the corresponding inlets on the faucet body. The included hoses are typically marked or color-coded (red for hot, blue for cold). Hand-tighten first, then use a wrench for a quarter turn. Do not overtighten.
- Connect to Water Supply: Connect the other ends of the water hoses to your hot and cold water supply valves. Use plumber's tape on the threads if desired for an extra seal.
- Check for Leaks: Slowly turn on the main water supply. Check all connections for any signs of leaks. If leaks occur, tighten the connections slightly until they stop.
- Flush the Faucet: Remove the aerator from the spout (if pre-installed) and turn on both hot and cold water for a few minutes to flush out any debris from the water lines. Reinstall the aerator.
Operating Instructions

Image: The iVIGA kitchen faucet dispensing water into a sink, showcasing its functional design.
- Water Flow and Temperature Control: The single lever handle controls both water flow and temperature.
- Flow Control: Lift the handle upwards to increase water flow. Push it downwards to decrease or stop the flow.
- Temperature Control: Move the handle to the left for hot water and to the right for cold water. Adjust the position between left and right to achieve your desired water temperature.
- 360° Swivel Spout: The faucet spout can rotate 360 degrees, allowing for flexible use across multiple sink basins or for moving the spout out of the way when not in use.

Image: Demonstration of the faucet's 360-degree swivel capability, allowing for versatile use and easy movement.
Maintenance
Cleaning:
- Clean the faucet regularly with a soft cloth and mild soap or a non-abrasive cleaner.
- Avoid using abrasive cleaners, harsh chemicals, or scouring pads, as these can damage the finish.
- Rinse thoroughly with clean water after cleaning and dry with a soft cloth to prevent water spots.
Aerator Maintenance:
The faucet features an effective aerator designed to save water and minimize splashes.

Image: Exploded view of the faucet's aerator, highlighting its water-saving and splash-minimizing design.
- If water flow becomes restricted or uneven, the aerator may be clogged with sediment.
- To clean, unscrew the aerator from the end of the spout.
- Rinse the aerator components under running water and gently brush away any debris.
- Reassemble the aerator and screw it back onto the spout.
Troubleshooting
| Problem | Possible Cause | Solution |
|---|---|---|
| Low Water Flow | Clogged aerator; partially closed supply valves; debris in water lines. | Clean the aerator. Ensure supply valves are fully open. Flush water lines. |
| Leaks at Faucet Base | Loose mounting nut; worn O-rings/gaskets. | Tighten the mounting nut under the sink. If problem persists, contact support. |
| Leaks from Spout | Damaged ceramic valve core. | Contact customer service for replacement parts or assistance. |
| Water Temperature Issues | Incorrect supply line connection; issue with water heater. | Verify hot/cold lines are connected correctly. Check water heater settings. |
Warranty and Support
Your iVIGA kitchen faucet comes with a 3-year warranty, ensuring quality and reliability. We also provide 24-hour customer service to assist you with any inquiries or issues.

Image: A comparative graphic highlighting the iVIGA faucet's superior quality, including its 3-year warranty and 24-hour customer service.
For technical support, warranty claims, or any questions regarding your iVIGA product, please refer to the contact information provided in your purchase documentation or visit the official iVIGA website.
Ask a question about this manual
Ask about setup, troubleshooting, compatibility, parts, safety, or missing instructions. Manuals+ will review the question and use this page’s manual context to help answer it.