Introduction
This manual provides detailed instructions for the assembly, operation, and maintenance of your ApisQueen DIY Underwater ROV Robot 10M-ROV. Designed for underwater exploration and educational purposes, this ROV allows you to view and interact with the underwater environment. Please read this manual thoroughly before use to ensure safe and optimal performance.
Setup
1. Components Overview
Your ApisQueen 10M-ROV kit includes the following components:
- Thruster CW#1 (1 unit)
- Thruster CW#2 (1 unit)
- Thruster CCW#3 (1 unit)
- Tube#2 (2 units)
- Tube#3 (4 units)
- Tube#4 (4 units)
- Tube#5 (2 units)
- Tube#6 (2 units)
- Tube#7 (2 units)
- 2S LiPo Battery (1 unit)
- 2S Charger (1 unit)
- Right Angle Head#1 (10 units)
- 3 Through-Head#8 (4 units)
- Parts Kit (1 unit)
- Rectangular Grid (1 unit)
- Zip Ties (1 unit)
- Buoyancy Sponge Roll (3 units)
- Control Box (1 unit)
- Waterproof Control Wire (1 unit)
2. Assembly Instructions
Follow these steps to assemble your ROV. An assembly video is also available for visual guidance.

Image: The basic frame of the ApisQueen ROV, showing the PVC pipe structure, thruster mounts, and buoyancy elements.

Image: Detailed view of the waterproof connection for the thruster wires, emphasizing proper sealing.
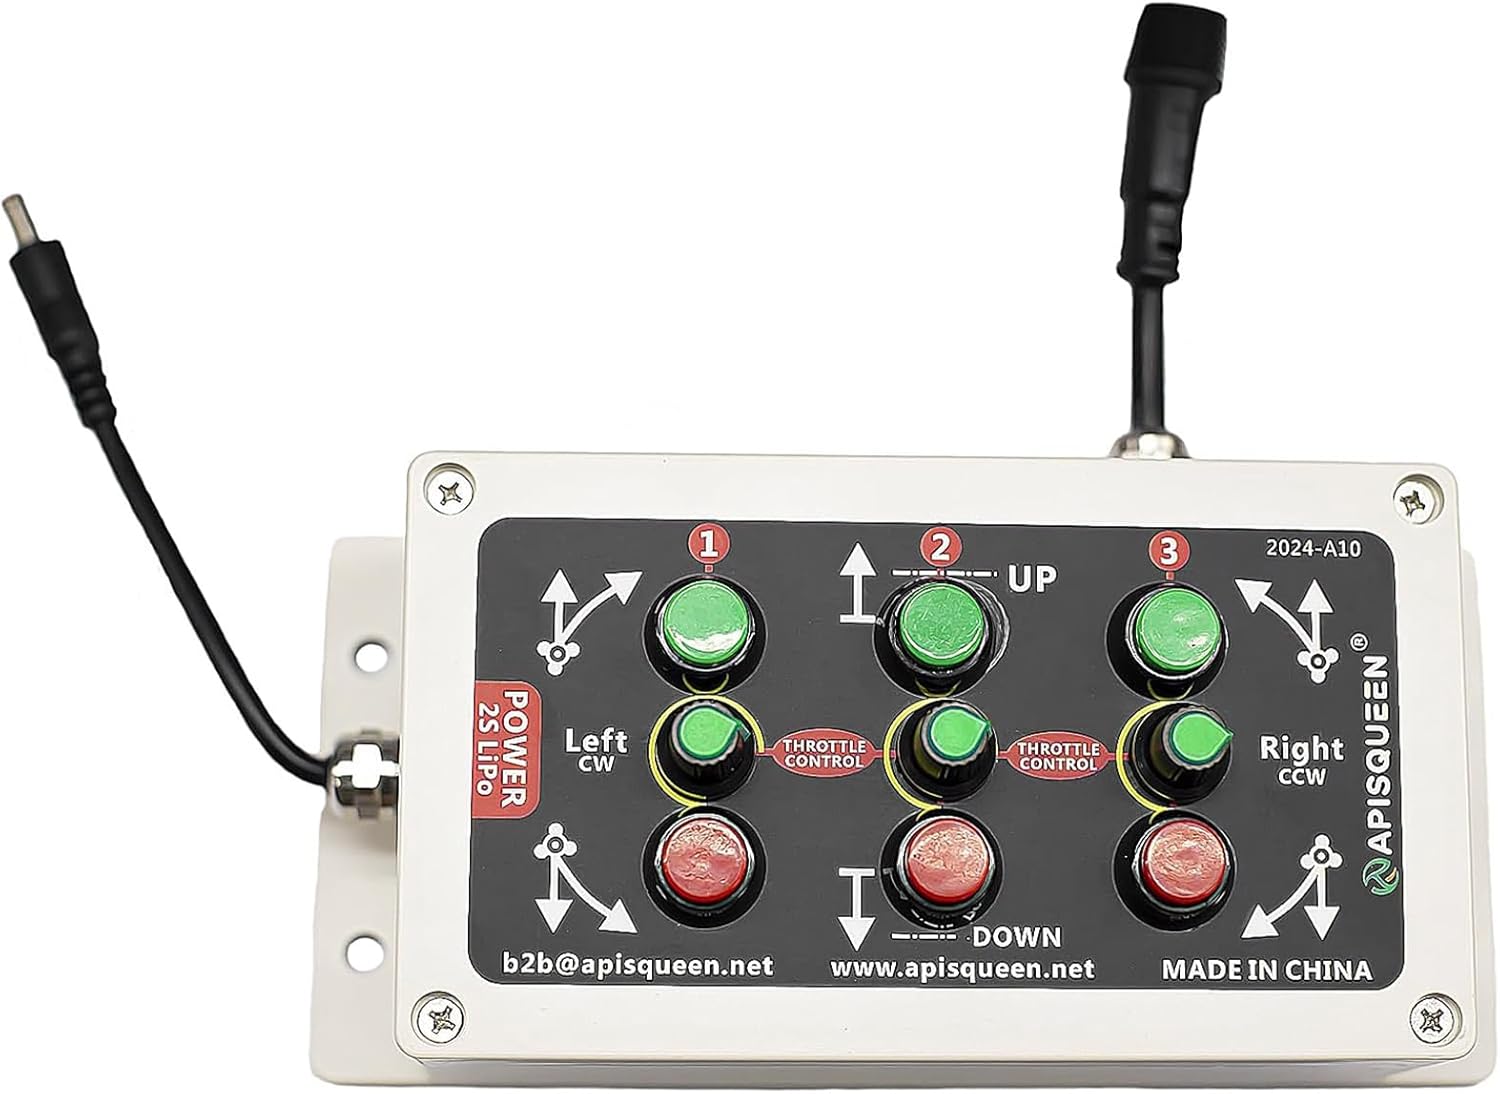
Image: The main control box for the ROV, featuring labeled buttons for directional and depth control.

Image: Side view of the control box, showing the various ports for connecting the waterproof control wire and power.

Image: The waterproof control wire, coiled, which connects the ROV to the control box.

Image: A close-up of the waterproof connectors on the control wire, designed for secure and watertight connections.
Assembly Video:
Video: This video demonstrates the step-by-step assembly process for the ApisQueen Underwater ROV, including connecting thrusters, wiring, and setting up the control system. It provides a visual guide to ensure correct setup.
- Connect Thrusters: Connect the three-phase wires of each thruster to the corresponding ESC (Electronic Speed Controller) wires, two by two.
- Connect ESC Power: Connect the ESC's power cable with the one-point-three adapter cable.
- Connect ESC Signal to Receiver: Connect the signal cable of the left ESC into channel 1 of the receiver. Insert the right ESC signal cable into channel 2. Pay attention to the direction of connection: the white wire is for signal, and the black wire is for negative.
- Power Supply Module: Connect the XT60 connector (input) of the power supply module to the adapter cable. The power supply module (UBEC) provides 5V output power to the receiver. Insert the output of the power supply module into any one of the receiver's 3-5 channels. One power supply for the receiver is sufficient.
- Remote Control: Turn on the remote control. After connecting the power supply, wait for the ESC to pass the self-test (beep sounds).
- Voltage Detection (Optional): If real-time voltage display is desired on the remote control screen, connect the voltage detection line by yourself. Insert the pin end into the XT60 connector of the ESC, ensuring red wire connects to red wire and black wire to black wire. This connection can be secured with insulating tape.
Operating Instructions
Before operating your ROV, ensure all connections are secure and the battery is fully charged.
- Prepare for Water: Soak the ROV in water and allow the inside of the tubes to fill with water. This helps achieve neutral buoyancy.
- Control Box Overview: The control box features three vertical rows of buttons.
- First vertical row: Controls thruster #1.
- Second vertical row: Controls thruster #2.
- Third vertical row: Controls thruster #3.
- Button Functions: Each vertical row has three buttons:
- Green button: Forward movement.
- Blue knob: Speed adjustment.
- Red button: Backward movement.
- Movement Commands:
- ROV Forward: Press green buttons #1 and #3 simultaneously.
- ROV Backward: Press red buttons #1 and #3 simultaneously.
- ROV Turns Left: Press red button #1 and green button #3 simultaneously.
- ROV Turns Right: Press green button #1 and red button #3 simultaneously.
- ROV Sinks: Press green button #2.
- ROV Floats Up: Press red button #2.
- Battery Recommendation: Use a 2S LiPo battery (7.2-8.4V) for optimal performance.
Maintenance
Proper maintenance ensures the longevity and reliable operation of your ApisQueen ROV.
- Rinse After Use: After each use, thoroughly rinse the ROV and all components with fresh water to remove salt, sand, or debris.
- Dry Completely: Ensure all parts, especially connectors and thrusters, are completely dry before storage to prevent corrosion.
- Inspect Connections: Regularly check all waterproof connections for any signs of wear, damage, or loose seals.
- Thruster Inspection: Inspect thrusters for any entanglement of debris (e.g., seaweed, fishing line) and clean as necessary.
- Battery Care: Follow the manufacturer's guidelines for LiPo battery charging, discharging, and storage to maximize battery life and safety.
- Storage: Store the ROV and its components in a cool, dry place away from direct sunlight and extreme temperatures.
Troubleshooting
If you encounter issues with your ROV, refer to the following common solutions:
- Thruster Not Operating:
- Check all power connections to the ESCs and receiver.
- Ensure the remote control is powered on and properly bound to the receiver.
- Verify that the thruster wires are correctly connected to the ESCs.
- Incorrect Movement Direction:
- If the forward/backward or left/right movement is incorrect, you can change the rotating direction of the paddle by switching the position of two of the three-phase wires connecting the thruster to the ESC.
- Ensure the remote control joystick is pushed straight (forward/back/left/right) and not tilted, as tilting can cause thrusters to vibrate at a high level or not operate correctly.
- ROV Not Buoyant/Sinking:
- Ensure the ROV tubes are fully filled with water before operation.
- Check buoyancy sponge rolls for proper placement and integrity.
- No Voltage Data on Remote Screen:
- Ensure the voltage detection line is correctly connected to the XT60 connector of the ESC (red to red, black to black).
Specifications
| Feature | Detail |
|---|---|
| Brand | ApisQueen |
| Model Name | 10M ROV |
| Cable Length | 10 meters |
| Motor Type | Brushed motor |
| Voltage | 2S LiPo (7.2-8.4V) |
| Number of Motors | 4 |
| ROV Size (L*W*H) | 300*200*200mm (11.81 x 7.87 x 7.87 inches) |
| Thruster Waterproof Level | IP68 |
| Material | Plastic |
| Item Weight | 1.5 ounces |
Warranty
Specific warranty details are typically provided with your product packaging or purchase documentation. Please refer to those documents for comprehensive warranty information.
Support
For any questions regarding product assembly, operation, or if you encounter any issues, please do not hesitate to contact ApisQueen customer service. We are committed to providing solutions and will reply to your message within 24 hours.
You can reach us through the Amazon platform or refer to the contact information provided in your product packaging.


