
1. Introduction
Thank you for choosing the Johgee 3 Zones Water Timer. This device is designed to automate your garden watering, providing convenience and efficiency. It features three independent programmable outlets, allowing you to manage different watering needs simultaneously. Please read this manual carefully before operation to ensure proper use and longevity of your product.

Figure 1: Johgee 3 Zones Water Timer Overview
2. Product Features
- 3 Independent Programmable Outlets: Control three separate watering zones from a single faucet.
- Automatic and Manual Watering Modes: Set precise schedules or initiate temporary watering without disrupting existing programs.
- Rain Delay Function: Pause watering schedules to conserve water during rainy periods.
- Child Safety Mode: Prevents accidental changes to settings.
- Durable and Waterproof Design: IPX5 rated for outdoor use, featuring an upgraded aluminum alloy filter to prevent leaks.
- Easy-to-Read Display: High-resolution screen with automatic sleep mode to save battery power.
- Long Battery Life: Operates for approximately 6 months on 2 AA alkaline batteries.

Figure 2: Key Features of the Water Timer

Figure 3: Three Independent Programmable Outlets
3. Package Contents
- 1 x Johgee 3 Zones Water Timer (Model: FY#HCT-378)
- 1 x User Manual
Note: AA alkaline batteries are not included and must be purchased separately.
4. Setup
4.1 Battery Installation
- Locate the battery compartment on the back of the timer.
- Open the battery cover.
- Insert two (2) new 1.5V 'AA' alkaline batteries, ensuring correct polarity (+/-).
- Close the battery cover securely to maintain waterproof sealing.
Important: Use only new alkaline batteries. Rechargeable batteries may not provide sufficient voltage for optimal performance.
4.2 Connecting the Timer
- Screw the timer onto your outdoor faucet (3/4" thread) by hand until it is snug. Do not overtighten.
- Connect your garden hoses or irrigation lines to the three independent outlets (A, B, C) at the bottom of the timer.

Figure 4: Battery Compartment and Drain Holes
4.3 Setting Current Time
Upon initial power-up or after battery replacement, the display will show the default time. Refer to the labeled diagram below for button functions.

Figure 5: Timer Display and Control Buttons
- Press the NOW button to enter time setting mode. The hour digits will flash.
- Use the + or - buttons to adjust the hour.
- Press OK to confirm the hour and move to minute setting.
- Use the + or - buttons to adjust the minute.
- Press OK to confirm the minute and save the current time.
5. Operating Instructions
5.1 Automatic Watering Program
The timer allows for independent programming of each of the three zones (A, B, C).
- Press the A/B/C button to select the zone you wish to program (A, B, or C). The selected zone indicator will light up.
- Press OK to enter programming mode for the selected zone.
- Set Watering Duration (HOW LONG): The 'HOW LONG' value will flash. Use + or - to set the watering duration from 1 second to 59 seconds, or from 1 minute to 360 minutes. Press OK to confirm.
- Set Watering Frequency (HOW OFTEN): The 'HOW OFTEN' value will flash. Use + or - to set the frequency from 1 hour to 23 hours, or from 1 day to 15 days. Press OK to confirm.
- Set Start Time (START TIME): The 'START TIME' value will flash. Use + or - to set the desired start time for the watering cycle. Press OK to confirm and save the program for the selected zone.
- Repeat steps 1-5 for zones B and C if desired.
5.2 Manual Watering
Manual watering allows you to water immediately without interrupting your preset schedules.
- Press the A/B/C button to select the zone (A, B, C, or ALL) you wish to water manually.
- Press the OK button and hold for 3 seconds. The 'HOW LONG' value will flash.
- Use the + or - buttons to set the manual watering duration (from 1 second to 360 minutes).
- Press OK to start manual watering. The timer will automatically return to its scheduled program after the manual watering is complete.

Figure 6: Manual Watering in Progress
5.3 Rain Delay Mode
The rain delay function helps conserve water by pausing your watering schedule during rainy conditions.
- Hold the DELAY button for 3 seconds. The rain delay symbol will flash on the screen.
- Use the + or - buttons to select the desired delay duration (e.g., 24 hours, 48 hours, 72 hours).
- Press OK to confirm the rain delay. The timer will pause all scheduled watering for the selected duration and resume automatically afterward.
- To cancel rain delay, hold the DELAY button for 3 seconds again.
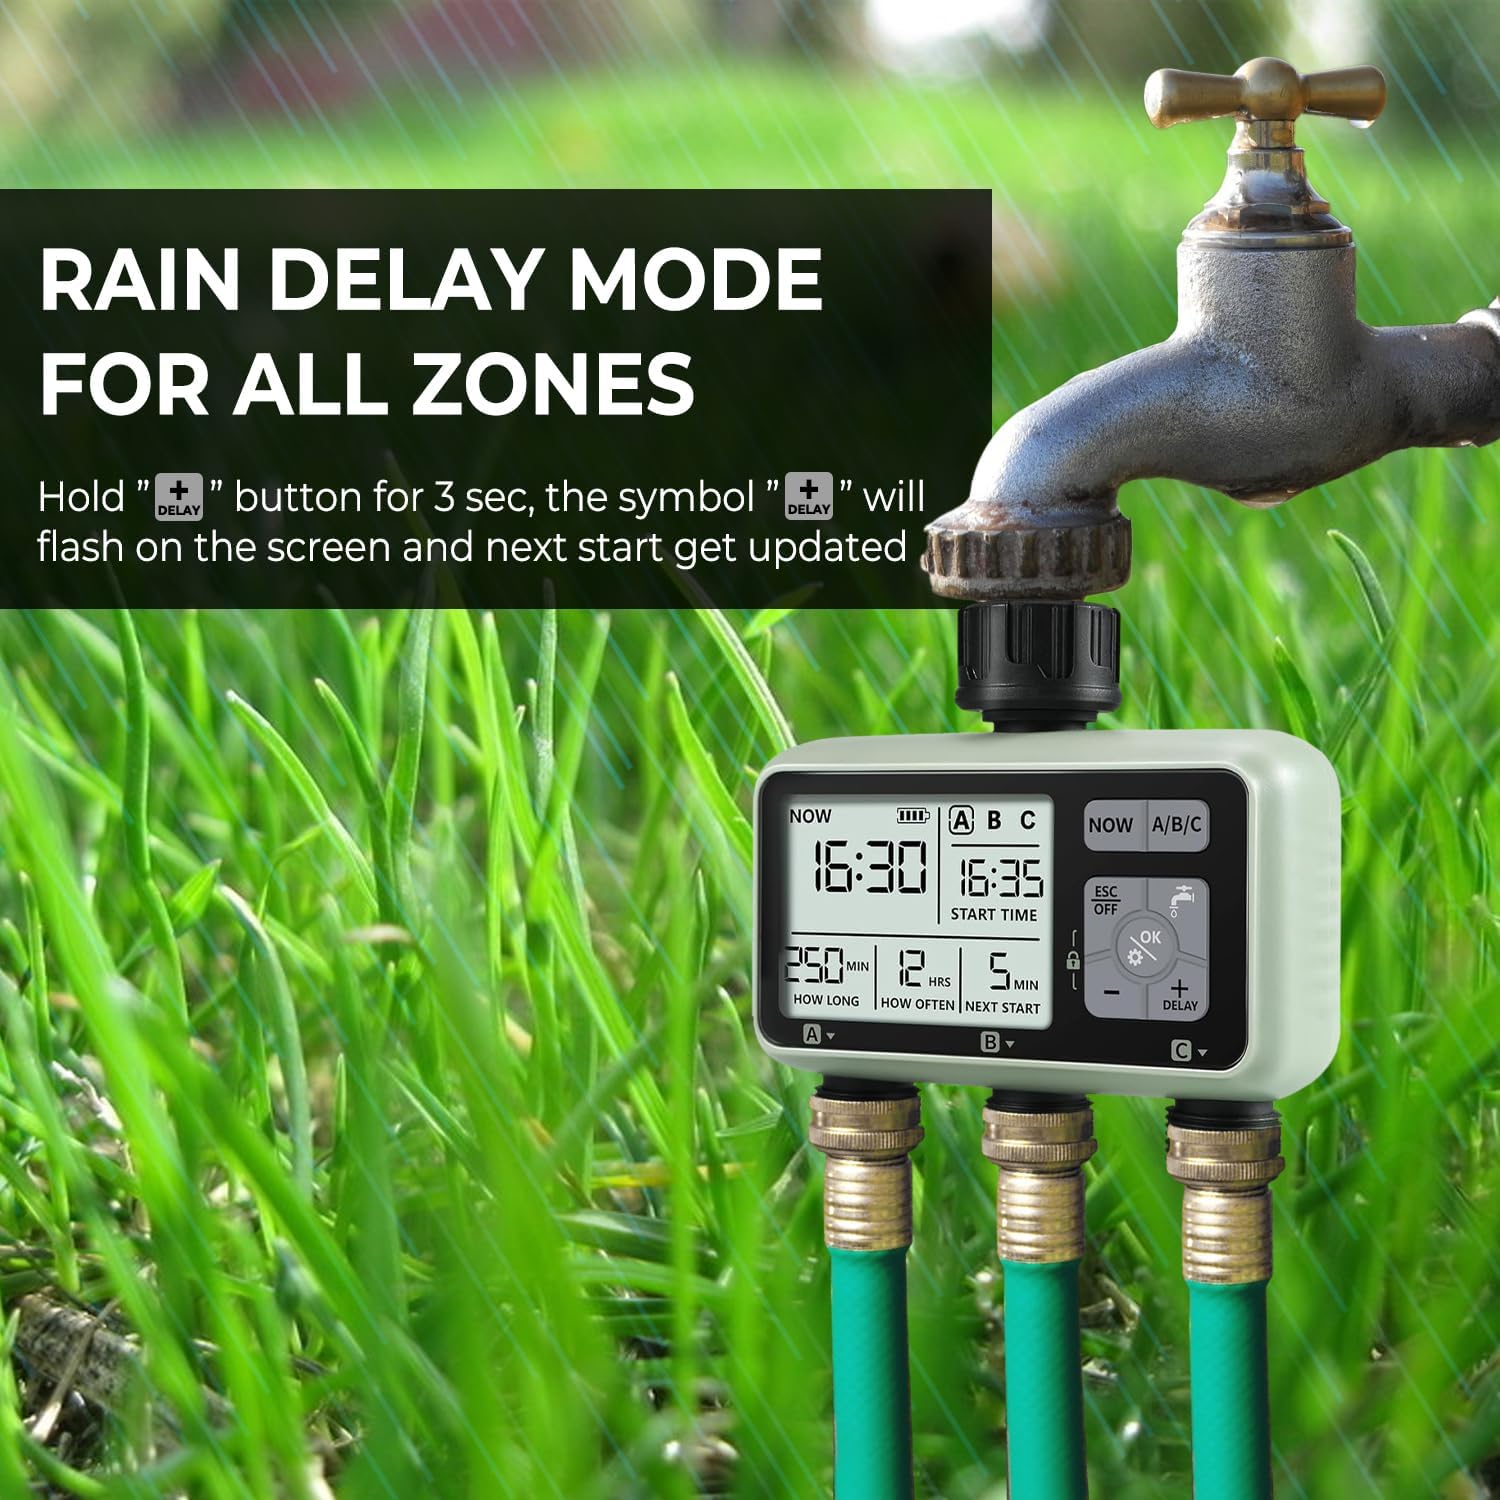
Figure 7: Rain Delay Mode Activated
5.4 Child Safety Mode
To prevent accidental changes to your watering programs, activate the child safety lock.
- To activate: Hold the OK button and the - button simultaneously for 3 seconds. A lock icon will appear on the display.
- To deactivate: Hold the OK button and the - button simultaneously for 3 seconds. The lock icon will disappear.
6. Maintenance
6.1 Cleaning the Filter
The timer is equipped with an aluminum alloy filter to prevent debris from entering the unit. Periodically check and clean the filter to ensure optimal water flow and prevent blockages.
- Unscrew the timer from the faucet.
- Remove the filter screen from the inlet.
- Rinse the filter under running water to remove any accumulated debris.
- Reinsert the clean filter and reattach the timer to the faucet.
Figure 8: Inlet Filter Screen
6.2 Battery Replacement
When the battery indicator on the display shows low power, replace the batteries promptly to avoid interruption of watering schedules. Follow the battery installation steps in Section 4.1.
6.3 Winter Storage
Before the first frost, disconnect the water timer from the faucet and drain any remaining water. Store the timer indoors in a dry, frost-free location to prevent damage from freezing temperatures.
7. Troubleshooting
| Problem | Possible Cause | Solution |
|---|---|---|
| Timer not turning on/display blank | Dead or incorrectly installed batteries. | Replace with new 1.5V 'AA' alkaline batteries, ensuring correct polarity. |
| No water flow from outlets | Faucet is off; low water pressure; clogged filter; timer not programmed or in manual mode. | Ensure faucet is fully open. Check water pressure. Clean the inlet filter (Section 6.1). Verify program settings or activate manual watering. |
| Timer not following schedule | Incorrect program settings; rain delay active; child lock active; low battery. | Review and adjust program settings (Section 5.1). Check if rain delay is active (Section 5.3). Deactivate child lock (Section 5.4). Replace batteries. |
| Water leakage from connections | Loose connections; worn washers; damaged threads. | Ensure all connections are tight. Check rubber washers for wear and replace if necessary. |
| Timer runs during rain | Rain delay not activated. | Manually activate the rain delay function when rain is expected (Section 5.3). This timer does not have an automatic rain sensor. |
8. Specifications
| Feature | Detail |
|---|---|
| Model Number | FY#HCT-378 |
| Material | Acrylonitrile Butadiene Styrene (ABS) |
| Ingress Protection | IPX5 (Waterproof) |
| Inlet & Outlet Thread | 3/4" |
| Working Temperature | 1°C - 45°C (34°F - 113°F) |
| Working Pressure | 0.05 - 0.8 Mpa |
| Power Supply | 2 x 1.5V 'AA' Alkaline Batteries |
| Watering Duration | 1 sec to 59 sec, or 1 min to 360 min |
| Watering Frequency | 1 hour to 23 hours, or 1 day to 15 days |
| Number of Settings | 3 independent programs |
| Screen Size | 2 Inches |
| Item Weight | 300 g |

Figure 9: Detailed Product Specifications
9. Warranty and Support
Johgee products are manufactured to high-quality standards. This product comes with a standard manufacturer's warranty against defects in materials and workmanship. For specific warranty details, please refer to the product packaging or contact your retailer.
If you encounter any issues or have questions regarding your Johgee 3 Zones Water Timer, please contact the seller or manufacturer's customer support for assistance. Provide your model number (FY#HCT-378) and purchase details when seeking support.

