Introduction
This instruction manual provides comprehensive guidance for the installation, operation, and maintenance of your Podofo Android 13 Car Radio. Please read this manual thoroughly before using the product to ensure proper function and safety. Keep this manual for future reference.
Safety Information
- Always ensure the vehicle is parked safely before operating the car radio's advanced features or making adjustments.
- Do not attempt to disassemble or modify the unit. This may cause damage, electric shock, or fire.
- Consult a professional for installation if you are unsure about any wiring procedures. Incorrect installation can damage the vehicle's electrical system or the unit itself.
- Keep the volume at a level that allows you to hear external traffic sounds.
- Avoid exposing the unit to extreme temperatures, direct sunlight for prolonged periods, or excessive moisture.
Package Contents
Verify that all items listed below are present in your package:
- 1 x Podofo Android 13 Car Radio Main Unit
- 2 x Power Cables (ISO Wiring Harness)
- 2 x RCA Cables
- 1 x GPS Antenna
- 1 x Radio Antenna
- 1 x USB Cable
- 1 x Camera Input Cable
- 1 x Rear Camera
- 1 x External Microphone
- 1 x Canbus Box
- 1 x Radio Adaptor

Image: Overview of the product dimensions and included accessories.
Applicable Vehicle Models
This car radio is designed for specific Volkswagen, Seat, and Skoda models. Please confirm your vehicle's compatibility before installation.
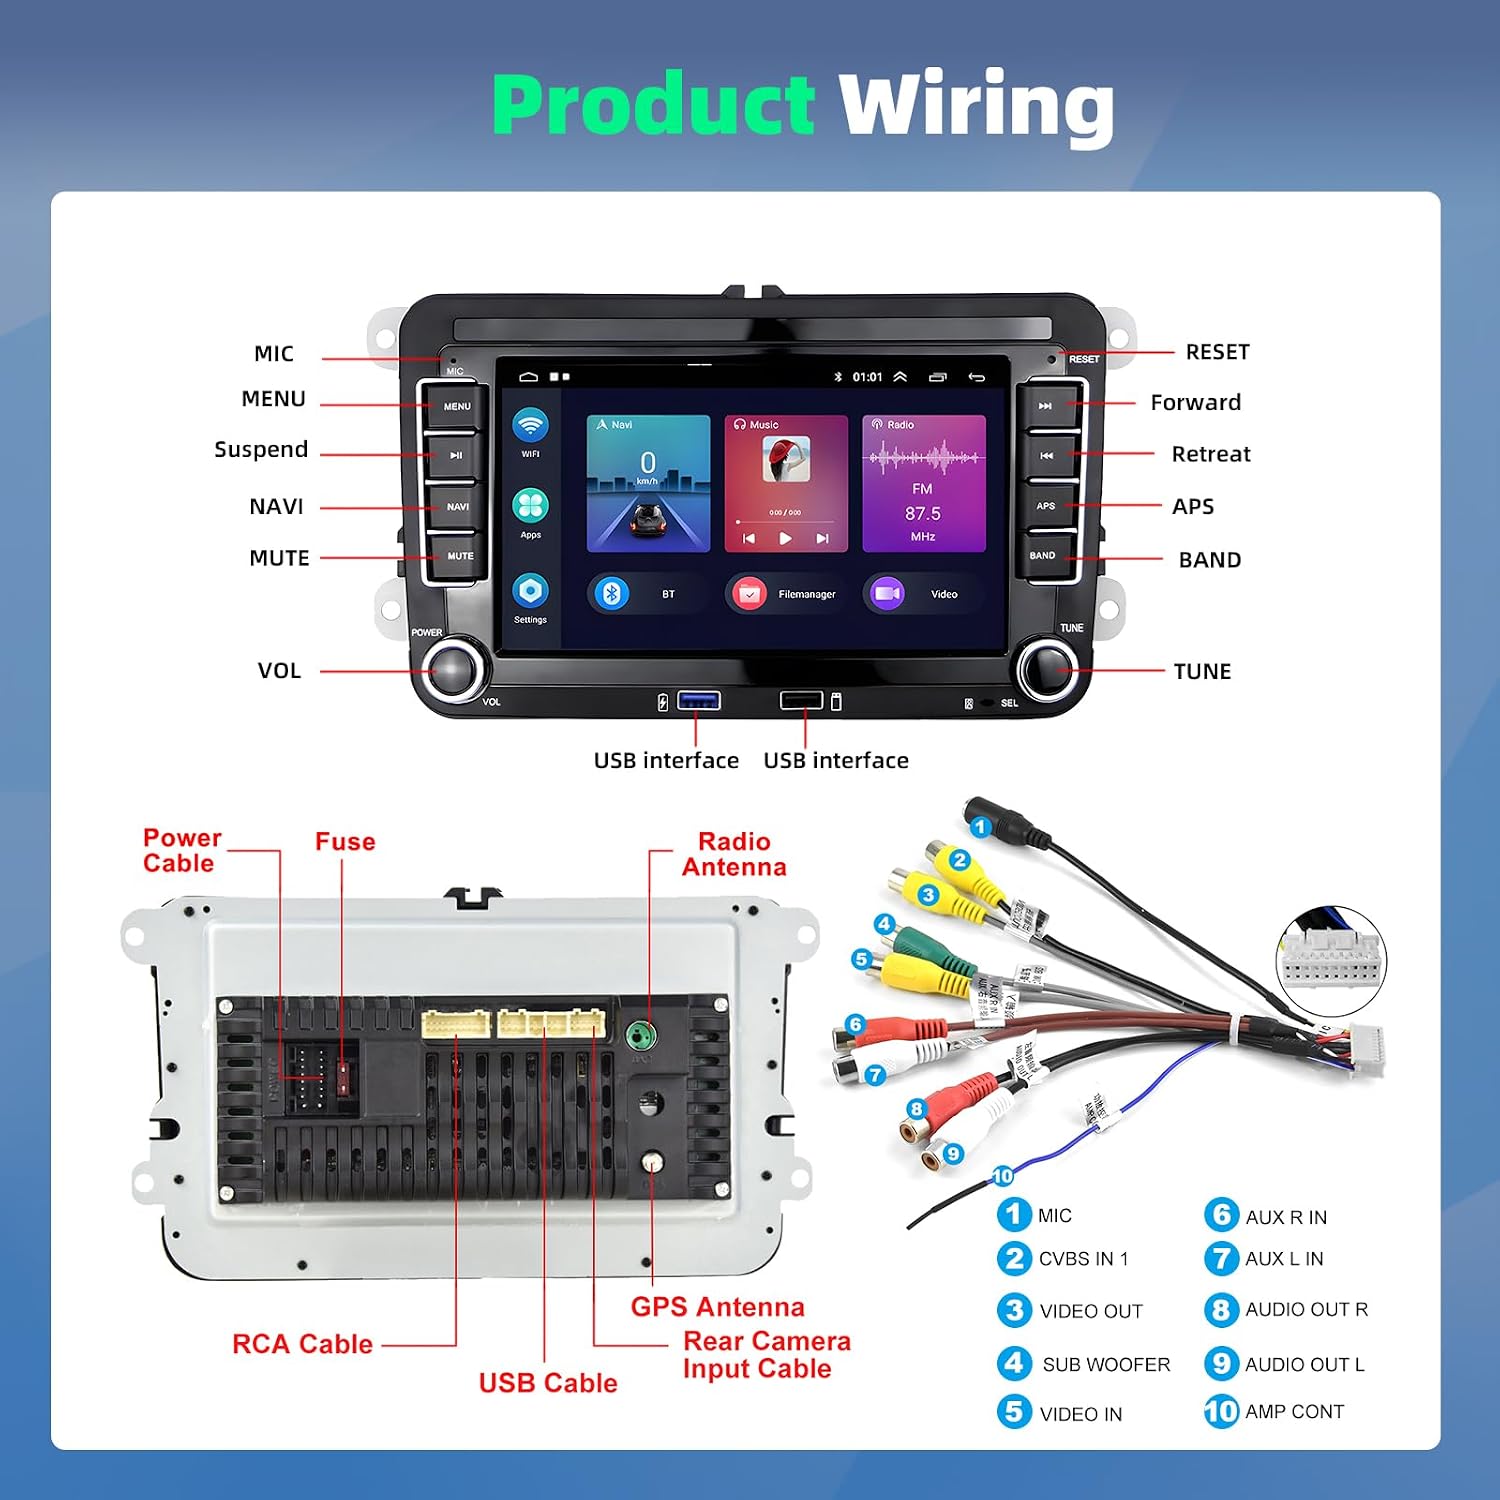
Image: List of compatible VW, Seat, and Skoda models. For VW, this includes models like SAGITAR/JETTA, MAGOTAN, PASSAT B6/B7/NMS/CC, TOURAN, GOLF V/VI, TIGUAN, SHARAN, CADDY, POLO, EOS, SCIROCCO, TRANSPORTER, BEETLE, MULTZVAN, GOLF BLUE MOTION, BORA, AMAROK. For Seat, models like Altea, Toledo, Leon, Altea XL, Alhambra. For Skoda, models like Fabia, Roomster, Octavia, Yeti, Superb.
Setup and Installation
1. Wiring Diagram
Refer to the wiring diagram below for correct connections. Ensure all cables are securely connected to prevent malfunctions.

Image: Detailed wiring diagram showing connections for power, USB, RCA, GPS antenna, radio antenna, microphone, and rear camera input. Key connections include MIC, CVBS IN 1, VIDEO OUT, SUB WOOFER, VIDEO IN, AUX R IN, AUX L IN, AUDIO OUT R, AUDIO OUT L, and AMP CONT.
2. General Installation Steps
- Disconnect Battery: Before starting, disconnect the vehicle's negative battery terminal to prevent electrical shorts.
- Remove Old Unit: Carefully remove your existing car radio from the dashboard.
- Connect Wiring Harness: Connect the provided ISO wiring harnesses to the car radio and your vehicle's wiring. Ensure the Canbus box is correctly integrated if your vehicle requires it for steering wheel controls or other functions.
- Connect Antennas: Attach the GPS antenna and radio antenna to their respective ports on the car radio. Position the GPS antenna in a location with a clear view of the sky.
- Connect USB Cables: Plug in the USB extension cables. Route them to a convenient location, such as the glove compartment.
- Connect External Microphone: Plug in the external microphone for improved call quality and voice commands. Position it near the driver.
- Connect Rear Camera (Optional): If installing the rear camera, connect its video cable to the "Camera Input" port on the car radio and its power cable to the vehicle's reverse light circuit.
- Test Connections: Before fully reassembling the dashboard, reconnect the battery and briefly test the unit's basic functions (power on, radio, sound).
- Secure Unit: Mount the car radio securely into the dashboard opening.
- Reassemble Dashboard: Reinstall any removed trim pieces.
3. Steering Wheel Control Setup
After installation, you may need to configure the steering wheel controls through the unit's settings menu. This allows you to control functions like volume, track skipping, and mode switching directly from your steering wheel.

Image: The car radio display showing the "Steering Learn" option within the settings menu, allowing users to map steering wheel buttons to specific functions. The image also depicts the rear view camera functionality with parking guidelines.
4. Rear Camera Installation and Function
The included AHD waterproof rear camera provides clear images for enhanced safety during parking and reversing. Connect the camera as described in the wiring section. When the vehicle is shifted into reverse gear, the display will automatically switch to the rear camera view.
Operating Instructions
1. Basic Operation
- Power On/Off: Press the POWER button to turn the unit on or off.
- Volume Control: Use the VOL knob to adjust the volume.
- Menu Navigation: Use the touch screen or physical buttons (MENU, NAVI, etc.) to navigate through the interface.
2. Wireless CarPlay and Android Auto
Connect your iPhone or Android smartphone wirelessly to access navigation, music, calls, and messages directly on the car radio display. This feature supports voice control via Siri or Google Assistant.
- Ensure Bluetooth and Wi-Fi are enabled on your smartphone.
- On the car radio, select the CarPlay or Android Auto application.
- Follow the on-screen prompts to pair your device.
- Once connected, you can use voice commands like "Hey Siri" or "Ok Google" for hands-free operation.

Image: The car radio display showing the Android 13 interface with icons for CarPlay and Android Auto, demonstrating seamless integration with smartphones for navigation, music, and communication. Voice commands for Siri and Google Assistant are also illustrated.
3. Bluetooth Hands-free and Music Streaming
Pair your phone via Bluetooth for hands-free calling and audio streaming.
- Go to the Bluetooth settings on the car radio.
- Enable Bluetooth on your phone and search for available devices.
- Select the car radio (e.g., "Podofo Car Radio") from your phone's list and confirm pairing.
- Once paired, you can make/receive calls and play music from your phone through the car's speakers.

Image: A composite image showing four key features. Top-left: Bluetooth hands-free calling interface with a dial pad and contact display. Top-right: FM/RDS radio interface displaying frequency tuning and signal strength. Bottom-left: EQ sound settings with various presets like Classical, Pop, Rock, and custom options. Bottom-right: HiFi audio output settings for enhanced sound quality.
4. GPS Navigation and WiFi Connection
The unit supports both online and offline navigation. Connect to a Wi-Fi hotspot to download maps, update applications, or browse the internet.
- WiFi Connection: Go to Settings > Network & Internet > Wi-Fi. Select your desired network and enter the password.
- GPS Navigation: Open the pre-installed navigation app or download your preferred app from the app store. Ensure the GPS antenna is properly installed for accurate positioning.
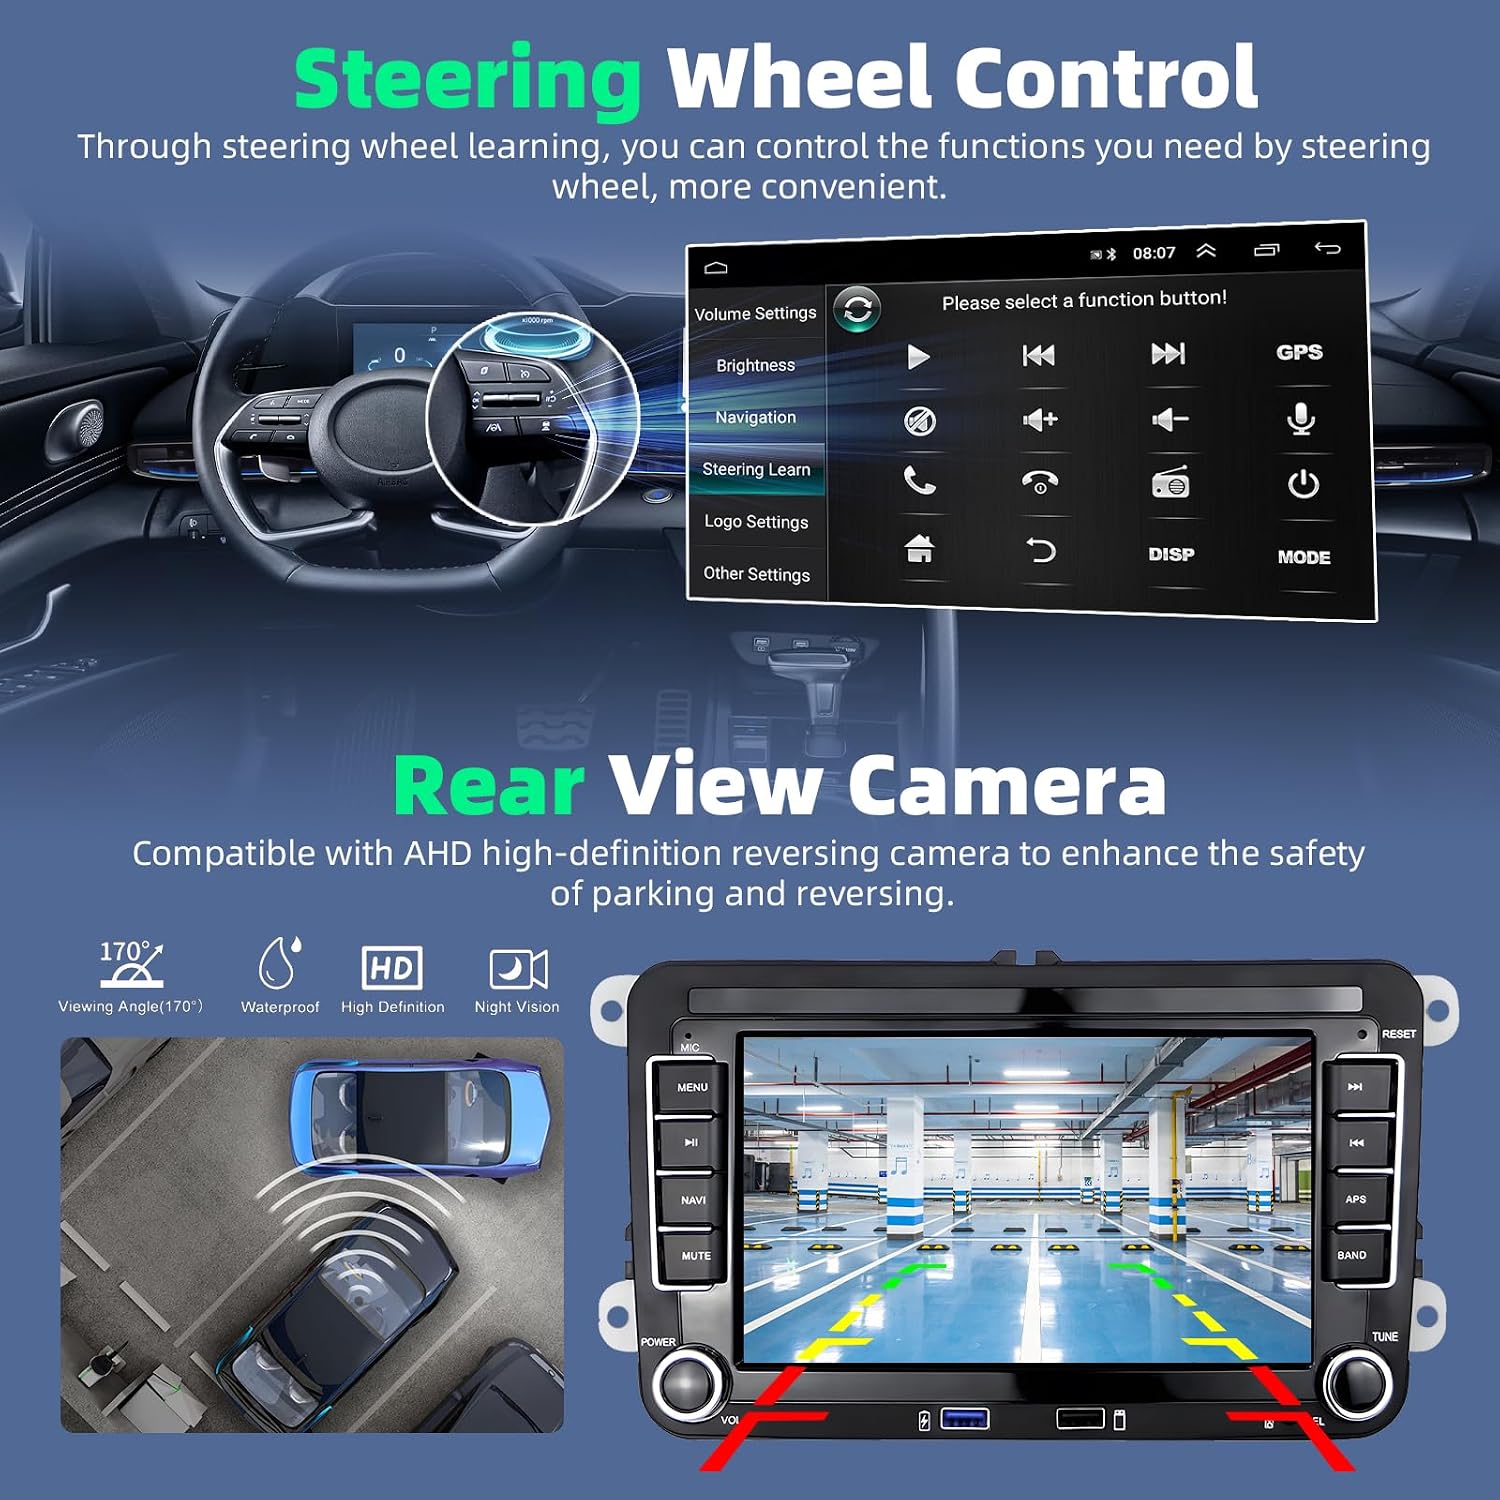
Image: The car radio display showing a GPS navigation map with route information, current speed, and estimated arrival time. Various app icons are visible at the top, indicating internet connectivity.
5. FM/RDS Radio
Tune into your favorite radio stations with FM and RDS support. RDS provides additional information like station name and traffic announcements.
- Select the "Radio" application from the main menu.
- Use the on-screen controls to scan for stations or manually tune to a frequency.
- Save your preferred stations as presets for quick access.
6. Media Playback and EQ Sound Settings
Play audio and video files from USB drives. Customize your audio experience using the built-in Equalizer (EQ) and HiFi settings.
- Insert a USB drive into one of the USB ports. The unit will automatically detect and allow you to browse media files.
- Access the "EQ" or "Sound Settings" menu to adjust bass, treble, balance, fader, and select from various sound presets (e.g., Pop, Rock, Classical).
- The HiFi output ensures high-quality sound reproduction.
7. iOS/Android Phone Mirror Link
Mirror your smartphone's screen onto the car radio display, allowing you to view apps and content from your phone.

Image: The car radio display showing a mirrored smartphone screen, playing music. Illustrations demonstrate both wired and wireless Mirror Link capabilities for Android and iOS devices.
Maintenance
- Cleaning: Use a soft, dry cloth to clean the screen and unit exterior. Avoid abrasive cleaners or solvents.
- Software Updates: Periodically check for software updates via the system settings or the manufacturer's website to ensure optimal performance and access to new features.
- Fuse Replacement: If the unit loses power, check the fuse in the power cable. Replace it with a fuse of the same rating if blown.
Troubleshooting
If you encounter issues, refer to the following common problems and solutions:
- No Power:
- Check all power cable connections.
- Verify the vehicle's fuse box and the unit's inline fuse.
- Ensure the vehicle's ignition is on.
- No Sound:
- Check speaker wiring connections.
- Ensure the volume is not muted or set too low.
- Verify audio settings (balance, fader, EQ).
- GPS Not Working / Inaccurate:
- Ensure the GPS antenna is properly connected and positioned with a clear view of the sky.
- Check GPS settings in the unit's menu.
- Verify that navigation maps are downloaded and up-to-date.
- Bluetooth Connection Issues:
- Ensure Bluetooth is enabled on both the car radio and your smartphone.
- Delete previous pairings on both devices and try pairing again.
- Restart both devices.
- CarPlay/Android Auto Not Connecting:
- Ensure your phone's operating system is up-to-date.
- Verify that Wi-Fi and Bluetooth are active on your phone.
- Check the settings within the CarPlay/Android Auto app on your phone.
- For wired connections (if applicable), try a different USB cable.
- Steering Wheel Controls Not Responding:
- Ensure the Canbus box is correctly installed and connected.
- Perform the "Steering Learn" function in the unit's settings menu to map the buttons.
If problems persist, please contact customer support.
Specifications
| System | Android 13 |
| Chipset | 8227L-DEMO |
| Screen Size | 7 inches |
| RAM | 2 GB |
| ROM | 64 GB |
| Screen Resolution | 1024 x 600 |
| Radio Chip | MT6625 |
| Output Power | 4 x 45 W |
| Operating Temperature | -20 ℃ to 75 ℃ |
| Amplifier Chip | TDA7388 |
| Radio Band | FM/RDS |
| Connectivity | Bluetooth, Wi-Fi |
| USB Interface | Dual USB |
| Audio Formats | APE, FLAC, WAV, MP3, WMA, etc. |
| Video Formats | MKV, RMVB, AVI, MP4, MDV, H.264, H.265/HEVC, MPEG-4, etc. |
| Image Formats | PNG, JPEG, JPG, GIF, WBMP, BNP, etc. |
| Control Method | Touch, Button |
| Compatible Devices | Smartphone |
| Input Types | RCA, AHD/CVBS (Rear Camera), USB, Microphone |
| Output Types | RCA, Speakers |
Warranty and Support
Your Podofo Android 13 Car Radio comes with a 2-year global warranty. Podofo is committed to providing professional technical support and offers a 30-day return or exchange policy without questions.
For any questions regarding installation, operation, or troubleshooting, our 24-hour online customer service is available to assist you.
Please refer to your purchase documentation or the official Podofo website for contact details and further warranty information.


