
1. Introduction
The LAUNCH X431 Pro TT is an advanced bidirectional diagnostic scanner designed for comprehensive automotive system analysis. This device features an 8-inch tablet with Android 10.0, a 2.0 GHz quad-core CPU, 4GB RAM, and 64GB storage, ensuring efficient operation. It supports a wide range of vehicle makes and models from 1984 to 2026, offering extensive diagnostic capabilities.
Key features include over 38 reset services, ECU coding, active testing, full system diagnostics, CANFD and DOIP protocol support, FCA AutoAuth, and VAG guided functions. The scanner connects wirelessly via Bluetooth (DBSCar VII VCI) and Wi-Fi (2.4GHz and 5GHz), providing flexibility during use. Its 6300 mAh battery offers up to 15 hours of operation.

Image 1.1: Overview of the LAUNCH X431 Pro TT diagnostic scanner highlighting its key features and capabilities.
2. Setup
2.1 Unpacking and Initial Inspection
Carefully unpack all components from the storage case. Verify that all items listed in the 'Included Components' section are present and undamaged. If any items are missing or damaged, contact customer support.
2.2 Included Components
- 1 x X431 Pro TT Host Unit
- 1 x DBSCar-VII/DS301 Bluetooth Adapter (VCI)
- Quick Start Guide
- User Manual
- Pin Envelope
- Storage Case
- Clipper
- Fuse
- Switching Adapter
- OBD 1 Adapter Box
- AIT I OBD16 Extension Cable
- USB A to Micro USB Cable
- Cigarette Lighter Line
- Power Cable with Double Clamp
- 26 Non-OBD2 Connectors and Adapters (e.g., Audi-4, Benz-14, BMW-20, Chrysler-6, Ford-6+1, Honda-3, Kia-20, Mazda-17, Mitsubishi/Hyundai-12+16, Nissan-14+16, Toyota-17, Toyota-22, Universal-3)

Image 2.1: Visual representation of the included OBD1 adapters and optional expansion modules.
2.3 Initial Device Configuration
- Power On: Press and hold the power button on the X431 Pro TT host unit to turn it on.
- Language Selection: Follow the on-screen prompts to select your preferred language.
- Wi-Fi Connection: Connect the device to a stable Wi-Fi network for software updates and online functions.
- Account Creation & Registration: Create a user account and register your scanner using the information provided on the black card included in the manual. This step is crucial for accessing updates and full functionality.
- Software Updates: Navigate to the 'Software Update' section and download all available updates to ensure the device has the latest vehicle coverage and features.
3. Operating Instructions
3.1 Connecting to a Vehicle
- Locate OBD-II Port: Identify the vehicle's OBD-II diagnostic port, typically located under the dashboard on the driver's side.
- Connect VCI: Plug the DBSCar-VII Bluetooth adapter (VCI) into the vehicle's OBD-II port. Ensure the VCI's indicator lights illuminate, confirming power.
- Establish Bluetooth Connection: On the X431 Pro TT tablet, ensure Bluetooth is enabled. The device should automatically detect and connect to the DBSCar-VII VCI. The VCI allows wireless communication up to 10-20 meters (33-66 feet).
- Vehicle Identification: The scanner supports AUTO VIN technology for automatic vehicle identification. Alternatively, you can manually enter VIN details or select the vehicle make and model.
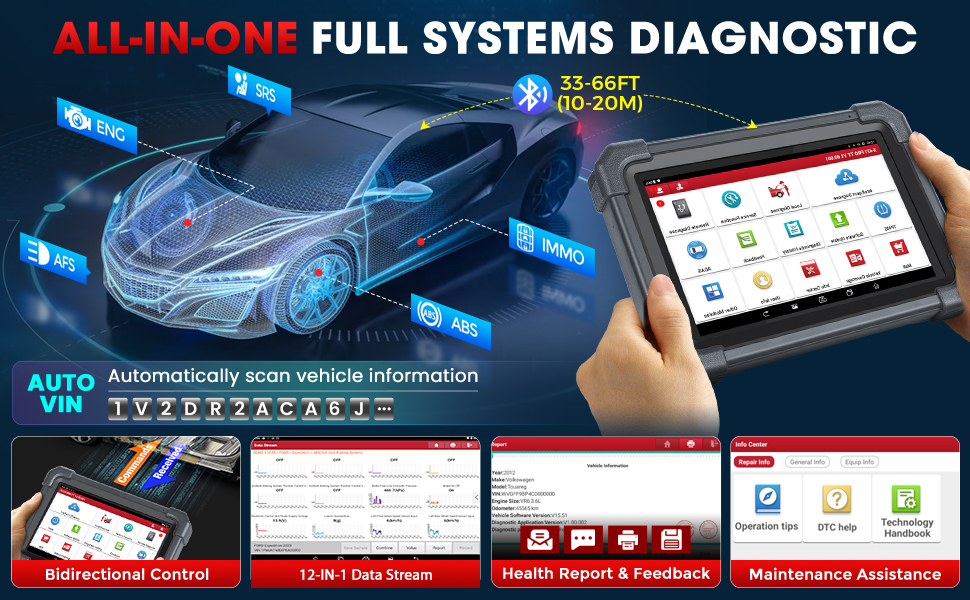
Image 3.1: Illustration of the full system diagnostic capabilities and wireless connectivity of the scanner.
3.2 Basic Diagnostic Functions
- Health Report: Perform a comprehensive health test to view the overall status of all vehicle systems and identify specific issues.
- Read/Clear DTCs: Retrieve Diagnostic Trouble Codes (DTCs) from all accessible ECUs and clear them after repairs.
- Live Data Stream: View real-time data parameters from various sensors and components. The X431 Pro TT supports displaying up to 8 data streams simultaneously.
- Diagnostic History: Access a record of all previously performed diagnostic sessions.
3.3 Advanced Functions
- Bidirectional Control (Active Test): Send commands to vehicle systems to perform specific tests, such as activating solenoids, actuators, windows, horn, lights, or fuel pumps, to verify component functionality.
- ECU Coding: Modify vehicle settings, recode changed modules, write VIN to ECU, renew ECU coordination, perform transmission quick relearn, and customize OE settings. This function can also disable annoying features or flash hidden features.
- Reset Services (38+): Access a wide array of maintenance and reset functions, including:
- Oil Reset
- SAS (Steering Angle Sensor) Reset
- EPB (Electronic Parking Brake) Reset
- TPMS (Tire Pressure Monitoring System) Reset
- DPF (Diesel Particulate Filter) Regeneration
- BMS (Battery Management System) Reset
- ETS (Electronic Throttle System) Reset
- ABS Bleeding
- Injector Coding
- Gear Learning
- Window Calibration
- Suspension Calibration
- Headlight Adjustment
- A/F Reset
- And many more, accessible through the 'Vehicle Brand' menu under 'Special Functions'.
- Adaptation, Initialization, Matching: Perform procedures to adapt new components, initialize systems, or match modules after replacement.
- CANFD & DOIP Support: The scanner supports advanced CANFD protocols for newer vehicles and DOIP (Diagnostic Over Internet Protocol) with an additional adapter.
- FCA AutoAuth: Provides secure gateway access for FCA vehicles (Chrysler, Dodge, Jeep, Alfa Romeo, Fiat) manufactured after 2017.
- VAG Guided Functions: Offers step-by-step guided procedures for Volkswagen, Audi, Skoda, Seat, and Bentley vehicles.

Image 3.2: Detailed view of the advanced ECU coding capabilities, including unlocking and disabling functions, customizing settings, and resetting adaptive data.

Image 3.3: Examples of the 38+ reset, relearn, match, and calibration functions available on the device.
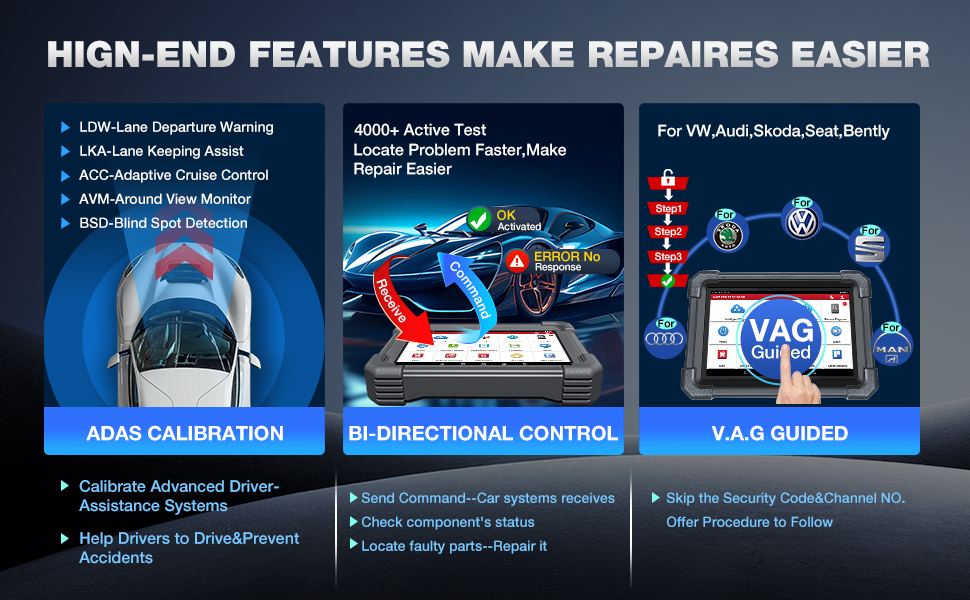
Image 3.4: Illustration of high-end features such as ADAS calibration, bidirectional control, and VAG guided functions.
3.4 Optional Expansion Modules
The X431 Pro TT is compatible with several optional expansion modules to extend its functionality:
- Videoscópio (VSP600): For inspecting inaccessible areas of the engine or fuel tank system.
- X431 TSGUN: For activating, relearning, and programming TPMS sensors.
- X431 PROG: For advanced key programming and immobilizer functions.
- X431 Printer: For printing diagnostic data and reports.
- ADAS Calibration Tool: For assisting with ADAS (Advanced Driver-Assistance Systems) calibration.
- Oscilloscope: For quickly acquiring and analyzing circuit signals.
- S2-2 SensorBox: For simulating vehicle sensor faults.
- BT360: For battery testing.
4. Maintenance
4.1 Software Updates
Regularly check for and install software updates to ensure optimal performance, expanded vehicle coverage, and new features. The device includes 2 years of free software updates. After this period, the device will retain its functionality as of the last installed update, but new updates will require a subscription.
4.2 Battery Care
The X431 Pro TT is equipped with a 6300 mAh battery, providing approximately 15 hours of continuous operation. To prolong battery life, avoid extreme temperatures and fully charge the device before long periods of inactivity.
4.3 Cleaning and Storage
Clean the device and VCI with a soft, damp cloth. Avoid using abrasive cleaners or solvents. When not in use, store the X431 Pro TT and its accessories in the provided hard case to protect them from dust, moisture, and physical damage.
5. Troubleshooting
5.1 General Diagnostic Tips
- Follow On-Screen Prompts: Always read and follow any pop-up messages or instructions displayed on the scanner screen.
- Check Vehicle Battery: The scanner displays the vehicle's battery voltage. Ensure the vehicle battery is adequately charged for accurate diagnostics.
- Consult Information Resources: Utilize the built-in 'Info Center' and 'Technology Handbook' for operation tips, DTC explanations, and step-by-step instructions.
Image 5.1: The diagnostic interface showing options like Health Report, Info Center, and Maintenance Assistance.
5.2 Common Issues and Solutions
| Issue | Possible Cause | Solution |
|---|---|---|
| Device does not power on | Low battery; Power button not pressed correctly | Charge the device; Press and hold the power button for several seconds |
| VCI not connecting to vehicle | Loose connection; Vehicle OBD-II port issue | Ensure VCI is securely plugged into OBD-II port; Check vehicle's OBD-II port for power |
| No Bluetooth connection to tablet | Bluetooth off; VCI not powered; Interference | Enable Bluetooth on tablet; Ensure VCI is powered; Move closer to VCI |
| Software update failure | Poor Wi-Fi connection; Insufficient storage | Ensure strong Wi-Fi signal; Clear unnecessary files to free up space |
6. Specifications
| Feature | Specification |
|---|---|
| Brand | LAUNCH |
| Model Number | X431 Pro TT |
| Operating System | Android 10.0 |
| CPU | 2.0 GHz Quad-core |
| Display Size | 8 Inches |
| Native Resolution | 1280 x 800 |
| Memory | 4GB RAM + 64GB Storage |
| Battery Capacity | 6300 mAh |
| Power Source | Battery Powered |
| Connectivity | Bluetooth (DBSCar VII), Wi-Fi (2.4GHz & 5GHz) |
| Product Dimensions (L x W x H) | 44 cm x 18 cm x 37 cm |
| Supported Protocols | CANFD, DOIP (with adapter), OBD-II, EOBD, JOBD, KOBD |
| Vehicle Coverage | 99.99% of vehicles, 1984-2026 (200+ car brands) |
| Language Support | Multilingual (25+ languages) |

Image 6.1: Rear view of the LAUNCH X431 Pro TT tablet, showing the camera and product labeling.
7. Warranty and Support
7.1 Software Update Policy
The LAUNCH X431 Pro TT includes 2 years of free software updates from the date of registration. After the free update period expires, the device will continue to function with the last installed software version. To receive further updates, a subscription renewal will be required.
7.2 Technical Support
For technical assistance, troubleshooting, or warranty inquiries, please contact LAUNCH customer support through their official website or the contact information provided in your product packaging. Ensure you have your device's serial number and purchase details available when contacting support.