
1. Introduction
Thank you for purchasing the BARWING Power Tower Pull-up Bar, Model BW-BLS06. This versatile fitness equipment is designed for various bodyweight exercises, including pull-ups, chin-ups, dips, and push-ups. It features a robust pi-shaped base frame, adjustable height, 3D padded armrests, and a multi-grip pull-up bar to support your fitness journey. Please read this manual thoroughly before assembly and use to ensure safe and effective operation.

Figure 1: Overview of the BARWING Power Tower Pull-up Bar, Model BW-BLS06.
2. Safety Information
- Always consult with a healthcare professional before starting any new exercise program.
- Ensure all bolts and nuts are securely tightened before each use. Regularly check for loose parts.
- Place the equipment on a flat, stable surface. Do not use on uneven ground.
- Maintain a clear area of at least 2 feet (60 cm) around the equipment during use.
- Do not exceed the maximum weight capacity (if specified, otherwise assume standard home gym limits).
- Keep children and pets away from the equipment during use.
- Stop exercising immediately if you feel pain, dizziness, or discomfort.
- Wear appropriate athletic footwear and clothing.
3. Package Contents
Verify that all components are present and undamaged before beginning assembly. If any parts are missing or damaged, please contact customer support.
- Main Frame Components (Base, Vertical Supports, Horizontal Bars)
- Pull-up Bar
- Dip Station/Armrest Assembly with 3D Pads
- Push-up Grips
- Hardware Kit (Bolts, Washers, Nuts, Wrenches)
- Instruction Manual
4. Assembly Instructions
Follow these steps carefully. It is recommended to have two people for assembly.
- Unpack and Identify Parts: Lay out all components and compare them with the parts list in the manual.
- Assemble the Base Frame: Connect the horizontal base bars to the vertical supports using the provided bolts and wrenches. Ensure the pi-shaped base is stable.
- Attach Vertical Supports: Secure the main vertical supports to the base frame.
- Install Dip Station/Armrests: Mount the dip station and armrest assembly onto the vertical supports. Adjust the 3D pads to your preferred position.
- Attach Pull-up Bar: Secure the 4-way pull-up bar to the top of the vertical supports.
- Install Push-up Grips: Attach the push-up grips to the designated points on the base.
- Final Tightening: Once all components are in place, systematically tighten all bolts and nuts. Do not overtighten.

Figure 2: Side view illustrating the assembled structure of the power tower.
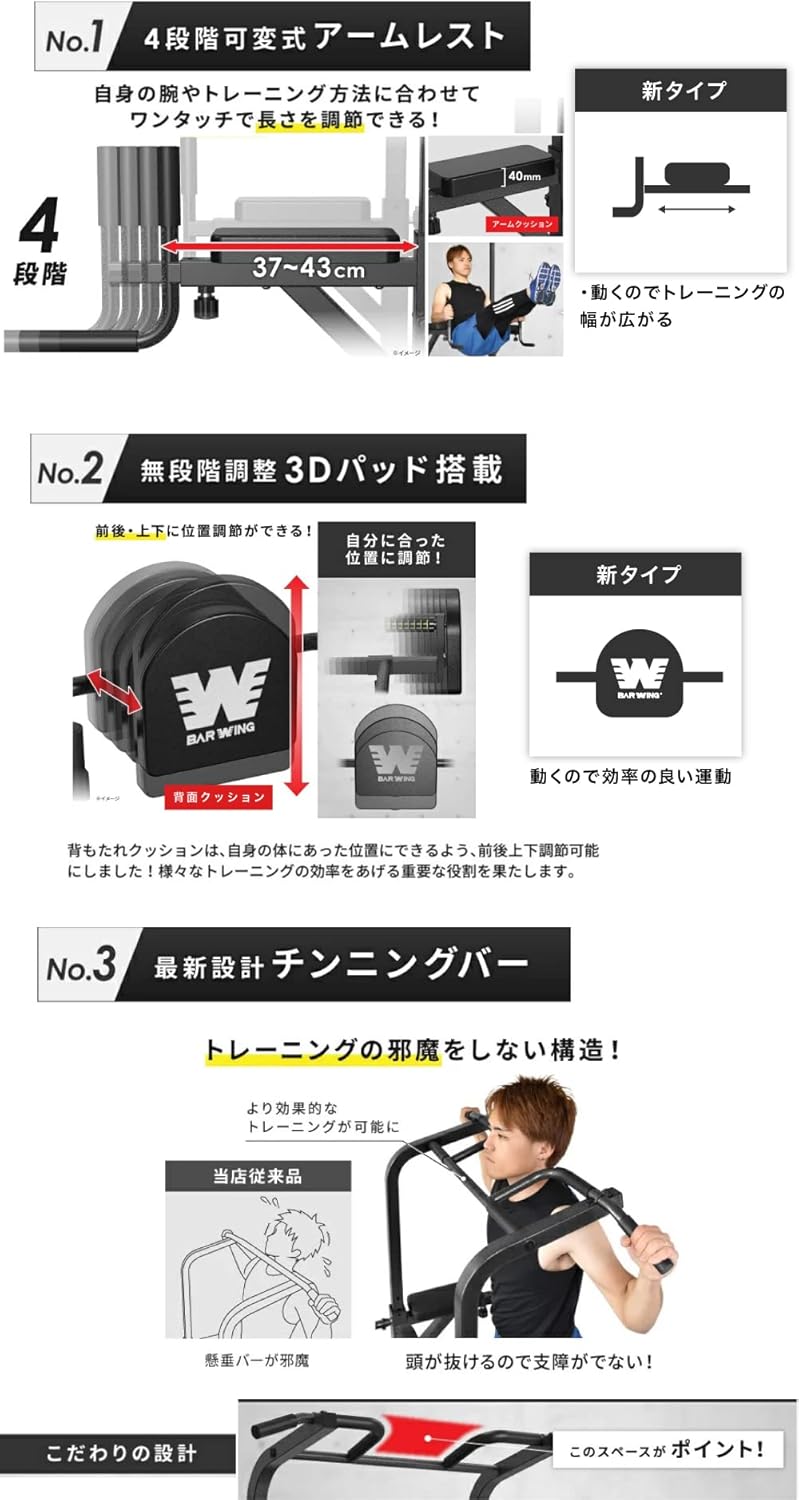
Figure 3: Rear view highlighting the robust frame and stability of the equipment.
5. Operating Instructions
5.1 Height Adjustment
The power tower features 11 levels of height adjustment for the main pull-up bar, ranging from 188 cm to 233 cm. To adjust, locate the adjustment pins on the vertical supports, pull them out, slide the bar to the desired height, and re-insert the pins securely. Ensure both sides are adjusted to the same height.
5.2 4-Way Pull-up Bar
The top bar offers multiple grip positions (wide, narrow, neutral, reverse) to target different muscle groups. Experiment with various grips to diversify your pull-up and chin-up routines.
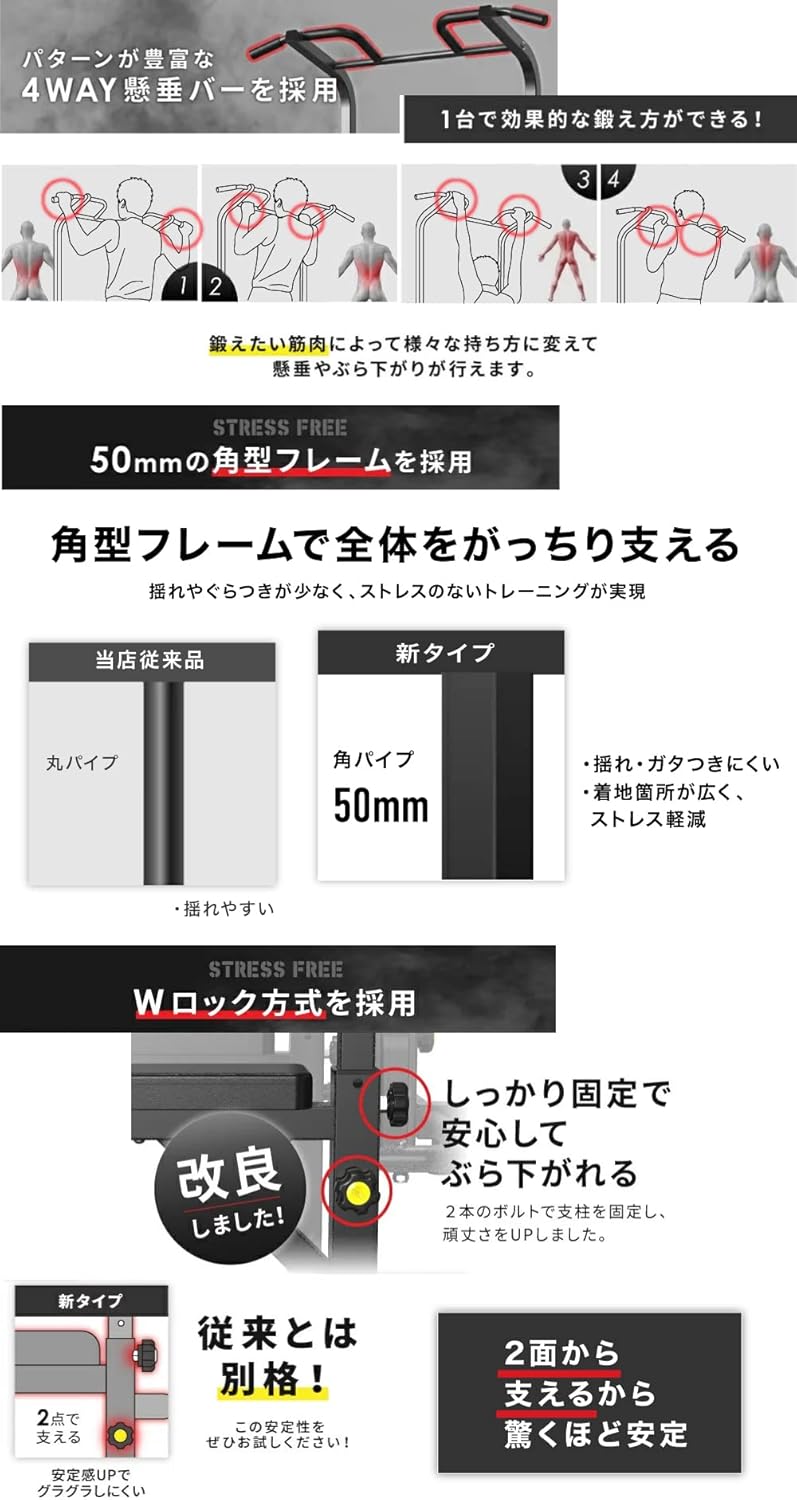
Figure 4: The 4-way adjustable armrests allow for varied training positions.
5.3 Adjustable 3D Pads
The armrests are equipped with 3D pads that can be adjusted vertically and horizontally to fit your body type and enhance comfort during exercises like knee raises and dips. Loosen the adjustment knob, position the pads, and tighten the knob firmly.
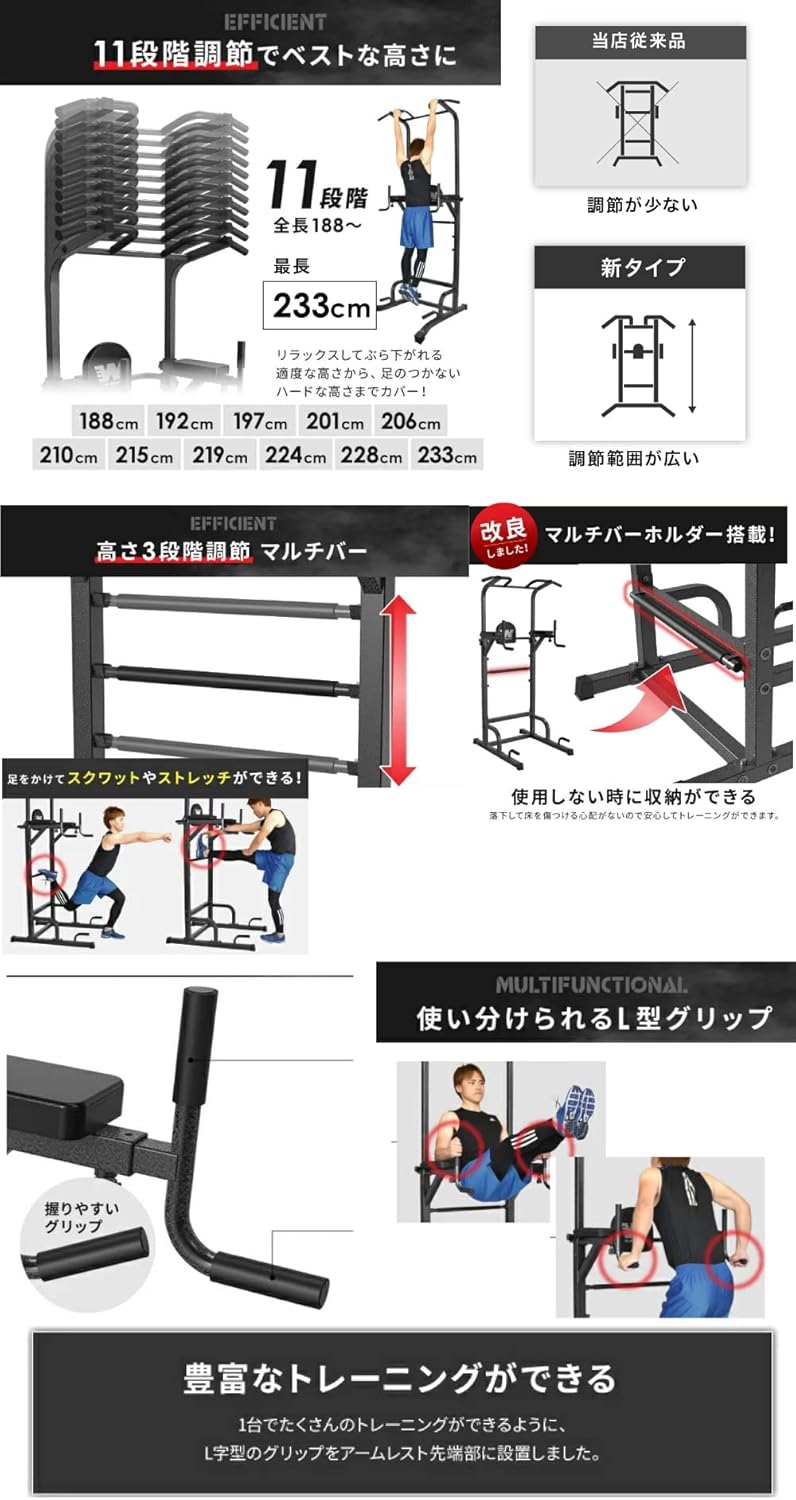
Figure 5: The 3D pads can be adjusted for optimal comfort and exercise efficiency.
5.4 Dip Station and Push-up Grips
Utilize the dip handles for triceps dips and the integrated push-up grips at the base for deeper and more effective push-ups. The L-shaped grips on the armrest ends also provide additional exercise options.

Figure 6: The ergonomic chin-up bar design ensures comfortable and effective training.
5.5 W-Lock System for Stability
The equipment incorporates a W-lock system to secure adjustable components, minimizing wobbling and ensuring a stable workout experience. Always ensure the W-locks are engaged before use.

Figure 7: The W-lock system provides secure fastening for adjustable parts.
6. Maintenance
- Cleaning: Wipe down the equipment with a damp cloth after each use to remove sweat and dust. Avoid abrasive cleaners.
- Inspection: Periodically inspect all bolts, nuts, and connections for tightness. Tighten any loose fasteners immediately.
- Wear and Tear: Check for any signs of wear, cracks, or damage to the frame, grips, or pads. Discontinue use if damage is found and contact customer support for replacement parts or repair.
- Storage: Store the power tower in a dry, cool place away from direct sunlight and extreme temperatures.
7. Troubleshooting
- Equipment Wobbles: Ensure the equipment is on a flat, level surface. Check and tighten all assembly bolts and nuts.
- Difficulty Adjusting Height: Ensure the adjustment pins are fully disengaged before attempting to slide the bar. Check for any obstructions in the adjustment holes.
- Squeaking Noises: Lubricate moving parts or joints with a silicone-based lubricant if squeaking occurs. Ensure all connections are tight.
- Missing Parts: Refer to the package contents list. If parts are missing upon delivery, contact customer support immediately.
8. Specifications
| Feature | Detail |
|---|---|
| Brand | BARWING |
| Model Number | BW-BLS06 |
| Color | Hammer Tone |
| Material | Stainless Steel |
| Mounting Type | Freestanding |
| Special Features | Multi-grip positions, Padded grips, Height adjustable, 3D pads |
| Height Adjustment | 11 levels (188 cm - 233 cm) |
| Base Dimensions | Approximately 86 cm x 91 cm (Pi-shaped base) |
9. Warranty and Support
BARWING products are manufactured to high-quality standards. For specific warranty details, please refer to the warranty card included with your purchase or visit the official BARWING website. If you encounter any issues or require assistance, please contact BARWING customer support through the retailer where you purchased the product or via the contact information provided on the official website.