
1. Introduction
This instruction manual provides comprehensive guidance for the installation, operation, and maintenance of your EsaSam Double Din Car Stereo. This unit, specifically Model M100S (1G+32G), is designed for VW Golf 6 vehicles manufactured between 2008 and 2016. Please read this manual thoroughly before installation and use to ensure proper function and safety.
2. Safety Information
- Professional Installation Recommended: Due to the complexity of car electrical systems, professional installation is highly recommended to prevent damage to the unit or your vehicle.
- Power Supply: Ensure the unit is connected to a 12V DC power supply with negative grounding.
- Wiring: Do not short-circuit any wires. Incorrect wiring can cause damage or fire.
- Driving Safety: Do not operate the unit in a way that distracts you from driving. Always prioritize road safety.
- Temperature: Avoid exposing the unit to extreme temperatures or direct sunlight for prolonged periods.
- Moisture: Keep the unit away from water and excessive moisture.
3. Package Contents
Please verify that all components are present upon unpacking:
- EsaSam Double Din Car Stereo Main Unit (Model M100S)
- Power Harness and necessary wiring adapters
- AHD Rear View Camera
- GPS Antenna
- 4G Antenna (if applicable to your model)
- USB Cables
- External Microphone
- User Manual (this document)
4. Product Overview
The EsaSam Double Din Car Stereo is an advanced multimedia system featuring a 9-inch touchscreen display, Android 12 operating system, and support for various connectivity options. It integrates seamlessly into compatible VW Golf 6 models.

Figure 4.1: EsaSam Double Din Car Stereo Main Unit. This image displays the front view of the car stereo unit, highlighting its 9-inch touchscreen interface and side control buttons.
Key Features:
- Android 12 Operating System
- 9-inch High-Definition IPS Touch Screen (1024*600 resolution)
- Built-in Wireless CarPlay and Android Auto
- Bluetooth 5.0 for hands-free calls and audio streaming
- Integrated GPS Navigation (supports online and offline maps)
- FM/AM Radio with RDS support
- Support for Steering Wheel Control (SWC)
- AHD Rear View Camera input included
- 4G LTE and 5GHz WiFi connectivity
- Split Screen Functionality
- Multi-language support
5. Setup and Installation
This section outlines the general steps for installing your car stereo. It is crucial to ensure compatibility and follow proper wiring procedures.
5.1. Compatibility Check
This unit is designed for VW Golf 6 models from 2008 to 2016. Before purchasing and installing, compare your vehicle's original center console with the product images to confirm compatibility. If your original console differs, please consult with the seller.
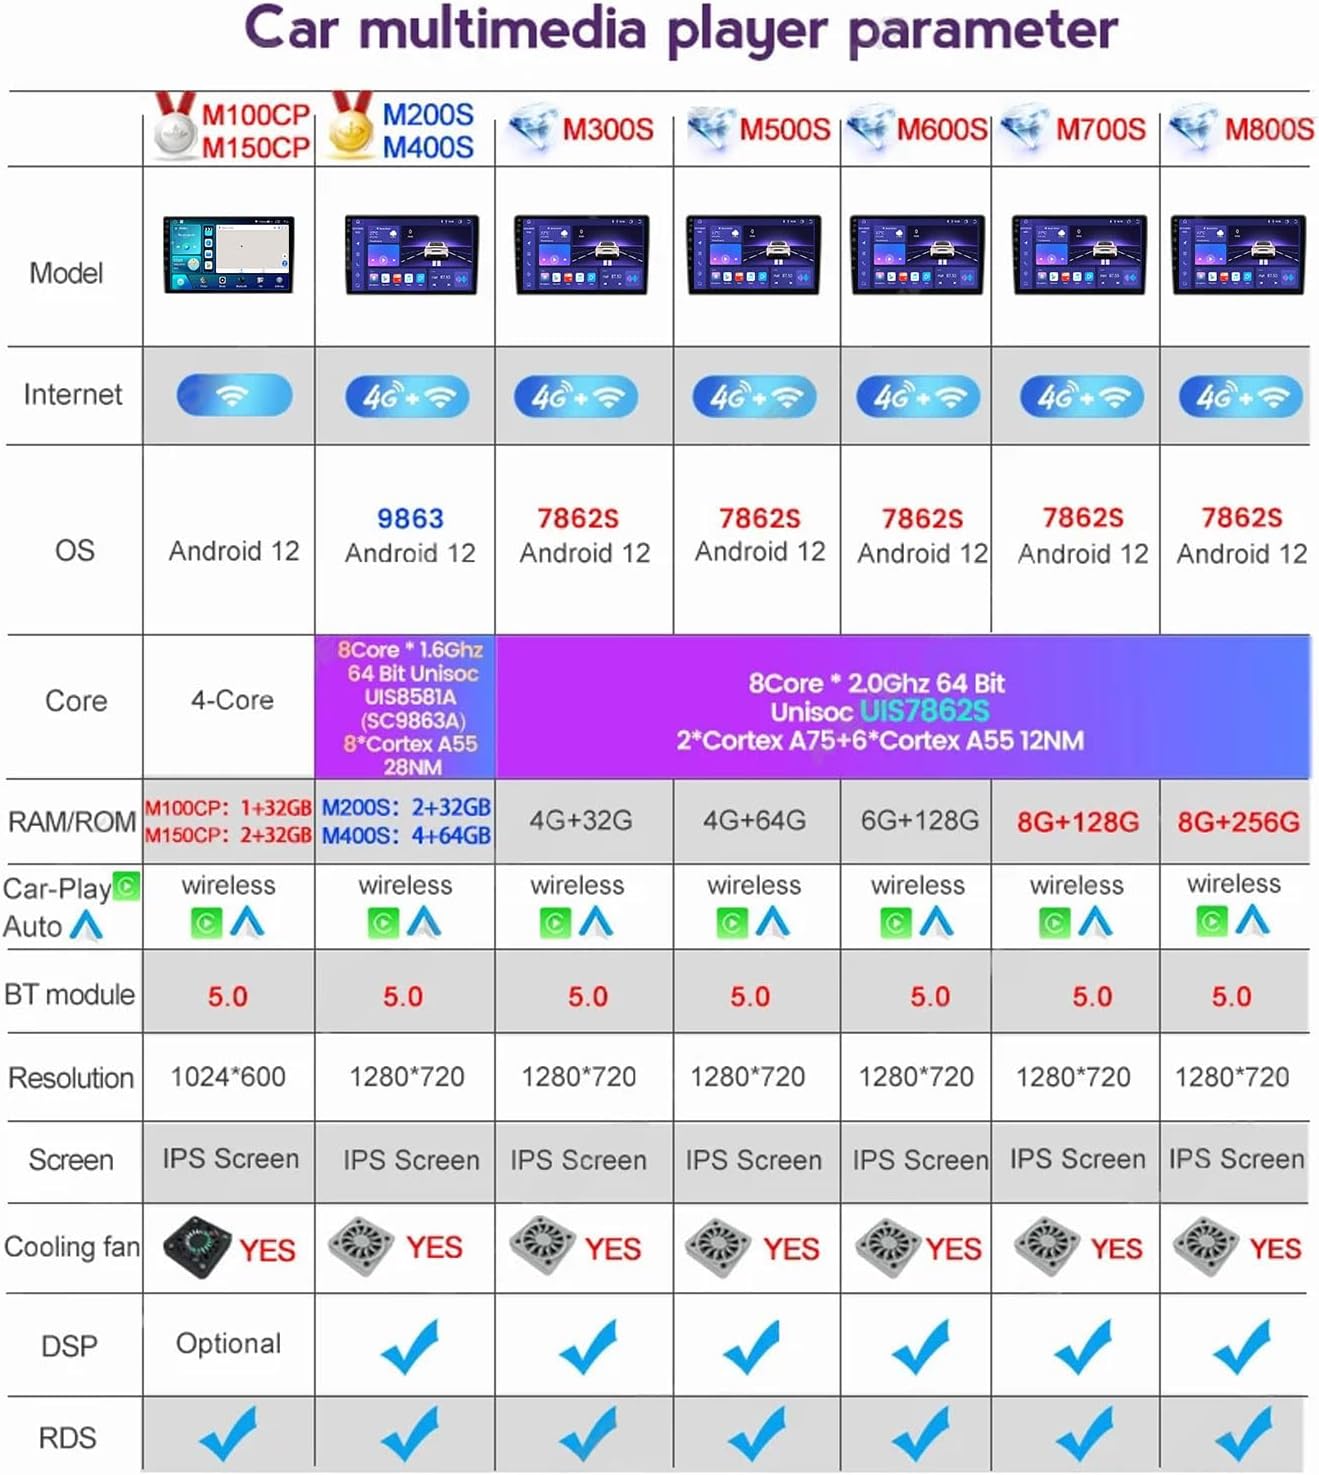
Figure 5.1: Before and After Installation Comparison. This image shows the vehicle's dashboard with the original radio unit on the left and the EsaSam car stereo installed on the right, demonstrating the visual integration.
5.2. Installation Steps
- Remove Original Unit: Carefully remove the existing car radio and trim panels from your vehicle's dashboard.
- Connect Wiring Harness: Connect the provided power harness and other necessary wiring (e.g., speaker wires, antenna, USB) to the new stereo unit and your vehicle's corresponding connectors. Ensure all connections are secure.
- Connect Peripherals: Attach the GPS antenna, 4G antenna (if applicable), external microphone, and AHD rear view camera cable.
- Test Functionality: Before fully securing the unit, perform a preliminary test to ensure all functions (power, audio, touchscreen, camera) are working correctly.
- Secure Unit: Mount the new car stereo into the dashboard opening and secure it with the appropriate brackets and screws. Reinstall any removed trim panels.

Figure 5.2: Car Stereo Installed in Dashboard. This image displays the EsaSam car stereo fully installed in a VW Golf 6 dashboard, showing its flush fit and integrated appearance.
5.3. AHD Rear View Camera Installation
The included AHD rear view camera provides clear imaging for safer reversing. Connect the camera's video output to the designated AHD camera input on the stereo unit. Ensure the camera's power wire is connected to your vehicle's reverse light circuit so it activates automatically when shifting into reverse.

Figure 5.3: AHD Reversing Camera and GPS Navigation. This image illustrates the AHD reversing camera's clear view and the GPS navigation interface, showing how both features enhance driving safety and convenience.
5.4. Cooling Fan Connection
For optimal performance and longevity, ensure the cooling fan is properly connected. The fan helps dissipate heat, especially during extended use or in warm climates.

Figure 5.4: CarPlay, 4G LTE, 5GHz WiFi, and Cooling Fan Connection. This image shows the interfaces for CarPlay, 4G LTE, and 5GHz WiFi, along with a diagram indicating the cooling fan connection point on the back of the unit.
6. Operating Instructions
This section details the various functions and features of your EsaSam car stereo.
6.1. Basic Operation
- Power On/Off: The unit typically powers on with the vehicle's ignition. Press and hold the power button (if available) for manual control.
- Touchscreen: Navigate the interface by tapping, swiping, and pinching on the 9-inch IPS display.
- Volume Control: Adjust volume using the on-screen controls or steering wheel controls.
6.2. Bluetooth Function (BT 5.0)
Connect your smartphone via Bluetooth for hands-free calling and audio streaming.
- Go to the Bluetooth application on the stereo.
- Enable Bluetooth on your smartphone and search for available devices.
- Select the stereo's Bluetooth name (e.g., 'CarBT') from your phone's list and pair.
- Once paired, you can make/receive calls and play music through the car speakers.

Figure 6.1: Bluetooth, Steering Wheel Control, Radio, Day/Night UI. This image displays the interfaces for Bluetooth connectivity, steering wheel control setup, FM/AM radio, and the automatic day/night UI switching feature.
6.3. Wireless CarPlay / Android Auto
Connect your iPhone or Android device for seamless integration of navigation, music, and communication apps.
- Wireless Connection: Enable Wi-Fi and Bluetooth on your phone. Open the 'CarPlay' or 'Android Auto' app on the stereo, then follow the on-screen instructions to connect wirelessly.
- Wired Connection: Connect your phone to the stereo via a USB cable. The system should automatically detect and launch CarPlay or Android Auto.
6.4. GPS Navigation
The unit supports both online and offline navigation. For offline maps, connect to Wi-Fi to download map data for your region.
- Open the 'Navigation' app from the main menu.
- Enter your destination to receive turn-by-turn directions.
- The system supports GPS, BDS, and GLONASS for accurate positioning.
6.5. FM/AM Radio
Access your favorite radio stations with the built-in tuner.
- Open the 'Radio' app.
- Use the scan function to find available stations or manually tune to a frequency.
- Save your preferred stations as presets for quick access.
- RDS (Radio Data System) provides additional information like station name and song title.
6.6. Steering Wheel Control (SWC)
Configure your vehicle's steering wheel buttons to control the stereo for convenience and safety.
- Go to 'Settings' > 'System Settings' > 'Steering Wheel Control'.
- Follow the on-screen instructions to map your steering wheel buttons to specific functions (e.g., volume up/down, track skip, mode).
6.7. Split Screen Function
Multitask by running two applications simultaneously on the screen.
- While an app is open, swipe up from the bottom or long-press the recent apps button (depending on UI) to activate split-screen mode.
- Select a second app to display alongside the first.
6.8. 4G LTE and 5GHz WiFi
Stay connected on the go.
- 4G LTE: Insert a compatible 4G SIM card into the designated slot (if available on your model) to access mobile data for online navigation, streaming, and app downloads.
- 5GHz WiFi: Connect to a local Wi-Fi hotspot for faster internet speeds and stable connectivity. Go to 'Settings' > 'Network & Internet' > 'Wi-Fi'.
6.9. Day & Night UI Interface Switching
The user interface automatically adjusts its brightness and color scheme based on ambient light conditions or vehicle headlights, enhancing visibility and reducing eye strain.
7. Maintenance
- Screen Cleaning: Use a soft, lint-free cloth to gently wipe the touchscreen. Avoid abrasive cleaners or harsh chemicals.
- Software Updates: Periodically check for software updates through the system settings or the manufacturer's website to ensure optimal performance and access to new features.
- General Care: Keep the unit free from dust and debris. Avoid spilling liquids on the device.
8. Troubleshooting
Refer to this section for solutions to common issues.
- No Power:
- Check all power connections and fuses.
- Ensure the vehicle's ignition is on. - No Sound:
- Verify speaker connections.
- Check volume levels and mute settings.
- Ensure the correct audio source is selected. - GPS Signal Issues:
- Ensure the GPS antenna is properly installed and has a clear view of the sky.
- Check GPS settings in the system. - Bluetooth Connection Failure:
- Ensure Bluetooth is enabled on both the stereo and your phone.
- Delete previous pairings and try reconnecting.
- Restart both devices. - Touchscreen Unresponsive:
- Restart the unit.
- Ensure the screen is clean and free of obstructions. - CarPlay/Android Auto Not Connecting:
- For wired connection, try a different USB cable.
- For wireless, ensure Wi-Fi and Bluetooth are active on your phone.
- Check phone settings for CarPlay/Android Auto permissions. - Factory Password: For Model M100S, the factory password is 8888.
9. Specifications

Figure 9.1: Car Multimedia Player Parameter Table. This image provides a detailed comparison table of various EsaSam car stereo models, highlighting specifications such as OS, CPU, RAM/ROM, Bluetooth version, resolution, and cooling fan presence. The M100S model is listed with its specific parameters.
| Feature | Specification (Model M100S) |
|---|---|
| Operating System | Android 12 |
| Processor | 4-Core |
| RAM | 1GB DDR3 |
| ROM | 32GB |
| Display Size | 9-inch IPS Touch Screen |
| Screen Resolution | 1024*600 |
| Bluetooth Version | 5.0 |
| Wi-Fi | Built-in, supports 5GHz |
| 4G LTE | Supported (SIM card slot) |
| GPS | Built-in (GPS, BDS, GLONASS) |
| Radio Tuner | FM/AM/RDS |
| Video Format | Supports HD 1080P |
| Audio Output | AUX-IN, Subwoofer audio output |
| Compatibility | VW Golf 6 (2008-2016) |
| Factory Password | 8888 |
Optional Features (Additional Purchase Required):
- ADAS DVR (Advanced Driver-Assistance Systems Digital Video Recorder)
- OBD II (On-Board Diagnostics)
- TPMS (Tire Pressure Monitoring System)
- DAB+ (Digital Audio Broadcasting)
10. Warranty and Support
For warranty information, please refer to the terms and conditions provided at the time of purchase or contact your seller directly. If you encounter any issues not covered in this manual or require further assistance, please reach out to EsaSam customer support through the retailer where the product was purchased.