
1. Introduction
The Haloview Byte Tango BT11 is an advanced wireless 1080P rear view mirror system designed for RVs and other vehicles, integrating a backup camera with Blind Spot Detection (BSD) forewarning. This system enhances driving safety by providing clear rear visibility, intelligent blind spot monitoring, and comprehensive recording capabilities.
This manual provides detailed instructions for the installation, operation, and maintenance of your BT11 system. Please read it thoroughly before use to ensure proper functionality and safety.
2. Package Contents
Verify that all components listed below are included in your package:
- Smart Screen (Rear View Mirror Display)
- Rear View Camera
- Gasket
- Camera Extension Cable (3.5m)
- Camera Extension Cable (1.5m)
- Power Adapter for Furrion Pre-wired RV
- GPS Module
- Smart Box (Receiver Unit)
- Power Filter
- 12V to 5V Power Conversion Box
- Bandage (Mounting Straps)

Figure 2.1: All components included in the Haloview Byte Tango BT11 system package.
3. Setup and Installation
Proper installation is crucial for optimal performance. Follow these steps carefully:
- Mount the Smart Screen: Secure the Smart Screen (rear view mirror display) over your existing rearview mirror using the provided bandages. Ensure it is firmly attached and does not obstruct your view.
- Install the Rear View Camera: Mount the rear view camera at the rear of your vehicle, ensuring a clear, unobstructed view. The gasket should be used for a secure and weather-resistant fit.
- Connect the Camera: Connect the rear view camera to the Smart Box using the appropriate camera extension cable (3.5m or 1.5m) depending on your vehicle's length.
- Install the GPS Module: Place the GPS module in a location with a clear view of the sky, typically on the dashboard or near the windshield, to ensure accurate signal reception.
- Power Connection:
- Connect the Smart Box to the vehicle's power supply. Use the 12V to 5V Power Conversion Box if necessary.
- If your RV is Furrion pre-wired, use the dedicated Power Adapter for Furrion Pre-wired RV.
- Integrate the Power Filter into the power line to ensure stable power delivery and minimize interference.
- Route Cables: Carefully route all cables to avoid interference with vehicle operation and to maintain a tidy appearance.

Figure 3.1: Diagram illustrating the typical installation and cable routing for the Haloview BT11 system in a vehicle.

Figure 3.2: Close-up view of the dashcam component installation near the rearview mirror.
4. Operating Instructions
The Haloview BT11 system is designed for intuitive operation. Here are key functionalities:
4.1. Display Modes
The Smart Screen can display various views. Use the touch interface to switch between modes:
- Rear View: Displays the live feed from the rear view camera.
- Dashcam View: Displays the live feed from the built-in front dashcam.
- Split Mode: Shows both rear view and dashcam feeds simultaneously for comprehensive monitoring.

Figure 4.1: The Smart Screen interface showing various display modes and feature icons, including BSD Forewarning, Dash Cam, 1080P Backup Camera, Video Recording, Intelligent Full-Color, Anti-Glare, Split Mode, and Easy to Install.
4.2. Blind Spot Detection (BSD) Forewarning
The system utilizes AI algorithms to accurately identify vehicles in your blind spots. When a vehicle is detected, the system provides visual and auditory alerts.
- Visual Alert: The display will highlight the side where a vehicle is detected (e.g., red illumination on the mirror edge).
- Auditory Alert: Distinct sounds ("Bong Bong" or "Ting Ting Ting") will indicate the presence of a vehicle in the blind spot, with different tones for proximity or potential collision risk.

Figure 4.2: The Haloview BT11 system displaying a vehicle in the blind spot with visual and auditory alerts.
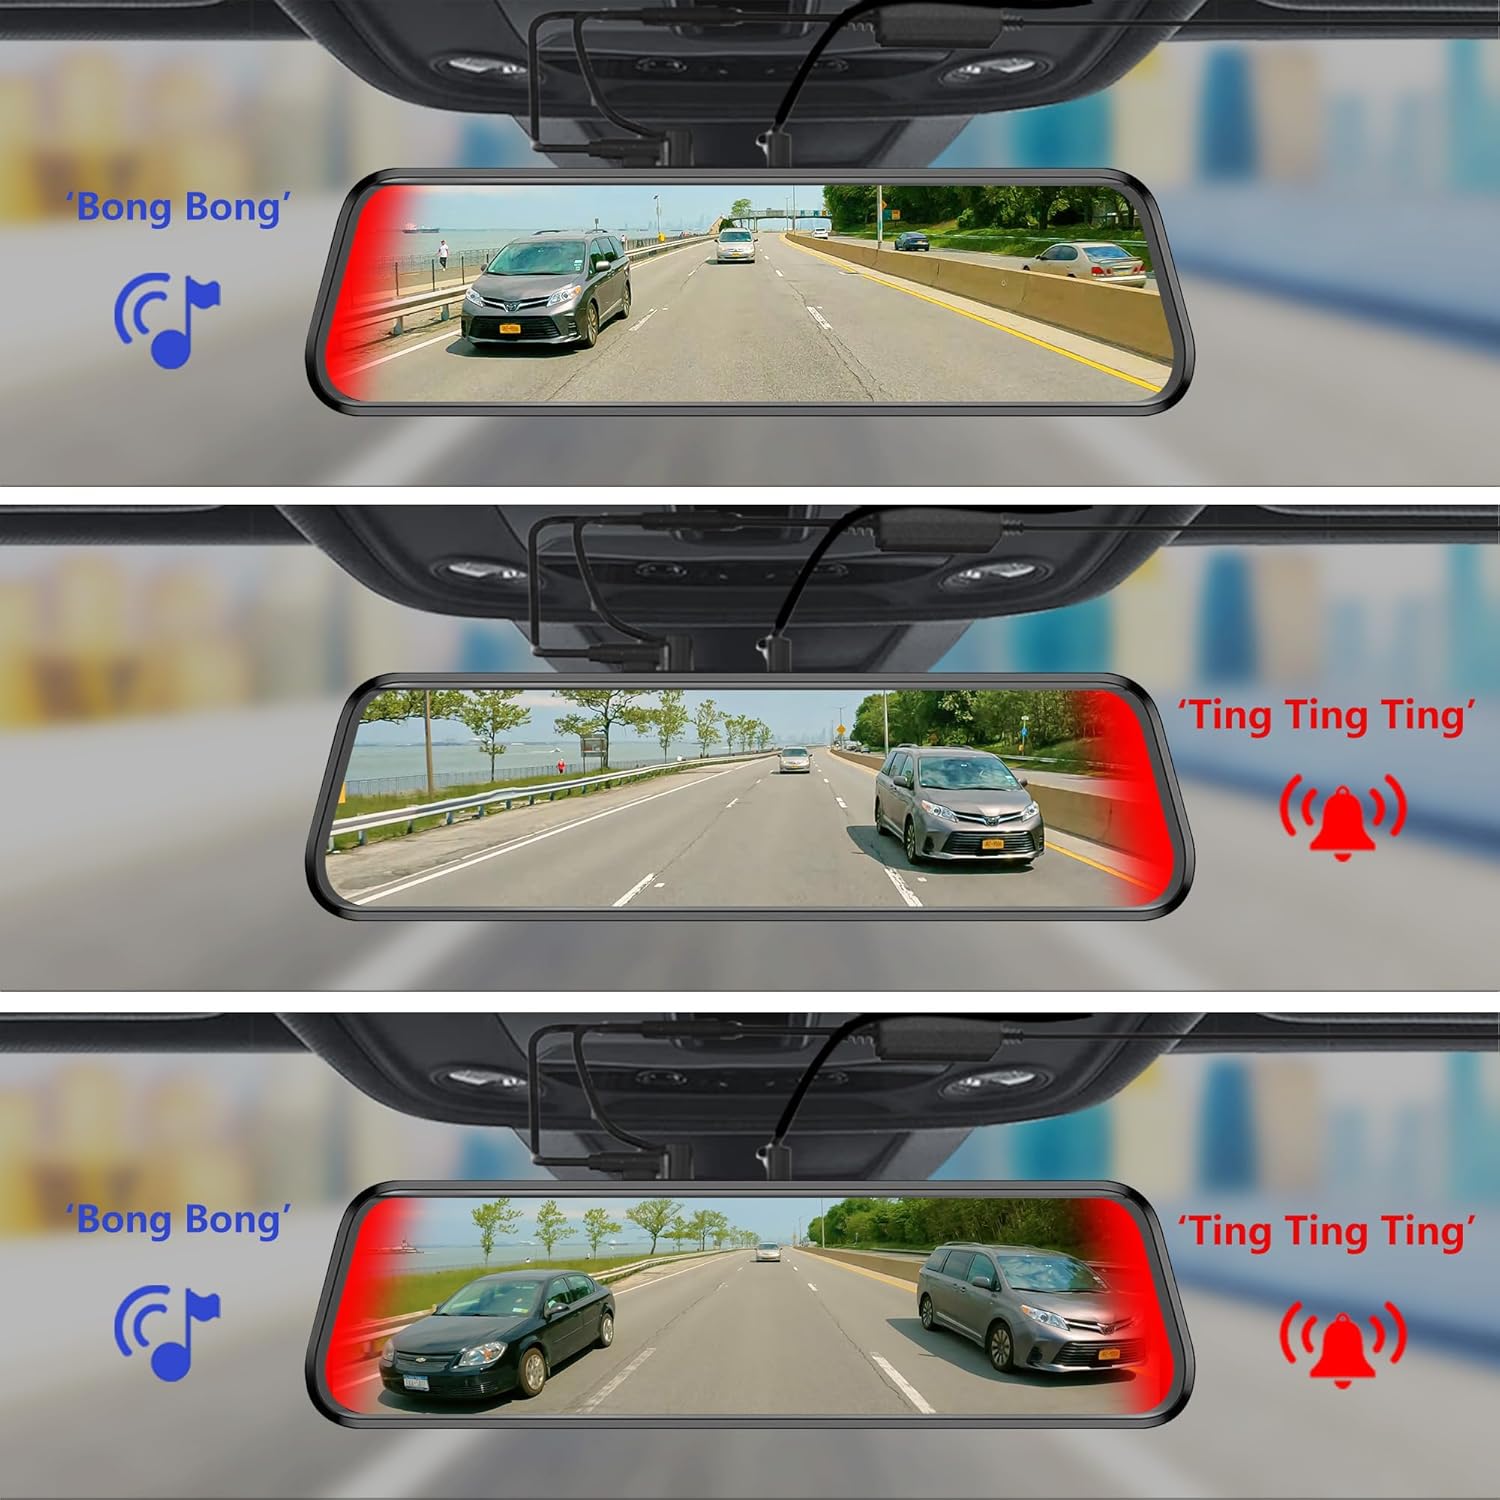
Figure 4.3: Various scenarios demonstrating the visual and auditory alerts of the BSD system, indicating vehicles in the blind spot with "Bong Bong" and "Ting Ting Ting" sounds.
4.3. G-sensor Function
The G-sensor automatically detects sudden impacts or collisions. When an event is detected, the system will automatically save and lock the current recorded footage, preventing it from being overwritten.

Figure 4.4: Illustration of the G-sensor function, which automatically locks important footage during a collision to prevent loss.
4.4. Enhanced Visibility Features
The BT11 system is designed to provide clear visibility even in challenging conditions:
- Rain and Low-Light Conditions: The system eliminates raindrop interference and enhances image contrast, allowing the camera to capture clear images of the rear vehicle. The display also features an "automatic brightening" effect on rainy days.
- Anti-Glare: The adjustable reflectance cover plate mirror and improved specular transmittance help avoid specular reflection interference, ensuring a clear view.

Figure 4.5: The Haloview BT11 system providing clear visibility in low-light conditions, showing the rear view on the mirror display and a side mirror view.

Figure 4.6: Comparison showing improved visibility with the BT11 system in rainy conditions compared to standard mirrors.

Figure 4.7: Diagram illustrating the multi-layered screen and lens technology that improves specular transmittance and avoids reflection interference for the BT11 system.
5. Maintenance
To ensure the longevity and optimal performance of your Haloview BT11 system, follow these maintenance guidelines:
- Cleaning the Lenses and Screen: Regularly clean the camera lenses and the Smart Screen with a soft, lint-free cloth. For stubborn dirt, use a mild, non-abrasive cleaning solution specifically designed for electronic screens. Do not use harsh chemicals or abrasive materials.
- Cable Inspection: Periodically check all cables for any signs of wear, fraying, or damage. Ensure all connections are secure. Replace damaged cables immediately.
- Firmware Updates: Check the Haloview official website periodically for any available firmware updates. Keeping your system updated ensures you have the latest features and performance improvements.
- Environmental Protection: While the system is designed for vehicle use, avoid exposing it to extreme temperatures or direct prolonged sunlight when parked, as this can affect electronic components.
6. Troubleshooting
If you encounter issues with your Haloview BT11 system, refer to the following common problems and solutions:
| Problem | Possible Cause | Solution |
|---|---|---|
| No image on screen |
|
|
| Poor image quality / Interference |
|
|
| BSD alerts are inaccurate or not working |
|
|
| G-sensor not locking footage |
|
|
If the problem persists after attempting these solutions, please contact Haloview customer support.
7. Specifications
| Feature | Detail |
|---|---|
| Product Dimensions | 11 x 8 x 3 inches (11"L x 8"W x 3"H) |
| Item Weight | 3 pounds |
| Display Technology | LCD |
| Screen Size | 7 Inches |
| Video Capture Resolution | 1080p |
| Voltage | 24 Volts |
| Optical Sensor Technology | CMOS |
| Effective Still Resolution | 1920 Pixels (1.92E+3 Pixels) |
| Installation Type | Surface Mount |
| Compatible Devices | Monitor |
8. Warranty and Support
Haloview products are manufactured to high quality standards and are backed by a manufacturer's warranty. For specific warranty terms and conditions, please refer to the warranty card included with your product or visit the official Haloview website.
For technical support, troubleshooting assistance, or inquiries regarding parts and service, please contact Haloview customer support through their official channels. Contact information can typically be found on the Haloview website or in the product packaging.
Haloview Official Website: www.haloview.com
