
Introduction
This manual provides detailed instructions for the installation, operation, and maintenance of your DEWIN MPPT Solar Charge Controller. This device is designed to manage the power flow from your solar panels to your battery bank, ensuring efficient charging and protecting your batteries from overcharge and over-discharge. Please read this manual thoroughly before installation and use.
Safety Instructions
Adhering to these safety guidelines is crucial for preventing injury and damage to the equipment.
- Battery Safety: Batteries store significant energy. Always wear eye protection and gloves when working with batteries. Do not short-circuit battery terminals.
- Electrical Safety: Ensure all connections are tight and correct. Incorrect wiring can cause damage to the controller, battery, or solar panels. Disconnect power sources before making or changing connections.
- Ventilation: Install the controller in a well-ventilated area to prevent overheating.
- Water Exposure: Avoid exposing the controller to water or excessive humidity.
- Children: Keep the device out of reach of children.
Product Overview
The DEWIN MPPT Solar Charge Controller is an advanced device featuring automatic MPPT tracking for high charging efficiency. It supports various lead-acid battery types (open, sealed, colloidal) and lithium batteries. Key features include:
- Automatic 12V/24V system identification.
- Multi-stage intelligent charging (boost, float, powerful).
- Comprehensive protection functions: overcharge, short-circuit, overload, low voltage, overcurrent, reverse connection.
- Integrated aluminum heat sink for efficient heat dissipation.
- Durable ABS engineering plastic shell.
- LCD display for clear operational status and adjustable parameters.
- Four 5V/2.5A USB output ports for charging mobile devices.

Image: Front view of the DEWIN MPPT Solar Charge Controller, showing the LCD screen, control buttons, and dual USB output ports on each side.

Image: Rear view of the DEWIN MPPT Solar Charge Controller, highlighting the multi-finned aluminum heat sink designed for efficient heat dissipation.

Image: The solar charge controller displayed with icons illustrating its multiple protection features, including battery over-current, reverse polarity, over-heating, load over-load, and load short-circuit protection.
Setup Instructions
Follow these steps for proper installation. Ensure all power sources are disconnected before making any connections.
1. Wiring Sequence
- Connect the Battery: Connect the battery to the charge controller first. Ensure correct polarity (+ to + and - to -). The controller will automatically detect the battery voltage (12V or 24V).
- Connect the Solar Panel: Connect the solar panel to the charge controller. Ensure correct polarity.
- Connect the Load: Connect the DC load to the charge controller. Ensure correct polarity.
Important: Always connect the battery first, then the solar panel, and finally the load. Disconnect in the reverse order: load, then solar panel, then battery.

Image: Detailed wiring diagram showing connections from solar panels to the controller, then to the battery, and finally to a DC load. It also indicates maximum PV input for different battery system voltages.
2. Battery Type Compatibility
This controller is compatible with various battery types, including:
- Open Lead-Acid Batteries
- Sealed Lead-Acid Batteries
- Colloidal (Gel) Lead-Acid Batteries
- Lithium Batteries
Note: For optimal performance and safety, especially when connecting multiple batteries in series/parallel, it is recommended to use sealed lead-acid batteries or sealed GEL/AGM lead-acid batteries.

Image: Visual representation of different battery types supported by the controller, including GEL, SLD (Sealed Lead-Acid), FLD (Flooded Lead-Acid), USR (User-defined), and Lithium batteries.
3. System Application Example

Image: Illustrative diagram of a home solar power system, showing solar panels on a roof connected to the charge controller, which then charges a battery bank and powers household appliances.
Operating Instructions
1. LCD Display
The LCD screen provides real-time information about the system's operational status. It displays battery voltage, charging status, load status, and other relevant parameters.

Image: A detailed view highlighting the LCD screen for clear system operation display, the durable ABS engineering plastic shell, and the dual USB charging interfaces with 2A output.
2. Control Buttons
The controller features intuitive buttons for navigation and parameter adjustment:
- Menu Button: Used to cycle through display screens and enter parameter settings.
- Up/Down Buttons: Used to adjust parameter values when in setting mode.
- Enter Button: Used to confirm selections or save parameter changes.
3. Charging Modes
The controller utilizes a three-stage intelligent charging process to optimize battery life and performance:
- Boost Charge: Rapidly charges the battery to a higher voltage level.
- Float Charge: Maintains the battery at a full charge level by providing a small, constant voltage.
- Powerful Charge: This stage ensures the battery reaches its maximum capacity.
4. Load Control Modes
The controller offers flexible load control options:
- All-Day Mode: The load output remains continuously on.
- Light Control Mode: The load output is controlled by ambient light levels, typically turning on at dusk and off at dawn.
These modes can be adjusted via the control buttons and LCD display.
Maintenance
To ensure optimal performance and longevity of your DEWIN MPPT Solar Charge Controller, follow these maintenance guidelines:
- Regular Inspection: Periodically check all wiring connections for tightness and corrosion.
- Cleanliness: Keep the controller clean and free from dust and debris. Use a dry cloth for cleaning.
- Ventilation: Ensure the installation area remains well-ventilated to prevent overheating.
- Battery Check: Regularly inspect your battery terminals for corrosion and ensure proper electrolyte levels for flooded batteries.
- Environmental Conditions: Avoid exposing the controller to extreme temperatures or direct sunlight for prolonged periods.
Troubleshooting
This section addresses common issues you might encounter with your solar charge controller.
| Problem | Possible Cause | Solution |
|---|---|---|
| No display on LCD | Battery not connected or low voltage; reverse polarity. | Check battery connections and voltage. Ensure correct polarity. Charge battery if voltage is too low. |
| Battery not charging | Solar panel not connected; insufficient sunlight; solar panel reverse polarity; faulty solar panel. | Check solar panel connections and polarity. Ensure adequate sunlight. Test solar panel output. |
| Load not working | Load not connected; load reverse polarity; battery low voltage; overload protection activated. | Check load connections and polarity. Ensure battery is sufficiently charged. Reduce load or check for short circuits. |
| Overheating | Poor ventilation; excessive load or charging current. | Ensure adequate airflow around the controller. Reduce load or check system sizing. |
Specifications
Detailed technical specifications for the DEWIN MPPT Solar Charge Controller 40A:
| Parameter | Value |
|---|---|
| Model | IXDQQEYDQ-GS109627-01 |
| Rated Charging Current | 40A |
| Rated Discharge Current | 40A |
| Battery Voltage | 12V/24V (Auto-identification) |
| Maximum Photovoltaic Voltage | 50V |
| Max Input Power (12V System) | 480W |
| Max Input Power (24V System) | 960W |
| USB Output | 5V/2.5A x 4 |
| Material | ABS Engineering Plastic |
| Display Type | LCD |
| Product Dimensions | 18 x 11 x 5 cm |
| Item Weight | 300 g |
| Working Environment Temperature | -35 ~ +60°C |
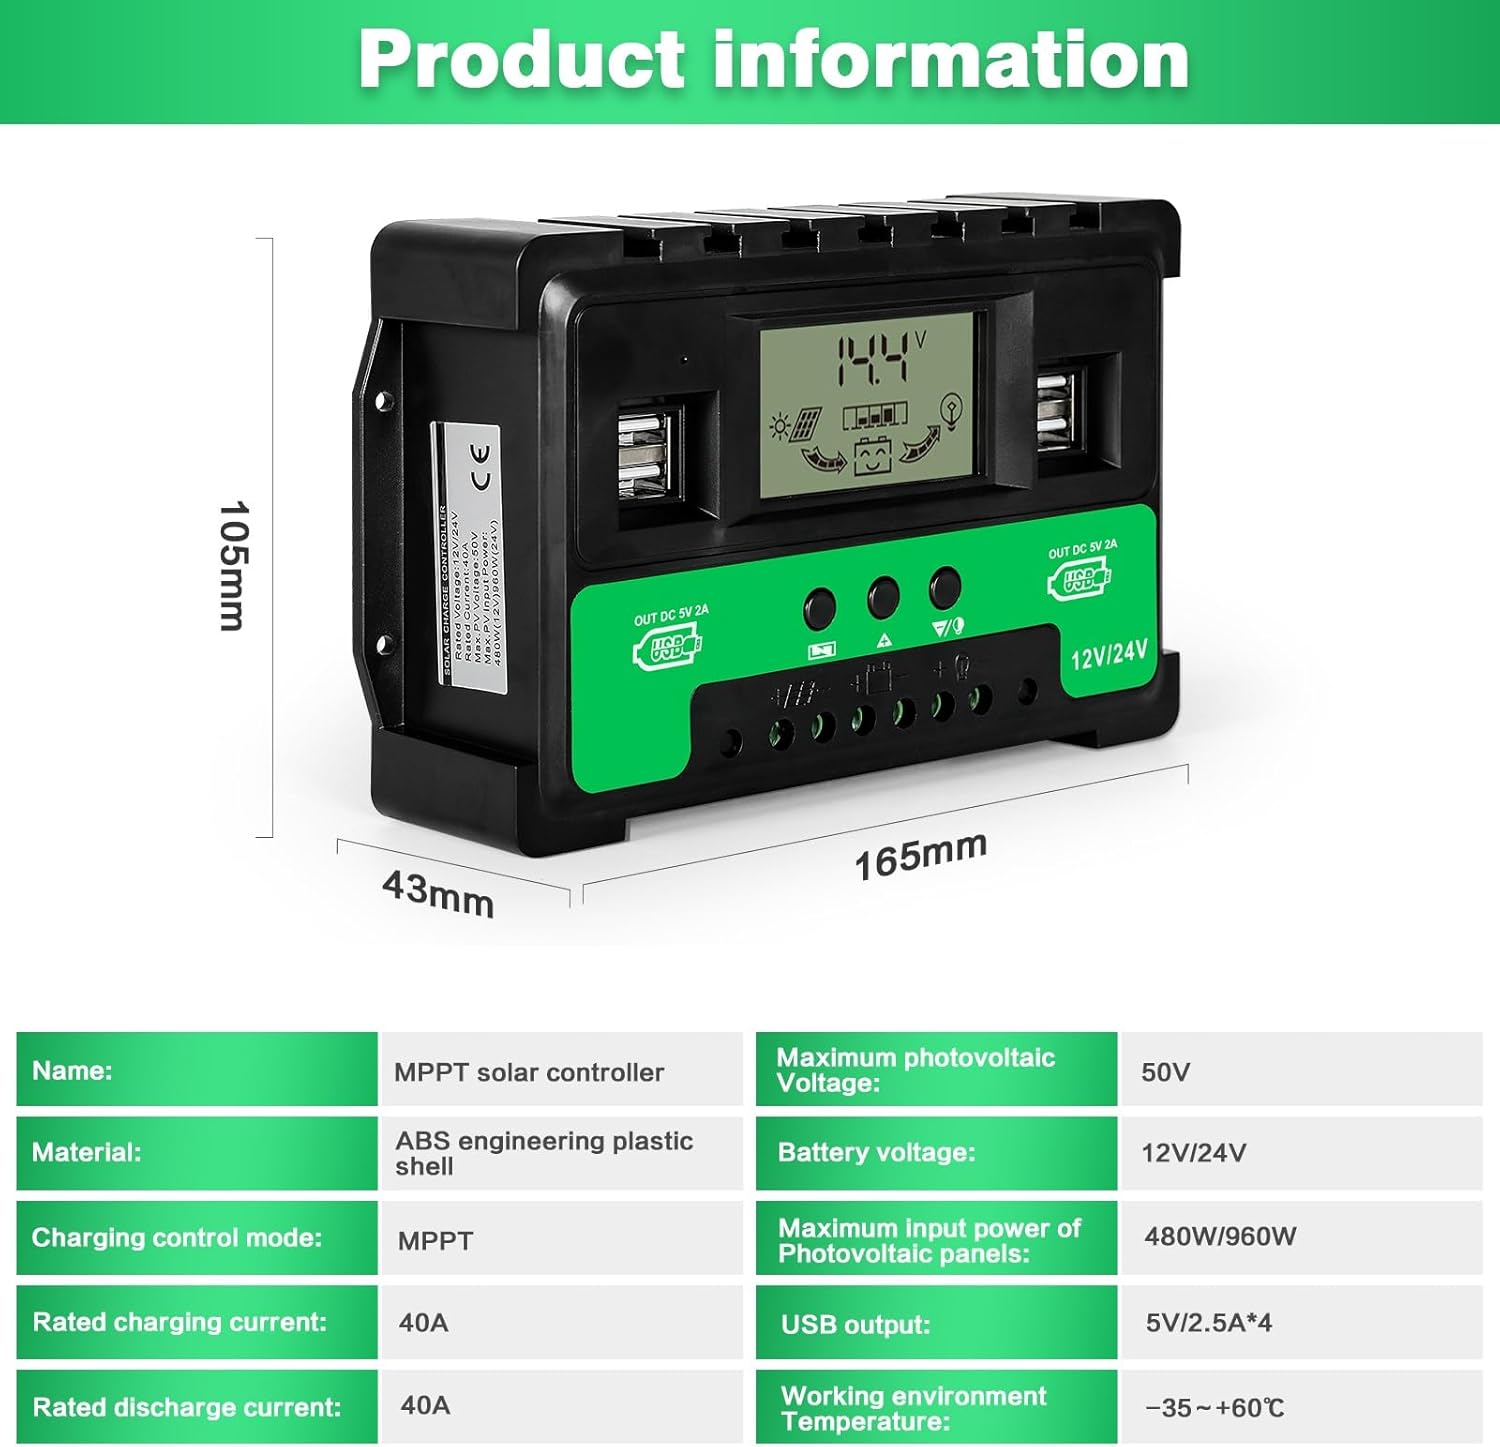
Image: A visual representation of the product's dimensions (18x11x5 cm) and a table summarizing key specifications such as material, charging mode, rated currents, battery voltage, max PV voltage, max input power, USB output, and working temperature.
Warranty Information
DEWIN products are manufactured to high-quality standards. For specific warranty details, please refer to the warranty card included with your product or contact DEWIN customer support. Typically, warranty covers manufacturing defects under normal use conditions.
Support
If you encounter any issues or have questions regarding your DEWIN MPPT Solar Charge Controller, please contact DEWIN customer support through the retailer where you purchased the product or visit the official DEWIN website for assistance.
For further information, you may visit the DEWIN Store on Amazon.