
1. Introduction
This manual provides detailed instructions for the installation, operation, and maintenance of your STARDOM ST2-B31 USB3.2 2-Bay External Storage Enclosure. This device is designed to house two 3.5" or 2.5" SATA drives, offering flexible storage solutions with support for JBOD, RAID 0, RAID 1, and BIG configurations via a high-speed USB 3.2 Gen 2 Type-C interface. Please read this manual thoroughly before using the product to ensure proper setup and optimal performance.
2. Product Overview
2.1 Key Features
- Drive Support: Accommodates two 3.5" or 2.5" SATA hard disk drives or solid-state drives.
- Interface: High-speed USB 3.2 Gen 2 Type-C for fast data transfer rates.
- RAID Functions: Supports JBOD (Just a Bunch Of Disks), RAID 0 (Striping), RAID 1 (Mirroring), and BIG (Concatenation) modes.
- Enclosure Design: Durable and compact design for external storage.
2.2 Package Contents
Please verify that all items are present in the package:
- STARDOM ST2-B31-B 2-Bay External Storage Enclosure
- USB-C to USB-C Cable
- Power Adapter
- User Manual (this document)
- Accessory Kit (screws for drive installation, if applicable)
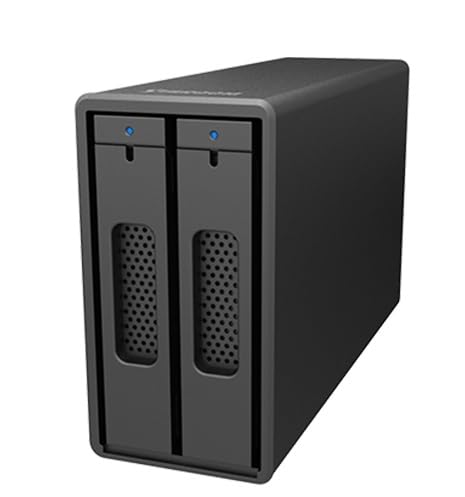
Figure 1: Front and side view of the STARDOM ST2-B31-B 2-Bay External Storage Enclosure, showing the two drive bays with LED indicators.
3. Setup
3.1 Drive Installation
- Ensure the enclosure is powered off and disconnected from your computer.
- Locate the drive bay doors on the front of the enclosure. Gently press the release latch (if present) or pull the handle to open the drive bay.
- Slide your 3.5" or 2.5" SATA drive into the empty bay. Ensure the drive is oriented correctly, with the SATA connector aligning with the enclosure's backplane connector. Push firmly until the drive is securely seated.
- Close the drive bay door until it latches. Repeat for the second drive if installing two drives.

Figure 2: A hard drive being slid into one of the bays of the STARDOM ST2-B31-B enclosure, demonstrating the easy installation process.
3.2 Connecting to Your Computer
- Connect one end of the provided USB-C to USB-C cable to the USB 3.2 Gen 2 Type-C port on the rear of the ST2-B31 enclosure.
- Connect the other end of the USB-C cable to an available USB-C port on your computer. For optimal performance, use a USB 3.2 Gen 2 compatible port.
- Connect the power adapter to the DC IN 12V/50W port on the rear of the enclosure, then plug the adapter into a power outlet.
- Flip the POWER ON/OFF switch on the rear panel to the "ON" position. The power LED on the front panel should illuminate.

Figure 3: Rear view of the STARDOM ST2-B31-B enclosure, detailing the power switch, DC input, fan speed switch, RAID mode switches, USB-C port, and reset button.
4. Operating Instructions
4.1 RAID Configuration
The ST2-B31 supports multiple RAID modes. Always back up your data before changing RAID modes, as this process will erase all data on the drives.
- Ensure the enclosure is powered off and disconnected from your computer.
- Locate the "RAID Mode" switches on the rear panel (refer to Figure 3).
- Set the switches according to the desired RAID configuration:
- JBOD (Just a Bunch Of Disks): Drives appear as individual volumes.
- BIG (Concatenation): Drives are combined into a single large volume.
- RAID 0 (Striping): Data is striped across both drives for maximum performance. No data redundancy.
- RAID 1 (Mirroring): Data is mirrored across both drives for data redundancy. Half the total storage capacity.
- After setting the RAID mode, use a small, pointed object (like a paperclip) to press and hold the "RESET" button for approximately 5 seconds. This will apply the new RAID configuration.
- Power on the enclosure and connect it to your computer. The drives will need to be initialized and formatted by your operating system before use.
4.2 Initializing and Formatting Drives
After setting the RAID mode and connecting the enclosure, the drives will appear as uninitialized in your operating system's disk management utility. Follow your OS-specific instructions to initialize and format the drives.
- Windows: Open Disk Management (right-click Start button > Disk Management). Locate the new disk(s), initialize them (GPT recommended for large drives), and create new simple volumes.
- macOS: Open Disk Utility (Applications > Utilities > Disk Utility). Select the new disk(s), erase them, and choose a format (e.g., APFS or Mac OS Extended).
4.3 Data Transfer
Once formatted, your ST2-B31 enclosure will appear as a regular external drive. You can drag and drop files, use backup software, or perform any standard file operations as you would with any other storage device.
5. Maintenance
- Cleaning: Use a soft, dry cloth to clean the exterior of the enclosure. Avoid liquid cleaners or solvents.
- Ventilation: Ensure the enclosure's fan and vents are not obstructed to prevent overheating. The rear panel includes a fan speed switch (Low/High) to adjust cooling as needed.
- Safe Removal: Always safely eject the external drive from your operating system before disconnecting the USB cable or powering off the enclosure to prevent data corruption.
- Firmware Updates: Check the manufacturer's website periodically for any available firmware updates for improved performance or compatibility.
6. Troubleshooting
- Enclosure not recognized by computer:
- Ensure the power adapter is securely connected and the enclosure is powered on.
- Verify the USB-C cable is properly connected to both the enclosure and the computer.
- Try a different USB-C port on your computer or a different USB-C cable.
- Check Disk Management (Windows) or Disk Utility (macOS) to see if the drives are detected but uninitialized/unformatted.
- Drives not appearing after installation:
- Ensure drives are fully seated in their bays.
- Confirm the RAID mode is correctly set and the RESET button has been pressed after changing modes.
- Verify the drives themselves are functional by testing them in another enclosure or directly connected to a computer, if possible.
- Slow data transfer speeds:
- Ensure you are using a USB 3.2 Gen 2 compatible port on your computer.
- Check the condition of your USB-C cable.
- Performance can vary based on the type of drives used (HDD vs. SSD) and the RAID mode (RAID 0 offers highest speed).
7. Specifications
| Model Name | ST2-B31-B |
| Brand | RAIDON (STARDOM) |
| Drive Bays | 2 x 3.5" or 2.5" SATA Drives |
| Interface | USB 3.2 Gen 2 Type-C |
| RAID Functions | JBOD, RAID 0, RAID 1, BIG |
| Color | Black |
| Compatible Devices | Notebooks, Personal Computers |
8. Warranty and Support
This product comes with a standard manufacturer's warranty. Please refer to the warranty card included in your package or visit the official STARDOM/RAIDON website for detailed warranty terms and conditions.
For technical support, troubleshooting assistance, or warranty claims, please contact your retailer or the official STARDOM/RAIDON customer support. Contact information can typically be found on the manufacturer's website or in your product documentation.
Note: Keep your proof of purchase for warranty purposes.