1. Introduction
This manual provides detailed instructions for the installation, operation, and maintenance of your MUSETEX G07 ATX PC Case. Please read this manual thoroughly before beginning assembly to ensure proper setup and safe use of the product.
2. Safety Information
- Always disconnect power from all components before installation or maintenance.
- Handle tempered glass panels with care. They are durable but can break if subjected to sharp impacts or uneven pressure.
- Be aware of sharp edges inside the case during installation.
- Keep small parts and accessories out of reach of children.
- Ensure proper grounding for all electrical components.
3. Package Contents
Verify that all items are present in your package:
- MUSETEX G07 ATX PC Case
- 6 x Pre-installed PWM ARGB Fans
- Accessory Box (containing screws, cable ties, and other small parts)
- User Manual (this document)
4. Specifications
| Feature | Specification |
|---|---|
| Model Name | G07 |
| Case Type | Mid Tower |
| Motherboard Compatibility | ATX, Micro-ATX, Mini-ITX |
| Dimensions (LxWxH) | 15.28 x 8.86 x 18.43 inches (388 x 225 x 468 mm) |
| Material | Metal, Plastic, Tempered Glass |
| Pre-installed Fans | 6 x PWM ARGB Fans |
| Max CPU Cooler Height | 176mm |
| Max GPU Length | 320mm (12.59 inches) |
| Max PSU Length | 205mm |
| Storage Drive Bays | 4 (SSD/HDD) |
| Front I/O Ports | 2 x USB 3.0, HD Audio |
| Cooling Method | Air, Water |
Fan and Radiator Support
- Front: 3 x 120mm fans (pre-installed)
- Top: 2 x 120mm/140mm fans or 280mm/240mm/120mm radiator
- Rear: 1 x 120mm/140mm fan (pre-installed)
- Middle: 2 x 120mm fans (pre-installed)
- Bottom (PSU Shroud): 2 x 120mm fans (optional)

Figure 1: Internal layout and component clearance.

Figure 2: Fan and radiator support locations.
5. Setup and Installation
5.1 Case Access
The MUSETEX G07 features a magnetic tempered glass side door for easy, tool-free access to internal components. Gently pull the handle to open the side panel.
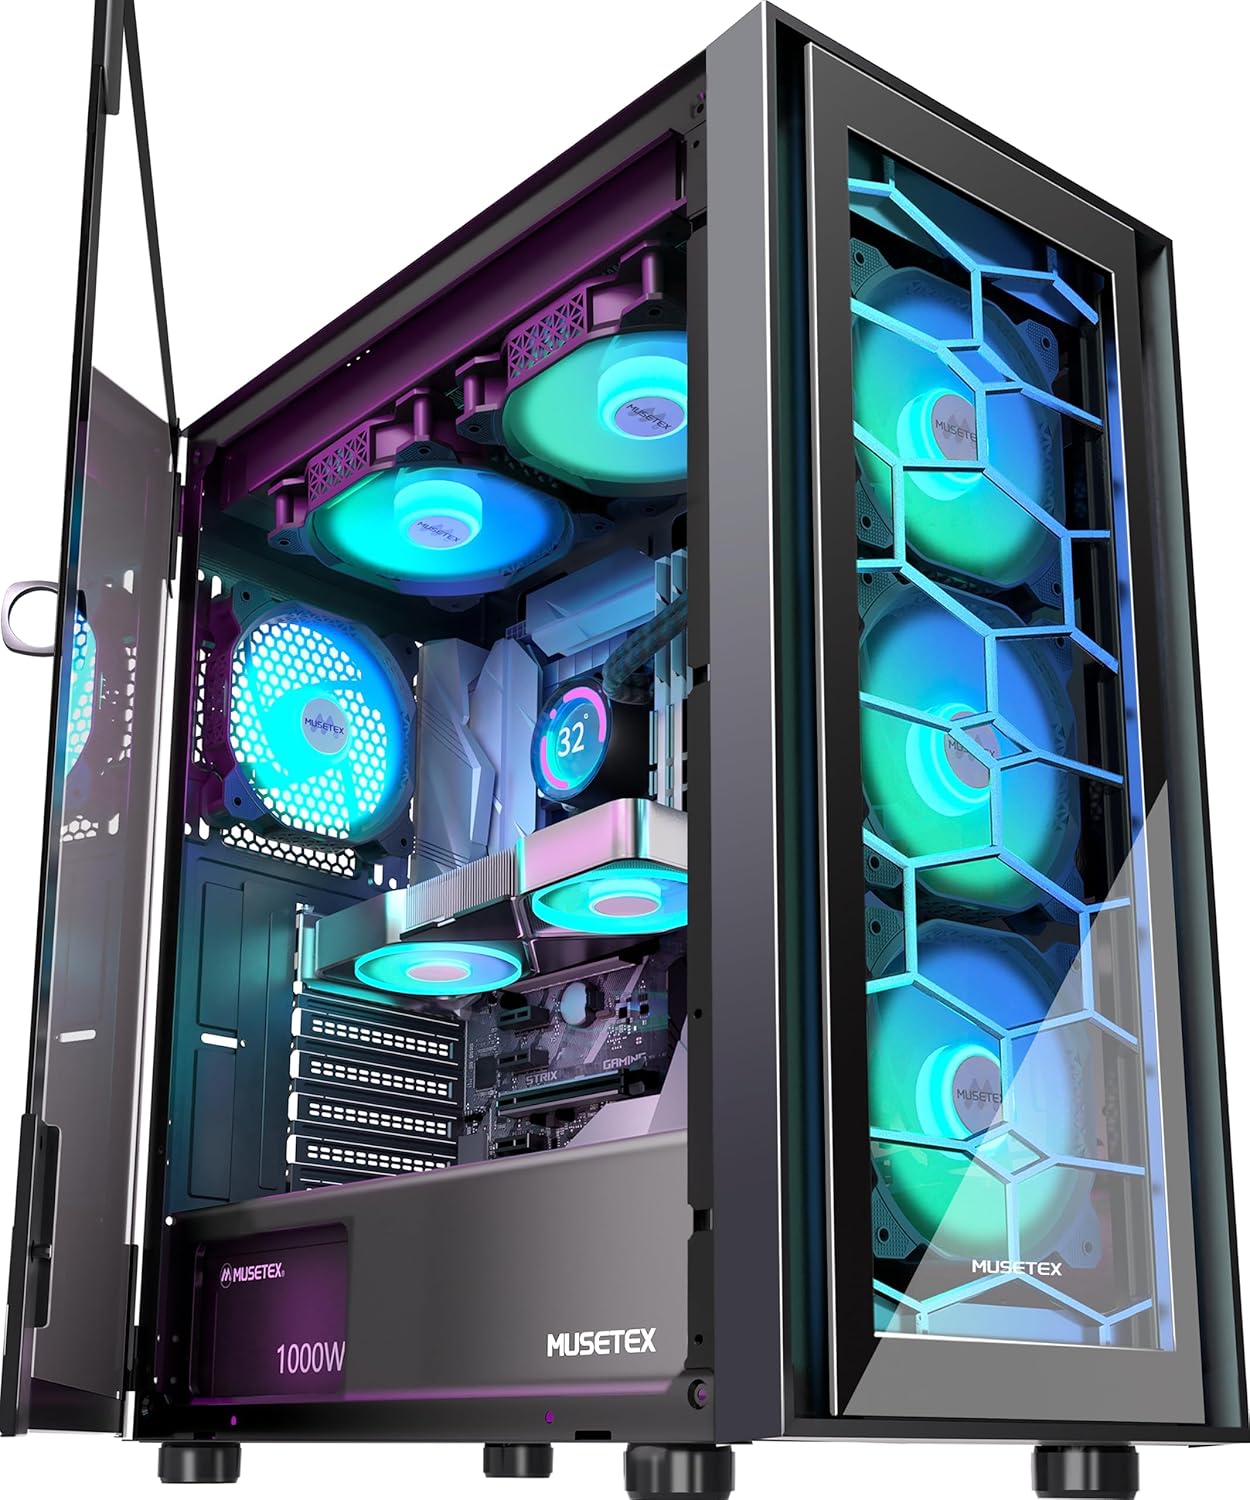
Figure 3: Case with open tempered glass door.
5.2 Motherboard Installation
- Place the motherboard I/O shield into the rear opening of the case (if not pre-attached to the motherboard).
- Align your ATX, Micro-ATX, or Mini-ITX motherboard with the standoffs inside the case.
- Secure the motherboard using the appropriate screws from the accessory box.
5.3 GPU Installation
- Remove the necessary PCI-E slot covers from the rear of the case.
- Insert your graphics card into the appropriate PCI-E slot on the motherboard.
- Secure the graphics card with screws. The case supports GPUs up to 320mm in length.
5.4 Storage Drive Installation
The case provides ample space for up to 4 storage drives (SSDs or HDDs).
- Locate the dedicated SSD mounting points behind the motherboard tray.
- Locate the HDD/SSD drive cage beneath the PSU shroud.
- Secure your drives using the provided screws.
Figure 4: Storage drive mounting locations.
5.5 Power Supply Installation
- Slide your power supply unit (PSU) into the dedicated compartment at the bottom rear of the case.
- Secure the PSU from the rear of the case using screws. The case supports PSUs up to 205mm in length.
5.6 Front I/O Panel Connections
Connect the cables from the case's front I/O panel to the corresponding headers on your motherboard:
- USB 3.0: Connect the USB 3.0 cable to your motherboard's USB 3.0 header.
- HD Audio: Connect the HD Audio cable to your motherboard's audio header. This cable features a signal shielding net to prevent noise interference.
- Power/Reset/LEDs: Connect the individual power switch, reset switch, and LED indicator cables to the front panel headers on your motherboard according to your motherboard manual.

Figure 5: Front I/O Panel.
6. Operating Instructions
6.1 Fan Control (PWM)
The G07 case comes with 6 pre-installed PWM ARGB fans. PWM (Pulse Width Modulation) allows your motherboard to dynamically control fan speeds based on system temperature, optimizing cooling performance and noise levels. Ensure the PWM fan cables are connected to your motherboard's fan headers.

Figure 6: PWM ARGB Fan Features.
6.2 ARGB Lighting Control
The pre-installed fans feature Addressable RGB (ARGB) lighting with 16.8 million colors. To control the lighting, your motherboard must have a 3-pin 5V ARGB header. Connect the ARGB cables from the fans to this header. You can then use your motherboard's RGB software (e.g., ASUS Aura Sync, MSI Mystic Light Sync, GIGABYTE RGB Fusion, ASRock Polychrome RGB) to customize lighting effects and synchronize them with other components.

Figure 7: ARGB Motherboard Synchronization.
7. Maintenance
7.1 Dust Filters
The G07 case is equipped with magnetic dust filters on the top and a pull-out dust filter at the bottom. Regularly clean these filters to prevent dust buildup, which can impede airflow and affect cooling performance.

Figure 8: Dust Filter Locations.
7.2 General Cleaning
Use a soft, dry cloth to clean the exterior of the case. For internal cleaning, use compressed air to remove dust from components and fans. Ensure the system is powered off and unplugged before cleaning.
7.3 Vibration and Noise Reduction
Sponge pads are integrated into the power supply compartment and case feet to effectively reduce vibration and noise generated during computer operation.

Figure 9: Vibration Dampening Features.
8. Troubleshooting
- No Power: Ensure all power cables (PSU to wall, PSU to components) are securely connected. Check the power switch on the PSU.
- Fans Not Spinning/No RGB: Verify fan power cables are connected to motherboard headers. Ensure ARGB cables are connected to a compatible 3-pin 5V ARGB header on the motherboard. Check motherboard BIOS/software for fan and RGB control settings.
- Front I/O Ports Not Working: Confirm that the USB 3.0 and HD Audio cables from the case are correctly connected to the corresponding headers on your motherboard.
- Overheating: Ensure all fans are spinning correctly and are oriented for optimal airflow (intake/exhaust). Clean dust filters regularly. Verify CPU cooler and GPU cooler are properly installed.
9. Warranty and Support
For any issues, questions, or warranty claims regarding your MUSETEX G07 PC Case, please contact MUSETEX directly through the platform where you purchased the product. On Amazon, you can typically find seller contact information by clicking on "Sold by MUSETEX" on the product page.

Figure 10: Locating MUSETEX Support.