
1. Introduction
This manual provides essential information and instructions for replacing the LCD screen on your Dell Inspiron 15 3520 P112F laptop with a SCREENARAMA FHD 40pin 144Hz IPS display. Please read all instructions carefully before beginning the installation process. Proper installation ensures optimal performance and avoids potential damage.

Image 1.1: SCREENARAMA FHD 40pin 144Hz IPS LCD LED Display.
2. Product Features
- Resolution: 1920x1080 Full HD (FHD).
- Refresh Rate: 144Hz for smooth visuals.
- Connector Type: 40-pin video connector.
- Display Type: IPS (In-Plane Switching) Wide View Matte finish, reducing glare and improving viewing angles.
- Compatibility: Designed for Non-Touch laptops ONLY. Not compatible with Touch displays.
- Warranty: Includes a 2-year warranty.

Image 2.1: IPS Wide View Matte finish provides better viewing angles and more vivid colors compared to TN screens.
3. Compatibility and Important Notes
Before proceeding with the installation, it is crucial to verify that this replacement screen is compatible with your specific laptop model and original screen specifications. Incompatibility can lead to non-functional display or damage.
- This screen is for Dell Inspiron 15 3520 P112F models.
- Ensure your original screen has a 1920x1080 FHD resolution.
- Confirm your original screen uses a 40-pin video connector.
- This screen is for Non-Touch laptops ONLY. It is not compatible with Touch displays. Touch and 144Hz versions are not interchangeable due to different video cables.
- The refresh rate is 144Hz.
To ensure correct selection:
- Check the model number on the back of your laptop.
- Inspect the back of your original screen for its model number and specifications (resolution, connector type, touch/non-touch, refresh rate).
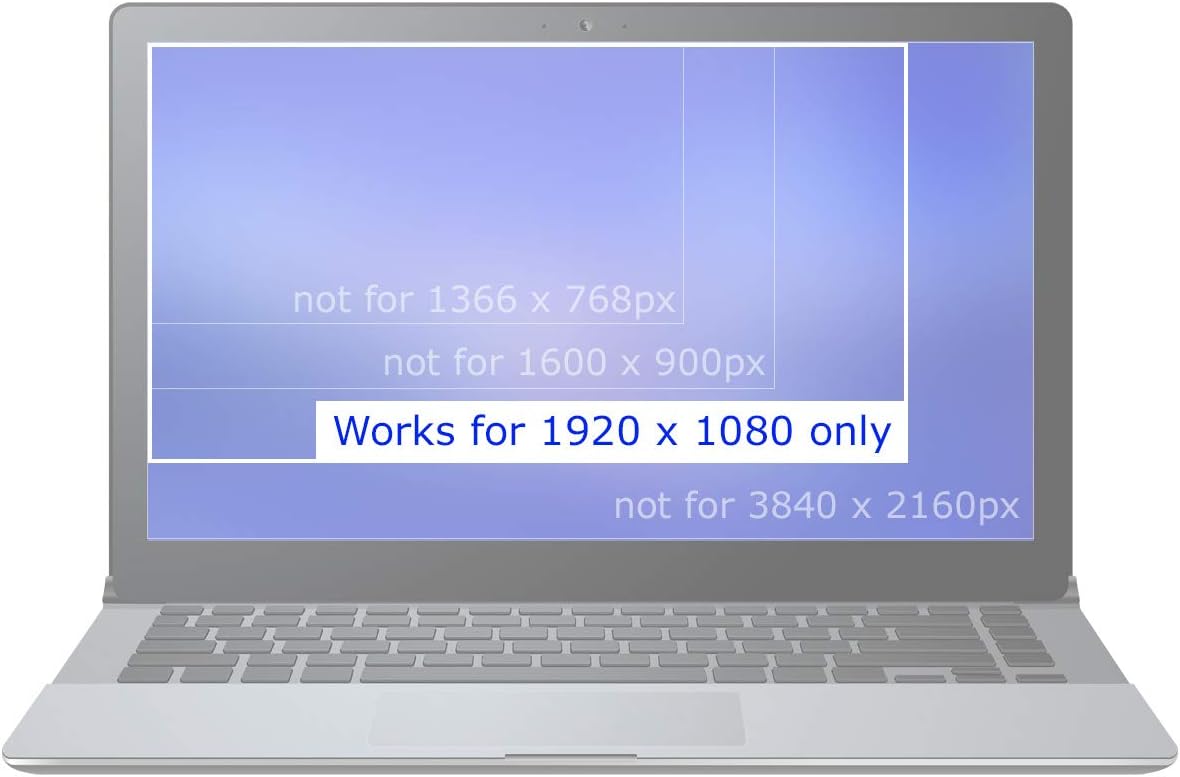
Image 3.1: This screen is compatible only with 1920x1080 resolution displays.

Image 3.2: This product is an LCD screen only and does not support touchscreen functionality.

Image 3.3: Ensure your original screen has a 40-pin video connector. This screen is not compatible with 30-pin connectors.
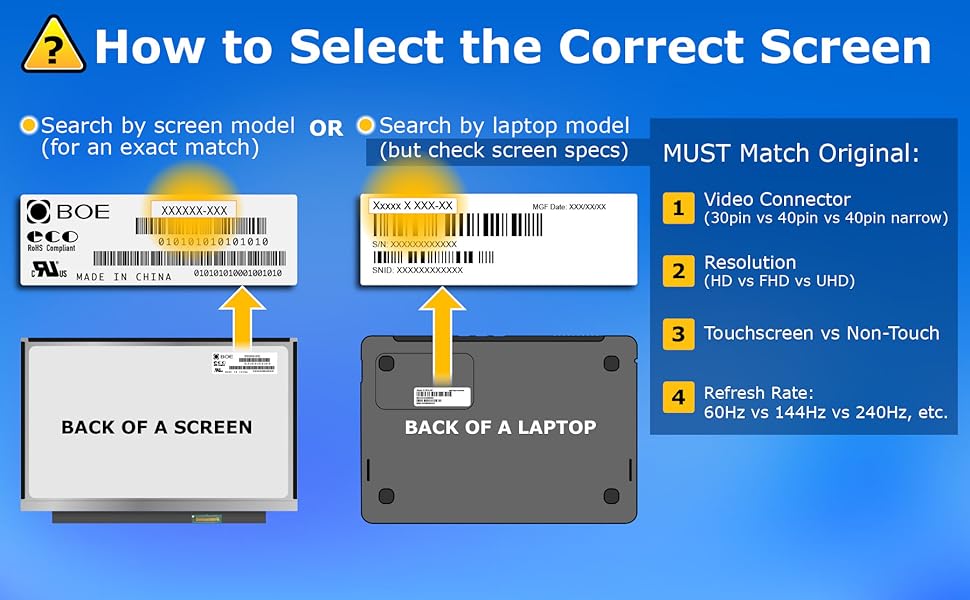
Image 3.4: Guide on how to select the correct screen by checking original specifications.
4. Package Contents
Your SCREENARAMA screen replacement package includes the following items:
- 1x SCREENARAMA FHD 40pin 144Hz IPS LCD LED Display.
- 1x Set of DIY installation tools.
- 1x Adhesive tape for secure installation.

Image 4.1: Included DIY installation tools.
5. Installation Instructions (Setup)
Replacing a laptop screen requires careful handling and attention to detail. If you are not comfortable with electronic repairs, consider seeking professional assistance. Always work in a clean, well-lit environment.
Safety Precautions:
- Disconnect Power: Always power off your laptop and remove the battery before starting any repair.
- Static Discharge: Use an anti-static wrist strap or frequently touch a grounded metal object to prevent electrostatic discharge (ESD) damage to components.
- Gentle Handling: LCD panels are fragile. Handle the new screen by its edges and avoid applying pressure to the display surface.
General Installation Steps:
- Remove Bezel: Carefully pry off the plastic bezel surrounding the screen. Use the included prying tools to avoid scratching the laptop casing.
- Unscrew Old Screen: Locate and remove the screws holding the old screen in place. These are often found on the sides of the screen assembly.
- Disconnect Video Cable: Gently lay the old screen face down on the keyboard. Carefully peel back any tape securing the video cable connector and unlatch the connector. Disconnect the 40-pin video cable from the old screen.
- Transfer Rails: The replacement screen does not come with mounting rails. You will need to carefully remove the metal mounting rails from your old LCD screen and attach them to the new SCREENARAMA screen. Use the provided adhesive tape for secure attachment.
- Connect New Screen: Connect the 40-pin video cable to the new SCREENARAMA screen. Ensure the connection is firm and secure, then re-apply any tape to hold it in place.
- Test Display: Before fully reassembling, temporarily connect the battery and power on the laptop to test the new screen. Verify that the display functions correctly, shows no lines or dead pixels, and has proper brightness.
- Secure New Screen: If the test is successful, power off the laptop, disconnect the battery, and screw the new screen into place.
- Reattach Bezel: Carefully snap the plastic bezel back into position around the new screen.
- Final Assembly: Reconnect the battery and power on your laptop.

Image 5.1: Location of the 40-pin video connector on the back of the screen.
Video Guide:
For a visual step-by-step guide, please refer to the following video:
Video 5.1: This video demonstrates the key specifications of the 15.6" FHD 40pin Matte 144Hz screen, including its non-touch functionality and lack of mounting tabs, which is relevant for installation.
6. Operating Instructions
Once the screen is successfully installed, operating it is straightforward. The screen functions as a standard laptop display.
- Power On: Turn on your laptop as usual. The new screen should display the operating system.
- Brightness Adjustment: Adjust screen brightness using your laptop's keyboard function keys (e.g., Fn + F2/F3) or through the display settings in your operating system.
- Resolution and Refresh Rate: The screen should automatically detect and operate at its native 1920x1080 resolution and 144Hz refresh rate. You can verify and adjust these settings in your operating system's display preferences.
7. Maintenance
To ensure the longevity and optimal performance of your new screen, follow these maintenance guidelines:
- Cleaning: Use a soft, lint-free microfiber cloth specifically designed for electronics. For stubborn smudges, lightly dampen the cloth with water or a screen-safe cleaning solution. Never spray liquid directly onto the screen.
- Avoid Pressure: Do not press on the screen surface with sharp objects or excessive force.
- Protection: When transporting your laptop, ensure it is in a protective sleeve or bag to prevent damage from impacts or pressure.
- Temperature: Avoid exposing the laptop to extreme temperatures, which can affect screen performance and lifespan.
8. Troubleshooting
If you encounter issues after installing your new screen, refer to the following troubleshooting steps:
- Blank Screen: If the screen remains blank, connect an external monitor to your laptop to confirm the laptop itself is operational.
- Check Connections: Power off the laptop, disconnect the battery, and carefully re-check the video cable connection at both the screen and motherboard ends. Ensure the 40-pin connector is fully seated and secured with tape. Verify that the number of pins on the original LCD and the new one is the same.
- Damaged Connector: Inspect the video cable and its connector for any signs of damage (bent pins, tears). A damaged cable may need replacement.
- Dim Image: If the image is dim, try connecting your old LCD screen (if it still powers on). If both LCDs do not light up, check the backlight fuse, which is usually located near the video connector on the motherboard.
- Persistent Issues: If the issue persists and the external monitor works, the problem might be with the new screen or the video cable. If the external monitor also shows issues, the problem is likely with another part of the laptop (e.g., graphics card, motherboard).

Image 8.1: Visual guide for troubleshooting common screen issues.
9. Specifications
| Feature | Specification |
|---|---|
| Model Compatibility | Dell Inspiron 15 3520 P112F |
| Resolution | 1920x1080 (FHD) |
| Refresh Rate | 144Hz |
| Connector Type | 40-pin |
| Display Type | IPS Wide View Matte |
| Touchscreen | No (Non-Touch) |
| Package Dimensions | 16.5 x 10.39 x 1.34 inches |
| Item Weight | 1.48 pounds |
| Manufacturer | SCREENARAMA |
10. Warranty and Support
Your SCREENARAMA replacement screen comes with a 2-Year warranty from the date of purchase. This warranty covers manufacturing defects and ensures your product performs as expected.
For warranty claims, technical assistance, or any questions regarding your product, please contact SCREENARAMA customer support through the retailer where you purchased the item or visit the official SCREENARAMA website for contact information.