Introduction
This manual provides detailed instructions for the installation, operation, and maintenance of your Gearwiz Wiz-Loc1 Fingerprint Keyless Entry Door Lock. Please read this manual thoroughly before installation and use to ensure proper function and security.
Key Features:
- Multiple Access Methods: Fingerprint, Keypad Code, and Mechanical Key.
- Biometric Fingerprint Recognition: Fast and secure unlocking in approximately 0.3 seconds.
- User Capacity: Supports up to 100 unique fingerprints and access codes.
- Temporary Codes: Ability to create one-time PIN codes for guests.
- Automatic Locking: Customizable auto-lock feature (10-99 seconds).
- One-Touch Locking: Securely lock the door by holding any keypad key for 2 seconds.
- Emergency Power: USB-C port for emergency power in case of battery depletion.
- Durable Construction: Crafted with high-quality aluminum.

Image: Front and back view of the Gearwiz Wiz-Loc1 Fingerprint Keyless Entry Door Lock. The front features a keypad, fingerprint sensor, and keyhole. The back shows the interior mechanism.
Package Contents
Please verify that all components are present in your package. If any items are missing or damaged, contact customer support.
- Exterior Keypad Assembly
- Interior Assembly
- Deadbolt Latch
- Mounting Plate
- Strike Plate
- Screws (various sizes)
- Mechanical Keys (2)
- User Manual (this document)
Product Overview
The Gearwiz Wiz-Loc1 offers multiple security features for enhanced access control.
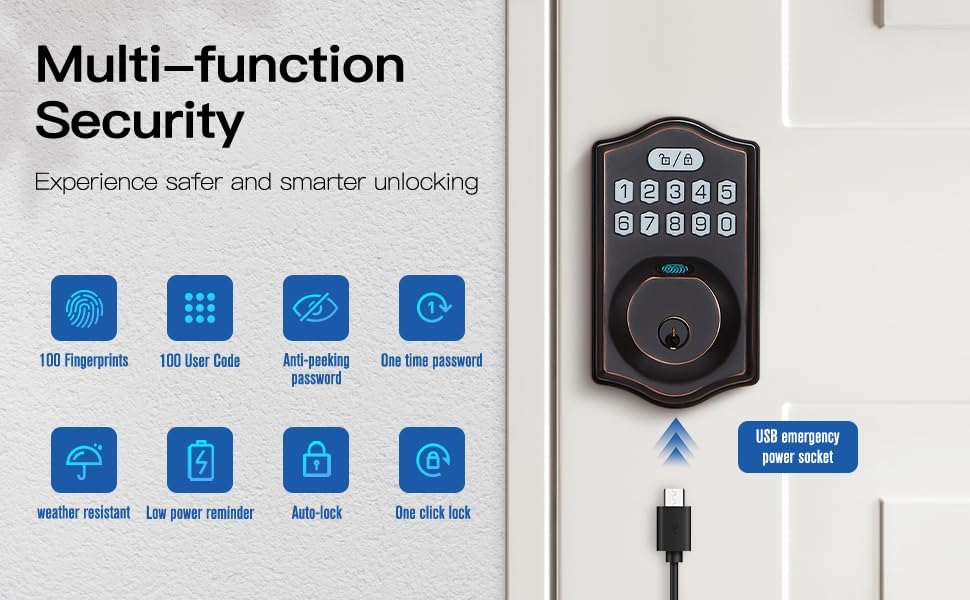
Image: Diagram illustrating the multi-function security features including 100 fingerprints, 100 user codes, anti-peeking password, one-time password, weather resistance, low power reminder, auto-lock, one-click lock, and a USB emergency power socket.

Image: Close-up view of the fingerprint sensor on the lock, highlighting its biometric identification speed (0.3s), recognition rate (99.9%), and false accept rate (0.01%).
Specifications
| Feature | Detail |
|---|---|
| Brand | Gearwiz |
| Model Name | Wiz-Loc1 |
| Lock Type | Keypad, Fingerprint |
| Material | Aluminum |
| Dimensions (L x W x H) | 5 x 3 x 0.5 inches |
| Item Weight | 2.25 pounds |
| Power Source | Batteries (not included) |
| Connectivity Protocol | Bluetooth (Note: This model does not support app control for unlocking/locking, Bluetooth is for initial setup/programming only if applicable, refer to specific instructions for your model's Bluetooth functionality) |
| UPC | 704001436249 |

Image: Product size diagram indicating a hole diameter of 2-1/8" (54mm) and bore diameter of 0.70" (18mm), confirming compatibility with most US standard door sizes.
Setup and Installation
The Gearwiz Wiz-Loc1 lock is designed for easy installation and is compatible with most US standard doors, including both left-handed and right-handed configurations. A screwdriver is typically the only tool required.
Before Installation:
- Ensure your door meets the specified dimensions (refer to the Specifications section).
- Check that the door frame is clear and the strike plate can be installed correctly.
- Gather necessary tools, primarily a Phillips head screwdriver.
Installation Steps (General Guide):
- Prepare the Door: If replacing an existing deadbolt, remove it. Ensure the door bore and edge bore are clean and correctly sized.
- Install the Latch: Insert the deadbolt latch into the door edge. Ensure the "UP" arrow on the latch is facing upwards. Secure with screws.
- Install Exterior Assembly: Route the cable from the exterior keypad assembly through the door bore. Align the exterior assembly with the latch.
- Install Interior Mounting Plate: Secure the interior mounting plate to the exterior assembly using the provided screws, ensuring the cable passes through the plate.
- Connect Cables: Connect the cable from the exterior assembly to the interior assembly.
- Install Interior Assembly: Attach the interior assembly to the mounting plate, ensuring the thumb turn operates smoothly. Secure with screws.
- Install Strike Plate: Install the strike plate on the door frame, aligning it with the deadbolt latch.
- Insert Batteries: Open the battery cover on the interior assembly and insert 4 AA batteries (not included).
- Door Handing Process: After battery installation, the lock will automatically detect door handing. Follow any prompts or sounds to confirm.
For detailed visual instructions, refer to the installation guide included in your product packaging.
Operating Instructions
The Gearwiz Wiz-Loc1 offers several convenient ways to secure and access your property.
1. Initial Setup and Master Code:
- Upon first power-up, the lock will be in factory default mode.
- It is crucial to set a Master Code immediately. This code is used for all programming functions.
- Refer to your specific programming guide for steps to set the Master Code. Typically, this involves pressing a program button, entering a default code, and then your new Master Code.
2. Unlocking the Door:
- Using Fingerprint: Place a registered finger on the fingerprint sensor. The lock will unlock if the fingerprint is recognized.
- Using Keypad Code: Enter your 4-8 digit user code on the keypad, followed by the '#' key. The lock will unlock.
- Using Mechanical Key: Insert the mechanical key into the keyhole and turn to unlock. This is for emergency access.
3. Locking the Door:
- Automatic Locking: The lock can be programmed to automatically lock after a set period (10-99 seconds) once the door is closed. Refer to programming instructions to enable and set this feature.
- One-Touch Locking: From the outside, press and hold any key on the keypad for 2 seconds. The deadbolt will extend, locking the door.
- Manual Locking (Interior): Turn the thumb turn on the interior assembly to lock the door.

Image: Illustration of the automatic locking feature, which engages within 1-99 seconds after the door closes, and the one-touch locking function activated by holding any key for 2 seconds.
4. User Management (Programming):
All programming functions require the Master Code. Refer to your lock's specific programming guide for exact sequences.
- Adding User Fingerprints: Typically involves entering the Master Code, then a command, and repeatedly placing the finger on the sensor until registered.
- Adding User Codes: Involves entering the Master Code, a command, and then the new user code.
- Creating One-Time PIN Codes: These codes are valid for a single use and are automatically deleted afterward. Useful for temporary access for service personnel or deliveries.
- Deleting Users/Codes: Follow programming instructions to remove individual fingerprints or codes, or to perform a factory reset.
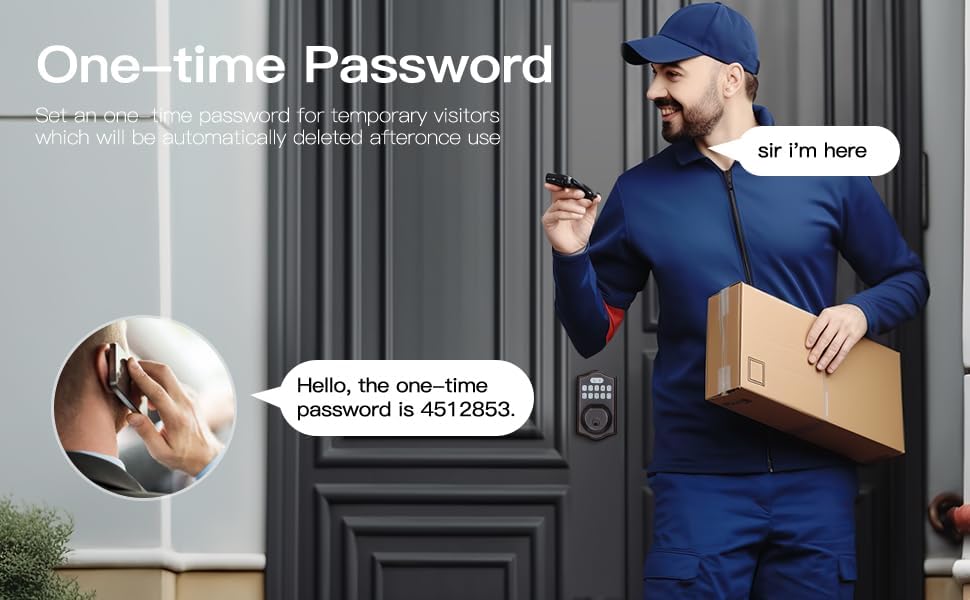
Image: Scenario showing a user providing a one-time password to a delivery person, illustrating the convenience of temporary access codes.
Maintenance
Proper maintenance ensures the longevity and reliable operation of your Gearwiz Wiz-Loc1 lock.
1. Battery Replacement:
- The lock will provide a low battery warning (e.g., flashing light, audible beeps) when batteries are running low.
- Replace all four AA batteries simultaneously with new, high-quality alkaline batteries. Do not mix old and new batteries or different battery types.
- To replace, remove the battery cover on the interior assembly, remove old batteries, insert new ones according to polarity markings, and replace the cover.
2. Emergency Power:
- In case of complete battery depletion, a USB-C port is available on the exterior assembly for emergency power.
- Connect a portable power bank (not included) to the USB-C port to temporarily power the lock and gain entry using a code or fingerprint.
3. Cleaning:
- Clean the lock's exterior with a soft, damp cloth. Avoid abrasive cleaners or solvents that could damage the finish or electronic components.
- Keep the fingerprint sensor and keypad free from dirt, dust, and moisture for optimal performance.
Troubleshooting
If you encounter issues with your Gearwiz Wiz-Loc1 lock, refer to the following common problems and solutions:
| Problem | Possible Cause | Solution |
|---|---|---|
| Lock does not respond to keypad or fingerprint. | Low batteries; incorrect code/fingerprint; sensor/keypad obstruction. | Replace batteries; ensure correct code is entered; clean sensor/keypad; use emergency key or USB-C power. |
| Fingerprint not recognized consistently. | Finger placement; dirty sensor; dry/wet finger; unregistered fingerprint. | Ensure full finger contact; clean sensor; try different finger or re-register fingerprint. Note: Extreme cold can affect biometric performance. |
| Auto-lock feature not working or locking incorrectly. | Feature disabled; incorrect setting; door not fully closed; installation issue. | Verify auto-lock is enabled and set correctly in programming; ensure door closes completely; check installation for proper alignment. |
| Lock beeps continuously or makes unusual sounds. | Low battery warning; error during operation; installation issue. | Check/replace batteries; refer to programming guide for error codes; re-check installation steps. |
| Cannot program new codes or fingerprints. | Incorrect Master Code; incorrect programming sequence; lock in error state. | Ensure correct Master Code is used; follow programming steps precisely; try a factory reset if necessary (refer to manual). |
If the problem persists after attempting these solutions, please contact Gearwiz customer support.
Warranty and Support
Gearwiz products are designed for quality and reliability. This product comes with a standard manufacturer's warranty against defects in materials and workmanship.
- Warranty Period: Please refer to the warranty card included with your product or visit the official Gearwiz website for specific warranty terms and duration.
- Customer Support: For technical assistance, troubleshooting, or warranty claims, please contact Gearwiz customer support through the contact information provided in your product packaging or on the official Gearwiz website.
- Online Resources: Additional support resources, FAQs, and video tutorials may be available on the Gearwiz website.
Please retain your proof of purchase for warranty purposes.