1. Introduction
Thank you for choosing the POWLSOJX Dual Battery Solar Charge Controller 30A. This device is designed to efficiently manage the charging of two independent batteries from a single solar panel system. It supports both 12V and 24V systems, automatically adapting to the voltage, and utilizes Pulse Width Modulation (PWM) technology for optimized battery performance and longevity. This manual provides essential information for the safe and effective installation, operation, and maintenance of your solar charge controller.

Image 1: POWLSOJX Dual Battery Solar Charge Controller 30A. This image shows the front view of the solar charge controller with its display and connection terminals.
2. Key Features
- Versatile Compatibility: Automatically adapts to 12V or 24V battery systems.
- PWM Charging: Features four-stage Pulse Width Modulation (PWM) charging (Boost, Direct, Constant Voltage, and Float) to optimize battery health and extend lifespan.
- Dual Battery Management: Designed to charge two independent batteries from a single solar array, prioritizing Battery 1.
- Comprehensive Protection: Built-in safeguards against short circuits, reverse current, reverse polarity, lightning, and overcharging.
- User-Friendly Display: Integrated industrial microcontroller with a State-of-Charge (SOC) indicator for easy monitoring of battery conditions.
- Durable Construction: Fine workmanship and robust build quality ensure long-term reliability in various environmental conditions (-35℃ to +60℃).
- Efficient Heat Dissipation: All-aluminum back heat dissipation design for quick and effective cooling of the controller.

Image 2: Security Protection. This graphic illustrates the various protection features of the controller, including short-circuit, overload, overcurrent, overcharge, undervoltage, and overvoltage protection.
3. Setup and Installation
Follow these steps carefully to ensure correct and safe installation of your solar charge controller. Incorrect wiring can damage the controller, batteries, or solar panel.
- Connect Battery 1: Connect the positive and negative terminals of the first battery to the controller's Battery 1 terminals. Ensure correct polarity.
- Connect Battery 2: Connect the positive and negative terminals of the second battery to the controller's Battery 2 terminals. Ensure correct polarity.
- Connect PV Panel: Connect the positive and negative terminals of your solar PV panel to the controller's PV Panel terminals. Ensure correct polarity.
- Connect Inverter (Optional): If using an inverter, connect it to the battery terminals, not directly to the controller's load terminals.
Important Note: Only two batteries with the same voltage (e.g., both 12V or both 24V) can be connected. The controller gives priority to charging the first battery (Battery 1) to 70% before beginning to charge Battery 2. This unit requires at least one battery with sufficient charge to power the controller for initial operation.

Image 3: Connection Steps. This diagram illustrates the correct wiring order for connecting the PV panel, Battery 1, Battery 2, and an optional inverter to the solar charge controller.
4. Operating Instructions
Once correctly installed, the controller will automatically begin managing the charging process.
4.1. Display Indicators
The controller features an intuitive display to show the status of your system:
| LED Light | Battery 1 Status | Battery 2 Status |
|---|---|---|
| Green Flashing | FULL | FULL |
| Green Steady | NORMAL | NORMAL |
| Yellow Steady | LOW | LOW |
| Red Steady | NEAR EMPTY | NEAR EMPTY |
The digital display indicates the charging priority status. The controller prioritizes charging Battery 1 until it reaches approximately 70% capacity, then it begins charging Battery 2.
4.2. Charging Process
The PWM charging process involves four stages:
- Boost Charge: Rapidly charges the battery to a higher voltage.
- Direct Charge: Continues charging at a steady rate.
- Constant Voltage Charge: Maintains a constant voltage to fully charge the battery without overcharging.
- Float Charge: Maintains the battery at a full state of charge by providing a small, continuous current.
5. Maintenance
To ensure optimal performance and longevity of your POWLSOJX Dual Battery Solar Charge Controller, regular maintenance is recommended.
- Inspect Connections: Periodically check all wiring connections to ensure they are tight and free from corrosion. Loose connections can lead to power loss or overheating.
- Clean Controller: Keep the controller clean and free from dust, dirt, and debris. Use a dry, soft cloth for cleaning. Do not use liquids or abrasive cleaners.
- Ventilation: Ensure the controller's heat dissipation fins are not obstructed to allow for proper airflow and cooling.
- Battery Health: Monitor your batteries regularly for signs of wear, damage, or low electrolyte levels (for flooded lead-acid batteries).
- Environmental Conditions: Ensure the controller is operating within its specified temperature range (-35℃ to +60℃) and protected from direct moisture exposure.
6. Troubleshooting
If you encounter issues with your solar charge controller, refer to the following common problems and solutions:
- No Display/Controller Not Powering On:
- Check battery connections and ensure correct polarity.
- Verify that at least one battery has sufficient charge to power the controller.
- Inspect fuses in the battery circuit if applicable.
- Batteries Not Charging:
- Check PV panel connections and ensure correct polarity.
- Verify that the solar panel is receiving adequate sunlight.
- Ensure the PV panel voltage is within the controller's operating range (Max 41V).
- Check for any blown fuses or tripped breakers in the solar panel circuit.
- Confirm battery voltage is not extremely low, as the controller may not initiate charging if batteries are deeply discharged.
- Overcharging/Over-Discharging:
- Ensure the controller is correctly configured for your battery type (though this model is automatic for 12V/24V, ensure batteries match system voltage).
- Verify battery health; a faulty battery may not charge correctly.
- Error Codes/Unusual Behavior:
- Refer to the LED indicator table in the Operating Instructions section.
- If the issue persists, disconnect all power sources (PV and batteries) for a few minutes, then reconnect in the correct order (Battery 1, Battery 2, then PV).
If you are unable to resolve the issue after following these steps, please contact customer support.
7. Specifications
| Model | 30A |
| System Voltage | 12V / 24V Auto-adapt |
| Max PV Voltage | 41V |
| Rated Charge Current | 30A |
| Charging Technology | PWM (4-stage: Boost, Direct, Constant Voltage, Float) |
| Protection Features | Short circuit, Overload, Overcurrent, Overcharge, Under-voltage, Over-voltage, Reverse polarity, Lightning |
| Working Temperature | -35℃ to +60℃ |
| Dimensions | 125mm x 70mm x 33mm (approx. 5.5 x 2.9 x 1.5 inches) |
| Item Weight | 6.4 ounces |
| Material | Plastic (with aluminum heat sink) |
| Display Type | Simple Display with LED indicators |
| UPC | 766157532480 |
| ASIN | B0CQJTXYSV |

Image 4: Controller Dimensions. This image provides a visual representation of the controller's physical dimensions (length, width, height).
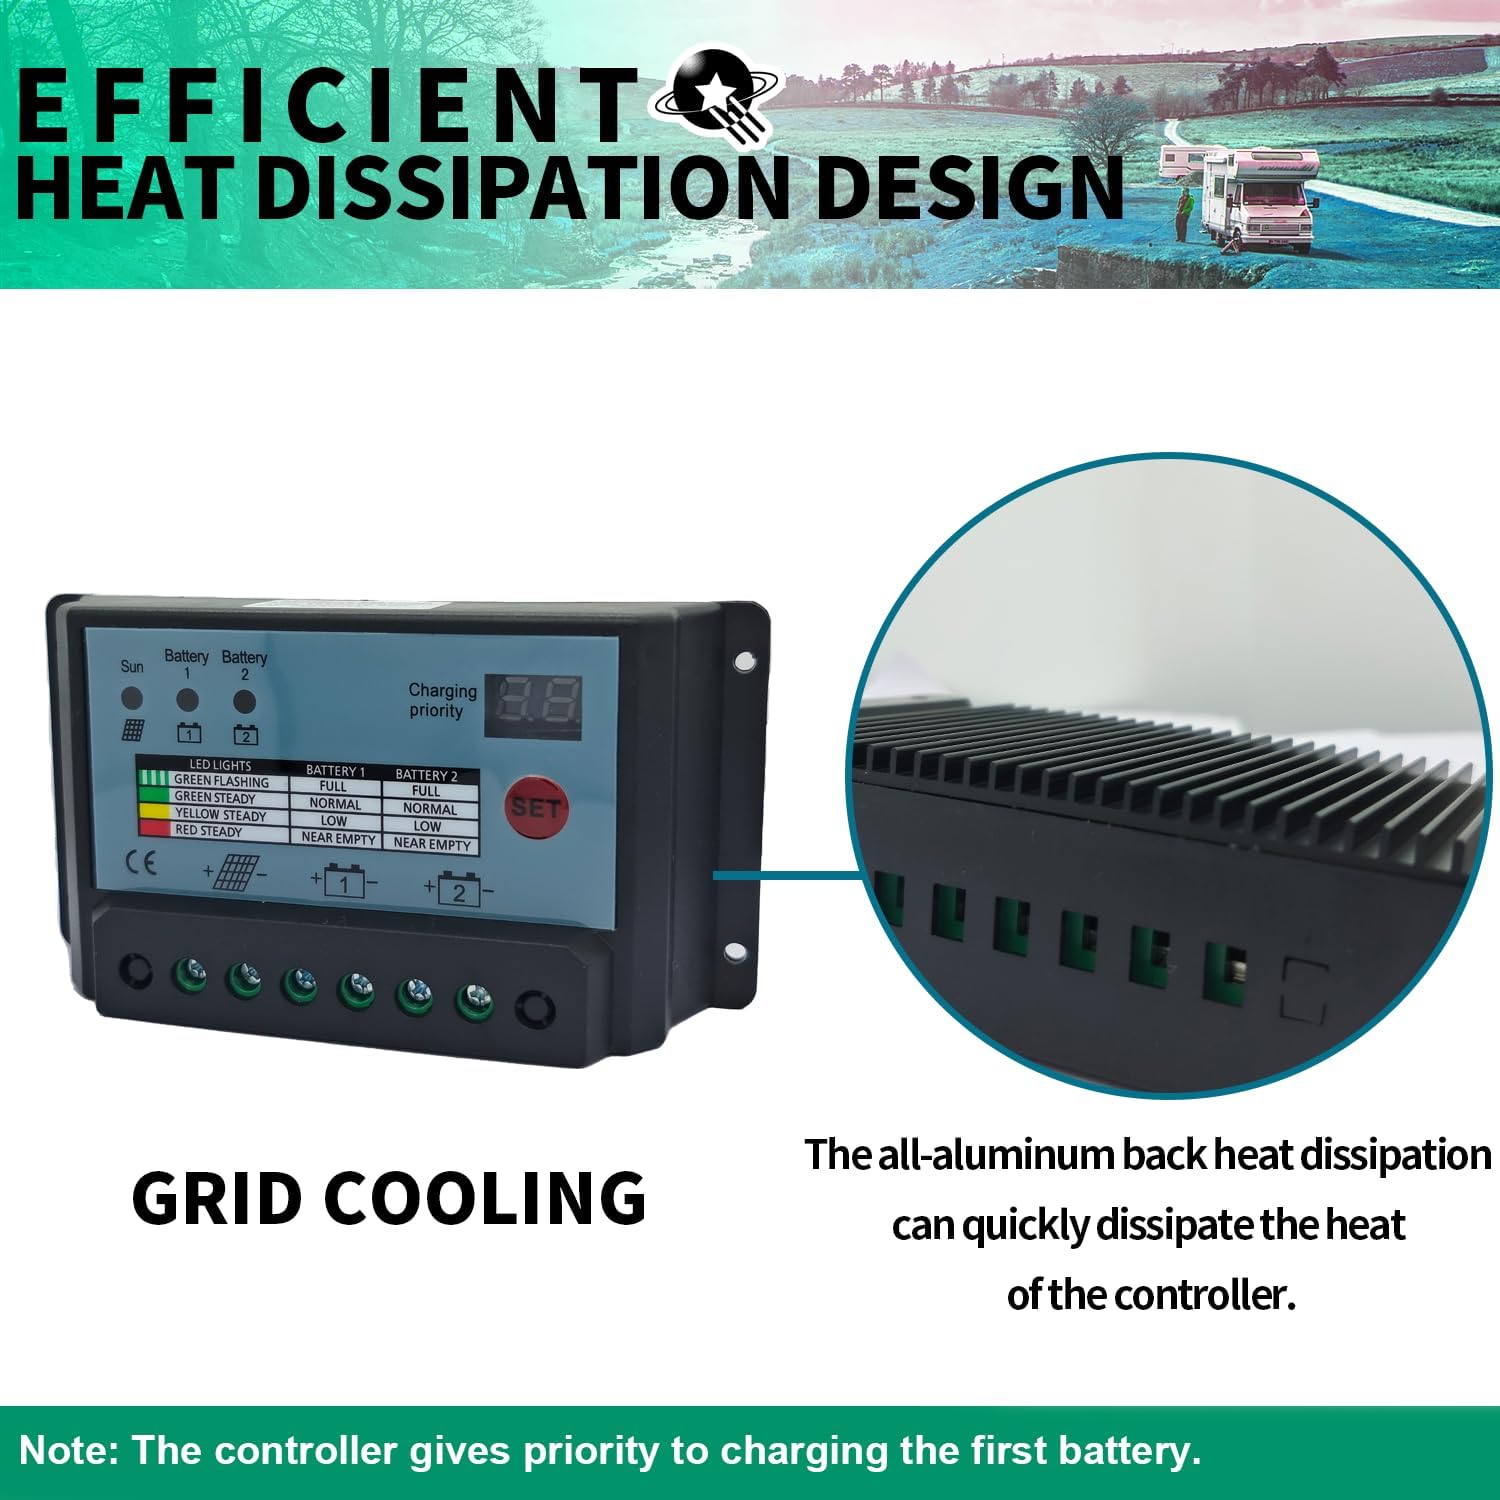
Image 5: Efficient Heat Dissipation Design. This image highlights the grid cooling design and the all-aluminum back for quick heat dissipation.
8. Warranty and Customer Support
POWLSOJX is committed to providing high-quality products and dedicated customer support.
8.1. Warranty Information
For specific warranty terms and conditions, please refer to the product packaging or contact POWLSOJX customer support directly. Keep your purchase receipt as proof of purchase for any warranty claims.
8.2. Customer Support
Should you have any questions, require assistance with installation, operation, or troubleshooting, or need to make a warranty claim, please contact our customer support team. Contact details can typically be found on the product packaging or the official POWLSOJX website.


