1. Introduction
This user manual provides comprehensive instructions for the installation, operation, and maintenance of your darkFlash DRX70 ATX Mid-Tower Gaming PC Case. Designed for optimal airflow and component compatibility, the DRX70 features a magnetic mesh front panel, tempered glass side panel, and pre-installed RGB fans to enhance your PC building experience.

Figure 1.1: darkFlash DRX70 ATX Mid-Tower Gaming PC Case (Black)
2. Safety Information
Please read and understand all safety precautions before installing or operating the PC case. Failure to do so may result in personal injury or damage to the product.
- Always disconnect the power supply from the wall outlet before performing any installation or maintenance.
- Handle tempered glass panels with care to prevent breakage.
- Avoid exposing the case to extreme temperatures, humidity, or direct sunlight.
- Keep small components and screws away from children.
- Ensure proper grounding to prevent electrical shock.
- Do not attempt to modify the case structure or components.
3. Package Contents
Verify that all items are present in the package:
- darkFlash DRX70 ATX Mid-Tower Gaming PC Case
- 3 x 120mm Fixed RGB Fans (pre-installed)
- Accessory Box (containing screws, cable ties, etc.)
- User Manual (this document)
4. Features Overview
The darkFlash DRX70 PC case is designed with several key features to optimize performance and user experience:
- Magnetic Mesh Front Panel: Enhances airflow and is easily removable for cleaning.
- Tempered Glass Side Panel: Provides a clear view of internal components and RGB lighting.
- Pre-installed 3x120mm Fixed RGB Fans: Located at the front for immediate cooling and aesthetic appeal.
- Extensive Cooling Support: Accommodates up to 8 fans and a 280mm radiator for efficient thermal management.
- Magnetic Dust Filters: Located on the top and front panels to minimize dust accumulation.
- Anti-slip Bottom Structure: Ensures stability on various surfaces.
- User-Friendly Design: Facilitates easy installation and cable management.
- Front I/O Ports: Includes USB 3.0, USB 2.0, and HD Audio ports for convenient connectivity.

Figure 4.1: Key features of the darkFlash DRX70 case, including magnetic quick release front panel, USB 3.0 & 2.0, full coverage dust proofing, tool-free design, supreme cooling layout, and motherboard compatibility.

Figure 4.2: Illustration of the superior cooling potential with large mesh front panel, multiple airflow channels, and support for up to 8 fans.

Figure 4.3: Close-up of the 120mm Rainbow fans, highlighting their anti-vortex vanes for concentrated airflow.
5. Setup and Installation Guide
Follow these steps to install your PC components into the darkFlash DRX70 case.
5.1. Preparing the Case
- Place the case on a flat, stable surface.
- Carefully remove the tempered glass side panel by unscrewing the thumb screws and gently pulling it away.
- Remove the magnetic mesh front panel by pulling it from the top or bottom edge.
- Remove the top magnetic dust filter.
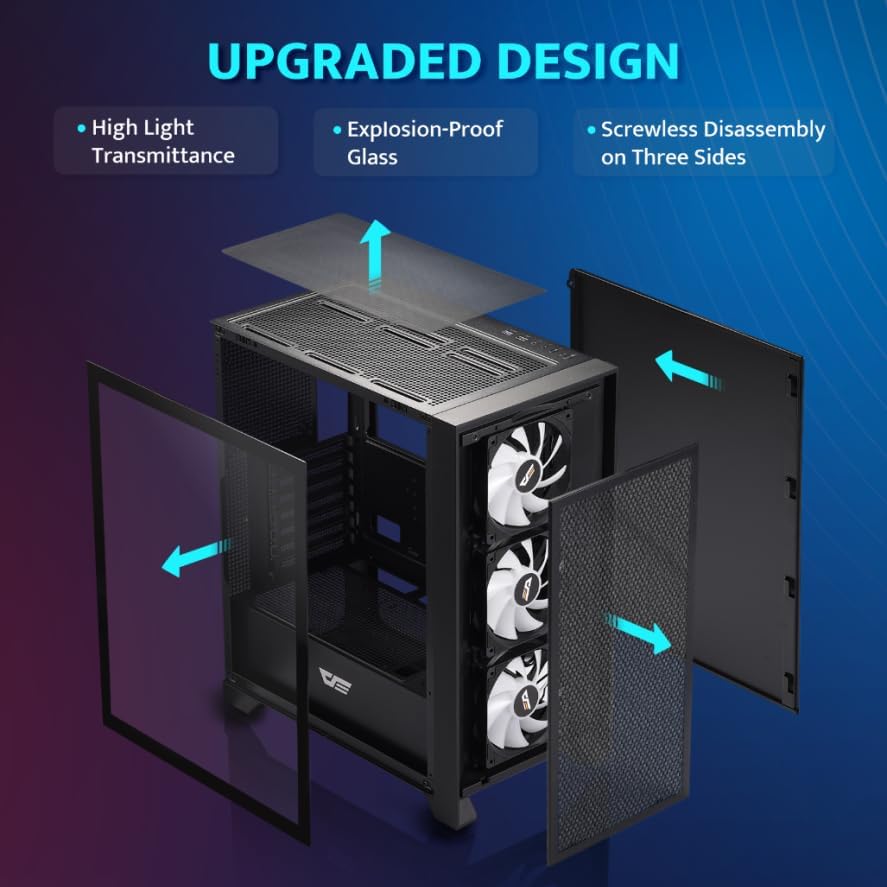
Figure 5.1: Exploded view showing the removable tempered glass side panel, top panel, and magnetic mesh front panel for easy access.

Figure 5.2: The magnetic mesh front panel, easily detachable for cleaning and component access.

Figure 5.3: The magnetic dust filter on the top of the case, designed for easy removal and cleaning.
5.2. Motherboard Installation
The DRX70 supports ATX, M-ATX, and ITX motherboards.
- Align your motherboard with the standoffs inside the case.
- Secure the motherboard using the appropriate screws from the accessory box.
Video 5.1: Official darkFlash DRX70 ATX PC Case overview, demonstrating features including motherboard compatibility.
5.3. Power Supply Unit (PSU) Installation
The case supports bottom-mounted PSUs up to 200mm in length.
- Slide the PSU into its designated compartment at the bottom rear of the case.
- Secure the PSU with screws from the rear of the case.
5.4. Storage Drive Installation
The case provides bays for 2.5" SSDs and 3.5" HDDs.
- Locate the drive bays/brackets.
- Mount your 2.5" SSDs or 3.5" HDDs using the provided screws.
5.5. Graphics Card (GPU) Installation
The case supports GPUs up to 350mm in length.
- Remove the necessary PCI-E slot covers from the rear of the case.
- Insert your graphics card into the PCI-E slot on the motherboard.
- Secure the graphics card with screws.

Figure 5.4: Detail of the standard graphics card tray, providing support for the GPU.
5.6. CPU Cooler Installation
The case accommodates CPU coolers up to 180mm in height.
- Install your CPU cooler according to its manufacturer's instructions.

Figure 5.5: Internal layout diagram showing maximum dimensions for CPU cooler (180mm), GPU (350mm), and PSU (200mm).
5.7. Fan and Radiator Installation
The case comes with three 120mm fixed RGB fans pre-installed at the front. It supports up to 8 fans and a 280mm radiator.
- Front: 3 x 120mm (pre-installed) or 2 x 140mm fans.
- Top: 2 x 120mm or 2 x 140mm fans, or 240/280mm radiator.
- Rear: 1 x 120mm fan.
- Bottom: 2 x 120mm fans.
Install additional fans or radiators as needed, ensuring proper airflow direction.

Figure 5.6: The case with its three pre-installed 120mm fixed RGB rainbow fans at the front.
5.8. Cable Management
Utilize the cable routing cutouts and tie-down points behind the motherboard tray to manage cables effectively. This improves airflow and aesthetics.

Figure 5.7: Illustration of cable assembly optimization, showing how cables can be concealed behind the motherboard tray for a cleaner build.
5.9. Front I/O Connections
Connect the front panel cables (USB 3.0, USB 2.0, HD Audio, Power, Reset) to the corresponding headers on your motherboard. Refer to your motherboard manual for specific header locations.

Figure 5.8: Close-up of the top I/O panel, featuring USB 3.0, USB 2.0, HD Audio jacks, Reset button, and Power button.

Figure 5.9: The dust stoppers for the I/O ports, helping to keep dust out of unused ports.
6. Operating Instructions
Once all components are installed and connected, you can power on your system.
- Power On: Press the power button on the top I/O panel to start your computer.
- RGB Fans: The pre-installed 120mm fans feature fixed RGB lighting. No software control is required for their illumination.
- Airflow: The mesh front panel and multiple fan mounts ensure optimal airflow for cooling your components.
7. Maintenance
Regular maintenance helps prolong the life of your PC components and ensures optimal performance.
- Dust Filters: Periodically remove and clean the magnetic dust filters on the top and front panels. Use compressed air or a soft brush to remove accumulated dust.
- Case Exterior: Wipe the exterior of the case with a soft, damp cloth. Avoid abrasive cleaners.
- Tempered Glass: Clean the tempered glass panel with a microfiber cloth and a glass cleaner designed for electronics.
- Internal Cleaning: With the system powered off and unplugged, use compressed air to clear dust from internal components and fans.
8. Troubleshooting
If you encounter issues with your PC build, consider the following common troubleshooting steps:
- No Power:
- Ensure the power supply is switched on and properly connected to the wall outlet and motherboard.
- Check all power cables (24-pin ATX, CPU, GPU) are securely seated.
- Verify the front panel power button cable is correctly connected to the motherboard.
- Fans Not Spinning / RGB Not Lit:
- Confirm fan power cables (Molex for pre-installed fans) are securely connected.
- Ensure the power supply is providing power.
- No Display Output:
- Verify the graphics card is fully seated in its PCI-E slot and its power cables are connected.
- Ensure the monitor cable is connected to the graphics card, not the motherboard (unless using integrated graphics).
- Reseat RAM modules.
- System Instability / Crashing:
- Check component temperatures to ensure adequate cooling.
- Verify all components are securely installed.
For persistent issues, consult your individual component manuals or seek professional assistance.
9. Specifications
| Feature | Detail |
|---|---|
| Brand | darkFlash |
| Model Name | DRX70 |
| Case Type | Mid Tower |
| Motherboard Compatibility | ATX, M-ATX, ITX |
| Dimensions (LxWxH) | 15 x 9 x 18.1 inches (381 x 228.6 x 459.7 mm) |
| Item Weight | 11.6 pounds (5.26 kg) |
| Color | Black |
| Material | Tempered Glass, Plastic, Metal |
| Manufacturer | darkFlash |
| Country of Origin | China |
| Pre-installed Fans | 3 x 120mm Fixed RGB (Front) |
| Max CPU Cooler Height | 180mm |
| Max GPU Length | 350mm |
| Max PSU Length | 200mm |
| Drive Bays | 1 x 2.5" SSD, 2 x (2.5" or 3.5" HDD) |
| PCI-E Slots | 7 |
| Front I/O Ports | 1 x USB 3.0, 1 x USB 2.0, HD Audio (Mic/Headphone), Power, Reset |
| Cooling Method | Water, Air |

Figure 9.1: External dimensions of the darkFlash DRX70 case (230mm width, 396mm depth, 462mm height).
10. Warranty and Support
darkFlash provides a 1-year assurance for this computer case, prioritizing customer satisfaction and product quality.
For technical support, warranty claims, or further assistance, please contact darkFlash customer service through their official website or the retailer where the product was purchased. Please have your product model number (DRX70) and proof of purchase ready when contacting support.
Online Resources:
- darkFlash Official Website: www.darkflash.com (Note: This is a placeholder URL, please refer to actual product documentation for official website)


