
HUANANZHI x99/x79-DCM
HUANANZHI X99-8D4 Motherboard User Manual
Model: X99-8D4 | Brand: HUANANZHI
1. Introduction
The HUANANZHI X99-8D4 Motherboard is engineered to deliver robust performance for high-end computing, supporting Intel LGA2011-3 Platform Processors. This manual provides detailed instructions and essential information to help you set up, operate, and maintain your motherboard effectively, ensuring stable and efficient system performance.
2. Product Overview

Figure 2.1: HUANANZHI X99-8D4 Motherboard and Packaging
This image displays the HUANANZHI X99-8D4 Motherboard alongside its retail packaging, highlighting the product's design and branding.

Figure 2.2: Top-Down View of Motherboard Components
A comprehensive top-down view of the motherboard, showcasing the dual CPU sockets, eight DDR4 memory slots, and various expansion interfaces.
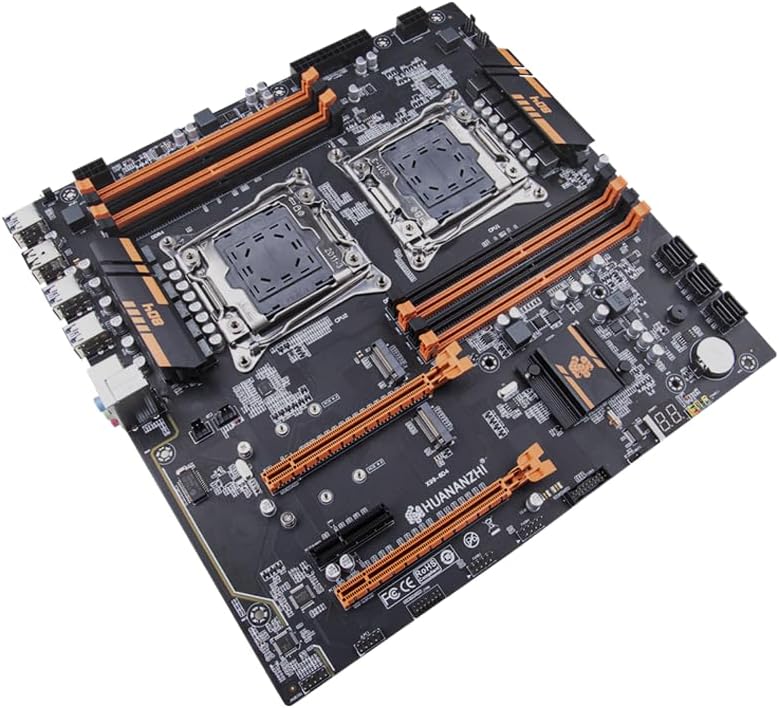
Figure 2.3: Angled View of Motherboard
An angled perspective of the motherboard, providing a clearer view of the heatsinks, PCIe slots, and M.2 NVME interfaces.

Figure 2.4: Rear I/O Panel
Close-up of the motherboard's rear input/output panel, showing USB ports, network port, and audio jacks.
3. Key Features
- Unleash Unparalleled Performance: Powered by the Intel C612 Series Chipset, supporting Intel LGA2011-3 Platform Processors. Features 8 DDR4 memory slots accommodating server-grade memory up to 256GB for lightning-fast responsiveness and multitasking.
- Storage and Expansion Mastery: Equipped with 6 SATA 3.0 6Gb/s interfaces and dual M.2 2280 NVME PCIe X4 3.0 32Gb/s slots for rapid data transfer and ample storage. Includes 2 PCI Express 3.0x16 and 1 PCI Express 3.0x4 expansion slots for customization.
- Immersive Audio and Connectivity: Features a 5.1 sound track and a Gigabit network card for immersive audio and seamless connectivity. The rear panel provides 4 USB 2.0 and 4 USB 3.0 ports for diverse device connections.
- Robust Power Delivery and Cooling: Built with a 6+6-phase power supply and a 6-layer PCB, ensuring stable power delivery and durability. Includes 2 CPU_FAN and 2 SYS_FAN pins for optimal cooling and sustained high performance.
- Seamless Interface and Compatibility: E-ATX form factor with a comprehensive front panel interface (USB 2.0/3.0, front audio, COM, etc.) for hassle-free installation and broad compatibility. Supports Windows 7, 10, and 11, and features an AMI UEFI BIOS for smooth operations.
4. Specifications
| Component | Specification |
|---|---|
| Model | HUANANZHI X99-8D4 Motherboard |
| Chipset | Intel C612 Series Chipset |
| CPU Socket | Intel LGA2011-3 Platform Processors |
| Memory Slots | 8x DDR4 Memory Slot (Support Server Memory) |
| Memory Standard | Four Channels DDR4 2400/2133MHz, Max 256GB |
| Storage Interface | 6x SATA 3.0 6Gb/s |
| Expansion Slots | 2x PCI Express 3.0x16, 1x PCI Express 3.0x4 |
| Expansion Interface | 2x M.2 2280 NVME PCIE X4 3.0 32Gb/s |
| Audio | 5.1 Sound Track |
| Network Card | Gigabit Network Card |
| Power Interface | 24PIN + 8PIN + 8PIN |
| FAN PIN | 2x CPU_FAN PIN, 2x SYS_FAN PIN |
| Power Supply | 6+6-Phase Power Supply |
| PCB Layers | 6-Layer PCB |
| Dimension | 295*290MM E-ATX |
| Rear Panel Interface | 4x USB2.0, 4x USB3.0, 1x Network Card Interface, 1x 3-Hole Audio Interface |
| Front Panel Interface | 2x USB2.0 PIN, 1x USB3.0 PIN, 1x Front Audio PIN, 1x COM PIN, 1x Power On/Restart PIN, 1x Motherboard Buzzer, 1x Debug PIN, 1x TPM PIN |
| Supported System | Windows 7, Windows 10, Windows 11 |
| BIOS | AMI UEFI BIOS |
5. Setup Guide
5.1 Pre-Installation Checklist
- Ensure your CPU (LGA2011-3), RAM (DDR4), and other components are compatible with the X99-8D4 motherboard.
- Prepare a clean, static-free workspace. Use an anti-static wrist strap if available.
- Gather necessary tools: Phillips head screwdriver, thermal paste, cable ties.
5.2 Physical Installation
- Install the CPU: Carefully open the CPU socket retention mechanism. Align the CPU with the socket (match the golden triangle/arrow on the CPU to the one on the socket) and gently place it in. Close the retention mechanism to secure the CPU.
- Apply Thermal Paste and Install CPU Cooler: Apply a small amount of thermal paste to the center of the CPU. Install your compatible CPU cooler according to its manufacturer's instructions, ensuring even pressure.
- Install RAM: Open the clips on the DDR4 memory slots. Align the RAM modules with the slots (notch on the module matches the key in the slot) and press firmly on both ends until the clips snap into place. For optimal performance, install modules in the recommended dual-channel or quad-channel configuration as per your CPU and memory kit.
- Mount the Motherboard: Install the I/O shield into your PC case. Align the motherboard with the standoffs in the case and secure it with screws.
- Install Graphics Card (GPU) and Other Expansion Cards: Insert your graphics card into the primary PCI Express 3.0x16 slot until it clicks into place. Secure it with the case screw. Install any other expansion cards (e.g., sound cards, network cards) into available PCIe slots.
- Install M.2 NVME SSDs: Insert M.2 NVME SSDs into the M.2 2280 slots at an angle, then push down and secure with the provided screw.
- Connect Storage Drives: Connect your SATA SSDs/HDDs to the SATA 3.0 ports using SATA data cables.
5.3 Cabling
- Connect Power Supply: Connect the 24-pin ATX power cable, and the 8-pin + 8-pin CPU power cables to their respective connectors on the motherboard. Connect PCIe power cables to your graphics card if required.
- Connect Front Panel Cables: Connect the power switch, reset switch, HDD LED, power LED, and front panel USB/audio cables to the corresponding headers on the motherboard. Refer to the motherboard's silkscreen labels for correct pin alignment.
- Connect Fan Cables: Connect CPU fan(s) to the CPU_FAN header(s) and case fans to the SYS_FAN headers.
5.4 Initial Boot and BIOS Setup
- After connecting all components, connect your monitor, keyboard, and mouse.
- Power on the system. Press the designated key (usually DEL or F2) repeatedly during startup to enter the BIOS/UEFI setup utility.
- In the BIOS, verify that all components (CPU, RAM, storage) are detected correctly.
- Set the boot order to prioritize your operating system installation media (USB drive or DVD).
- Save changes and exit the BIOS. The system will restart and begin the OS installation process.
6. Operating System Compatibility
The HUANANZHI X99-8D4 Motherboard supports a wide range of Microsoft Windows operating systems, ensuring broad compatibility for your computing needs:
- Windows 7 (64-bit)
- Windows 10 (64-bit)
- Windows 11 (64-bit)
For optimal performance, it is recommended to install the latest drivers for your motherboard's chipset, network card, and audio components after operating system installation. These can typically be found on the manufacturer's support website.
7. Maintenance
Regular maintenance helps ensure the longevity and stable performance of your motherboard and PC system.
7.1 Dust Removal
- Periodically clean dust from inside your PC case, especially from fans (CPU cooler, case fans, GPU fans) and heatsinks.
- Use compressed air or a soft brush. Ensure the system is powered off and unplugged before cleaning.
7.2 Driver and BIOS Updates
- Keep your motherboard drivers (chipset, LAN, audio) updated to the latest versions. Check the HUANANZHI official website for driver downloads.
- BIOS updates can improve compatibility, stability, and performance. Only update the BIOS if necessary and follow the instructions precisely to avoid system damage.
8. Troubleshooting
This section provides solutions to common issues you might encounter.
8.1 No Power / No POST (Power-On Self-Test)
- Check Power Connections: Ensure the 24-pin ATX and 8-pin + 8-pin CPU power cables are securely connected to the motherboard and power supply.
- Verify Components: Reseat RAM modules, graphics card, and CPU. Ensure the CPU cooler is properly installed.
- Clear CMOS: Refer to your motherboard's manual for instructions on how to clear the CMOS (usually by removing the CMOS battery for a few minutes or using a jumper).
- Test with Minimal Components: Disconnect all non-essential components (storage drives, extra fans, etc.) and try to boot with only CPU, one RAM stick, and GPU (if no integrated graphics).
8.2 No Display Output
- Check Monitor Connection: Ensure the display cable is securely connected to both the graphics card (or motherboard if using integrated graphics) and the monitor.
- Verify Graphics Card: Ensure the graphics card is fully seated in its PCIe slot and any required PCIe power cables are connected.
- Test with Another Display: If possible, test with a different monitor or cable.
8.3 System Instability / Crashes
- Check Temperatures: Monitor CPU and GPU temperatures using software. Overheating can cause instability. Ensure proper airflow and cooling.
- Update Drivers: Ensure all system drivers, especially chipset, graphics, and audio drivers, are up to date.
- Test RAM: Run a memory diagnostic tool (e.g., Windows Memory Diagnostic) to check for RAM errors.
- Check Power Supply: Ensure your power supply unit (PSU) has sufficient wattage for all your components.
9. Packing List
The following items are included in the product package:
- 1 x HUANANZHI X99-8D4 Motherboard
- 2 x SATA Cables
- 1 x I/O Panel Shield
10. Warranty and Support
For warranty information and technical support, please refer to the official HUANANZHI website or contact your retailer. Keep your proof of purchase for warranty claims.

Figure 10.1: Advanced Circuitry Design
An illustrative image depicting the intricate and advanced circuitry design, symbolizing the technological foundation of the motherboard.
Related documentsx99/x79-DCM

Ask a question about this manual
Ask about setup, troubleshooting, compatibility, parts, safety, or missing instructions. Manuals+ will review the question and use this page’s manual context to help answer it.