1. Introduction
This manual provides detailed instructions for the installation, operation, and maintenance of your Aublinto 8227L-DEMO Android 12 Car Navigation System. Please read this manual thoroughly before using the product to ensure proper function and safety. This unit features a 10-inch HD 2.5D tempered glass mirror display, offering a high-quality visual experience.

Image: The HD IPS Touchscreen display of the Aublinto car navigation unit, highlighting its anti-glare, scratch-resistant, and full-touch capabilities.
2. Safety Information
- Ensure all connections are secure and correctly wired to prevent damage to the unit or vehicle.
- Do not attempt to operate the system in a way that distracts you from driving. Always prioritize road safety.
- Consult a professional for installation if you are unsure about any steps.
- Keep the unit away from extreme temperatures, direct sunlight, and moisture.
3. Package Contents
Verify that all items listed below are present in your package:
- Aublinto 10-inch Android 12 Car Navigation Unit
- Power Cable
- RCA Input/Output Cables
- 2 USB Cables
- Camera Input Cable
- GPS Antenna
- Instruction Manual
- USB Adapter
- Four-Light Camera (Rear Camera)
- Installation Tools (Plastic pry tools)

Image: Contents of the Aublinto 8227L-DEMO package, including the main unit, various cables, GPS antenna, rear camera, and installation tools.
4. Setup and Installation
4.1 Wiring Diagram
Refer to the following diagram for correct wiring connections. Incorrect wiring can cause damage to the unit or vehicle electrical system.

Image: Detailed wiring diagram showing connections for power, RCA, USB, GPS, and the reversing camera.
- H (Reversing line) connect to I (reversing detection cable).
- J and K connect to the positive pole of the backup lamp (BUL).
- L connect to grounding or leave unconnected if not required.
4.2 Physical Installation
The unit is designed for in-dash installation. Use the provided tools to carefully remove your existing car stereo. Connect all necessary cables as per the wiring diagram. Secure the new unit in place. Ensure all connections are firm before powering on the device.
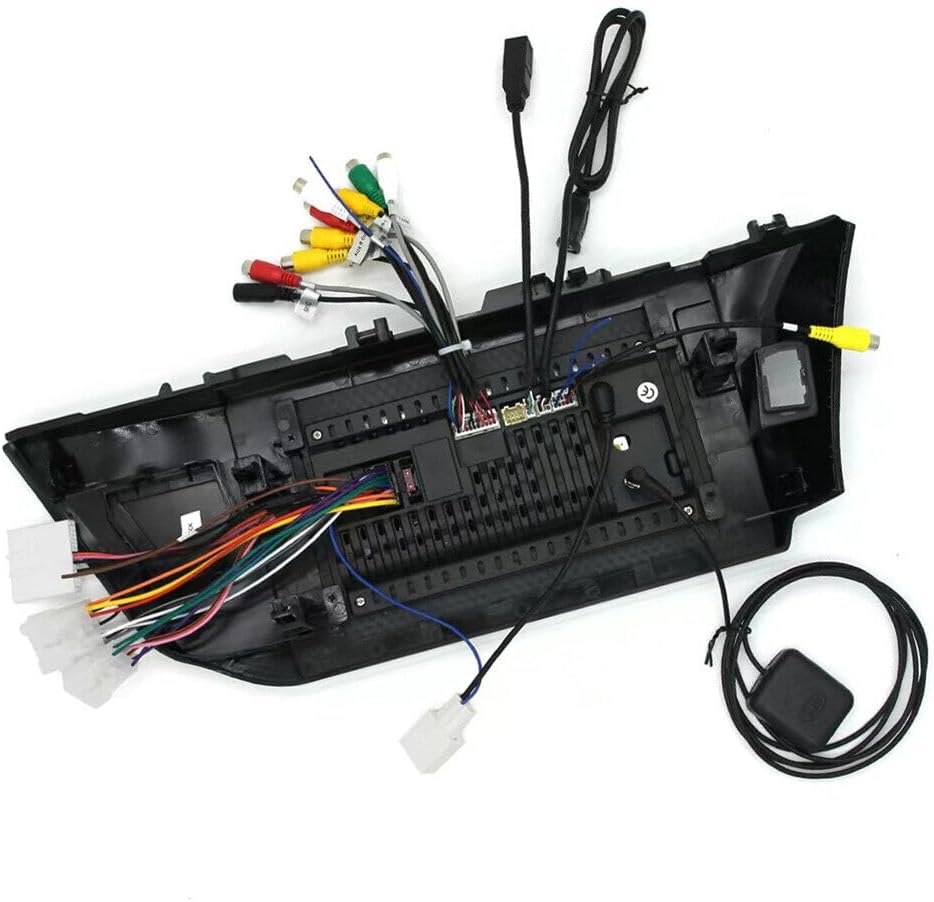
Image: Rear view of the Aublinto car navigation unit, illustrating the numerous ports and cable harnesses for power, audio/video, and data connections.
5. Operating Instructions
5.1 CarPlay and Android Auto
The system supports both wireless and wired CarPlay for iOS devices, and wireless and wired Android Auto for Android devices. This allows seamless integration of your smartphone's features with the car's display.
- Wireless Connection: Connect your smartphone via Bluetooth. For CarPlay, use the ZLINK APP. For Android Auto, ensure the Android Auto app is installed on your phone.
- Wired Connection: Connect your smartphone using a USB cable.
- Once connected, you can access navigation, make calls, send messages, and play music directly from the car's display.

Image: The main screen of the Aublinto unit showing the CarPlay interface with various app icons like Phone, Music, Maps, and Messages.

Image: The Aublinto navigation system integrated into a car dashboard, displaying the CarPlay interface and highlighting voice assistant compatibility.

Image: A visual representation of CarPlay and Android Auto functionality, showing smartphone mirroring and integrated app displays on the car stereo.
5.2 GPS Navigation
The unit features built-in GPS navigation. You can use pre-installed maps or download offline maps from the Play Store. With a Wi-Fi connection, Google Maps and other online navigation services can be utilized for real-time traffic updates and route planning.

Image: Display showing GPS navigation with map applications and an illustration of Wi-Fi hotspot connectivity for online services.
5.3 Bluetooth Functionality
Connect your phone via Bluetooth for hands-free calling, music streaming (A2DP), and automatic phonebook loading. This enhances safety by allowing you to manage calls without holding your phone.
- Pair your device through the Bluetooth settings menu on the unit.
- Once paired, you can dial numbers, answer calls, and play audio directly from your phone.

Image: The Bluetooth interface on the car stereo, showing options for hands-free calls, phonebook access, and music playback.
5.4 FM Radio
The unit includes an FM radio with 18 preset stations. You can scan for stations and save your favorites. Online music can also be transferred to the car stereo by FM transmission.
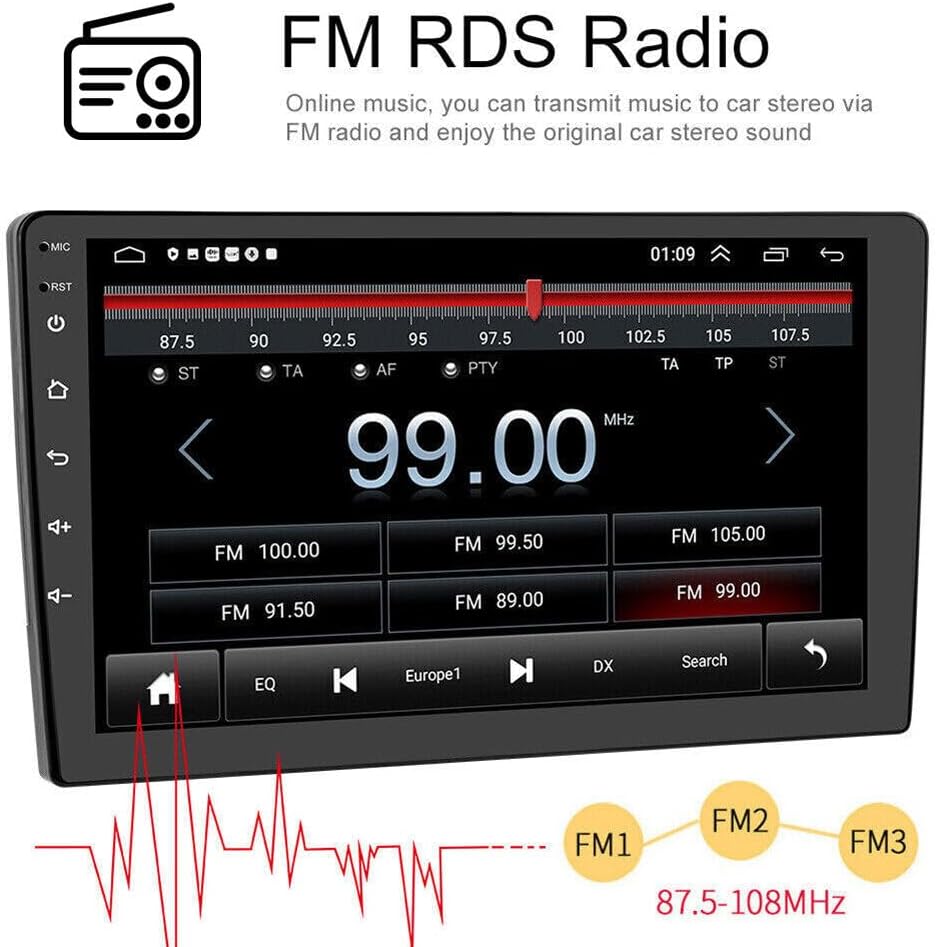
Image: The FM radio interface, displaying frequency tuning, preset stations, and RDS information.

Image: A graphic illustrating the FM/RDS radio functionality, including a sound equalizer and music playback interface.
5.5 Steering Wheel Control (SWC)
The system supports steering wheel controls, allowing you to manage functions like volume, track changes, and calls directly from your steering wheel buttons. This feature enhances convenience and safety.
- Access the "Steering Learn" option in the settings menu to configure your vehicle's steering wheel buttons.

Image: A composite image showing the rear view camera display, the steering wheel control learning interface, and the split-screen multitasking feature.
5.6 Rear Camera Input
The unit supports a rear camera input, providing a clear view of the area behind your vehicle when reversing. The display automatically switches to the camera feed when the vehicle is in reverse gear.
- Ensure the rear camera is correctly wired according to the installation section.
- You can switch CVBS settings in the system menu if needed.
5.7 Wi-Fi and App Management
Connect the unit to a Wi-Fi network to access online features, download apps from the Play Store, and browse the internet. The system supports downloading, installing, and deleting thousands of Android applications.
- Go to Settings > Wi-Fi to connect to an available network.
- Use the pre-installed Play Store to manage applications.
5.8 Time Setting
The system can automatically set the date and time using network or GPS data. Alternatively, you can adjust it manually through the settings menu.
6. Maintenance
- Cleaning: Use a soft, dry cloth to clean the screen and unit. Avoid abrasive cleaners or solvents.
- Software Updates: Periodically check for software updates to ensure optimal performance and access to new features.
- Temperature: Avoid exposing the unit to extreme temperatures.
7. Troubleshooting
If you encounter issues, refer to the following common problems and solutions:
| Problem | Possible Solution |
|---|---|
| Unit does not power on. | Check power cable connections and vehicle's fuse box. Ensure proper grounding. |
| No sound. | Verify speaker connections. Check volume settings and audio source. |
| GPS signal lost or inaccurate. | Ensure GPS antenna is properly installed and has a clear view of the sky. |
| Bluetooth connection issues. | Ensure Bluetooth is enabled on both the unit and your phone. Try re-pairing the devices. |
| CarPlay/Android Auto not connecting. | For wireless, check Bluetooth and Wi-Fi connections. For wired, try a different USB cable. Ensure ZLINK app (CarPlay) or Android Auto app (Android) is updated. |
If problems persist, please contact customer support.
8. Specifications
| Feature | Detail |
|---|---|
| Model | 8227L-DEMO |
| Operating System | Android 12 |
| Display Size | 10 inches |
| Display Type | 2.5D Tempered Glass Mirror, Full Capacitance Touch Screen, HD 1080P |
| Resolution | 1024x600 |
| Memory (RAM+ROM) | 2GB RAM + 32GB ROM |
| Connectivity | Wi-Fi, Bluetooth (A2DP), USB |
| Navigation | Built-in GPS, supports offline maps and online navigation (Google Maps) |
| Smartphone Integration | Wireless & Wired CarPlay (via ZLINK APP), Wireless & Wired Android Auto |
| Radio | FM Radio with 18 preset stations |
| Camera Support | Rear camera input (CVBS support) |
| Audio Features | DSP function, Bluetooth music player |
| Control | Steering Wheel Control (SWC) support |
| Language Support | Up to 40 national languages |
| Manufacturer Part Number | TTT-QA1387X-Tulip |
9. Warranty and Support
For warranty information, please refer to the documentation provided with your purchase or contact the seller directly. If you have any questions or require technical assistance, please reach out to Aublinto customer support.

Image: An important notice advising users to check package contents, refer to the manual for installation, and contact the seller for any problems or questions.


