1. Introduction
This manual provides comprehensive instructions for the installation, operation, and maintenance of your Okinos Aqua 3 Micro ATX PC Case. Please read this manual thoroughly before beginning assembly to ensure proper setup and safe usage. Keep this manual for future reference.
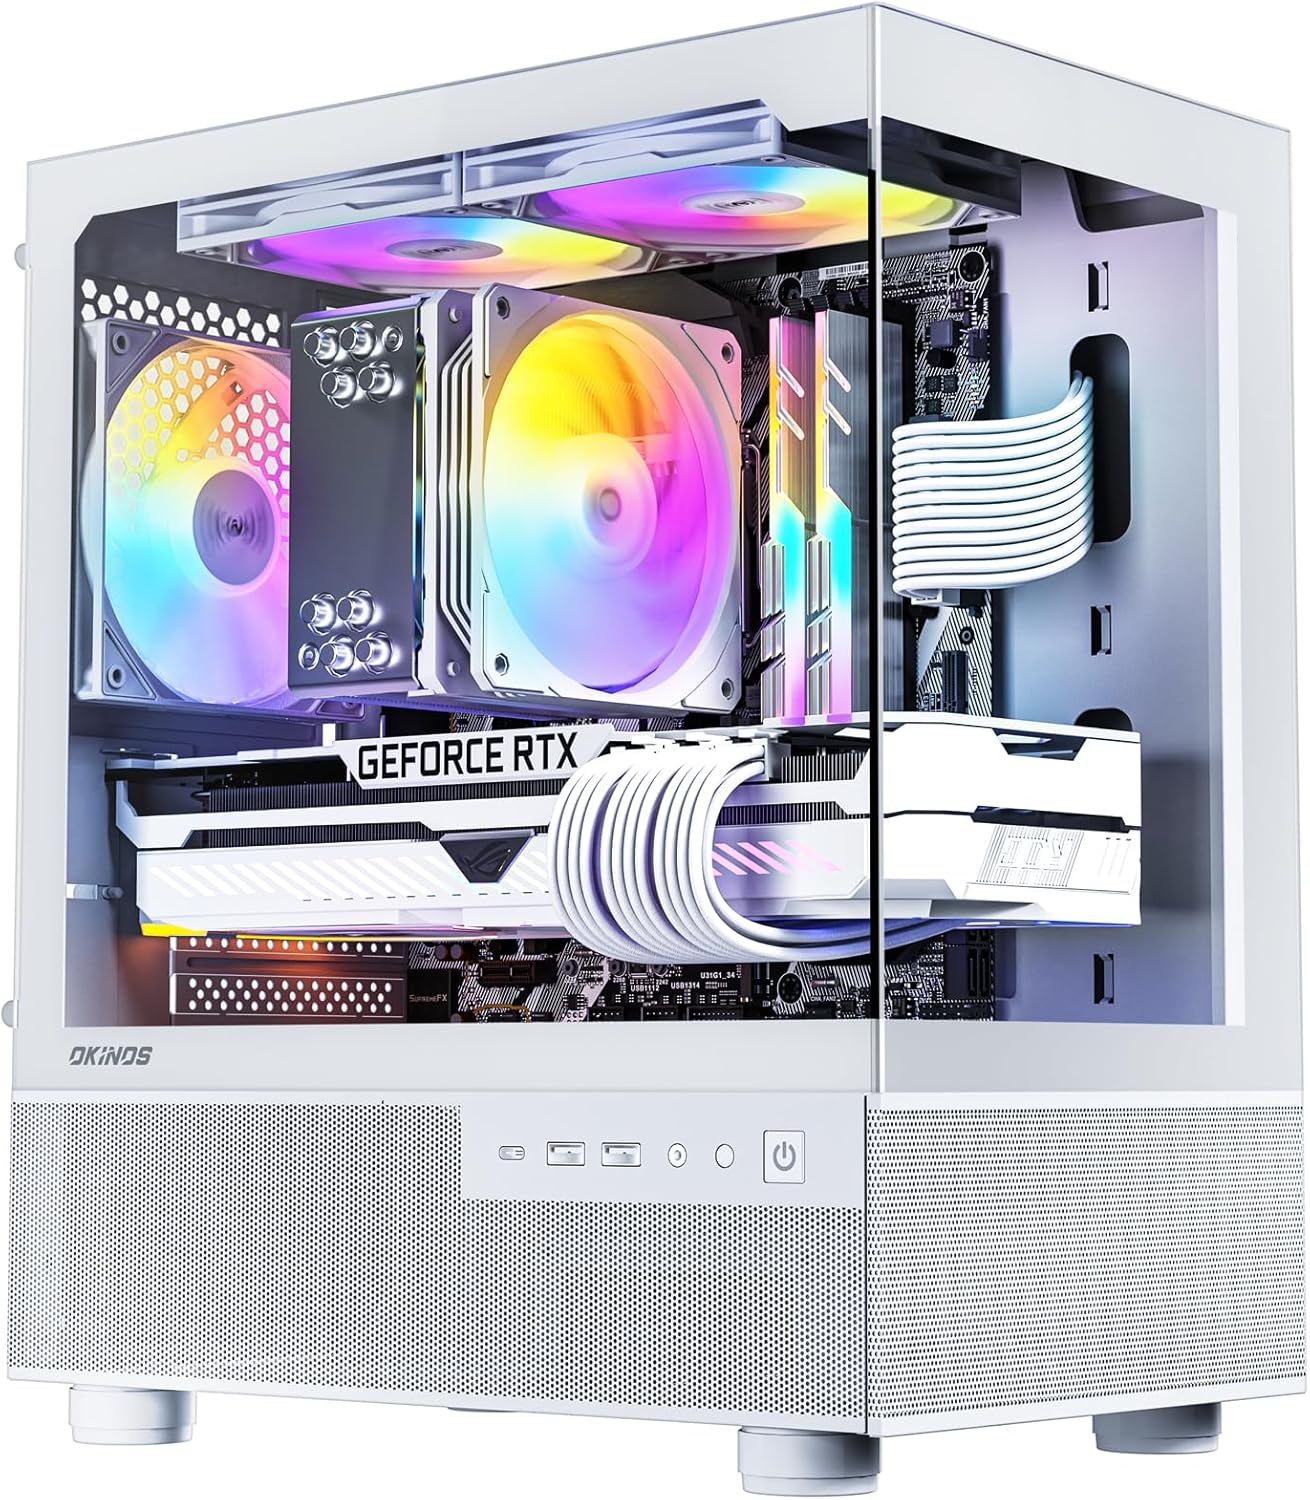
Image 1.1: The Okinos Aqua 3 Micro ATX PC Case, showcasing its panoramic tempered glass panels and internal component visibility with ARGB lighting.
2. Safety Information
Always observe the following safety precautions during installation and operation:
- Disconnect all power sources before installing or removing any components.
- Handle tempered glass panels with care to prevent breakage.
- Avoid touching electronic components directly to prevent electrostatic discharge (ESD). Use an anti-static wrist strap if available.
- Ensure proper ventilation around the case to prevent overheating.
- Keep small parts and screws away from children.
3. Package Contents
Verify that all items are present in your package:
- Okinos Aqua 3 Micro ATX PC Case
- 3 x 120mm 3-Pin ARGB Fans (2 pre-installed at top, 1 pre-installed at rear)
- Accessory Box (containing screws, zip ties, additional standoffs)
- User Manual (this document)
4. Setup and Installation
4.1. Case Overview and Dimensions
The Okinos Aqua 3 case features a panoramic design with tempered glass front and side panels, offering a 270° wide-angle view of your internal components. Its compact dimensions are 350mm (Depth) x 210mm (Width) x 392mm (Height).

Image 4.1: Case dimensions and standard fan configuration. Two 120mm ARGB fans are located at the top, and one 120mm ARGB fan is at the rear.
4.2. Removing Panels
The front tempered glass panel and side panels are designed for quick release, facilitating easy access for component installation without the need for screws. The front glass uses a secure rivet-mounted mechanism.

Image 4.2: Advanced quick-release panels for easy access to the case interior.
4.3. Motherboard Installation
The Okinos Aqua 3 supports Micro ATX (M-ATX) and Mini-ITX (ITX) motherboards. Six standoffs are pre-installed for M-ATX motherboards, with additional standoffs included in the accessory box for ITX configurations if needed.

Image 4.3: Motherboard standoff locations and compatibility.
4.4. GPU and CPU Cooler Compatibility
The case accommodates graphics cards up to 320mm in length and CPU coolers up to 164mm in height. This allows for compatibility with high-performance components, including RTX 4070 series graphics cards.

Image 4.4: GPU compatibility, supporting cards up to 320mm in length.

Image 4.5: CPU cooler compatibility, supporting coolers up to 164mm in height.
4.5. GPU Installation Steps
To install your graphics card:
- Loosen the screws securing the PCIe slot covers at the rear of the case.
- Carefully insert the graphics card into the appropriate PCIe slot on your motherboard.
- Secure the graphics card by tightening the screws on the PCIe slot covers.
If the GPU bracket becomes loose, refer to the diagram for reinstallation onto the chassis.

Image 4.6: GPU installation guide.
4.6. Power Supply and Storage Installation
The case supports standard power supply units (PSUs) with a length of 140mm. The hard drive rack can be moved to increase cable management space in the power supply compartment from 48mm to 65mm.

Image 4.7: Power supply and cable management space adjustment.
The case provides mounting points for SSDs and HDDs. Refer to the compatibility diagram for specific locations.

Image 4.8: Overall component compatibility and mounting locations.
4.7. Fan Configuration and Airflow
The Aqua 3 comes with three 120mm 3-Pin ARGB fans pre-installed: two at the top and one at the rear. This configuration is designed for vertical airflow, drawing air from the bottom and exhausting it through the top and rear for efficient cooling. The case features a 1.2mm steel mesh design for optimal heat dissipation and dust resistance.

Image 4.9: Massive air intake and vertical airflow design.

Image 4.10: Exquisite 1.2mm steel mesh for improved airflow and dust resistance.
The case supports up to three 120mm fans. Note that radiators are not supported on the top panel.

Image 4.11: Fan placement options and radiator compatibility.
4.8. ARGB Fan Controller and Connections
The case includes a built-in 4-port ARGB fan controller at the rear, allowing for seamless synchronization with your motherboard for dynamic lighting effects. A 1-to-3 fan splitter cable is included for fan connections.

Image 4.12: ARGB fan installation and controller wiring diagram.
4.9. Front I/O Panel (Multi-Functional Zone)
The front I/O panel provides convenient access to essential ports and controls:
- Power Switch: To turn the system on or off.
- ARGB Fan Control Button: To customize case lighting effects.
- 2 x USB 3.0 Ports: For high-speed data transfer.
- Audio Jacks: Headphone/Microphone combo jack.
- 1 x Type-C 3.2 Gen 2 (10Gbps) Port: For fast data transfer and device connections.

Image 4.13: Front I/O panel (Multi-Functional Zone) with port labels.
4.10. Cable Management
The case offers 23mm of space behind the motherboard tray for efficient cable management, helping to maintain a clean interior and optimize airflow.

Image 4.14: Cable management space behind the motherboard tray.
5. Operating Instructions
5.1. Powering On/Off
Press the power button on the front I/O panel to turn your system on or off. Ensure all internal components are correctly connected to the power supply and motherboard before powering on.
5.2. ARGB Lighting Control
Use the ARGB fan control button on the front I/O panel to cycle through various lighting effects. Alternatively, if connected to a compatible motherboard, you can control the ARGB lighting through your motherboard's software.
5.3. USB Port Usage
The USB ports (USB 3.0 and Type-C 3.2 Gen 2) are primarily for data transfer. While they can provide power, they are not recommended for dedicated device charging, as most motherboard USB ports support a maximum voltage of 5V.
6. Maintenance
6.1. Cleaning Dust Filters
The Okinos Aqua 3 features magnetic dust filters on the top and bottom panels. Regularly remove and clean these filters to maintain optimal airflow and prevent dust buildup inside the case. Simply detach the magnetic filters, clean them with a soft brush or cloth, and reattach.
6.2. General Case Cleaning
Use a soft, damp cloth to clean the exterior surfaces of the case, including the tempered glass panels. Avoid abrasive cleaners or solvents that could damage the finish. For internal cleaning, use compressed air to remove dust from components and fans, ensuring the system is powered off and unplugged.
7. Troubleshooting
7.1. System Not Powering On
- Ensure the power supply is switched on and properly connected to the wall outlet and motherboard.
- Verify that the front panel power switch cable is correctly connected to the motherboard's front panel header.
- Check all internal power connections to components (motherboard, GPU, storage drives).
7.2. ARGB Fans Not Lighting Up or Synchronizing
- Confirm that the ARGB fans are correctly connected to the built-in 4-port ARGB controller.
- Ensure the ARGB controller is receiving power (e.g., via SATA power connector).
- If using motherboard synchronization, verify the controller's ARGB cable is connected to the motherboard's 5V ARGB header and that the motherboard software is configured correctly.
- Try using the case's ARGB control button to check if the fans light up independently of motherboard software.
7.3. Excessive Noise from Fans
- Check if any cables are obstructing the fan blades.
- Ensure fans are securely mounted and not vibrating against the case.
- Clean any dust buildup on fan blades.
8. Specifications
| Feature | Specification |
|---|---|
| Model Name | Aqua 3 |
| Item Model Number | OKICC-AQUA3-MATXW-H3WA |
| Dimensions (L x W x H) | 350mm x 210mm x 392mm (13.78 x 8.27 x 15.43 inches) |
| Motherboard Compatibility | Micro ATX (M-ATX), Mini-ITX (ITX) |
| Pre-installed Fans | 3 x 120mm 3-Pin ARGB Fans (2 Top, 1 Rear) |
| Max GPU Length | 320mm |
| Max CPU Cooler Height | 164mm |
| PSU Length Support | Up to 140mm (with adjustable HDD rack) |
| Cable Management Space | 23mm |
| Front I/O Ports | 2 x USB 3.0, 1 x Type-C 3.2 Gen 2 (10Gbps), Audio Jacks, Power, ARGB Control |
| Material | Tempered Glass, Steel Mesh |
| Dust Filters | Magnetic (Top & Bottom) |
| Item Weight | 9.17 pounds |
9. Warranty and Support
For warranty information and technical support, please refer to the official Okinos website or contact your retailer. Keep your proof of purchase for warranty claims.